Intel
®
Server System SR1600UR Service Guide
65
Installing a Slimline Optical Drive or Internal USB Floppy
To install a slimline optical drive or USB floppy, follow these steps:
1. Remove the slimline drive bay filler panel, if installed.
2. Obtain the optical drive and the drive tray.
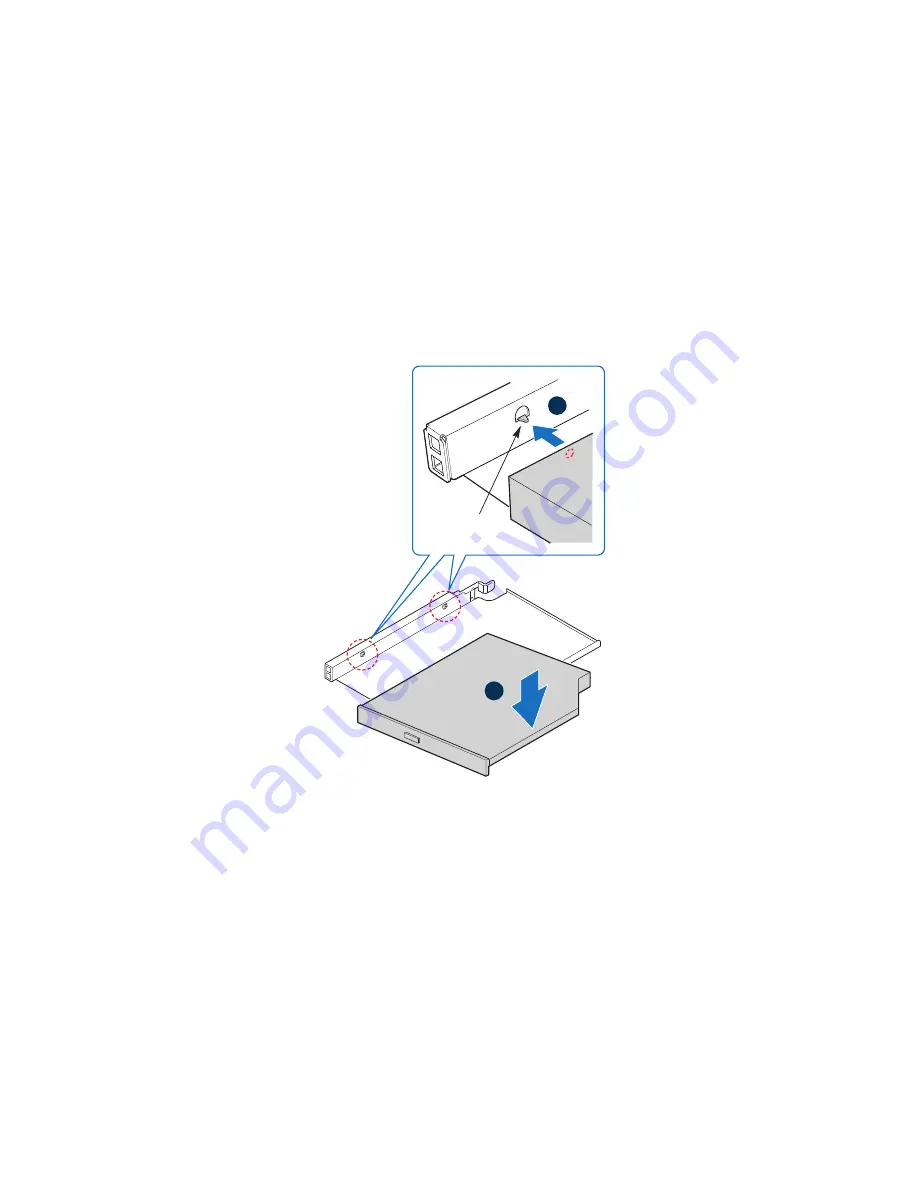
3. Align the two holes on the left edge of the optical drive with the two metal tabs in
the tray (see letter “A” in
Figure 54
).
4. Lower the opposite side of the optical drive into the tray until it clicks into place
(see letter “B” in
Figure 54
).
Figure 54. Installing an Optical Drive into the Drive Tray
5. Pull the power and data cables through the front of the chassis opening (see letter
“A” in
Figure 55
).
6. Connect the cables to the rear of the optical device (see letter “B” in
Figure 55
).
7. From the back side of the device bay, pull the cables back into the chassis opening
as you insert the device. Push the device all the way from the front until it clicks
(see letter “C” in
Figure 55
).
8. Verify that the blue release lever on the tray (see letter “D” in
Figure 55
) locks into
place.
B
Metal Tab
A
AF002
88
7
Содержание SR1600UR - Server System - 0 MB RAM
Страница 4: ...iv Intel Server System SR1600UR Service Guide...
Страница 6: ...vi Intel Server System SR1600UR Service Guide...
Страница 8: ...viii Intel Server System SR1600UR Service Guide...
Страница 14: ...xiv Intel Server System SR1600UR Service Guide...
Страница 18: ...xviii Intel Server System SR1600UR Service Guide...
Страница 58: ...40 Intel Server System SR1600UR Service Guide Figure 25 Installing the Server System Cover TP02196 A B...
Страница 122: ...104 Intel Server System SR1600UR Service Guide...
Страница 126: ...108 Intel Server System SR1600UR Service Guide...
Страница 132: ...114 Intel Server System SR1600UR Service Guide...
Страница 142: ...124 Intel Server System SR1600UR Service Guide...
Страница 166: ...148 Intel Server System SR1600UR Service Guide...
Страница 190: ...172 Intel Server System SR1600UR Service Guide...


