


42
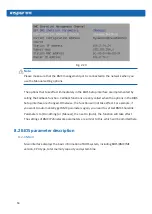
Menu Instruction Table
Create RAID Volume
To create an RAID volume
Delete RAID Volume
To delete an existed RAID volume
Reset Disks to Non-RAID
To reset disks in RAID volume, and to restore them to non-RAID
status
Mask Disk as Spare
To mask the disks as spare disks. The data will be cleared, and these
disks can not be selected during RAID setting. It can be restored
through the Reset Disks to Non-RAID menu.
Exit
To exit SATA Host RAID configuration interface
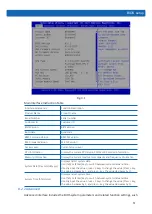
3.2 Create RAID Volume menu. After entering SATA RAID configuration interface, you could
use up and down arrow keys to select this menu, and then press Enter to enter the Create
RAID Volume menu, or directly input the number before the menu to enter the Create RAID
Volume menu. For other menu operations that are similar, it will not be repeated here.
A Create RAID Volume instance is shown in the following figure:
Fig. 2.16
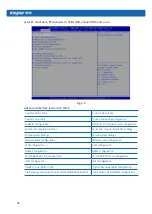
Create RAID Menu Instruction Table
Interface Parameters
Function Description
Name
Please enter a volume label name less than 16 characters without containing
any special characters.
RAID Level
Please select RAID volume level. If no volume has been created at present,
there are four volume levels of RAID0 (Stripe), RAID1 (Mirror), RAID10 (RAID0+1)
and RAID5 (Parity) for selection. Please select volume level according to actual
requirements.
RAID0: This RAID volume is allowed to be made on 2 or above disks.
RAID1: This RAID volume is allowed to be made on 2 disks.
RAID10: This RAID volume is allowed to be made on 4 disks, which is only
available when disk quantity is 4 or above.
RAID5 (Parity): This RAID volume is allowed to be made on 3 or above disks.
Select Disks
Select disks to make RAID volume, press Enter, select X, and then press Enter to
return to Create RAID Volume interface.
Strip Size
Please select the strip size, only RAID0 and RAID5 volumes could enable this option.
Capacity
Set the volume capacity.
Содержание AGX-5
Страница 1: ...Inspur Server User Manual NF5888M5 AGX 5 V1 1 ...
Страница 18: ...12 shown below ...
Страница 22: ...16 ...
Страница 37: ...31 Cabling Note Please route the cables according to the purchased machine configuration ...
Страница 46: ...40 Fig 2 11 Fig 2 12 Fig 2 13 ...
Страница 113: ...BMC settings 107 ...
Страница 116: ...110 ...
Страница 118: ...112 One key collect log One key collect log ...
Страница 123: ...BMC settings 117 ...
Страница 139: ...BMC settings 133 ...
Страница 142: ...136 ...
Страница 144: ...138 ...
Страница 149: ...BMC settings 143 ...


