


Copyright ©2018, Infoblox, Inc.All right reserved.
1.
2.
3.
4.
5.
indicates the activity and status of each drive. The LEDs are not visible unless you remove the face plate. To do so, gently grip the left edge of the
face plate and pull towards the front.
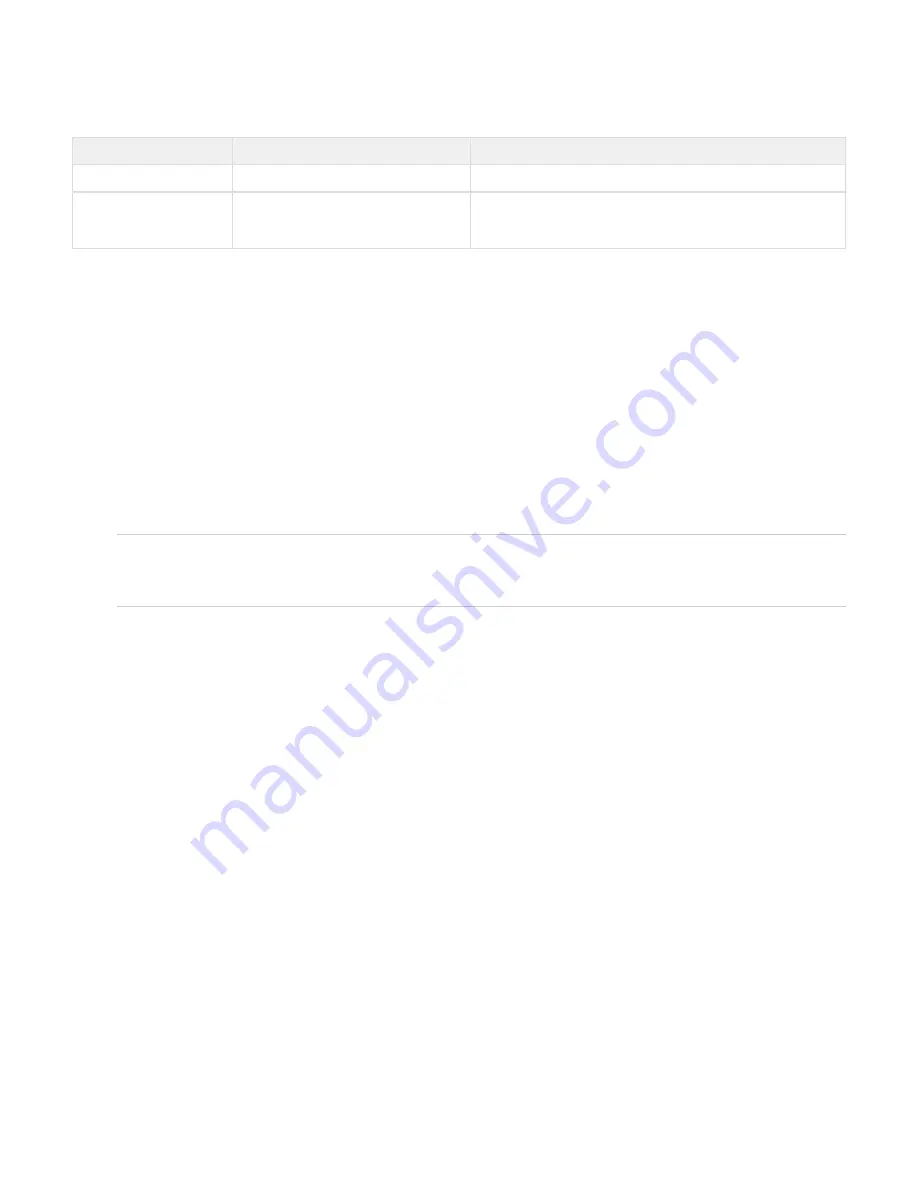
Disk Drive LED
Upper LED Color
Condition
Action
Green (flickers on and off)
Disk is connected and operating normally
None
Dark
Disk has failed or not inserted
Verify the disk failure in the Grid Manager or CLI. Remove the disk
and replace with a functional disk drive. Note that the drive rebuilds
with its twin.
Hard Disk Drive Replacement
The Infoblox 4005 Series appliances ship with four hot-swappable hard disk drives configured in a RAID (Redundant Array of Independent Disks)
10 array. The appliances are designed to provide continuous operation in the event of a failed disk. Hot-swapping a disk drive is a simple process
that does not require issuing commands or a Grid Manager operation.
When you replace a failed disk, you must replace it with an Infoblox supplied disk. To ensure that you receive the correct replacement disk, report
the disk type or part number of the failed disk. The appliance also displays the disk type in the
panel of the Grid Manager.
Detailed Status
Installing disks that are not qualified and shipped from Infoblox could cause failures in the appliance.
You can access the disk drives from the front of the appliance. Each disk drive weighs about 2 pounds (.90 kg).
You can remove or replace a defective drive without interrupting appliance operations or network services. To remove a disk drive:
Identify and verify the failed drive through the Grid Manager or the CLI.
If the activity light is green or blinking green, ensure that you have identified the correct drive. Conditions may exist where a drive
gradually fails and continues to show green in the activity light.
: Never remove a correctly functioning drive in a live system. If a disk drive fails, remove the failed disk only. NEVER remove two
Caution
or more disks at once. Removing more than one disk at a time can cause a complete failure of the appliance and require an RMA (Return
Material Authorization). All replacement drives must complete the rebuilding process before you can remove another drive. You can log in
to the Grid Manager and check the status of the disk drives.
Press the release button to release the catch-release lever.
Use the catch-release lever to pull the disk about two cm (one inch) to disengage contact, as indicated in the
.
figure below
Wait about 30 seconds for the disk to completely stop spinning.
Pull the catch-release lever to remove hard drive


