background image

12 - 10

   PRINTER DRIVER SETTINGS

Position

This setting offers you the control for where the Watermark is to 
be positioned on the page.

Page Setting

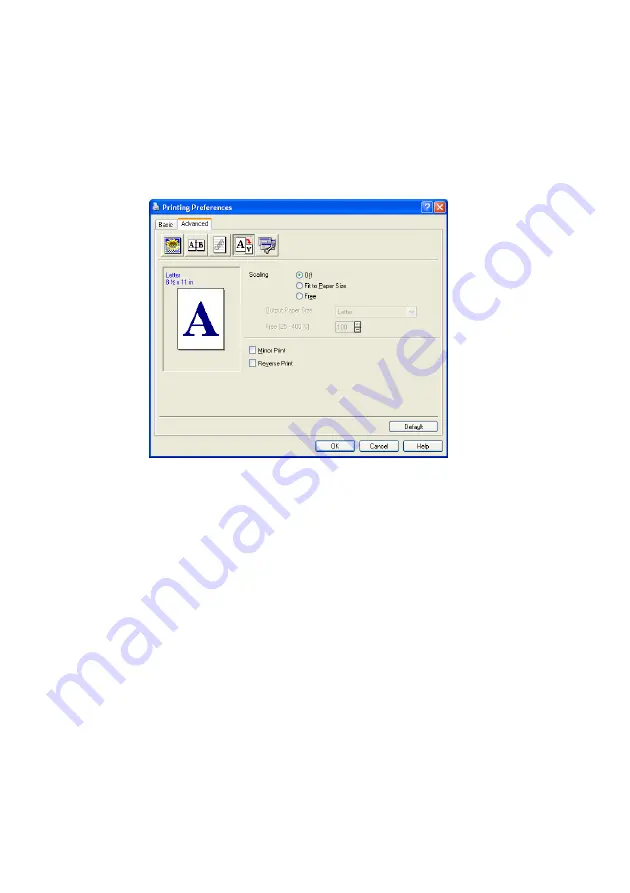
You can change the print size of your document with the Scaling 
feature.  

Check 

Off

 if you want to print the document as it appears on your 

screen.

Check 

Fit to Paper Size

, if your document has an unusual size, 

or if you have only the standard size paper.

Check the 

Free

 box if you want to manually reduce or enlarge the 

output.

You can also use the 

Mirror Print 

or 

Reverse Print

 feature for 

your page setting.

Содержание ix2700

Страница 1: ...User s Guide ix2700 Version A...

Страница 2: ...tituting other supplies may result in inferior image quality and machine malfunction To order supplies call the Imagistics Supply Line at 1 800 462 6797 For faster service please have your machine mod...

Страница 3: ...he power outlet Do not handle the plug with wet hands Doing this might cause an electrical shock After you use the machine some internal parts are extremely HOT To prevent injuries be careful not to p...

Страница 4: ...cket outlet that is easily accessible To reduce the risk of shock or fire use only a No 26 AWG or larger telecommunication line cord Do not use a telephone in the vicinity of gas leak to report leak D...

Страница 5: ...ce near heaters air conditioners water chemicals or refrigerators Do not expose the machine to direct sunlight excessive heat moisture or dust Do not connect your machine to electrical outlets control...

Страница 6: ...select On and then press Enter OR For the next transmission only press or to select Next Fax Only and then press Enter 5 For the next fax only press or to select Next Fax On and then press Enter 6 Pre...

Страница 7: ...rch Speed Dial press and then press the three digit Speed Dial number 4 Press Start Using Search 1 If it is not illuminated in green press Fax 2 Press Search Speed Dial and then enter the first letter...

Страница 8: ...necting an external telephone answering machine TAM 1 15 Sequence 1 15 Connections 1 17 Recording outgoing message OGM on an external TAM 1 17 Special line considerations 1 18 Two line phone system 1...

Страница 9: ...4 4 Setting Tone and Pulse dialing mode 4 4 System Setup 4 5 Setting the Mode Timer 4 5 Setting the Paper Type 4 5 Setting the Paper Size 4 6 Setting the Ring Volume 4 7 Setting the Beeper Volume 4 7...

Страница 10: ...l 5 12 Before you choose the ring pattern to register 5 12 Registering the Unique Ring pattern 5 13 Turning off the Unique Ring 5 13 Caller ID 5 14 Viewing Caller ID List 5 15 Clearing a Caller ID sto...

Страница 11: ...curity 6 22 Setting up the password 6 22 Turning Memory Security on 6 23 Turning Memory Security off 6 23 7 Auto Dial numbers and dialing options 7 1 Storing numbers for easy dialing 7 1 Storing One T...

Страница 12: ...Memory message 10 5 Using the copy keys Temporary settings 10 6 Enlarge Reduce 10 7 Copy Mode type of original 10 8 Sorting copies using the ADF 10 9 Contrast 10 9 Tray Select 10 10 Duplex N in 1 10...

Страница 13: ...iver settings 12 1 Features in the Native Driver 12 2 Basic tab 12 2 Paper Size 12 3 Multiple Page 12 3 Orientation 12 3 Copies 12 4 Media Type 12 4 Advanced tab 12 5 Print Quality 12 5 Duplex Printin...

Страница 14: ...cable users 13 16 Scan to E mail 13 17 Scan to Image 13 17 Scan to OCR 13 18 Scan to File 13 18 Using ScanSoft PaperPort and TextBridge OCR 13 19 Viewing items 13 20 Organizing your items in folders 1...

Страница 15: ...o access Scan to OCR Configurations screen 14 12 Scanner settings 14 12 Word Processor 14 13 Scan to Image 14 14 To access Scan to Image Configurations screen 14 14 Scanner Settings 14 14 Target Appli...

Страница 16: ...ion 15 30 2 Select Configuration for the Scan Type 15 31 3 Select Scan Settings 15 35 16 Using Remote Setup 16 1 Remote Setup 16 1 17 Using PC FAX software 17 1 PC FAX sending 17 1 Setting up user inf...

Страница 17: ...the printer driver with your Apple Macintosh Mac OS 8 6 9 2 18 2 Using the Printer Driver with Your Apple Macintosh Mac OS X 18 5 Choosing page setup options 18 5 Specific settings 18 6 Using the PS d...

Страница 18: ...the Network PC FAX software 20 5 Quick Tips 20 5 Sending a Network PC FAX from your Macintosh application 20 6 For Mac OS 8 6 9 2 users 20 6 For Mac OS X users 20 6 21 Important information 21 1 Stan...

Страница 19: ...2 21 Routine maintenance 22 24 Cleaning the scanner 22 24 Cleaning the printer 22 25 Cleaning the drum unit 22 26 Replacing the toner cartridge 22 27 How to replace the toner cartridge 22 28 Replacing...

Страница 20: ...S Specifications S 1 Product description S 1 General S 1 Print media S 2 Copy S 2 Fax S 3 Scanner S 4 Printer S 5 Interfaces S 5 Computer requirements S 6 24 Index I 1 25 Remote Retrieval Access card...

Страница 21: ...ctions To make things clearer and to help you press the correct keys we used special fonts and added some of the messages that will appear in the LCD Introduction Bold Bold typeface identifies specifi...

Страница 22: ...ocument Support Extension Place the original here to use the ADF unit 7 ADF Document Output Support Flap Unfold to prevent the scanned pages from sliding off the machine 8 Document Cover Open to place...

Страница 23: ...remove paper jammed inside the ADF unit 17 Telephone Line Jack Plug the line cord supplied with the machine into here 18 USB Interface Connector Connect the USB Cable here 19 Parallel Interface Conne...

Страница 24: ...hen using the ADF 23 Scanner Lock Lever Use to lock unlock the scanner when relocating the machine 24 Document Cover Open to place the original on the scanner glass 25 White Film Clean it for good qua...

Страница 25: ...INTRODUCTION 1 5 Control panel overview 6 12 7 4 1 3 9 5 8 10 11 2...

Страница 26: ...previously stored dial numbers 3 Print keys Secure Lets you print out data saved in memory by entering your four digit password Job cancel Clears data from the printer memory 4 Status LED Light Emitti...

Страница 27: ...g if you want to make sure a fax machine will answer and then press Start Resolution Sets the resolution when you send a fax Search Speed Dial Lets you look up numbers that are stored in the dialing m...

Страница 28: ...s entered data or lets you exit the menu by pressing repeatedly or Press to scroll forward or backward to a menu selection When using the speaker or ring you can press these keys to adjust the volume...

Страница 29: ...for the next copy Sort Lets you sort multiple copies using the ADF Duplex N in 1 You can choose Duplex to copy on both sides of the paper or N in 1 to copy 2 or 4 pages onto one page 0 Dial Pad Use th...

Страница 30: ...ff Green Yellow Red LED is on Green Yellow Red LED is blinking LED machine status Description Sleep Mode The power switch is off or the machine is in Sleep mode Green Warming Up The machine is warming...

Страница 31: ...the cover See Error messages on page 22 1 Toner empty Replace the toner cartridge with a new one See Replacing the toner cartridge on page 22 27 Paper error Put paper in the tray or clear the paper j...

Страница 32: ...ceiving faxes If you set Voice Mail and the machine to answer after the same number of rings there is no way of knowing which one will answer first It is important to remember that neither Voice Mail...

Страница 33: ...chine is set to the Fax Only mode it will answer every call automatically with fax receiving tones If the other person hangs up your machine will continue to send the chirps for about 40 seconds and t...

Страница 34: ...y do you may send and receive fax messages that are continuously being checked by the machine Your machine must have enough memory for this feature to work Connecting the machine Connecting an externa...

Страница 35: ...sure you carefully follow the instructions in this guide for recording your outgoing message We do not recommend using the toll saver feature on your external answering machine if it exceeds five rin...

Страница 36: ...1 16 INTRODUCTION Do not connect a TAM elsewhere on the same phone line unless you have the Unique Ring service TAM TAM...

Страница 37: ...swer calls 6 Set the Answer Mode to External TAM See Choosing the Answer Mode on page 5 1 Recording outgoing message OGM on an external TAM Timing is important in recording this message The message se...

Страница 38: ...our machine See EXT TEL RX on page 5 4 Converting telephone wall outlets There are three ways to convert to an RJ11 jack The first two ways may require assistance from the telephone company You can ch...

Страница 39: ...phone next to your machine 2 Plug one end of the telephone line cord for your machine into the L2 jack of the triplex adapter Plug the other end into the LINE jack on the back of the machine 3 Plug on...

Страница 40: ...call is received If you are installing the machine to work with a PBX 1 It is not guaranteed that the unit will operate correctly under all circumstances with a PBX Any cases of difficulty should be...

Страница 41: ...paper is suitable Use paper that is made for plain paper copying Use paper that is 75 to 90 g m2 20 to 24 lb Use neutral paper Do not use acidic or alkaline paper Use long grain paper Use paper with...

Страница 42: ...bossed letterhead For optimum printing use a recommended type of paper especially for plain paper and transparencies For more information on paper specifications call your nearest authorized sales rep...

Страница 43: ...mm 2 75 to 8 66 in Height 116 to 406 4 mm 4 57 to 16 0 in 50 sheets 80 g m2 or 20 lb Paper tray Upper Tray A4 Letter Legal B5 ISO B5 JIS Executive A5 A6 B6 ISO 250 sheets 80 g m2 or 20 lb Optional low...

Страница 44: ...Transparency 2 Paper weights Multi purpose tray 60 to 161 g m2 16 to 43 lb Paper tray 60 to 105 g m2 16 to 28 lb Optional Lower tray 60 to 105 g m2 16 to 28 lb Paper sizes Multi purpose tray Width 69...

Страница 45: ...completely out of the machine 2 While pressing the paper guide release lever slide the adjusters to fit the paper size Check that the guides are firmly in the slots For Legal size paper press the univ...

Страница 46: ...r stack 5 Put the paper tray firmly back in the machine and unfold the support flap before you use the machine When you put paper in the paper tray please remember the following The side to be printed...

Страница 47: ...flap 3 When loading paper in the MP tray make sure it touches the back of the tray When printing envelopes and labels you should only use the multi purpose tray Make sure that the paper is straight an...

Страница 48: ...nvelopes or up to 50 sheets of 80 g m2 or 20 lb paper in the MP tray When you put paper in the MP tray please remember the following The side to be printed on must be face up During printing the insid...

Страница 49: ...you are using This feature is available for A4 Letter or Legal size paper See Setting Duplex printing for Fax mode on page 5 10 Duplex N in 1 on page 10 11 and Two sided printing Duplex Printing on pa...

Страница 50: ...e menu selections and programming options Menu table You can probably program your machine without the User s Guide But to help you understand the menu selections and options that are found in the mac...

Страница 51: ...board is installed OR Press 0 for Initial Setup menu OR You can scroll more quickly through each menu level by pressing the arrow for the direction you want or Access the menu Go to the next menu leve...

Страница 52: ...the LCD The LCD will then show the next menu level Press or to scroll to your next menu selection Press Enter When you finish setting an option the LCD shows Accepted Use to scroll backward if you pa...

Страница 53: ...in the Multi purpose tray 4 5 2 Upper Tray Thin Plain Thick Thicker Transparency Sets the type of paper in upper tray 4 5 3 Lower Tray option Thin Plain Thick Thicker Transparency Sets the type of pa...

Страница 54: ...Sleep Timer Conserves power 4 9 6 Tray Use Copy If you have the optional lower tray see page 3 14 Upper Tray MP Only Auto Selects the tray that will be used for Copy mode 4 10 7 Tray Use Fax This set...

Страница 55: ...all calls at an extension or external phone and use codes to turn the machine on or off You can personalize these codes 5 8 5 Auto Reduction On Off Reduces the size of incoming faxes 5 5 6 Print Densi...

Страница 56: ...ne to be retrieved by another fax machine 6 21 7 Cover Sheet Next Fax Only On Off Print Sample Automatically sends a Cover Sheet you have programmed 6 12 8 Cover Message You can set up your own commen...

Страница 57: ...rt and Journal 9 1 2 Journal Every 50 Faxes Every 6 Hours Every 12 Hours Every 24 Hours Every 2 Days Every 7 Days Off 9 2 5 Remote Fax Opt 1 RMT RTV FX FWD Off Remote Retrieve Fax Forward Storing inco...

Страница 58: ...attern with the machine 5 13 4 Caller ID Display Print Report View or print a list of the last 30 Caller IDs stored in the memory 5 15 3 Copy 1 Copy Mode Auto Text Photo Selects the Copy resolution fo...

Страница 59: ...Setup 1 Answer Mode Fax Only Fax Tel External TAM Manual You can choose the receive mode that best suits your needs 5 2 2 Date Time Puts the date and time on the LCD and in headings of faxes you send...

Страница 60: ...the IP address 3 Subnet Mask 000 255 000 255 000 255 000 255 Enter the Subnet mask 4 Gateway 000 255 000 255 000 255 000 255 Enter the Gateway address 5 Host Name BRN_XXXXXX Enter the Host name 6 WINS...

Страница 61: ...d to login to the POP3 server 3 Setup Mail RX 1 Auto Polling On Off Automatically checks the POP3 server for new messages 2 Poll Frequency 10Min Sets the interval for checking for new messages on the...

Страница 62: ...o 8023 ENET 8022 SNAP Lets you specify the frame type 3 AppleTalk On Off Select On to use the machine on a Macintosh network 4 DLC LLC On Off Select On to use the machine on a DLC LLC network 5 Net BI...

Страница 63: ...Page 1 System Setup 6 Tray Use Copy Upper Tray Lower Tray MP Only Auto Select the tray that will be used for copying 4 10 7 Tray Use Fax Upper Tray Lower Tray Auto Auto Separation Select the tray that...

Страница 64: ...fected 1 Press Menu 0 2 2 Enter the last two digits of the year Press Enter 3 Enter two digits for the month Press Enter For example enter 09 for September or 10 for October 4 Enter two digits for the...

Страница 65: ...umber and fax number are the same enter the same number again 4 Use the dial pad to enter your name up to 20 characters Press Enter See Entering text on page 4 3 5 Press Stop The LCD will show the dat...

Страница 66: ...enter a space press once between numbers and twice between characters Making corrections If you entered a letter incorrectly and want to change it press to move the cursor under the incorrect charact...

Страница 67: ...it unlawful for any person to use a computer or electronic device to send any message via a telephone fax machine unless such messages clearly contain in a margin at the top or bottom of each transmi...

Страница 68: ...you used last 1 Press Menu 1 1 2 Press or to select 0 Sec 30 Secs 1 Min 2 Mins 5 Mins or Off 3 Press Enter Setting the Paper Type To get the best print quality set the machine for the type of paper yo...

Страница 69: ...o select A4 Letter Legal Executive A5 A6 B5 or B6 Press Enter 3 Press Stop With optional paper tray LT 5000 1 Press Menu 1 3 1 to set the paper size for Upper Tray OR Press Menu 1 3 2 to set the paper...

Страница 70: ...machine will ring so you can hear the active setting as the LCD shows it The volume changes with each key press The new setting will stay until you change it again Setting the Beeper Volume You can c...

Страница 71: ...evel Press or to adjust the volume level The LCD shows the setting you are choosing Each key press changes the volume to the next setting The new setting will remain until you change it again Save Ton...

Страница 72: ...ning off the Scanner Lamp The scanner lamp stays on for 16 hours before automatically switching off to preserve the life of the lamp You can turn off the scanner lamp manually if you wish by pressing...

Страница 73: ...optional paper tray press or to select Upper Tray Lower Tray MP Only or Auto 3 Press Enter 4 Press Stop 1 Copies will automatically be printed from Lower Tray only if the Paper Size setting for Lower...

Страница 74: ...er Tray Auto or Auto Separation 3 Press Enter 4 Press Stop Setting the Tray Use for Printing Reports If your machine doesn t have the optional Lower Tray you can skip this setting The default setting...

Страница 75: ...an change the contrast to help the LCD look lighter or darker 1 Press Menu 1 7 OR If you have the optional Lower Tray press Menu 1 9 2 Press to increase the contrast OR Press to decrease the contrast...

Страница 76: ...hone calls You cannot have an answering machine on the same line even if it is on a separate wall jack phone socket on the same line You cannot use the telephone company s Voice Mail in this mode Exte...

Страница 77: ...ep the Ring Count setting of 4 See EXT TEL RX on page 5 4 and Operation from extension telephones on page 5 7 1 If it is not illuminated in green press Fax 2 Press Menu 2 1 1 3 Press or to select how...

Страница 78: ...no other phones on the same line will ring with the special pseudo double ring However you can still answer the call on any extension phone in a separate wall jack phone socket on the same line as the...

Страница 79: ...Off means you ll have to activate the machine yourself by lifting the handset of an external or extension phone and then press Start on the machine OR by pressing 51 if you are not at your machine Se...

Страница 80: ...green press Fax 2 Press Menu 2 1 5 3 If you have the optional paper lower tray press or to select Upper Tray or Lower Tray Press Enter 4 Use or to select On or Off Press Enter 5 Press Stop Printing a...

Страница 81: ...print density making your printed pages darker or lighter 1 If it is not illuminated in green press Fax 2 Press Menu 2 1 6 3 Press to make the print darker OR Press to make the print lighter Press Ent...

Страница 82: ...you re receiving a manual fax At an extension phone on a separate telephone wall jack phone socket press 51 wait for fax receiving tones chirps and then hang up At an external phone connected to the...

Страница 83: ...Remote Codes might not work with some telephone systems The preset Fax Receive Code is 51 The preset Telephone Answer Code is 51 1 If it is not illuminated in green press Fax 2 Press Menu 2 1 4 3 Pres...

Страница 84: ...to receive a fax they pay for the call If you poll someone s fax machine to receive a fax you pay for the call Setting up Polling Receive Polling Receive is when you call another fax machine to receiv...

Страница 85: ...press Enter between each fax number 5 Press Start Your machine will poll each number or Group number in turn to receive a fax Setting Duplex printing for Fax mode If you set Duplex to On for fax rece...

Страница 86: ...number has its own unique ring pattern so you will know which phone number is ringing This is one way you can have a separate phone number for your machine What does ix2700 s Unique Ring do The ix2700...

Страница 87: ...ow the directions below to register the new Unique Ring pattern they give you This is so your machine can recognize its incoming calls Before you choose the ring pattern to register You can only regis...

Страница 88: ...Voice Mail set up on the Unique Ring number Manual mode means you must answer all the calls yourself You can not change the answer mode to the other mode while the Unique Ring is set to on 1 Press Me...

Страница 89: ...lay means the caller has intentionally blocked transmission of information If both the name and number are received the LCD shows only the name You can print a list of Caller ID information received b...

Страница 90: ...nd then press Enter The LCD shows the caller s number and the date and time of the call 4 Press or to return to the Caller ID listing OR Press Stop Clearing a Caller ID stored in the memory For effect...

Страница 91: ...ld up to 50 pages and feeds each sheet individually Use standard 20 lb or 75 g m2 paper and always fan the pages before putting them in the ADF Make sure originals written with ink are completely dry...

Страница 92: ...and stagger them at an angle Make sure you put the originals face up top edge first in the ADF until you feel them touch the feed roller 4 Adjust the paper guides to fit the width of your originals 5...

Страница 93: ...e first page 5 To send a single page press 2 or press Start again The machine starts sending the original OR To send more than one page press 1 and go to Step 6 6 Place the next page on the scanner gl...

Страница 94: ...nned so far or to press Stop to cancel the operation Manual transmission Manual transmission lets you hear the dialing ringing and fax receiving tones while sending a fax 1 If it is not illuminated in...

Страница 95: ...ress 2 or Start Sending a fax at the end of a conversation At the end of a conversation you can send a fax to the other party before you both hang up 1 Ask the other party to wait for fax tones beeps...

Страница 96: ...s and go to the next step Contrast If your original is very light or very dark you may want to set the contrast Use Light to make the fax darker Use Dark to make the fax lighter 1 If it is not illumin...

Страница 97: ...s you can use the Resolution key to change the setting temporarily for this fax only If it is not illuminated in green press Fax Press Resolution repeatedly until the LCD shows the setting you want OR...

Страница 98: ...en press Start to try again If you want to make a second call to the last number dialed you can save time by pressing Redial Pause and Start Redial Pause only works if you dialed from the control pane...

Страница 99: ...xt fax OR If you are using the scanner glass go to Step 4 4 To send a single page press 2 or press Start again The machine starts sending the original OR To send more than one page press 1 and go to S...

Страница 100: ...1 If it is not illuminated in green press Fax Place the original face up in the ADF or face down on the scanner glass 2 Press Menu 2 2 5 3 To change the default setting press or to select On or Off P...

Страница 101: ...scheduled job You can cancel a fax job that is stored and waiting in memory See Checking job status on page 6 11 1 Press Menu 2 6 Any jobs that are waiting will appear on the LCD 2 If you have more th...

Страница 102: ...7 the number of sheets is left blank You can select a comment to include on your Cover Sheet 1 Comment Off 2 Please Call 3 Urgent 4 Confidential Instead of using one of the preset comments you can ent...

Страница 103: ...2 Press Menu 2 2 8 3 Press or to choose 5 or 6 for your own comment Press Enter 4 Use the dial pad to enter your customized comment Press Enter See Entering text on page 4 3 5 Press 1 if you want to c...

Страница 104: ...ows Next Fax Only Press Enter 4 Press or to select Next Fax On or Next Fax Off Press Enter 5 Press or to select one of the standard or your own comments Press Enter 6 Enter two digits to show the numb...

Страница 105: ...to select one of the standard or your own comments Press Enter 5 Press 1 if you want to choose more settings and the LCD will return to the TX Settings menu OR Press 2 to exit if you have finished ch...

Страница 106: ...r between each of the numbers Use Search Speed Dial to help you choose the numbers easily See Setting up Groups for Broadcasting on page 7 4 After the broadcast is finished a Broadcast Report will be...

Страница 107: ...ialing using the dial pad 7 Press Start If you are using the scanner glass go to Step 8 8 To send a single page press 2 or press Start again The machine starts sending the fax OR To send more than one...

Страница 108: ...Press Enter 4 Press 1 if you want to choose more settings and the LCD will return to the TX Settings menu OR Press 2 if you have finished choosing settings and then go to Step 5 5 Enter the fax number...

Страница 109: ...Press 1 if you want to choose more settings and the LCD will return to the TX Settings menu OR Press 2 if youhave finishedchoosingsettings and then go toStep 5 5 Enter the fax number 6 Press Start If...

Страница 110: ...e memory by destination and scheduled time All delayed faxes that are scheduled to be sent at the same time to the same fax number will be sent as one fax to save transmission time 1 If it is not illu...

Страница 111: ...settings and go to step 5 5 Press Start The machine starts scanning the document 6 If you place the original in the ADF wait for the fax to be polled OR If you are using the scanner glass go to Step...

Страница 112: ...ve or Fax Forward is On before you turn Memory Security On then Fax Forwarding and Remote Retrieval will continue to work While Memory Security is On the following operations are available Receiving f...

Страница 113: ...ss Menu Enter the registered 4 digit password and press Enter 2 Memory Security is automatically turned off and the LCD shows the Date and Time If there is a power failure the data in the memory will...

Страница 114: ...ch Dialing on page 7 5 One Touch keys are the 20 keys numbers 01 40 located on the left side of the control panel 1 Press Menu 2 3 1 2 Press the One Touch key where you want to store a number If you h...

Страница 115: ...the LCD shows the name and number you ve stored or if you haven t stored a name only the number you ve stored Storing Speed Dial numbers You can store Speed Dial numbers so that when you dial you will...

Страница 116: ...or number and will ask you to do one of the following 1 Press 1 to change the stored number OR Press 2 to exit without making a change 2 Enter a new number Press Enter To erase the whole number or wh...

Страница 117: ...Speed Dial numbers on page 7 3 1 Press Menu 2 3 3 2 Decide where you wish to store the Group AND Press a One Touch key OR Press Search Speed Dial and enter the three digit location and then press Ente...

Страница 118: ...r the first letter of the name you re looking for and press or OR Press or To search for numbers numerically press or 4 When the LCD shows the name you want to call Press Start One Touch Dialing 1 If...

Страница 119: ...ng means pressing all of the digits of the phone number Using an external telephone The easiest way to use your external telephone is to pick up the handset and dial the number on the external telepho...

Страница 120: ...the dial pad The combined number will be dialed in the order that you entered it as soon as you press Start See Storing One Touch Dial numbers on page 7 1 For example you can store 555 on One Touch k...

Страница 121: ...or Pulse If you have a Pulse dialing service but need to send Tone signals for example for telephone banking follow the instructions below If you have Touch Tone service you will not need this featur...

Страница 122: ...rwards the fax message 1 Press Menu 2 5 1 2 Press or to select Fax Forward Press Enter The LCD will ask you to enter the fax number to which faxes will be forwarded 3 Enter the forwarding number up to...

Страница 123: ...Enter 5 Press Stop Local Print If you have selected Remote Retrieve or Fax Forward and set Local Print to On your machine automatically prints faxes as they are received into memory This is a safety...

Страница 124: ...sages 4 The machine gives two short beeps which tells you to enter a command The machine will hang up if you wait longer than 30 seconds to enter a command The machine will beep three times if you ent...

Страница 125: ...NO See Page 8 1 Once you have registered the number your machine will change automatically to FAX FWD ON mode 2 Remote Retrieval 3 Fax Forwarding 4 FAX FWD No 96 Retrieve a fax 2 Retrieve all faxes E...

Страница 126: ...essages Changing your Fax Forwarding number You can change the default setting of your fax forwarding number from another telephone or fax machine using Touch Tone 1 Dial your fax number 2 When your m...

Страница 127: ...report will print for every fax you send If you send a lot of faxes to the same place you may need more than the job numbers to know which faxes you must send again Selecting All Image or Inc Image wi...

Страница 128: ...begin printing in 24 hour format Press Enter For example enter 19 45 for 7 45 PM 4 Press Stop If you select 6 12 24 hours 2 or 7 days the machine will print the report at the selected time and then er...

Страница 129: ...he Help List so you can see at a glance how to quickly program your machine 2 Dialer Dir Lists names and numbers stored in the One Touch and Speed Dial memory in numerical order 3 Journal Lists inform...

Страница 130: ...opy to enter Copy mode The default setting is Fax You can change the number of seconds or minutes that the machine stays in Copy mode after a copy operation See Setting the Mode Timer on page 4 5 The...

Страница 131: ...y settings again place the next original in the ADF or on the scanner glass within that time However if you have set the Mode Timer for Copy and Scan modes to 0 to 30 seconds the machine returns to th...

Страница 132: ...t Do NOT pull on the original while copying is in progress Making multiple copies from the ADF 1 Press Copy to illuminate it in green Insert the original face up in the ADF 2 Use the dial pad to enter...

Страница 133: ...1 Press Copy to illuminate it in green Lift the Document Cover 2 Using the document guidelines on the left center the original face down on the scanner glass and close the document cover 3 Using the...

Страница 134: ...you get an Out Of Memory message you may be able to make copies if you first print incoming faxes in the memory to restore the memory to 100 To gain extra memory you can turn off Fax Storage OR Print...

Страница 135: ...hange the settings only for the next copy use the Temporary Copy Keys You can use different combinations The large LCD shows your current Copy mode settings Temporary Copy Keys Duplex N in 1 Example o...

Страница 136: ...ou to enter a ratio from 25 to 400 1 Press Copy to illuminate it in green Place the original face up in the ADF or face down on the scanner glass 2 Use the dial pad to enter the number of copies you w...

Страница 137: ...ting is Auto which is used for originals that contain both text and photographs Text is used for originals containing only text Photo is used for copying photographs 1 Press Copy to illuminate it in g...

Страница 138: ...Press Sort 4 Press Start OR Press other Temporary Copy keys for more settings Contrast You can adjust copy contrast to make copies darker or lighter 1 Press Copy to illuminate it in green Place the or...

Страница 139: ...ADF or face down on the scanner glass 2 Use the dial pad to enter the number of copies you want up to 99 3 Press Tray Select 4 Press or to select the tray usage Press Enter 5 Press Start OR Press oth...

Страница 140: ...plex 1 in 1 Portrait1 Portrait2 Single Sided Double Sided Landscape1 Single Sided Double Sided Landscape2 Duplex 2 in 1 Portrait1 Portrait2 Landscape1 Landscape2 Duplex 4 in 1 Portrait1 Portrait2 Land...

Страница 141: ...ter 5 If you are ready to copy go to Step 7 OR Press or to select Mode Contrast or Tray Press Enter 6 Press or to select a new setting Press Enter 7 Press Start If you are using the ADF the machine sc...

Страница 142: ...ginal 1 Press Copy to illuminate it in green Place the original face up in the ADF or face down the scanner glass 2 Use the dial pad to enter the number of copies you want up to 99 3 Press Duplex N in...

Страница 143: ...nter or press 1 to copy next page 8 After all the pages of the original have been scanned select 2 and press Enter or press 2 Make a double sided copy from a double sided original Not available for mu...

Страница 144: ...x 2 in 1 or Duplex 4 in 1 Press Enter 4 Press or to select Portrait1 Portrait2 Landscape1 or Landscape2 Press Enter 5 Press Start to scan the original If you placed the original in the ADF the machine...

Страница 145: ...3 1 2 Press or to select Text Photo or Auto Press Enter 3 Press Stop Contrast You can change the contrast to help an image look lighter or darker 1 Press Menu 3 2 2 Press to make lighter OR Press to m...

Страница 146: ...Me 2000 Professional XP and Windows NT workstation 4 0 are available on the CD ROM supplied with your machine You can install them easily into your Windows system using our installer program The drive...

Страница 147: ...ics ix2700 USB Printer as your printer driver from the Print or Print Settings menu in your software application and then click on OK to begin printing 2 Your computer sends a print command and data t...

Страница 148: ...Duplex Printing In this mode the machine prints on both sides of the A4 Letter or Legal paper automatically 1 Open the Properties dialog box in the printer driver 2 Select Duplex Printing mode in the...

Страница 149: ...er straighten it well or you may get a paper jam Very thin or very thick paper is not recommended We recommend 75 to 90 g m2 20 to 24 lb paper Face down output tray The machine ejects paper with print...

Страница 150: ...ssing the paper guide release lever slide the paper guide to fit the paper size 6 Send the print data to the machine Make sure that the paper is straight and in the proper position on the MP tray If i...

Страница 151: ...r Size Media Type Paper Source and other settings in the printer driver Media Type Thick paper or Thicker paper Paper Source MP Tray 2 Open the back output tray and then pull out the face up output tr...

Страница 152: ...ob close the back output tray Caution Remove each sheet immediately after printing Stacking the sheets may cause a paper jam or the paper to curl When you put paper in the MP tray please remember the...

Страница 153: ...upport if necessary 3 Open the MP tray and lower it gently 4 Pull out the MP tray support flap All sides should be properly folded without any wrinkles or creases If envelopes are creased after they h...

Страница 154: ...the back of the tray Do not put more than 3 envelopes in the MP tray at any one time or it may cause a jam Make sure that the envelopes are neatly stacked and in the proper position in the MP tray If...

Страница 155: ...achine 8 After you finish the print job close the back output tray When you put envelopes in the MP tray please remember the following During printing the inside tray rises to feed envelopes into the...

Страница 156: ...from the memory To use this function you need to set your password in the printer driver dialog box See Device Options on page 12 11 1 Press Secure 2 Press or to select the user name Press Enter The...

Страница 157: ...to AUTO You can change the default emulation mode manually by using the control panel 1 Press Menu 4 1 2 Press or to select Auto HP LaserJet or BR Script3 Press Enter 3 Press Stop If you turn the pow...

Страница 158: ...ess Menu 4 2 2 2 Press Start The machine prints the settings 3 Press Stop Restoring factory default settings You can return the machine to the original factory settings Fonts and macros in the tempora...

Страница 159: ...the printer driver settings 1 Select Print from the File menu in your application software 2 Select Imagistics ix2700 USB Printer as your printer and click Preferences for Windows 2000 XP Properties...

Страница 160: ...le Page Border Line if any and Orientation 2 Select number of Copies and Media Type 3 Select Paper Source First Page and Other Pages Auto Select allows the printer driver to select a suitable tray for...

Страница 161: ...sheet of paper or enlarging the image size for printing one page on multiple sheets of paper Border Line When printing multiple pages on one sheet with the Multiple Page feature you can select to have...

Страница 162: ...or the best print quality select the type of media that you wish to use Plain Paper Thin Paper Thick Paper Thicker Paper Bond Paper Transparencies Envelopes Env Thick Env Thin When using ordinary plai...

Страница 163: ...wing icons 1 Print Quality 2 Duplex 3 Watermark 4 Page Setting 5 Device Options Print Quality Resolution You can change the resolution as follows HQ 1200 600 dpi 300 dpi To return to the default setti...

Страница 164: ...or Scanned Images When you choose Auto Recommended the printer automatically prints with the most suitable print settings With the Print Setting set to Manual you can change the Brightness Contrast an...

Страница 165: ...x box and then select Manual Duplex In this mode the machine prints all the even numbered pages first Then the printer driver stops and shows the instructions required to re install the paper When you...

Страница 166: ...he preset Watermarks or you can use a bitmap file or text file that you have created Check Use Watermark and then select the watermark you want to use In background Check In background to print the wa...

Страница 167: ...termark and clicking the Edit button If you want to add a new Watermark click the New button and then select Text or Bitmap in the Watermark Style Title You can select the CONFIDENTIAL COPY or DRAFT a...

Страница 168: ...of your document with the Scaling feature Check Off if you want to print the document as it appears on your screen Check Fit to Paper Size if your document has an unusual size or if you have only the...

Страница 169: ...he control panel of the machine with the password to print them To send a secured document 1 Select Secure Print from Printer Function and check Secure Print 2 Enter your password user name and job na...

Страница 170: ...tup The Quick Print Setup feature allows you to quickly select driver settings To view setting simply click your mouse button on the task tray icon This feature can be set to ON or OFF from the Device...

Страница 171: ...8SE Me Users Only The administrator selection permits the Copy Scaling and Watermark features to be locked and password protected Record your password and keep it in a safe place for future reference...

Страница 172: ...t You can change the Font by clicking the Font button or the Position To include a background with the Date and Time select Opaque When Opaque is selected you can set the Darkness of the Date and Time...

Страница 173: ...ab of theprinter driver seeBasic tabon page 12 2 the printer driver will automatically use the Paper Source setting to select a tray which matches the Paper Size setting in the printer driver Default...

Страница 174: ...en the Select Components screen appears check PS Printer Driver and then continue following the on screen instructions If you have not previously installed the driver and software insert the CD ROM in...

Страница 175: ...PRINTER DRIVER SETTINGS 12 17 Device Settings tab Select the options you installed...

Страница 176: ...n Page Order and Page Per Sheet Booklet For Windows 2000 XP You can print a booklet by selecting Booklet from Pages Per Sheet list If you are using Windows NT 4 0 Windows 2000 or XP you can access the...

Страница 177: ...PRINTER DRIVER SETTINGS 12 19 Paper Quality tab Select the Paper Source...

Страница 178: ...e Font setting 3 You can change settings by selecting the setting in the Printer Features list Media Type Toner Save BR Script Level If you are using Windows NT 4 0 Windows 2000 or XP you can access t...

Страница 179: ...include popular programs like Adobe Photoshop Adobe PageMaker CorelDraw and many more How to scan using Windows The scanning operations and drivers will be different depending on your operating system...

Страница 180: ...ton The Scan pane appears in the left panel 3 Select Imagistics ix2700 from the Scanner drop down list box 4 Click Scan The Imagistics ix2700 Scanner Setup dialog box will appear The instructions for...

Страница 181: ...t the following settings if required in the Scanner window Image Type Resolution Scan Type Brightness Contrast Document Size See Settings in the Scanner window on page 13 6 3 Click the Start button in...

Страница 182: ...e image 1 Place the original face up in the ADF or face down on the scanner glass 2 Select the settings for Image Type Photo Web or Text Resolution Scan Type Brightness and Contrast as needed 3 In the...

Страница 183: ...his time only the selected area of the original will appear in the PaperPort window or your software application window 7 In the PaperPort window use the options available to refine the image You can...

Страница 184: ...ution you can choose and the available colors Image Type Resolution Scan Type Photo Select for scanning photo images 300 x 300 dpi 24 bit color Web Select for attaching the scanned image to web pages...

Страница 185: ...ite and Color settings are selected as the Scan Type You can increase or decrease the contrast level by moving the slide bar to the left or right An increase emphasizes dark and light areas of the Ima...

Страница 186: ...o 215 9 355 6 mm To scan photographs or business cards select the document size and then place the document face down at the center of scanner glass When scanning photographsorother imagesfor use in a...

Страница 187: ...of scanning area Height shows the height of scanning area Data Size shows the approximate data size calculated in a Bitmap format The size will be different for other file formats such as JPEG You can...

Страница 188: ...ion that supports WIA or TWAIN scanning How to access the scanner 1 Open your software application to scan a document 2 Select Scan from the File drop down menu or select the Scan button The Scan pane...

Страница 189: ...g the ADF 1 Place the original face up in the ADF automatic document feeder 2 Select the Document Feeder from the Paper source drop down list box A 3 Select the picture type B 4 Select the Paper size...

Страница 190: ...To start scanning your document click the Scan button in the Scan dialog box The scanner resolution you can select is up to 1200 1200 dpi For resolutions greater than 1200 dpi use the Scanner Utility...

Страница 191: ...eview an image for cropping any unwanted portions from the image When you are satisfied with the preview click the Scan button from the scanner window to scan the image 1 Place the original face down...

Страница 192: ...nning area 5 Select the portion you want to scan by clicking the left mouse button and dragging it over the area 6 If you require advanced settings click Picture Type from the Adjust the quality of th...

Страница 193: ...uring the scanner driver for resolutions greater than 1200dpi and for changing the paper size If you want to set Legal size as the default size change the setting using this utility You must restart y...

Страница 194: ...Windows based computer and loaded the appropriate Drivers for your version of Windows When you are ready to use Scan make sure the SmartUI application is running on your computer For details about ho...

Страница 195: ...original create a file attachment and launch your E mail application displaying the new message waiting to be addressed Scan to Image You can scan a color picture into your graphics application for vi...

Страница 196: ...Press Enter The machine will start the scanning process Scan to File You can scan a black and white or a color original into your computer and save it as a file in the folder you choose The file type...

Страница 197: ...xing or filing ScanSoft PaperPort can be accessed through the ScanSoft PaperPort program group See Documentation for ScanSoft PaperPort on the CD ROM The complete ScanSoft PaperPort Users Guide includ...

Страница 198: ...other applications Non PaperPort items include an icon that indicates the application that was used to create the item a non PaperPort item is represented by a small rectangular thumbnail and not an...

Страница 199: ...and non paperport files appear on the Desktop You can also use Windows Explorer to manage the folders and items shown in Desktop View Quick links to other applications ScanSoft PaperPort automatically...

Страница 200: ...R PaperPort can use your preferred OCR application if it is already on your computer You can convert the entire item or by using the Copy Text command you can select only a portion of the text to conv...

Страница 201: ...aying images Exporting an image file 1 Select the Save As command from the File pull down menu in the PaperPort window The Save XXXXX as dialog box will be displayed 2 Select the drive and directory w...

Страница 202: ...e Add Remove button Select PaperPort 8 0 SE from the list and clickthe Add Remove button For Windows 2000 Professional Select Start Settings Control Panel and Add Remove Programs Select SmartUI for Pa...

Страница 203: ...used scanning applications Using the SmartUI stops the need to manually startup any specific applications The SmartUI provides three operations Scan Copy and PC Fax Scan directly to a file E mail word...

Страница 204: ...tomatically you can turn off AutoLoad How to turn off AutoLoad 1 Left click the SmartUI icon and click Show 2 When the SmartUI window appears left click the Smart Click button A dialog box will appear...

Страница 205: ...viewer editor For example if you are using Outlook as your default E mail application the SmartUI will create a link and a scanning application button for Outlook You can change a default application...

Страница 206: ...iginal not a graphic image into a word processing file You can choose the word processing application such as Word Pad MS Word and so on Scan to Image Lets you scan an image directly into any graphic...

Страница 207: ...tons When the Pop Up screen appears you can access the Scanner Settings window Click the Smart Click icon at the top right of the SmartUI screen OR Click the Modify Settings button on any of the Confi...

Страница 208: ...mode has its own set of stored settings You can keep the factory default settings or change them at any time Resolution From the pull down list select the scanning resolution you most often use Color...

Страница 209: ...reen If you see this screen it means you left clicked a button in the SmartUI window without first placing an original in the ADF Place the original in the machine s ADF and then click OK to go to the...

Страница 210: ...e Modify Settings button to view the configuration screen of the SmartUI 3 To save your settings click OK OR To go back to the factory default settings click the Restore Defaults button Scanner settin...

Страница 211: ...t select the type of file PaperPort Image Item max PaperPort Self Viewing exe PaperPort Browser Viewable htm PaperPort 5 0 Image Item max PaperPort 4 0 Image Item max PaperPort 3 0 Image Item max Wind...

Страница 212: ...n Click the Modify Settings button to view the configuration screen of the SmartUI 3 To save your settings click OK OR To go back to the factory default settings click the Restore Defaults button Scan...

Страница 213: ...e doc format and JPEG images in the jpg format All documents and image items Converts all items regardless of the program in which the item was created for example converts all Word doc files and JPEG...

Страница 214: ...nfiguration Click the Modify Settings button to view the configuration screen of the SmartUI To save your settings click OK OR To go back to the factory default settings click the Restore Defaults but...

Страница 215: ...ument images to editable documents This option is available only when you have an OCR program other than the one provided with PaperPort PaperPort 8 0 uses the same OCR engine that is in ScanSoft s Te...

Страница 216: ...ngs click OK OR To go back to the factory default settings click the Restore Defaults button Scanner Settings From the pull down list select the scanning mode that is appropriate for the type of file...

Страница 217: ...iguration screen of the SmartUI To save your settings click OK OR To go back to the factory default settings click the Restore Defaults button Scanner settings From the pull down list select the scann...

Страница 218: ...the Modify Settings button to view the configuration screen of the SmartUI To save your settings click OK OR To go back to the factory default settings click the Restore Defaults button Scanner settin...

Страница 219: ...1 To change the fax options click the FAX Options button The PC FAX Properties screen appears For Windows 95 98 98SE Me and Windows NT WS 4 0 For Windows 2000 Professional 2 Select the Paper Size and...

Страница 220: ...ectly to a folder on your computer The SmartUI provides four categories of operations 1 Scan directly to a file E mail word processor or graphics application of your choice 2 Enhanced copy functions s...

Страница 221: ...task bar If you don t want the SmartUI to load automatically you can turn AutoLoad off How to turn off Auto Load 1 Right click the SmartUI icon in the Task Tray and select Show 2 The main SmartUI wind...

Страница 222: ...nfigure the hardware Scan key on your machine such as Scan to File The Scan to File feature allows you to scan a document directly to your hard disk and choose the file format and destination folder w...

Страница 223: ...mail application the SmartUI automatically will create a link and a scanning application button for Outlook You can change the default application by right clicking on any of the scan buttons in the...

Страница 224: ...configuration When the SmartUI is displayed you can access the Hardware Section window to reconfigure the Scan button on your machine Click the Hardware Section tab at the top left of the SmartUI scre...

Страница 225: ...change the configuration that includes the destination E mail application attachment file and the scanner settings To change the destination E mail application you use the Application pull down list t...

Страница 226: ...e Scan to File button and the following screen will appear Select the file type for the saved image by selecting from the Format pull down list You can save the file to the default PaperPort folder so...

Страница 227: ...to Image To configure the Scan to Image feature left click on the Scan to Image button and the following screen will appear You have the ability to change the configuration which includes the destina...

Страница 228: ...click on the Scan Settings tab You can set the Color Mode to Black White 8 bit Gray or 24 bit Color The resolution can be changed from 100 to 1200 dpi You can define the size of the paper you re usin...

Страница 229: ...ED SMARTUI Scan to OCR To configure the Scan to OCR feature left click on the Scan to OCR button and the following screen will appear You have the ability to change the configuration which includes th...

Страница 230: ...You have the option to send your scan as a different file type You can select the application from the File Type window according to your needs You have the option to choose your OCR setting from Sin...

Страница 231: ...e most frequently used applications The Scan section contains four buttons for Scan to File Scan to E mail Scan to Word Processor and Scan to Image applications The Copy section contains four buttons...

Страница 232: ...Perfect or whichever word processing program is installed on your computer 4 Scan to Graphic Application Default MS Paint enables you to scan a page directly into any graphic viewer editor applicatio...

Страница 233: ...ly send the image as a fax from the PC using the PC FAX software Custom Scan to File These buttons have been pre programmed for the Scan to File feature You can change the configuration of each of the...

Страница 234: ...e and save it in a specific file type to any directory on your hard disk This allows you to easily archive your paper documents To configure the file type and save to directory right click on the Scan...

Страница 235: ...from the Format pull down list You can save the file to the default PaperPort folder so the file appears in PaperPort or you can select another folder directory by clicking the Browse button You can...

Страница 236: ...ion To change the default E mail application or attachment file type right click on the E mail button and select Configuration The Scan Action tab is set to E mail and should not be changed To change...

Страница 237: ...SED SMARTUI To change the file type of the attachment click the Link Preferences button to set up links Check the Convert attachment to specified file type box and then select the appropriate file typ...

Страница 238: ...t are PaperPort MAX files Combine items into single file if possible Click this check box if you want to combine all the attachments into one file With this box unchecked each scanned page will be sav...

Страница 239: ...USING THE WINDOWS BASED SMARTUI Scanner settings You have the ability to change the scanner settings used to create the file attachments Click on the Scan Settings tab and select the appropriate sett...

Страница 240: ...instead of Word and file type You can also choose another OCR software package besides the TextBridge OCR which is built into PaperPort To configure Scan to OCR right click on the WordPad button and s...

Страница 241: ...D SMARTUI To change the program link preferences click the Link Preferences button File Type From the pull down list select the file format you want to use for documents OCR Select the OCR application...

Страница 242: ...lication allows you to scan an image so you can edit the image To change the default graphics application right click on the button and select Configuration The Scan Action tab is set to Application a...

Страница 243: ...te application from the Application pull down list To change the other configuration options click the Link Preferences button This option enables you to reduce image to screen resolution 96dpi show a...

Страница 244: ...ult printer including non Imagistics s printers Before you can use the Copy buttons you must first configure the printer driver by right clicking on a Copy button and selecting Configuration In the Sc...

Страница 245: ...UI Select the number of Pages Per Sheet from the Scaling selections As an example to configure the section Copy button to copy two pages to one you must select 2 in 1 You must configure each of the co...

Страница 246: ...indows Application to send a Fax as simply as printing a document The SmartUI automatically configures the Fax button to use the PC FAX driver no user configuration is required The Scan Action tab is...

Страница 247: ...USING THE WINDOWS BASED SMARTUI FAX settings PC FAX To change the driver settings click on the Setup button Select the Paper Size Paper Source If you need more customized setup click on the Options b...

Страница 248: ...E WINDOWS BASED SMARTUI 15 29 Select the Paper Size Orientation Portrait or Landscape and Resolution 200x200 dpi or 200x100 dpi and click OK To return to the factory default settings click the Default...

Страница 249: ...lect the file format to be used OCR Scanned documents will be converted to editable text files If you have a third party OCR software package installed on your PC you can select it The default OCR sof...

Страница 250: ...Configuration Tab Depending upon which Scan Type button you selected you will see a different Configuration Tab list of settings Application Select the destination application program from the pull do...

Страница 251: ...Select the file format from the Format pull down list You can either send the file to the default PaperPort directory or select your own destination directory by selecting Other Folder Use the Browse...

Страница 252: ...on Link Preferences and select the destination Application from the scroll menu on the left Select the File Type from the File Type pull down list You can also choose another OCR application from the...

Страница 253: ...SMARTUI E mail Select the destination E mail application program from the pull down list Click on the Link Preferences button to configure the Send To E mail options You can select the File type and Q...

Страница 254: ...RTUI 15 35 3 Select Scan Settings You can select the scanner settings from each of the Scan Type options for the Custom buttons You have the option to select Color Mode Resolution Paper Size and Brigh...

Страница 255: ...to the machine begins The Remote Setup program is closed if an error message is displayed enter the correct data again and then click OK Cancel button The Cancel button clears your changes and exits...

Страница 256: ...the new data to the machine Then you can click the Print button to get an up to date printout Export button Click the Export button to save your current settings to a file Import button Click the Impo...

Страница 257: ...page note All you have to do is set up the receiving parties as Members or Groups in your PC FAX Address Book Then you can use the Address Book Search feature to quickly find them to address your fax...

Страница 258: ...then select PC FAX Setup The PC FAX Setup dialog box will appear 2 You must enter this information to create the Fax Header and Cover Page 3 Click OK to save the User Information You can access the Us...

Страница 259: ...ow The include header option sends an additional page of information along with fax or E mail data which contains user and subject information The user has the choice of two user interfaces Simple sty...

Страница 260: ...mple if you must dial 9 to get an outside line in your office Include header To add header information to the top of the fax pages you send check the Include header box Addressbook file You can select...

Страница 261: ...USING PC FAX SOFTWARE 17 5 User interface In the Sending tab select user interface You can choose the Simple Style or the Facsimile Style Simple style Facsimile style...

Страница 262: ...ace You can register a Member or Group on each of the ten Speed Dial buttons To register an address in a Speed Dial button 1 Click the Speed Dial button you want to program 2 Click the Member or Group...

Страница 263: ...USING PC FAX SOFTWARE 17 7 The Address Book From the Start menu select Programs Imagistics Multi Function Suite and then click PC FAX Address Book The Address Book dialog box will appear...

Страница 264: ...can add edit and delete stored information of Members and Groups 1 In the Address Book dialog box click the icon to add a Member The Address Book Member Setup dialog box will appear 2 In the Member Se...

Страница 265: ...s Book dialog box click the icon to create a Group The Group Setup dialog box appears 2 Type the name of the new Group in the Group Name field 3 In the Available Names box select each Member to be inc...

Страница 266: ...at will be attached to that Member s outgoing E mail A Vcard is an electronic business card that contains the sender s contact information To export the whole current Address book 1 From the Address B...

Страница 267: ...USING PC FAX SOFTWARE 17 11 4 Select OK to save the data 5 Type the name of the file and then select Save...

Страница 268: ...s Book select File point to Import and then click Text OR Click Vcard and go to Step 5 2 From the Available Items column select the data fields you want to Import and click Add 3 Select the Divide Cha...

Страница 269: ...Cover Page From the PC FAX dialog box click to access the PC Fax Cover Page setup screen See Sending a file as a PC FAX using the Facsimile style on page 17 15 The PC FAX Cover Page Setup dialog box...

Страница 270: ...a bitmap file such as your company logo in the cover page Use the browse button to select the BMP file and then select the alignment style Count Cover Page When the Count Cover Page box is checked th...

Страница 271: ...ng the Facsimile style 1 Create a file in Word Excel Paint Draw or any other application on your PC 2 From the File menu select Print The Print dialog box will appear 3 Select PC FAX as your printer a...

Страница 272: ...e Cover Page icon to enter or edit the Cover Page information 6 Click Start to send the fax Redial If you want to redial a number click Redial to scroll through the last five fax numbers and then clic...

Страница 273: ...ddress Book to select destination fax numbers by clicking the To button If you made a mistake entering a number click the Clear button to delete all the entries 5 To send a Cover Page and note click t...

Страница 274: ...hen click PC Fax RX Setup 2 The PC Fax RX Setup dialog box will appear 3 In Ring Delay select the number of rings before you want your PC to answer Incoming calls 4 In Save file to use the Browse butt...

Страница 275: ...een received the icon will remain red The red icon will change to green once the received fax has been received 1 Run PaperPort 2 Open the Fax Received folder 3 Double click any of the new faxes to op...

Страница 276: ...ix2700 Windows XP driver After the driver is installed refer to the following information to configure your Windows XP PC for Fax receiving 1 To activate Faxing receiving click Set up faxing in the P...

Страница 277: ...tions Fax Fax Console If you have not configured your fax connection the following screen will be displayed Enter your details ensuring you specify the outside line access number if necessary and clic...

Страница 278: ...k Next 6 Enter the sender information and then click Next 7 Select Imagistics ix2700 in the Please select the fax device pull down list Click to select the Enable Receive check box Specify the number...

Страница 279: ...8 Enter the Transmitting Subscriber Identification TSID and then click Next 9 Enter the Called Subscriber Identification CSID and then click Next 10 Select if you print a received fax or save it in a...

Страница 280: ...installation is now complete When PC FAX Receiving is active you cannot run the Remote Setup utility To use Remote Setup check off Enable Receive in Step 7 For information on how to use PC FAX Sending...

Страница 281: ...ax Console to open the Fax Console In the left pane expand the Fax folder if it is not already expanded The Fax folder contains the following folders The Incoming folder contains faxes that are curren...

Страница 282: ...please upgrade to Mac OS X 10 2 1 or greater Using your Machine with a Macintosh Before you can connect the machine to your Macintosh you must buy a USB cable that is not longer than 6 feet 1 8 metre...

Страница 283: ...he printer driver with your Apple Macintosh Mac OS 8 6 9 2 To select a Printer 1 Open the Chooser from the Apple menu 2 Click the Imagistics Laser icon On the right side of the Chooser window click th...

Страница 284: ...lect Page Setup You can change the settings for Paper Size Orientation and Scaling and then click OK 2 From application software such as Presto PageManager click File menu and select Print Click Print...

Страница 285: ...18 4 USING YOUR MACHINE WITH A MACINTOSH Device Options allows you to select Duplex...

Страница 286: ...pplication software such as TextEdit click the File menu and select Page Setup Make sure ix2700 is selected in the Format for pop up menu You can change the settings for Paper Size Orientation and Sca...

Страница 287: ...18 6 USING YOUR MACHINE WITH A MACINTOSH Specific settings Set the Media Type Resolution Toner Save and other settings Press Copies Pages to select settings you want to change Duplex...

Страница 288: ...USING YOUR MACHINE WITH A MACINTOSH 18 7 Printer settings...

Страница 289: ...Open the Applications Mac OS 9 folder Open the Utilities folder The screens are based on Mac OS 9 04 To use the PS driver on a Network see the NC 9100h Network User s Guide on CD ROM To use the PS dri...

Страница 290: ...USING YOUR MACHINE WITH A MACINTOSH 18 9 2 Open the Desktop Printer Utility icon 3 Select Printer USB and then click OK...

Страница 291: ...HINE WITH A MACINTOSH 4 Click Change in the PostScriptTM Printer Description PPD file Select Imagistics ix2700 and then click Select 5 Click Change in the USB Printer Selection Select Imagistics ix270...

Страница 292: ...USING YOUR MACHINE WITH A MACINTOSH 18 11 6 Click Create 7 Enter your machine name ix2700 and then click Save 8 Select Quit from the File menu 9 Click the ix2700 icon on the Desktop...

Страница 293: ...isted in Printer list you will need to delete it and then install the PS driver To use the PS driver with a USB cable you need to set the Emulation to BR Script3 Menu 4 1 before connecting the USB cab...

Страница 294: ...USING YOUR MACHINE WITH A MACINTOSH 18 13 2 Open the Utilities folder 3 Open the Print Center icon 4 Click Add Printer...

Страница 295: ...18 14 USING YOUR MACHINE WITH A MACINTOSH 5 Select USB 6 Select ix2700 and then click Add 7 Select Quit Printer Center from the Print Center menu...

Страница 296: ...he following 1 Create a document in a Macintosh application 2 To send a fax select Print from the File menu The Printer dialog box will appear When Printer is selected the top button shows Print and t...

Страница 297: ...ox shows the Destination Fax Numbers as you select them 5 To address the fax type a fax number in the Input Fax Number box 6 When you are finished addressing your fax click Send Fax Click OK to go to...

Страница 298: ...users You can send a fax directly from a Macintosh application by doing the following 1 Create a document in a Macintosh application 2 To send a fax select Print from the File menu The Printer dialog...

Страница 299: ...e Output pull down menu 5 To address the fax type a fax number in the Input Fax Numbers box and the click Print If you want to send a fax to more than one number click Add after entering the first fax...

Страница 300: ...c OS X Address Book application 1 Click Address Book button 2 Drag a vCard from the Mac OS X Address Book application to the Destination Fax Numbers filed When you are finished addressing your fax cli...

Страница 301: ...red Fax Numbers pull down list only the fax number stored in the Mac OS X Address Book for the selected category will be used If the fax number is stored in only one of the Mac OS X Address Book categ...

Страница 302: ...time you use the Imagistics TWAIN driver set it as the default by choosing Select Source or the other menu name to select the device Afterwards for each document you scan choose Acquire Image or Scan...

Страница 303: ...nning the document Scanning a whole page 1 Place the original face up in the ADF or face down on the scanner glass 2 Adjust the following settings if needed in the Scanner Setup dialog box Resolution...

Страница 304: ...original face up in the ADF or face down on the scanner glass 2 Click PreScan The whole image will be scanned into your Macintosh and will appear in the Scanning Area of the Scanner dialog box 3 To sc...

Страница 305: ...HINE WITH A MACINTOSH Settings in the Scanner window Image Resolution From the Resolution pop up menu choose the scanning resolution Higher resolutions use more memory and transfer time but produce a...

Страница 306: ...ack dots instead of the true gray dots in a specific matrix instead of true gray dots True Gray is used for documents with photographic images or graphics This mode is more exact because it uses up to...

Страница 307: ...adjust the scanning area Click and hold the mouse button as you drag the mouse to crop the image Width Enter the width of the custom size Height Enter the height of the custom size Business Card Size...

Страница 308: ...age is too light set a lower Brightness level and scan the image again If the image is too dark set a higher Brightness level and scan the image again Contrast You can only adjust the Contrast level w...

Страница 309: ...e OK This starts the process of uploading the data to the machine and exiting the remote setup program If an error message is displayed enter the correct data again Click OK Cancel This exits the remo...

Страница 310: ...USING YOUR MACHINE WITH A MACINTOSH 18 29 Export This command saves the current configuration settings to a file Import This command reads the settings from a file...

Страница 311: ...Guide on the CD ROM Registering your PC with the machine If you need to change the machine that was registered to your PC during the installation of Multi Function Suite see Quick Setup Guide on page...

Страница 312: ...dialog box 2 Click the Network Setting tab in the dialog box and select a method to specify the machine as a Network scanner for your PC Specify your machine by address Enter the actual IP address of...

Страница 313: ...me in the Display Name field The machine s LCD displays the Name you enter Default setting is your PC Name You can enter a name if you like 4 You can avoid receiving unwanted documents by setting a 4...

Страница 314: ...rdware Section Changing the Scan to button configuration on page 15 5 to 15 9 1 Place the original face up in the ADF or face down on the scanner glass 2 Press Scan 3 Press or to select Scan to E mail...

Страница 315: ...f there isn t other selection go to Step 5 5 Press or to select Change Quality Press Enter 6 Press or to select Color 150 dpi Color 300 dpi Color 600 dpi B W 200 dpi or B W 200 100 dpi Press Enter If...

Страница 316: ...button configuration on page 15 5 to 15 10 1 Place the original face up in the ADF or face down on the scanner glass 2 Press Scan 3 Press or to select Scan to Image Press Enter 4 Press or to select a...

Страница 317: ...ndows XP See Hardware Section Changing the Scan to button configuration on page 15 5 to 15 11 1 Place the original face up in the ADF or face down on the scanner glass 2 Press Scan 3 Press or to selec...

Страница 318: ...lace the original face up in the ADF or face down on the scanner glass 2 Press Scan 3 Press or to select Scan to File Press Enter 4 Press or to select a destination you want to send Press Enter If the...

Страница 319: ...through PC FAX Setup Sending tab Sending setup In order to use the full functionality of Network PC FAX it is strongly recommended that you enable the Network PC FAX Setup option on the Sending tab P...

Страница 320: ...C FAX SOFTWARE 2 Check Enable box This software can be used in a network environment and with a locally connected machine It is important that when used in a network environment the Network PC Fax is...

Страница 321: ...ember s information Name is required field You can also enter an E mail contact address and machine address for the address book member 3 To send to this contact it is necessary to specify which is th...

Страница 322: ...hen select Network Print Software Follow the screen prompts you will prompted for the IP address of the NC 9100h If in any doubt contact your Network Administrator To check select Start Settings and P...

Страница 323: ...ch a cover page note All you have to do is set up the receiving parties as Members or Groups in your PC FAX Address Book or simply enter the destination address or fax number into the User Interface Y...

Страница 324: ...as the chosen destination for that member 4 To send a Network Fax simply select a member from the address book or enter the fax number into the User Interface with the PC keyboard The member must hav...

Страница 325: ...pment to the premises wiring and telephone network must comply with the applicable FCC Part 68 rules and requirements adopted by the ACTA A compliant telephone cord and modular plug is provided with t...

Страница 326: ...ne network the telephone company may request that you disconnect the equipment until the problem is resolved Connection to party line service is subject to state tariffs Contact the state public utili...

Страница 327: ...s are designed to provide reasonable protection against harmful interference in a residential installation This equipment generates uses and can radiate radio frequency energy and if not installed and...

Страница 328: ...est conforme la norme NMB 003 du Canada International ENERGY STAR Compliance Statement The purpose of the International ENERGY STAR Program is to promote the development and popularization of energy e...

Страница 329: ...with the FDA regulations and must be attached to laser products marketed in the United States WARNING Use of controls adjustments or performance of procedures other than those specified in this manua...

Страница 330: ...ation is provided 8 This product should be operated from the type of power source indicated on the label If you are not sure of the type of power available call your dealer or local power company Use...

Страница 331: ...to rain or water If the product does not operate normally when the operating instructions are followed Adjust only those controls that are covered by the operating instructions Improper adjustment of...

Страница 332: ...and iBook are trademarks or registered trademarks of Apple Computer Inc Postscript and Postscript Level 3 are registered trademarks or trademarks of Adobe Systems Incorporated PaperPort and TextBridg...

Страница 333: ...l you have a print quality problem then replace the drum unit with a new one The drum counter was not reset 1 Open the front cover and then press Clear Back 2 Press 1 to reset Check Original The origi...

Страница 334: ...the drum unit Disconnected The other party or other party s fax machine terminated the call Try to transmit or receive again DX Lever Error The paper adjustment lever for duplex printing is not corre...

Страница 335: ...the memory See Out of Memory message on page 10 5 OR Add an optional memory See Memory board on page 23 1 Please Wait Wait For A While The temperature of the drum unit or toner cartridge is too hot Th...

Страница 336: ...annot reset itself and return to the date and time prompt it will display Machine Error XX Please call the Imagistics National Diagnostic Center In USA 1 800 243 5556 No DX Tray You tried to make dupl...

Страница 337: ...ADF unit 1 Take out any paper from the ADF that is not jammed 2 Lift the document cover 3 Pull the jammed original out to the right 4 Close the document cover 5 Press Stop OR 1 Take the ADF support ou...

Страница 338: ...lows If the jammed paper is removed completely by using the information in the following steps you can install the paper tray first and then close the front cover and the machine will resume printing...

Страница 339: ...up and out of the machine 3 Press the cover release button and then open the front cover 4 Pull out the drum unit assembly Pull the jammed paper up and out of the machine If you cannot remove the dru...

Страница 340: ...he following diagram 5 Open the back output tray Pull the jammed paper out of the fuser unit If the paper jam can be cleared go to Step 7 If you have to pull the paper toward the back of the machine t...

Страница 341: ...parts of the machine are extremely HOT Wait for the machine to cool down before you touch the internal parts of the machine 6 Open the jam clear cover fuser cover Pull the jammed paper out of the fuse...

Страница 342: ...the lock lever down and take the toner cartridge out of the drum unit assembly Take out the jammed paper if there is any inside the drum unit 9 Put the drum unit assembly back in the machine 10 Put th...

Страница 343: ...ROUTINE MAINTENANCE 22 11 Paper is jammed in the duplex tray 1 Pull the duplex tray and paper tray out of the machine 2 Pull the jammed paper out of the machine 3 Put the duplex tray and paper tray ba...

Страница 344: ...r from the Face Down Output Tray after only one side has printed If the Paper Adjustment Lever for Duplex Printing is not set correctly for the paper size paper jams may occur and the printing will be...

Страница 345: ...nal blank page your Paper Size setting may not be correct for the paper you are using See Type and size of paper on page 2 1 Make sure that auto reduction function setting is turned on See Printing a...

Страница 346: ...does not print Check the following The machine is plugged in and the power switch turned On See the Quick Setup Guide on page 7 The toner cartridge and drum unit are installed properly See Replacing t...

Страница 347: ...directional machine i e Parallel Port Mode ECP MFC is Busy Error Message appears MFC Connect Failure If the machine is not connected to your PC and you have loaded the software the PC will show Machi...

Страница 348: ...ting the Paper Type on page 4 5 and Media Type on page 12 4 Printouts are too light Set Toner Save mode to off in the Advance tab in the printer driver See Toner Save Mode on page 12 6 Network Difficu...

Страница 349: ...page 22 33 Ghost Make sure you use paper that meetsour specifications Rough surfaced paper or thick print media may cause this problem Make sure that you choose the appropriate media type in the prin...

Страница 350: ...t gear by hand while looking at the surface of the OPC drum Do not touch the photosensitive drum with your fingers 3 When you have located the mark on the drum that matches the print sample wipe the s...

Страница 351: ...ion The drum unit may be damaged Install a new drum unit See Replacing the drum unit on page 22 33 The toner cartridge may be damaged Put in a new toner cartridge See Replacing the toner cartridge on...

Страница 352: ...r on page 2 1 Try printing using the straight through output path See How to load paper on page 2 5 Turn over the stack of paper in the tray or try rotating the paper 180 in the input tray The drum un...

Страница 353: ...warranty 1 Turn the machine power switch off 2 Unplug the machine from the telephone wall jack 3 Unplug the machine from the AC outlet Lock the Scanner Lock 4 Push the Scanner Lock Lever down to lock...

Страница 354: ...e installed in the drum unit 7 Place the drum unit and toner cartridge assembly into the plastic bag and seal the bag 8 Close the front cover Fold down the face down output tray flap Remove the teleph...

Страница 355: ...TING AND ROUTINE MAINTENANCE 22 23 10 Pack the drum unit and toner cartridge assembly telephone line cord AC cord and printed materials in the original carton as shown below 11 Close the carton and ta...

Страница 356: ...itch off and lift the document cover Clean the scanner glass and glass strip with dry cloth and the white film with isopropyl alcohol on a lint free cloth If the screen stilldisplays a scanner error c...

Страница 357: ...tters and your hands or clothes get dirty immediately wipe or wash it off with cold water 1 Turn the machine power switch off and open the front cover 2 Remove the drum unit and toner cartridge assemb...

Страница 358: ...the drum unit by gently sliding the blue tab from right to left several times 2 Return the blue tab and snap it into the Home position Caution If the blue tab is not at Home position printed pages ma...

Страница 359: ...ocal regulations keeping it separate from domestic waste Be sure to seal the toner cartridge tightly so toner powder does not spill out of the cartridge If you have questions call your local waste dis...

Страница 360: ...will be extremely HOT So never touch the shaded parts shown in the illustration 1 Open the front cover and pull out the drum unit Caution Place the drum unit on a drop cloth or large piece of disposa...

Страница 361: ...29 2 Hold down the lock lever on the right and pull the toner cartridge out of the drum unit Caution Handle the toner cartridge carefully If toner scatters on your hands or clothes immediately wipe it...

Страница 362: ...end that you continue to use only Genuine Imagistics replacement toner cartridges 484 5 Using or attempting to use potentially incompatible toner and or toner cartridges in your machine may cause dama...

Страница 363: ...place If you put it in properly the lock lever will lift automatically 7 Clean the primary corona wire inside the drum unit by gently sliding the blue tab from right to left several times Return the b...

Страница 364: ...22 32 TROUBLESHOOTING AND ROUTINE MAINTENANCE 8 Reinstall the drum unit and toner cartridge assembly and close the front cover...

Страница 365: ...the drum unit See Cleaning the drum unit on page 22 26 Caution When removing the drum unit handle it carefully because it contains toner If toner scatters and your hands or clothes get dirty immediate...

Страница 366: ...Press the cover release button and then open the front cover 2 Remove the old drum unit and toner cartridge assembly Place it on a drop cloth or disposable paper to avoid scattering toner Caution To p...

Страница 367: ...um unit See Replacing the toner cartridge on page 22 27 6 Reinstall the new drum unit keeping the front cover open 7 Press Clear Back 8 Press 1 and when the LCD shows Accepted and close the front cove...

Страница 368: ...s that your machine has printed 1 Press Menu 2 Press Start 3 The LCD shows number of pages for Total Copy Print and List Fax 4 Press Stop OR 1 Press Menu 2 0 2 2 The LCD shows number of pages for Tota...

Страница 369: ...printer operations Optional accessories Optional Memory 32MB TECHWORKS 12457 0001 64MB TECHWORKS 12458 0001 128MB TECHWORKS 12459 0001 In general the DIMM must have the following specifications Type...

Страница 370: ...e there are no faxes in the memory 1 Disconnect the telephone line cord turn the machine power switch off unplug the machine power cord from the AC outlet and then disconnect the interface cable WARNI...

Страница 371: ...on each side of the DIMM slot are open or facing outwards 5 Press the DIMM straight into the slot press firmly Make sure the locks on each side of the DIMM click into place To remove a DIMM you must r...

Страница 372: ...AN Board you can connect your machine into the network to use the Internet FAX Network Scanner Network Printer and Network Management operations WARNING DO NOT touch the surface of the main board with...

Страница 373: ...ounding mat if possible If you do not have an anti static wrist strap touch the bare metal surface on the back of the machine before handling the Network board Avoid moving around the work area in ord...

Страница 374: ...n the machine power switch off before installing or removing the Network board 2 Remove the side cover Loosen the two screws and then remove the metal shield plate 3 Loosen the two screws and then rem...

Страница 375: ...e two screws 5 Put the metal shield plate back on and secure it with the two screws 6 Put the side cover back on 7 Reconnect the telephone line cord 8 Reconnect any additional interface cables that yo...

Страница 376: ...tor an RJ45 Connector of the Network board Verifying successful hardware Installation Plug in the AC power cord After initialization and warm up this may take several seconds the machine will come to...

Страница 377: ...he Lower Tray accessory 6429779 to use as a third paper source Lower Tray holds up to 250 sheets of 20 lb 80 g m2 paper If there is a valid connection to the network the LED will blink orange or green...

Страница 378: ...per The sound the keys make when they are pressed an error occurs or a fax has been received or sent Beeper volume Volume setting for the beep when you press a key or make an error Broadcasting The ab...

Страница 379: ...d fax number number of pages and comment You can generate an electronic cover sheet at the other end with pre programmed information from memory or you can print a sample cover sheet to fax with your...

Страница 380: ...ive faxes and telephone calls Do not use this mode if you are using a telephone answering device TAM Fax tones The signals sent by sending and receiving fax machines while communicating information Fi...

Страница 381: ...t TextBridge software application converts an image of text to text you can edit One Touch Keys on the machine control panel where you can store numbers for easy dialing You can store a second number...

Страница 382: ...g of stored One Touch Speed Dial and Group numbers Speed Dial A preprogrammed number for easy dialing You must press the Search Speed Dialkey and then and the three digit code to start the dialing pro...

Страница 383: ...stems If you install the True Type fonts more types of fonts will be available for Windows applications Unique Ring A subscriber service purchased from the telephone company that provides another phon...

Страница 384: ...heets 20 lb Multi Purpose Tray 50 Sheets 20 lb Printer Type Laser Print Method Electrophotography by semiconductor laser beam scanning LCD Liquid Crystal Display 22 characters 5 lines Warm up Max 18 s...

Страница 385: ...er specifications for each paper tray on page 2 4 Maximum paper tray capacity Approx 250 sheets of 20 lb 80 g m2 plain paper Maximum multi purpose tray capacity Approx 50 sheets of 20 lb 80 g m2 plain...

Страница 386: ...trol Automatic Light Dark manual setting Resolution Horizontal 203 dot inch 8 dot mm Vertical Standard 98 line inch 3 85 line mm Fine Photo 196 line inch 7 7 line mm Superfine 392 line inch 15 4 line...

Страница 387: ...l Maximum 1200 x 1200 dpi scanning with Windows XP resolution up to 9600 x 9600 dpi can be selected by using the scanner utility Document Size ADF Width 5 8 to 8 5 148 mm to 216 mm ADF Height 5 8 to 1...

Страница 388: ...ting mode Economy printing mode saves toner usage Print Speed Up to 17 pages minute letter size when loading paper from paper tray Duplex Printing Up to 8 5 pages minute 8 5 sides per minute 4 25 shee...

Страница 389: ...sional Pentium 133MHz 64 MB 128 MB XP Pentium 233MHz 180 MB Apple Macintosh Operating System OS 8 6 9 2 Printing Scanning and PC FAX Send Only All base models meet minimum Requirements 32 MB 64 MB 50...

Страница 390: ...14 11 connecting external TAD 1 15 external TAM 1 15 external telephone 1 14 control panel overview 1 6 copy contrast 10 16 default settings changing 10 16 Duplex N in 1 10 11 Enlarge Reduce 10 7 ente...

Страница 391: ...10 5 extension telephone using 5 7 external telephone 1 14 F fax codes Fax Receive Code 5 7 Telephone Answer Code 5 7 Fax Forwarding changing remotely 8 4 8 5 programming a number 8 1 Fax Storage prin...

Страница 392: ...t 4 12 M maintenance routine 22 24 manual receive 5 1 transmission 6 4 Memory Security 6 22 6 23 Memory Storage 3 1 multi line connections PBX 1 20 O OCR changing setting 15 11 One Touch numbers stori...

Страница 393: ...5 1 Redial Pause 6 8 reducing copies 10 7 long faxes 5 5 Remote Retrieval 8 2 commands 8 4 getting your faxes 8 5 Reports 9 1 resolution fax standard Fine Ex Fine Photo S 3 print S 5 Scan 13 6 S 4 set...

Страница 394: ...idge replacing 22 27 22 28 tray use setting copy 4 10 fax 4 11 troubleshooting 22 1 error messages on LCD 22 1 if you are having difficulty incoming calls 22 14 paper handling 22 15 phone line difficu...

Страница 395: ...te Access Code 1 Dial your fax number from a telephone or fax machine using touch tone When your machine answers immediately enter your Remote Access Code 3 digits followed by Your machine signals the...

Страница 396: ...beep hang up and wait Erase all fax messages press 3 Changing R R Passcode 1 Press or to select Remote Retrieve and then press Enter 2 3 Enter a three digit number from 000 to 999 The cannot be change...

Страница 397: ...fications NOTICE The Ringer Equivalence Number is an indication of the maximum number of devices allowed to be connected to a telephone interface The termination on an interface may consist of any com...

Страница 398: ...2003 09 01 03 FX30093...

Отзывы: