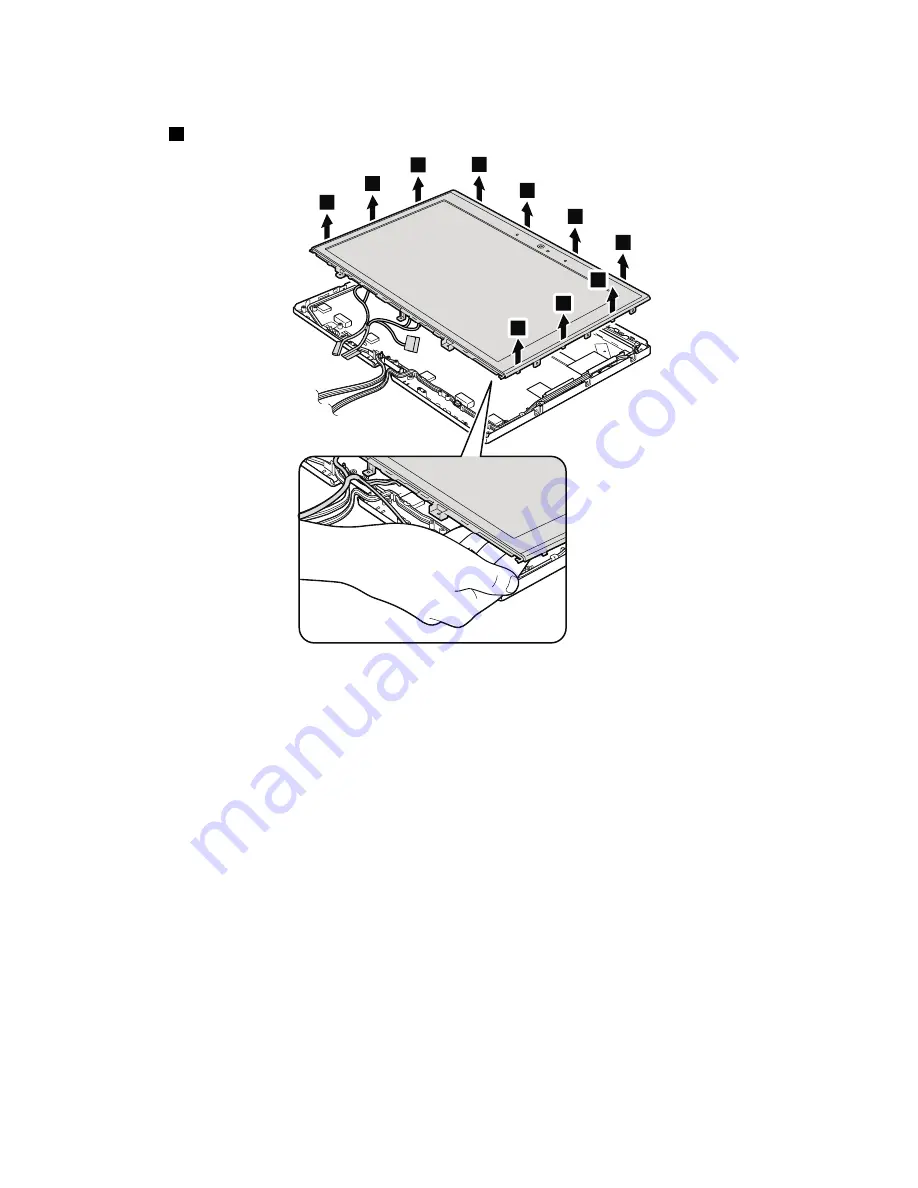
Table 28. Removal steps of LCD panel and LCD cable (continued)
In step
3
, detach the claws. Then remove the LCD panel.
3
3
3
3
3
3
3
3
3
3
When installing:
• Make sure that all the claws are attached firmly.
• When attaching the LCD panel to the cover, gently press the left and right edges covered with metal. Do not
press the surface of the panel or apply any excessive force to the panel.
Chapter 8
.
Removing and replacing a FRU
101
Содержание ThinkPad X220
Страница 1: ...ThinkPad X220 Tablet and X220i Tablet Hardware Maintenance Manual ...
Страница 6: ...iv ThinkPad X220 Tablet and X220i Tablet Hardware Maintenance Manual ...
Страница 18: ...12 ThinkPad X220 Tablet and X220i Tablet Hardware Maintenance Manual ...
Страница 19: ...Chapter 1 Safety information 13 ...
Страница 23: ...Chapter 1 Safety information 17 ...
Страница 24: ...18 ThinkPad X220 Tablet and X220i Tablet Hardware Maintenance Manual ...
Страница 25: ...Chapter 1 Safety information 19 ...
Страница 26: ...20 ThinkPad X220 Tablet and X220i Tablet Hardware Maintenance Manual ...
Страница 27: ...Chapter 1 Safety information 21 ...
Страница 28: ...22 ThinkPad X220 Tablet and X220i Tablet Hardware Maintenance Manual ...
Страница 42: ...36 ThinkPad X220 Tablet and X220i Tablet Hardware Maintenance Manual ...
Страница 64: ...58 ThinkPad X220 Tablet and X220i Tablet Hardware Maintenance Manual ...
Страница 77: ...Table 15 Removal steps of palm rest continued 2 3 4 4 5 5 5 Chapter 8 Removing and replacing a FRU 71 ...
Страница 79: ...Table 16 Removal steps of backup battery Chapter 8 Removing and replacing a FRU 73 ...
Страница 112: ...106 ThinkPad X220 Tablet and X220i Tablet Hardware Maintenance Manual ...
Страница 118: ...112 ThinkPad X220 Tablet and X220i Tablet Hardware Maintenance Manual ...
Страница 144: ...138 ThinkPad X220 Tablet and X220i Tablet Hardware Maintenance Manual ...
Страница 145: ......
Страница 146: ...Part Number 0A60175_01 Printed in China 1P P N 0A60175_01 0A60175_01 ...


