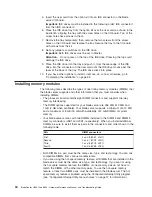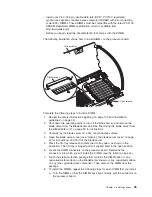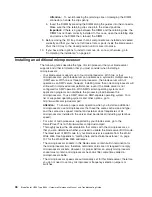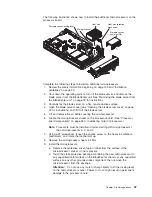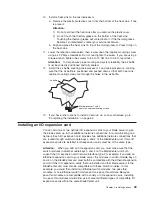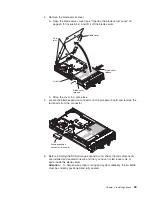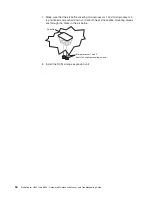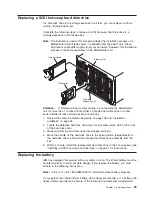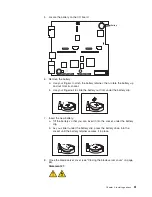
Attention:
To
avoid
breaking
the
retaining
clips
or
damaging
the
DIMM
connectors,
handle
the
clips
gently.
b.
Insert
the
DIMM
by
pressing
the
DIMM
along
the
guides
into
the
connector.
Make
sure
that
the
retaining
clips
snap
into
the
closed
positions.
Important:
If
there
is
a
gap
between
the
DIMM
and
the
retaining
clips,
the
DIMM
has
not
been
correctly
installed.
In
this
case,
open
the
retaining
clips
and
remove
the
DIMM;
then,
reinsert
the
DIMM.
9.
Before
closing
the
I/O
tray,
check
that
all
components
are
installed
and
seated
correctly
and
that
you
have
not
left
loose
tools
or
parts
inside
the
blade
server.
Pivot
the
I/O
tray
to
the
closed
position
until
it
clicks
into
place.
10.
If
you
have
other
options
to
install
or
remove,
do
so
now;
otherwise,
go
to
“Completing
the
installation”
on
page
62.
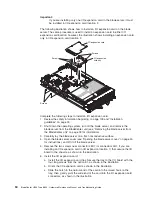
Installing
an
additional
microprocessor
The
following
notes
describe
the
type
of
microprocessor
that
your
blade
server
supports
and
other
information
that
you
must
consider
when
installing
a
microprocessor:
v
Your
blade
server
supports
up
to
four
microprocessors.
With
two
or
four
microprocessors,
your
blade
server
can
operate
as
a
symmetric
multiprocessing
(SMP)
server.
With
one
or
three
microprocessors,
the
blade
server
will
not
operate
as
an
SMP
server;
however,
installing
more
than
one
microprocessor
will
still
result
in
improved
server
performance,
even
if
the
blade
server
is
not
configured
for
SMP
operation.
With
SMP,
certain
operating
systems
and
application
programs
can
distribute
the
processing
load
between
the
microprocessors.
To
use
SMP,
obtain
an
SMP-capable
operating
system.
For
a
list
of
supported
operating
systems
and
other
options,
go
to
http://www.ibm.com/pc/us/compat/.
Attention:
To
ensure
proper
server
operation
when
you
install
an
additional
microprocessor,
use
microprocessors
that
have
the
same
cache
size
and
type,
and
the
same
clock
speed.
Internal
and
external
clock
frequencies
of
all
microprocessors
installed
in
the
server
must
be
identical
(including
system
bus
speed).
v
For
a
list
of
microprocessors
supported
by
your
blade
server,
go
to
the
ServerProven
®
list
at
http://www.ibm.com/pc/us/compat/.
v
Thoroughly
review
the
documentation
that
comes
with
the
microprocessor,
so
that
you
can
determine
whether
you
need
to
update
the
blade
server
BIOS
code.
The
latest
level
of
BIOS
code
for
your
blade
server
is
available
from
the
World
Wide
Web.
See
Appendix
A,
“Getting
help
and
technical
assistance,”
on
page
107
for
the
World
Wide
Web
addresses.
v
The
microprocessor
sockets
in
this
blade
server
contain
built-in
termination
for
the
microprocessor
bus;
therefore,
terminator
cards
are
not
required
for
empty
microprocessor
sockets.
However,
for
proper
airflow,
an
empty
microprocessor
socket
must
contain
a
microprocessor
heat-sink
filler,
sometimes
called
a
microprocessor
baffle.
v
The
microprocessor
speeds
are
automatically
set
for
this
blade
server;
therefore,
you
do
not
need
to
set
any
microprocessor
frequency-selection
jumpers
or
switches.
46
BladeCenter
HS40
Type
8839:
Hardware
Maintenance
Manual
and
Troubleshooting
Guide
Содержание HS40 - BladeCenter - 8839
Страница 1: ...BladeCenter HS40 Type 8839 Hardware Maintenance Manual and Troubleshooting Guide ERserver...
Страница 2: ......
Страница 3: ...BladeCenter HS40 Type 8839 Hardware Maintenance Manual and Troubleshooting Guide ERserver...
Страница 6: ...iv BladeCenter HS40 Type 8839 Hardware Maintenance Manual and Troubleshooting Guide...
Страница 10: ...viii BladeCenter HS40 Type 8839 Hardware Maintenance Manual and Troubleshooting Guide...
Страница 20: ...10 BladeCenter HS40 Type 8839 Hardware Maintenance Manual and Troubleshooting Guide...
Страница 30: ...20 BladeCenter HS40 Type 8839 Hardware Maintenance Manual and Troubleshooting Guide...
Страница 42: ...32 BladeCenter HS40 Type 8839 Hardware Maintenance Manual and Troubleshooting Guide...
Страница 86: ...76 BladeCenter HS40 Type 8839 Hardware Maintenance Manual and Troubleshooting Guide...
Страница 114: ...104 BladeCenter HS40 Type 8839 Hardware Maintenance Manual and Troubleshooting Guide...
Страница 131: ...Appendix B Safety information 121...
Страница 132: ...122 BladeCenter HS40 Type 8839 Hardware Maintenance Manual and Troubleshooting Guide...
Страница 133: ...Appendix B Safety information 123...
Страница 134: ...124 BladeCenter HS40 Type 8839 Hardware Maintenance Manual and Troubleshooting Guide...
Страница 135: ...Appendix B Safety information 125...
Страница 136: ...126 BladeCenter HS40 Type 8839 Hardware Maintenance Manual and Troubleshooting Guide...
Страница 137: ...Appendix B Safety information 127...
Страница 149: ...Appendix B Safety information 139...
Страница 150: ...140 BladeCenter HS40 Type 8839 Hardware Maintenance Manual and Troubleshooting Guide...
Страница 151: ...Appendix B Safety information 141...
Страница 152: ...142 BladeCenter HS40 Type 8839 Hardware Maintenance Manual and Troubleshooting Guide...
Страница 153: ...Appendix B Safety information 143...
Страница 154: ...144 BladeCenter HS40 Type 8839 Hardware Maintenance Manual and Troubleshooting Guide...
Страница 166: ...156 BladeCenter HS40 Type 8839 Hardware Maintenance Manual and Troubleshooting Guide...
Страница 171: ......
Страница 172: ...Part Number 25K8105 Printed in USA 1P P N 25K8105...


