background image


                                                                                                                                              Page 24

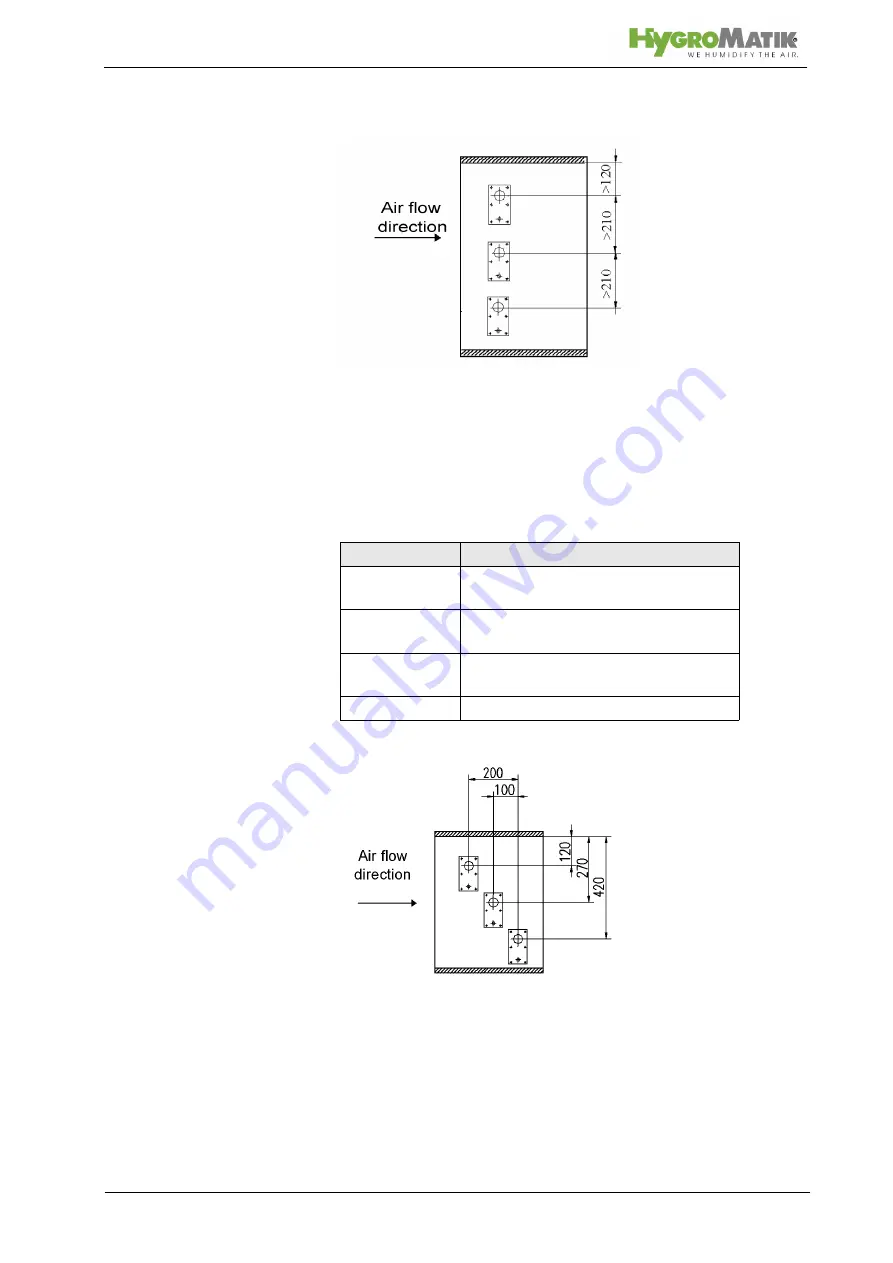
Position the steam manifold to ensure uniform steam 
distribution in the air duct.

Install the steam manifold horizontal with it ensure a 
clean steam out.  

By tilting the steam manifold 30 - 45° towards the air 
flow direction, the minimum upper clearance can be 
reduced to 70 mm.

Air Duct

Note on Installation

low

Different lengths in the air flow direc-
tion side by side

narrow, high

Identical lengths one on top of the
other. Staggered laterally if possible.

square

Identical lengths, staggered vertically
and laterally

low, very wide Facing each other.

Содержание DemiLine 12

Страница 1: ...DemiLine Electric Heater Steam Humidifier For Fully Demineralized Water Manual...

Страница 2: ...servicing of the electrical components of this unit to be performed by qualified electricians only Disconnect power supply before installation and servicing Copyright HYGROMATIK Lufttechnischer Appara...

Страница 3: ...tting 13 5 Installation 14 5 1 Steam Humidifier Operating Environment 14 5 1 1 Fitting measures 15 5 1 2 Equipment Dimensions DemiLine 16 5 2 Fan Unit option 17 5 3 Absorption Distance BN 19 5 3 1 Det...

Страница 4: ...der 45 9 4 Replacing Heater Elements 48 9 5 Replacing Thermo Sensor for Heater Element 49 9 6 Unlocking of a Released Thermo Sensor for heater element 50 9 7 Unlocking of a Released Thermo Sensor for...

Страница 5: ...Hotline Fax 49 0 4193 895 33 e mail hot1 HygroMatik de For all technical questions or spare parts orders please be pre pared to provide unit type and serial number see name plate on the unit 1 1 Typog...

Страница 6: ...steam with a tem perature of 100 C The steam may not be inhaled directly Only qualified and authorised personnel may operate the unit Persons transporting or working on the unit must have read and un...

Страница 7: ...c trostatic discharges In order to safeguard these components during installation and servicing steps must be taken to protect against ESD Reminder Materials and consumables must be handled and or dis...

Страница 8: ...ponents from power supply prior to work In case of a malfunction in the electrical power supply switch off the unit immediately Use only original fuses with the appropriate amperage rating Regularly c...

Страница 9: ...n the name plate match what is in the purchasing and delivery documents equipment is complete and in perfect condition Note In case of damage during shipment and or missing parts immediately file a wr...

Страница 10: ...includes Unit of the selected HyLine type including selected con trol Water installation hose Manuals for the steam humidifier and the control Ordered accessories steam manifold steam hose condensate...

Страница 11: ...y germ free 4 2 Installation and Method of Operation When the hygrostat or controller signals a demand for humidifi cation the inlet solenoid valve 14 opens The solenoid valve is designed for pressure...

Страница 12: ...done easily The heater elements are equipped with a mechanical high tem perature safety This mechanism provides a redundant safety system in the event of excessively low water levels Dry Run Although...

Страница 13: ...The steam generator is connected to the fan unit with steam and condensate hoses Steam lines in steam bath cabins employ special steam hoses and piping if required Accumulated condensate is normally...

Страница 14: ...elative humidity must not exceed 80 RH The minimum clearances indicated in the diagram below must be observed these are necessary to ensure adequate ventilation for the housing The steam humidifier sh...

Страница 15: ...Page 15 5 1 1 Fitting measures Clearances Note When choosing the site for the steam humidifier consider the location of existing water installations feed and drain lines...

Страница 16: ...Page 16 5 1 2 Equipment Dimensions DemiLine DemiLine a 707 b 519 c 327 d 482 e 650 f 30 g 250 h 60 i 50 j 175 k 158 l m 256 n 111 o p 42 q 18...

Страница 17: ...a wall The fan unit is installed above the steam humidifier When using multiple fan units do not exceed a maxi mum distance of 5 m from the steam humidifier Observe the clearances specified in the di...

Страница 18: ...7 VG30 Quantity of Steam kg h 8 17 30 Steam Inlet mm 25 25 40 Condensate Outlet mm 12 12 12 Airflow Capacity cbm h 185 185 350 Nominal Output W 35 35 67 Nominal voltage V 230 230 230 Dimensions W mm 4...

Страница 19: ...ated as a multiplier of the absorption distance BN The absorption distance has no fixed value but depends on many factors These are depicted in the absorption distance nomogram below 5 3 1 Determining...

Страница 20: ...e of the parameters enumerated above into the respective quadrants The resulting point of intersection indicates the value of the desired absorption distance BN Notes x1 ______________________________...

Страница 21: ...Page 21 5 3 2 Absorption Distance Nomogram Source Henne Erich Luftbefeuchtung Air Humidification 3rd Edition 1984 Page 101 Olden bourg Industrieverlag Munich...

Страница 22: ...not install the steam manifold near a temperature sensor or inaccurate readings may result The number and size of appropriate steam manifolds as well the nominal width of their respective steam and c...

Страница 23: ...air pressure is 500 Pa With high pressure air conditioning systems the unit s drain or supply hose must be lengthened depending on the overall pres sure When this is the case please consult HygroMatik...

Страница 24: ...steam manifold 30 45 towards the air flow direction the minimum upper clearance can be reduced to 70 mm Air Duct Note on Installation low Different lengths in the air flow direc tion side by side nar...

Страница 25: ...installation conditions are exceptional carefully evalu ate the state of the air Above all assess the danger of condensation in the duct We note that the German Association of Engineers VDI Guideline...

Страница 26: ...on two steam manifolds the T pieces for the steam and condensate hose should be installed near the manifolds If the installation is carried out in this way only one steam hose is necessary for the mai...

Страница 27: ...k flange plates may be used to neatly complete instal lation of the steam humidifier in the air duct Two piece flange plates are available for the DN25 and DN40 steam manifolds flange plate DN25 E 260...

Страница 28: ...Page 28 5 7 Drill Pattern 5 7 1 Drill Pattern DN25 not to scale Note Due to variable print media the dimensions are not to scale...

Страница 29: ...Page 29 5 7 2 Drill Pattern DN40 not to scale Note Due to variable print media the dimensions are not to scale...

Страница 30: ...operat ing noises can be reduced in this manner If the steam manifold is positioned lower than 500 mm above the steam humidifier The condensate must be drained separately To prevent steam loss lay a...

Страница 31: ...above the steam humidifier Lay steam hose at a height of at least 400 mm above unit and then connect to the steam manifold with a con stant fall Lay condensate hose with a loop of 200 mm diameter vap...

Страница 32: ...The best position is just above the steam humidifier Installation of Steam Solenoid Valve 5 11 Unit Installation Check Attention This unit may only be operated by qualified and prop erly trained perso...

Страница 33: ...tion water health risks and or impaired unit operation cannot be ruled out Use of additives is not advised unless specif ically recommended by the unit manufacturer When employing demineralized water...

Страница 34: ...backflow preven ter are not provided by HygroMatik Install as follows Check whether the valve strainer has been inserted in the solenoid valve Screw cap nut Q onto the supply connection Tighten by ha...

Страница 35: ...he height is less than 1 m insert a feed pump or install the humidifier lower if possible 6 3 Water Treatment For water treatment system specifications use the following table The figures below assume...

Страница 36: ...the water drain system as follows Run 150 300 mm length of 1 1 4 drain hose loosely into a drainpipe with a minimum inner diameter of 40 mm Slide the drain hose over the pump discharge hose and secure...

Страница 37: ...s the water supply line properly flushed out Has the water installation been performed correctly Is the drainage system correctly installed Are the water supply and drain lines free of leaks Warning F...

Страница 38: ...on and secure against restart Verify the absence of electric current Installation or removal of the display and control unit may only be performed when the unit is switched off See also section Access...

Страница 39: ...aring parts and are guaranteed by the manufacturer for 150 000 cycles Operation which minimizes activation cycles will extend the life of the main contactors Type Main Power Supply HL6 45 400V 3Phases...

Страница 40: ...connected to Terminal 2 guided via the auxiliary contact of the main contactor Only cables with same diameter are alllowed to be connected to one common clamp 7 4 Safety Interlock Note Install contac...

Страница 41: ...allation Checklist Perform electrical installation checks in compliance with cus tomer site requirements and public power utility regulations Does the mains voltage match the voltage on the name plate...

Страница 42: ...re Switch on unit by setting control switch to I Set control of initial operation check to humidity demand The following functions are operating The unit performs a self test If the control includes a...

Страница 43: ...itch off the unit prior to maintenance and secure against restart After maintenance work have qualified personnel check that the unit is operating safely The steam humidifier s performance and mainten...

Страница 44: ...after Initial Operation Visual check of electrical and mechanical connections Visual check of water level control Visual check of steam cylinder interior Annually Visual check of electrical and mecha...

Страница 45: ...Close off water supply Drain steam cylinder 9 by setting main switch to Pos II Disconnect power supply and secure against restart switch off control switch remove main fuse and control fuse F1 Verify...

Страница 46: ...s are acceptable Reassembley Replace the flange o ring Note When joining the cylinder the upper and lower parts must have a firm fit Connect upper and lower parts with bolts Remove o ring from the low...

Страница 47: ...ondensate hoses as well as the connection hoses to the water level control Connect the connector plug for steam cylinder lead Push in safety fuse Switch on the unit and operate for 15 to 30 minutes Ch...

Страница 48: ...essary remove the capillary tube from the thermal cut out by detaching the retainer clips Remove heater element Clean the sealing surface on the underside of the cover around the area where the new he...

Страница 49: ...of electric current Remove and open steam cylinder as described above in section Cleaning Steam Cylinder Remove thermo sensor cap Loosen thermo sensor screw terminals and detach wires Loosen clips of...

Страница 50: ...temperature the blue button P is on the same level as the top of its holder Additional the control reports a failure thermo sensor activated After the system has cooled down the release button P can b...

Страница 51: ...m the drain hoses and pump possibly replace o ring A and wave seal B if these parts are no longer in good condition Assemble pump Moisten o ring C and place in the side connection of the base Push pum...

Страница 52: ...ical connectors from solenoid Remove solenoid valve mounting screws Take the solenoid valve out of hole Cleaning Remove fine mesh filter from the solenoid valve and clean Installation Place solenoid v...

Страница 53: ...t and operate for a few minutes ideally at maximum output Check safety devices Check hose connections for possible leaks 9 12 Dismantling Once the steam humidifier will no longer be used dismantle dem...

Страница 54: ...Page 54 10 EC Declaration of Conformity...

Страница 55: ...nder base DN40 25i 15 12 12 1 1 1 1 1 B 2214023 Mounting set for cylinder base 24 1 1 1 1 1 E 2205026 Mounting kit for heaters with 3 clamps 25 1 1 1 1 1 E 2204035 Condensate plug 2 1 1 1 1 1 E 220901...

Страница 56: ...525506 Jack 6pole 6mm mounted on metal sheet 1 E 2525502 Jack 9pole 6mm mounted on metal sheet Control Basic 1 1 1 1 1 B 2526203 Electronic pcb Basis for heater element humidifier 1 1 1 1 1 B 2526213...

Страница 57: ...delivery ____________forwarder _____________ shipment by ___________ delivery address if different from invoice address __________________________ __________________________ _________________________...

Страница 58: ...Number of Steam Cylinder 1 Number of Heater Elements 1 1 2 2 3 Steam Hose Connection 1x25mm 1x40mm Condensate Hose Connection 1x12mm Net Weight kg 25 25 26 26 27 Operating Weight kg 43 43 44 44 45 He...

Страница 59: ......

Страница 60: ...Page 60 14 Exploded View...

Страница 61: ...Page 61 15 View of Cabinet...

Страница 62: ...12 2004 Lise Meitner Str 3 D 24558 Henstedt Ulzburg Phone 49 0 4193 895 0 Fax 33 eMail hy hygromatik de www hygromatik com A member of the Group...

Отзывы: