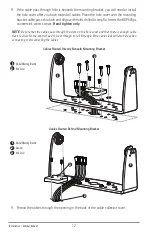
5. Set the gimbal bracket aside and drill the four mounting screw holes using a 5/32" (4.0
mm) drill bit.
6a. If the cables must pass through a hole directly beneath the mounting bracket, mark and
drill an additional 1" (25 mm) hole centered between the four mounting holes. Route
the cables through the 1" hole. Place the gimbal over the mounting surface hole, then
use it to mark the position of the two mounting screws, closest to the center large hole.
Remove the gimbal and drill the two mounting holes using a 9/64" (3.5 mm) bit. Do not
install the hole cover at this time.
or...
6b. If the cables cannot be routed directly beneath the mounting bracket, mark and drill a
1" (25 mm) hole that will allow you to run the cables close to the bracket. Pass the
cables through the 1" (25 mm) hole, routing the cables through the grommet and
pressing the grommet into place. Place the hole cover over the mounting surface hole,
then use it to mark the position of the two mounting screws. Remove the hole cover,
drill the two mounting holes using a 9/64" (3.5 mm) bit, fill them with marine-grade
silicone sealant, then replace the hole cover and insert the #8 Phillips countersink wood
screws.
Hand-tighten only.
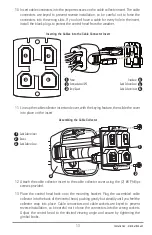
7. Place the mounting bracket on the mounting surface aligned with the drilled holes and
fill the mounting holes with marine grade silicone sealant. Insert the four #10 Slotted-
Hex wood screws into the mounting holes.
Hand-tighten only
.
Mounting Screws
1
Washer
2
Gimbal Mounting Bracket
3
3
2
1
11
Installation - Gimbal Mount
Содержание 1158? combo
Страница 1: ...Installation and Operations Manual 1158c Combo 1198c SI Combo Product Manual...
Страница 73: ...61 to your boat including the following items What s on the Sonar Display 7 10 3 4 5 6 11...
Страница 146: ...Sonar Tab Normal Mode Sonar Tab Advanced Mode Menu Quick Tips 134...
Страница 214: ...AIS Target List Accessories Menu Tab 202...

