HP StorageWorks 1/8 Скачать руководство пользователя страница 59

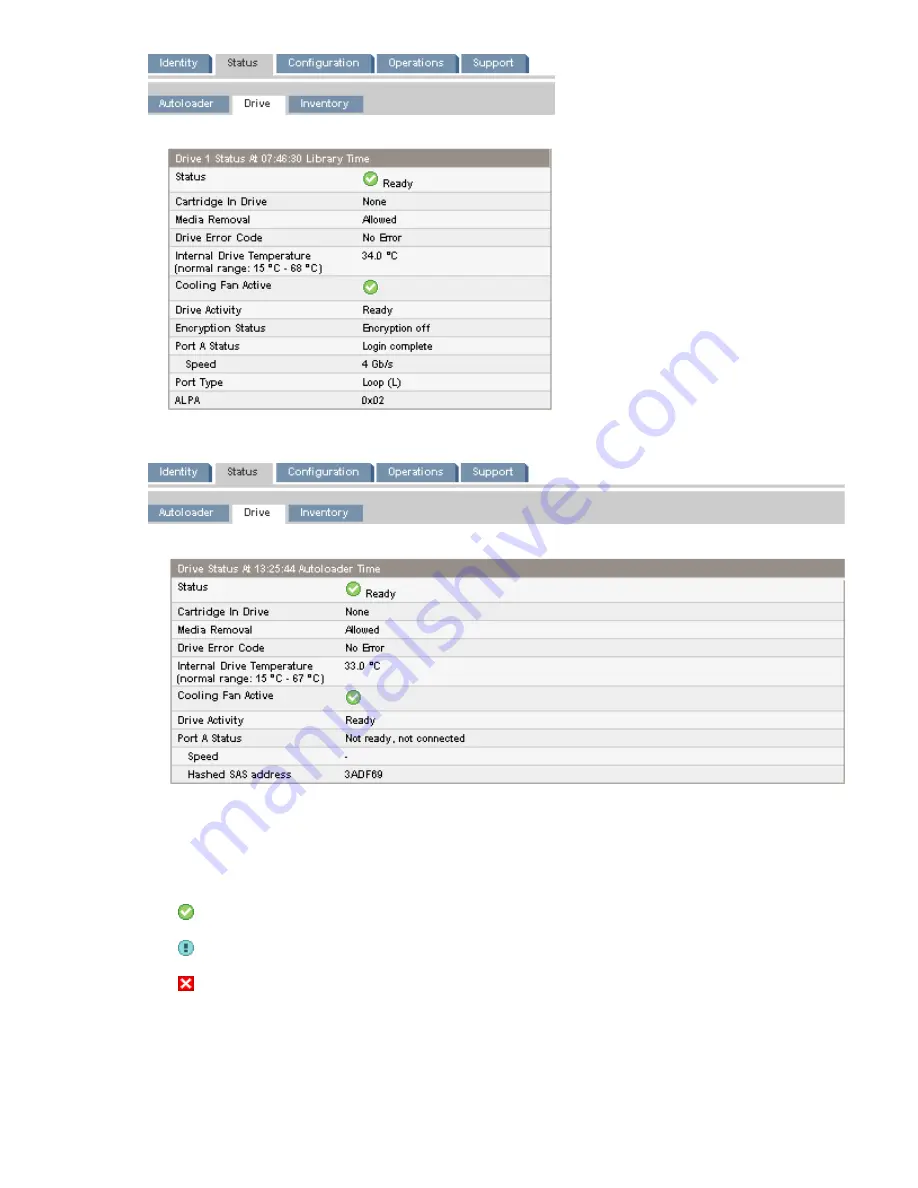
Figure 32 Status: Drive page (FC)

.

Figure 33 Status: Drive page (SAS)

.

You can see, but not modify, the following:

Status of the drive

The drive is operating normally.

The device is functional, but might have an issue that should be addressed.

The drive is in a failed state.

Cartridge in Drive — information about the cartridge, if any, currently in the drive.

HP StorageWorks 1/8 G2 Tape Autoloader User and service guide

59

Содержание StorageWorks 1/8

Страница 1: ...vides information on installing configuring upgrading and troubleshooting the Tape Autoloader This guide is intended for system administrators and other users who need physical and functional knowledge of the Tape Autoloader Part Number AK377 96012 Fifth edition September 2010 ...

Страница 2: ...other language without the prior written consent of Hewlett Packard The information is provided as is without warranty of any kind and is subject to change without notice The only warranties for HP products and services are set forth in the express warranty statements accompanying such products and services Nothing herein should be construed as constituting an additional warranty HP shall not be l...

Страница 3: ...I busses 28 Optimizing throughput 28 SCSI addresses 29 Planning the SAS configuration 29 About SAS 29 SAS cables and connectors 29 World Wide identifiers 30 Planning the Fibre Channel configuration 30 Direct connection 30 SAN connection 31 Choosing a location 31 Unpacking the shipping container 32 Identifying product components 32 Attaching the feet 33 Removing the shipping lock 34 Mounting the de...

Страница 4: ...onfiguration 64 Changing the network configuration 65 Configuration Network Management 67 Changing the administrator password 69 Setting the date and time 70 Setting error log mode 71 Setting event notification parameters 72 Saving and restoring the device configuration and restoring factory defaults 72 Operations 74 Moving media 74 Updating the current media inventory 75 Releasing and replacing t...

Страница 5: ...the tape drive Operations Clean Drive 97 Moving tapes in the Autoloader Operations Move Tape 98 Updating tape cartridge inventory Operations Perform Inventory 99 Rebooting the Autoloader Operations Reboot Autoloader 100 Enabling password locks Operations Enable Autoldr Password Locks 100 Support 100 Powering a drive on or off Support Power On Off Drive 101 Running the demonstration Support Run Dem...

Страница 6: ...l panel 161 Using the remote management interface 161 Using the manual magazine release 162 Removing and replacing the base chassis 163 Recording configuration settings 164 Removing the tape cartridge from the tape drive 164 Removing the cables magazines and tape drive 164 Removing the base chassis 165 Unpacking the new chassis 166 Replacing the base chassis 166 7 Support and other resources 169 H...

Страница 7: ...ese laser notice 182 Spanish laser notice 182 Recycling notices 182 English notice 182 Bulgarian notice 183 Czech notice 183 Danish notice 183 Dutch notice 183 Estonian notice 184 Finnish notice 184 French notice 184 German notice 184 Greek notice 185 Hungarian notice 185 Italian notice 185 Latvian notice 185 Lithuanian notice 186 Polish notice 186 Portuguese notice 186 Romanian notice 186 Slovak ...

Страница 8: ...C Electrostatic discharge 193 Preventing electrostatic damage 193 Grounding methods 193 Glossary 195 Index 199 8 ...

Страница 9: ...he tabletop conversion cover 37 15 Attaching the parallel SCSI cable to the tape drive 38 16 Attaching the power cord 40 17 Apply the label within the recessed area 46 18 Write protecting the data cartridge 46 19 Left magazine slot numbering with mailslot enabled 48 20 Right magazine slot numbering with mailslot enabled 48 21 RMI login page 51 22 System Status pane 52 23 Help button 52 24 Identity...

Страница 10: ...ions Inventory page 75 48 Operations Magazines page 76 49 Support General Diagnostic page 76 50 Support HP Service page 77 51 Support Firmware page 78 52 Support Reboot page 78 53 Support Autoloader Logs page 79 54 Support Clean Drive page 79 55 Support Support Ticket page 80 56 LEDs 82 57 Home screen 82 58 Operator control panel buttons 84 59 Autoloader menu tree 85 60 Removing a tape from the ma...

Страница 11: ...ive 160 77 RMI login page 161 78 Operations Magazines page 162 79 Manual magazine release holes 162 80 Removing the left magazine 163 81 Captive screws on the tape drive 164 82 Removing the tape drive 165 83 Removing the base chassis from the rack 165 84 Shipping lock location 166 85 Securing the Autoloader to the rack 167 86 Sliding the Autoloader into the cover 167 87 HP StorageWorks 1 8 G2 Tape...

Страница 12: ... 43 13 Ultrium 3000 tape drive 43 14 Read and write compatibility 47 15 Drive status 83 16 Display indication definitions 87 17 Power problems 111 18 Failure attention indications displayed on the front panel 112 19 Tape movement problems 112 20 Media problems 114 21 Parallel SCSI device not detected 115 22 Attention LED is lit 115 23 Inventory problems 117 24 RMI network connection issues 117 25 ...

Страница 13: ...odes 148 36 Configuration change events 153 37 Informational events 154 38 Document conventions 169 39 Customer self repair parts 171 40 1 8 G2 Tape Autoloader physical specifications all models 173 41 Environmental specifications 173 42 HP StorageWorks 1 8 G2 Tape Autoloader User and service guide 13 ...

Страница 14: ...14 ...

Страница 15: ...tible backup application to take full advantage of its many features To verify compatibility go to http www hp com go ebs The Autoloader uses the interface types described in Table 1 The parallel SCSI Tape Autoloader uses a single SCSI ID with two logical unit numbers LUNs one for the tape drive and the other for the robotic Table 1 Model and interface type SCSI ID Interface LTO generation 4 Ultra...

Страница 16: ... 800 GB Compressed 2 1 12 8 TB Maximum storage capacity 8 data cartridges Native 80 MB s 288 GB hr Compressed 2 1 160 MB s 576 GB hr Maximum data transfer rate HP LTO4 Ultrium 1 6 TB RW Data Cartridge green part number C7974A HP LTO4 Ultrium 1 6 TB WORM Data Cartridge two tone green and gray part number C7974W Data cartridges HP Ultrium universal cleaning cartridge 50 cleans orange part number C79...

Страница 17: ...ncryption while encryption is enabled with the Encryption Kit will not be able to do so which can cause backups or other write operations to fail Command View TL TapeAssure HP StorageWorks Command View TL software provides a browser based GUI for remote management and monitoring of most HP libraries through a LAN With Command View TL you can view and analyze the performance and health of the LTO 4...

Страница 18: ...rs HBAs For optimum performance place the Autoloader on its own SCSI bus with a host bus adapter that can transfer data as fast as the Autoloader can read and write The HBA must also be supported by your operating system Refer to the EBS matrix at http www hp com go ebs for current HBA compatibility information For LTO 3 or LTO 4 tape drives use an Ultra 320 HBA For LTO 2 tape drives use an Ultra ...

Страница 19: ... For example a 2 Gb switch in the path may result in performance degradation when backing up highly compressible data to a 4 Gb tape drive Configure zoning so only the backup servers may access the Autoloader Interface specifications and requirements for SAS drives The server must have an HP or third party SAS host bus adapter with an external connector Table 8 SAS drive interface speeds Supported...

Страница 20: ...g the data from unauthorized access and use LTO tape drives use the 256 bit version of the industry standard AES encrypting algorithm to protect your data To make use of this feature you need The HP StorageWorks 1 8 G2 MSL Encryption Kit or a backup application that supports hardware encryption LTO 4 or LTO 5 media no encryption will be performed when writing LTO 3 and earlier generations of tape ...

Страница 21: ...ditional information on using the Encryption Kit Using application managed encryption Hardware encryption is turned off by default and is switched on by settings in your backup application where you also generate and supply the encryption key Your backup application must support hardware encryption for this feature to work See http www hp com go ebs for an up to date list of other suitable backup ...

Страница 22: ...itepapers html For detailed instructions about enabling encryption please refer to the documentation supplied with your backup application or with the HP StorageWorks 1 8 G2 and MSL Encryption Kit This will also highlight any default states for example when copying tapes that may need changing if using encrypted tapes Front panel overview The front panel provides access to the power button operato...

Страница 23: ...age displays on the LCD screen see Troubleshooting on page 107 for more information Amber 4 Back panel overview The back panel provides access to the drive interface connectors the tape drive the power connector the Ethernet serial and USB ports and the magazine release holes as shown in Figure 3 Figure 4 and Figure 5 Figure 3 Back panel overview with parallel SCSI tape drive 2 Fan vent 1 Power co...

Страница 24: ...ve LED Figure 5 Back panel overview with FC tape drive 2 Fan vent 1 Power connector 4 Magazine release hole 3 Tape drive 6 Serial port Factory use only 5 Ethernet port 8 Shipping lock storage location 7 USB port 10 Pull out tab containing the serial number and other product information 9 FC port 12 Tape drive Ethernet port LTO 5 only 11 Tape drive LED The device requires a 110 220 volt AC power co...

Страница 25: ...Figure 6 Tape drive LED 1 Tape drive LED HP StorageWorks 1 8 G2 Tape Autoloader User and service guide 25 ...

Страница 26: ...Features and overview 26 ...

Страница 27: ...ly Powering on the device Configuring the device Verifying the connection Labeling and loading the tape cartridges Verifying the installation Configuring additional features Preparing the host IMPORTANT Use proper procedures to prevent electrostatic discharge ESD see Appendix Electrostatic discharge on page 193 Use wrist grounding straps and anti static mats when handling internal components Follo...

Страница 28: ...canning for the application software to operate the Autoloader HP Smart Array controllers most third party RAID controllers and many on board SCSI controllers do not support multiple LUNs An HBA might have one or two channels with each channel supporting one parallel SCSI bus Check to see how many channels the HBA has and what devices are already connected to the HBA Some devices such as parallel ...

Страница 29: ...AUTION Do not connect the Autoloader to a SAS RAID controller unless the EBS matrix shows that the controller is qualified with the Autoloader The server might not be able to boot when the Autoloader is connected to a non supported SAS RAID controller About SAS Serial Attached SCSI SAS is a computer bus technology mainly used to transfer data to and from storage devices including disk drives and t...

Страница 30: ...ransfer speed of the interface of your components SAS cables described as equalized may not support 6 Gb s data rates and should not be used with LTO 5 tape drives unless these cables are verified for 6 Gb s data rates For optimum performance only use HP cables of the length specified as qualified for your products World Wide identifiers A SAS tape drive is identified by a unique identifier called...

Страница 31: ... a power outlet Choose a location that meets the criteria shown in Table 10 on page 31 Table 10 Location criteria Definition Criteria The Autoloader can only be placed on a flat surface if the support feet have been properly applied or the Autoloader is mounted in the optional tabletop conversion cover Select a location that is flat sturdy and close to the host server Ensure that all of the feet o...

Страница 32: ...vice will be installed varies by 15º C 30º F from the room where it was stored allow it to acclimate to the surrounding environment for at least 12 hours before unpacking it from the shipping container Unpacking the Tape Autoloader 1 Inspect the container for shipping damage If you notice any damage report it to the shipping company immediately 2 Open the shipping container and remove the packagin...

Страница 33: ...g the shipping lock on page 34 CAUTION The Autoloader must be supported under both side edges to operate properly If the Autoloader is not mounted in a rack or in the tabletop conversion kit you must apply the feet Do not put anything on top of the Autoloader Weight on top of the Autoloader can prevent the robotic inside from moving properly If you must place items on top of the Autoloader install...

Страница 34: ...tions with a damp paper towel 5 Peel the backing paper off each foot and apply it within a set of foot location lines see Figure 9 on page 34 6 With another person gently turn the Autoloader over and set it on its feet Figure 9 Attaching the feet to the bottom of the Autoloader Removing the shipping lock The shipping lock prevents the robotic transport mechanism from moving during shipment You mus...

Страница 35: ... without media and 13 1 kg 28 9 lb with media 8 cartridges When moving the Autoloader to reduce the risk of personal injury or damage to the Autoloader 1 observe local health and safety requirements and guidelines for manual material handing 2 always remove all tapes to reduce the overall weight of the Autoloader and 3 obtain adequate assistance to lift and stabilize the Autoloader during installa...

Страница 36: ...into the rack 1 Using the screws for your rack type and a 3 Phillips screwdriver secure one rail to each side of the rack in your chosen rack location 2 Secure the front of one rail to the front of the rack Extend the rail to the depth of the rack and secure the rail to the back of the rack The front of the rails are straight and the back are angled as shown in Figure 13 on page 36 Figure 13 Insta...

Страница 37: ...rts the edges of the Tape Autoloader and is capable of holding 15 kg 33 lb To install the cover 1 Place the cover on a flat level surface behind the device 2 Slide the device into the cover until the front panel of the device is aligned with the cover see Figure 15 Figure 15 Installing the tabletop conversion cover 3 Tighten the captive screws on the front panel until the cover is secure Changing ...

Страница 38: ... SCSI devices only NOTE LTO 3 and LTO 4 tape drives are Ultra 320 SCSI LVD devices Use only cables and terminators specified for Ultra 320 or labeled as MultiMode LTO 2 tape drives are Ultra 160 SCSI LVD SE devices use only cables and terminators specified for Ultra 160 or Ultra 320 or labeled as MultiMode NOTE For optimal performance a parallel SCSI tape drive should be the only device on the bus...

Страница 39: ... parallel SCSI bus Make sure the last device on the parallel SCSI bus is properly terminated Connecting the Fibre Channel cables Fibre Channel devices only To connect the Fibre Channel cable to the Autoloader 1 Remove the FC port cap if necessary Attach one end of the Fibre Channel cable to the Fibre Channel port on the tape drive 2 Attach the other end of the FC cable to a switch or HBA Connectin...

Страница 40: ...outlet 4 Power on the device by pressing the power button located on the front panel Check the LCD screen to make sure it has power If not check the power connections and your power source During the Power On Self Test POST all four LEDs are illuminated briefly followed by a flashing Ready LED When the initialization sequence is complete the Home screen is displayed 5 Plug in the host server and a...

Страница 41: ...cate with the robotics 2 Verify the connection between the Autoloader and the host Install the HP Library Tape Tools Diagnostic Installation Check Utility available at http www hp com support TapeTools onto the host server This utility verifies that the unit is connected and communicating with the host server It also verifies that the device is functioning and provides diagnostic information Run t...

Страница 42: ...ee Upgrading firmware Support Autoloader FW Upgrade Support Drive FW Upgrade on page 103 Using HP Library and Tape Tools L TT which can be downloaded free of charge from http www hp com support TapeTools After configuring the Autoloader you can save the configuration settings to a USB flash drive from the OCP or to a file from the RMI Configuration Save Restore screen Having a backup of the Autolo...

Страница 43: ...sal cleaning cartridge 50 cleans orange Table 12 Ultrium 920 tape drive Part number Cartridge type C7973A HP LTO3 Ultrium 800 GB RW Data Cartridge yellow C7973W HP LTO3 Ultrium 800 GB WORM Data Cartridge two tone yellow and white C7978A HP Ultrium universal cleaning cartridge 50 cleans orange Table 13 Ultrium 1760 tape drive Part number Cartridge type C7974A HP LTO4 Ultrium 1 6 TB RW Data Cartridg...

Страница 44: ...ridges designated for your device Clean the tape drive when the Clean drive LED is illuminated CAUTION Use only Ultrium Universal cleaning cartridges Do not drop a cartridge Excessive shock can damage the internal contents of the cartridge or the cartridge case itself making the cartridge unusable Do not expose data cartridges to direct sunlight or sources of heat including portable heaters and he...

Страница 45: ... checking Ignore Barcode Media ID in the RMI Configuration System screen will keep the Autoloader from interpreting bar code Media IDs Your host software may need to keep track of the following information via the associated bar code Date of format or initialization Tape s media pool Data residing on the tape Age of the backup Errors encountered while using the tape to determine if the tape is fau...

Страница 46: ...rasure or overwriting of data Before loading a cartridge into the device make sure the write protect switch on the front of the cartridge is in the desired position Slide the switch to the left to allow the device to write data to the cartridge see Figure 19 1 Slide the switch to the right to write protect the cartridge An indicator such as a red mark or small padlock is visible showing that the c...

Страница 47: ... Write with encryption key Incompatible Incompatible Incompatible Incompatible LTO 5 media encrypted CAUTION Ultrium 2 and Ultrium 3 tape drives require the most recent firmware to immediately identify Ultrium 4 media Without the most recent firmware loading an Ultrium 4 cartridge into an earlier generation drive may result in a long media identification and unload time The drive may not identify ...

Страница 48: ... or the remote management interface The slot numbering scheme is shown in Figure 20 for the left magazine and Figure 21 for the right magazine Figure 20 Left magazine slot numbering with mailslot enabled Figure 21 Right magazine slot numbering with mailslot enabled When the mailslot is disabled the mailslot M1 becomes Slot 1 and all other slots are re numbered accordingly Tape cartridges and magaz...

Страница 49: ...I you must configure the device network settings and set the administrator password with the OCP See Configuring network settings Configuration Configure Network Settings on page 94 and Changing the administrator password Configuration Change Admin Password on page 90 To start the RMI open any HTML browser and enter the IP address of the device in the browser s address bar TIP Check the Help scree...

Страница 50: ...n page 72 Saving and restoring the device configuration and restoring factory defaults on page 72 Operations on page 74 Moving media on page 74 Updating the current media inventory on page 75 Releasing and replacing the magazines on page 75 Support on page 76 Performing general diagnostics on page 76 Service Service restricted on page 77 Determining and updating firmware on page 77 Rebooting the d...

Страница 51: ...nnel only The service password is set at the factory The same service password is used for the RMI and OCP The user login provides access to the Identity and Status options but not the Configuration Operations and Support options Administrator level provides access to all screens except for the Log configuration and HP Service screens TIP By default the administrator password is unset all of the d...

Страница 52: ... Free Total Free is the number of empty storage slots Total is the number of storage slots available to the host software which does NOT include reserved slots Mailslot shows whether the mailslot is open closed or disabled Autoloader Time the date and time from the Autoloader which can be set from the OCP or RMI The Autoloader Time is updated when the system status is refreshed The time of the mos...

Страница 53: ...evice will switch from Sequential to Random mode if it receives media changer SCSI commands Manual the device will stay in the current mode until another mode is configured by a user Random the device will not automatically load and unload tapes Instead it will wait for commands from the backup software or the OCP to load and unload tapes Sequential the device will automatically unload the tape in...

Страница 54: ...ically load the tape from the lowest numbered full slot on power up WWide Node Name a world wide unique identifier that the Autoloader reports over SCSI and may be used by operating systems or software applications to identify and track the Autoloader Viewing static drive information The Identity Drive page Identity Drive page Fibre Channel and Identity Drive page SAS provide detailed information ...

Страница 55: ...SCSI drive only SCSI address of the drive The LUN for the tape drive is 0 World Wide ID SAS drive only world wide unique name for the drive The World Wide ID is assigned by the autoloader controller to the drive bay and cannot be changed by the user When a tape drive is replaced the World Wide ID is re assigned to the replacement drive Physical Drive Slot Number the physical location of the drive ...

Страница 56: ...pe the current setting of the drive port Direct connected devices are typically Loop Devices connected to a switch are typically Fabric Speed Viewing network information The Identity Network page displays information about the network configuration Figure 29 Identity Network page You can see but not modify MAC Address a unique identifier for the autoloader controller network interface Full Qualifi...

Страница 57: ...rs DHCPv6 Addressing when Enabled the Autoloader will request an IP address from a DHCP server each time the device is booted Static Addressing when Enabled the device will use a statically configured address Static Assigned Address the IPv6 address when Static Addressing Enabled is On Status Viewing dynamic device information The Status Autoloader page displays dynamic information about the devic...

Страница 58: ...ernal temperature reported by the device Media Removal Prevented if the backup software is preventing media removal from the device When media removal is prevented the mailslot and magazine functionality is disabled Left Magazine Present if the device senses the presence of the left magazine Right Magazine Present if the device senses the presence of the right magazine Viewing dynamic drive inform...

Страница 59: ...g Status of the drive The drive is operating normally The device is functional but might have an issue that should be addressed The drive is in a failed state Cartridge in Drive information about the cartridge if any currently in the drive HP StorageWorks 1 8 G2 Tape Autoloader User and service guide 59 ...

Страница 60: ...rt Type Fibre Channel drives only the current setting of the drive port Direct connected devices are typically Loop Devices connected to a switch are typically Fabric N Port ID Fibre Channel drives only Fabric address Only relevant when in Fabric mode ALPA Fibre Channel drives only Loop address Only relevant when in Loop mode Hashed SAS address A short version of the SAS World Wide Identifier WWI ...

Страница 61: ...loaded into a drive in this device or if the inventory has changed Comment any additional information about the tape in the slot for example Clean Tape if the cartridge is a cleaning tape Configuration Changing the system configuration Use the Configuration System page on page 62 to modify the system configuration System configuration changes are only applied after the Apply Selections or the Subm...

Страница 62: ...ifies a tape cartridge as a cleaning cartridge if it has a bar code label that starts with CLN or after an unlabeled cleaning tape has been loaded into the tape drive The device can use a cleaning cartridge from any slot even if the slot is not active The device keeps track of the usage count for each of the cleaning cartridges When multiple cleaning cart ridges are available the device will first...

Страница 63: ... the Autoloader only has one tape drive Autoloader Mode Random Sequential Automatic Autoload Loop The device supports three behavior modes Random Sequential and Automatic The device automatically detects the required mode from the series of SCSI commands it receives however you can also change the mode Choose the operating mode based on the capabilities of the software controlling the tape cartrid...

Страница 64: ... store cleaning or data tapes in the reserved slots The slots are reserved from the highest slot number down The default is to have no reserved slots You can reserve up to six slots If the mailslot is enabled the maximum number of active slots is reduced by one Changing the drive configuration Use the Configuration Drive page parallel SCSI to change the tape drive s SCSI ID and power the tape driv...

Страница 65: ...de is Hard you must configure a fixed ALPA address that is unique on the loop If the Addressing Mode is Soft the system will assign an ALPA during fabric login If the Addressing mode is Hard auto select the device will acquire an ALPA at the initial system setup and then fix that as a hard address from then on ALPA Arbitrated Loop Port Address Figure 39 Configuration Drive page SAS Changing the ne...

Страница 66: ...ovided by your network administrator for the Autoloader Domain name enter the domain name provided by your network administrator for the Autoloader Enable HTTPS when On the RMI can only be accessed through an HTTPS connection Restricted Network Access when On disables all non essential network functionality that is not required for normal product operation In most circumstances leave this On For I...

Страница 67: ...The default is Off Static Addressing Enabled when On the Autoloader will use a statically configured address The default is Off Static Assigned Address configures the address when Static Addressing Enabled is On You can select the standard prefix FE80 or the prefix of a nearby router Enter the remainder of the address and click Add To remove an IPv6 static IP address click Delete next to the addre...

Страница 68: ...d in the SNMP Target IP Addresses field SNMP Target IP Addresses the IP addresses for up to three computers running IPv4 SNMP management software and up to three computers running IPv6 SNMP management software IP addresses will not be cleared if SNMP is disabled but those targets will no longer be able to Operating the Tape Autoloader 68 ...

Страница 69: ...the network configuration SNMP queries are only accepted from configured targets To configure the Autoloader for use with HP SIM 1 From the RMI add the HP SIM management station as an SNMP target 2 If the Autoloader IP address is in an HP SIM automatic discovery IP address list the SIM management station will detect the Autoloader at the next scheduled scan To configure HP SIM for manual discovery...

Страница 70: ...page You may change the Password The password is exactly eight numbers each from 0 to 9 Password Time Out The number of minutes that the current administrator login session will remain logged in without user interaction Setting the date and time Use the Configuration Date Time page to set the date and time NOTE The device does not adjust its time to daylight saving time the time must be adjusted m...

Страница 71: ...ame are entered the IP address will be resolved from the DNS using that name The device will store the resulting address rather than the name If the address changes enter the name or a new ad dress so the device can find the server again UTC Time Zone Offset Select the time zone for your area Enable Daylight Savings Adjustment Enabling daylight saving time will advance the local time by one hour T...

Страница 72: ...ed events e g firstname lastname ex ample com Only one email address can be configured Email Domain domain of the return e mail address e g example com SMTP Server Address IP address of the SMTP server Saving and restoring the device configuration and restoring factory defaults Use the Configuration Restore defaults page to restore the factory defaults reset the administrator password to null or s...

Страница 73: ...e unique network identities NOTE You can save the device configuration to a USB flash drive from the OCP For the see Saving and restoring the Autoloader configuration Configuration Save Restore Configuration on page 96 Figure 46 Configuration Save Restore page The restored factory default settings are SCSI address 4 Drive power drive powered on Active slots maximum possible Autoloader mode Automat...

Страница 74: ...ings including DHCP DNS IPv4 and IPv6 addresses Barcode reader label length and barcode reader alignment Reserved slots Autoloader mode All drive configuration settings Auto clean SNMP addresses and configurations Log tracing configuration Email notification configuration SMTP address email address filter level Option to allow the magazine access without the administrator password Option to ignore...

Страница 75: ... Operations Inventory page Releasing and replacing the magazines Use the Operations Magazine page to release the left right or both magazines When you click Release the device will unlock the magazine and display Left Magazine Unlocked or Right Magazine Unlocked on the OCP screen If you do not remove the magazine within a few seconds the device will lock it When you replace the magazine the device...

Страница 76: ...t offline Performing general diagnostics Use the Support General Diagnostic page to run general tests to verify the usability and reliability of the device Select the test and enter the number of test cycles before starting the test To cancel the test early click on the Stop button Figure 50 Support General Diagnostic page The available tests are Demo moves cartridges from the slots to the drives ...

Страница 77: ...g and updating firmware Use the Support Firmware page to see the current version of the device and drive firmware and upload new firmware The firmware files must be in the HP L TT format with the frm file extension You can find firmware files on the HP Support website http www hp com support After the firmware is updated the device or tape drive with updated firmware is reset CAUTION Do not interr...

Страница 78: ...Warning Trace Configuration Change Trace and Standard Trace The log entries are displayed in order of most recent to oldest The format for the log entries is YY MM DD HH MM SS ss LIB ERR 80 89 62 40 YY MM DD the date displayed as Year Month Day HH MM SS ss the time displayed as Hour Minute Second Hundredths of a second First code hard or soft error The code after LIB ERR 80 in the example will be ...

Страница 79: ...er of the cleaning tape Figure 55 Support Clean Drive page Downloading a support ticket Use the Support Support ticket page to download a support ticket for the Autoloader or tape drive The support ticket can help a service engineer or system administrator diagnose a device problem HP StorageWorks 1 8 G2 Tape Autoloader User and service guide 79 ...

Страница 80: ... generate a support ticket during an unload and that ticket may be downloaded at any time LTO 4 tape drives with older firmware must be empty to download a support ticket Gathering a current ticket for an LTO 4 tape drive may cause a temporary performance decrease while the ticket is generated Figure 56 Support Support Ticket page Operating the Tape Autoloader 80 ...

Страница 81: ...n Autoloader Behavior on page 92 Setting the date and time Configuration Autoloader Date Time on page 93 Configuring network settings Configuration Configure Network Settings on page 94 Configuring automatic cleaning Configuration Configure Auto Cleaning on page 95 Restoring factory defaults Configuration Restore Defaults on page 95 Saving and restoring the Autoloader configuration Configuration S...

Страница 82: ...ive or robotics activity Green 1 Clean Illuminated when a cleaning cartridge should be used Amber 2 Attention Illuminated if the device has detected a condition that requires attention Amber 3 Error Illuminated if an unrecoverable error occurs A corresponding error message displays on the LCD screen Amber 4 Autoloader home screen The first line of the Home screen displays the device s product name...

Страница 83: ...ing CLN Drive is rewinding RWD Drive is seeking SEEK Performing a tape move or tape exchange operation MOV Drive is erasing a tape ERASE Drive is calibrating CAL Performing a test TEST Performing a firmware upgrade operation UPGR Decrypting DCR Encrypting ENC Operator control panel buttons The four operator control panel buttons described in Figure 59 let you traverse the OCP menu structure and en...

Страница 84: ...n Configuration Operations and Support NOTE The Unlock Mailslot menu is only displayed when the mailslot is enabled To enable the mailslot see Configuring the mailslot Configuration Configure Mailslot on page 91 From the Home screen press Enter to bring up the first menu item From a menu use the Previous and Next keys to cycle through the menus press Enter to see the first option in the menu or pr...

Страница 85: ...the OCP to protect the administrator functions on the OCP and enable the administrator functions in the RMI Options that require a password will prompt for a password before allowing access to the restricted screens Once entered the administrator password does not need to be entered again unless there is no user activity for five minutes or the password lock is enabled The number 1 should be flash...

Страница 86: ...s in the left magazine NOTE The Unlock Mailslot menu is only displayed when the mailslot is enabled To enable the mailslot see Configuring the mailslot Configuration Configure Mailslot on page 91 To access the mailslot 1 From the Home screen press Next until the screen displays Unlock Mailslot Press Enter to select 2 The mailslot ejects automatically Pull the mailslot out to access the tape see Fi...

Страница 87: ...tion Drive or Mailslot The screen display may read Mailslot AESO32L3 where AESO32L3 is an example of the bar code number on the tape or it may read Full or Empty Left or right magazine The screen display may read Left Magazine or Right Magazine The second line on the display indicates which slots have a tape or are empty Slots in the left magazine are numbered 1 4 or 1 3 and slots in the right mag...

Страница 88: ...another inventory location 6 To view the inventory of a tape drive press Previous or Next until the screen displays Drive The display will show the tape bar code number Full or Empty Autoloader information Status Information Autoloader Information To obtain information about your device 1 From the Home screen press Previous or Next until the screen displays Status Information Press Enter to select...

Страница 89: ...component has an error condition that should be addressed The device may not be fully functional Failed the component has a known failure and should be replaced Network information Status Information Network Information To access network settings for the device 1 From the Home screen press Previous or Next until the screen displays Status Information Press Enter to select 2 Press Previous or Next ...

Страница 90: ...assword to change the administrator password Passwords consist of exactly eight numbers each between the values of 0 and 9 Screens that require a password prompt for the password before allowing access to the restricted areas Once entered the administrator password does not have to be entered a second time unless there is no user activity for five minutes Enter the administrator password if you ar...

Страница 91: ...led or Mailslot Disabled 5 Press Previous or Next until the screen displays Disable Mailslot or Enable Mailslot Press Enter when the correct action is displayed Bar code reporting format Configuration Barcode Format Reporting You can configure how the tape bar code is displayed in the OCP and RMI and how it is reported to the host software You can configure the number of characters to display and ...

Страница 92: ...ad and unload tapes Random mode is used with a full featured or a robotics aware backup application and is the most common mode of operation Your backup software must support robotics which may require an additional software module Sequential mode In Sequential mode the device automatically loads and unloads tapes from the drive Sequential mode is used when the backup software is NOT robotics awar...

Страница 93: ...ays either Disable Autoload Mode or Enable Autoload Mode Press Previous or Next to toggle between the enabled and disabled screens Press Enter to select the Autoload mode The display shows the new Autoload mode b Press Previous or Next until the screen displays either Loop Mode Disable or Loop Mode Enable To change loop mode press Enter The screen displays either Enable Loop Mode or Disable Loop M...

Страница 94: ...ge the IP address press Enter The screen displays Set IP Address with the first number flashing Press Previous or Next to change the flashing number to the correct value 7 Press Enter to select the next number until all numbers have been set The screen displays New IP Address 8 Press Previous or Next until the screen displays Subnet Mask Address To change the Subnet Mask Address press Enter The sc...

Страница 95: ...ackup application or the device not both To configure automatic cleaning 1 From the Home screen press Previous or Next until the screen displays Configuration Press Enter to select 2 Press Previous or Next until the screen displays Configure Auto Cleaning Press Enter to select 3 The screen displays Auto Cleaning Disabled or Auto Cleaning Enabled depending on the current setting To change the auto ...

Страница 96: ... until the screen displays Configuration Press Enter to select 3 Press Previous or Next until the screen displays Save Restore Configuration Press Enter to select 4 Enter the administrator password if prompted 5 The screen displays Save Configuration to USB Press Enter to save 6 When the save operation is completed remove the USB flash drive from the USB port To restore the device configuration se...

Страница 97: ...splays Operations 2 Press Enter to select 3 Press Previous or Next until the screen displays either Unlock Left Magazine or Unlock Right Magazine 4 Press Enter to select the desired magazine to unlock 5 Enter the administrator password if requested 6 The display reads Left Magazine Unlocked or Right Magazine Unlocked 7 Pull the released magazine out of the device 8 The screen now displays Insert L...

Страница 98: ...e tape as a cleaning tape If a slot number is displayed continue to Step 6 If no slot number is displayed it indicates that the device is not able to detect that a cleaning tape with a bar code is in the device In this case the operator must select the slot where a cleaning tape resides 6 Use Previous or Next to display the location of a cleaning tape 7 When the correct location for the cleaning t...

Страница 99: ...ious or Next to display the slot Only empty slots are listed Once the correct slot is displayed press Enter to select The device now moves the tape from the selected source to the selected destination While the device moves the tape the screen displays Moving Tape Once the tape has been moved the screen displays either Move Complete or Move Failed If the move failed press Enter to display the erro...

Страница 100: ...pically used if you do not want to wait for the time out to reset the locks Power cycling or rebooting the device also resets the locks To enable the password locks 1 From the Home screen press Previous or Next until the screen displays Operations Press Enter to select 2 Press Previous or Next until the screen displays Enable Autoldr Password Locks Press Enter to select Support The Support menu pr...

Страница 101: ...monstration program The demonstration continues until the Cancel button is pressed on the operator control panel During the demonstration the device will move cartridges to the tape drive and back At the end of the demonstration the cartridges are returned to their original slots Access to this feature requires the administrator password To run the demonstration 1 From the Home screen press Previo...

Страница 102: ...t Support Run Wellness Test Use this option to check the health of the device for the specified number of loops If a failure occurs during the test check the error code and failure message for more information Access to this feature requires the administrator password For more information about the wellness test see The wellness test on page 128 For complete testing enable the mailslot and ensure ...

Страница 103: ...d current Autoloader firmware using HP Library Tape Tools or from the HP support website http www hp com support storage Copy the firmware onto the USB flash drive TIP The display will only show the first 16 characters of the file name If the USB drive has multiple firmware files ensure that you can distinguish the files from the first 16 characters in their file names 2 Insert the USB flash drive...

Страница 104: ...emove a data tape to make room for the firmware upgrade tape 2 From the Home screen press Previous or Next until the screen displays Support Press Enter to select 3 Press Previous or Next until the screen displays Drive FW Upgrade Press Enter to select 4 Enter the administrator password if prompted 5 Press Previous or Next until the screen displays Drive FW Upgrade by Tape Press Enter to select 6 ...

Страница 105: ...me screen press Previous or Next until the screen displays Support Press Enter to select 3 Press Previous or Next until the screen displays Download Support Ticket Press Enter to select Forcing the drive to eject a tape Support Force Drive To Eject Tape Use this option to make the tape drive eject the tape and place it into an open slot Before issuing this command attempt to eject the tape with th...

Страница 106: ...Operating the Tape Autoloader 106 ...

Страница 107: ... www hp com support MSLG3Tstree The problems and solutions in the troubleshooting tree are updated more frequently than this manual Detection problems after installing a parallel SCSI device Problems encountered after installation are often caused by improper parallel SCSI bus configuration application software configuration errors or an incorrectly configured operating system If the application s...

Страница 108: ...vice uses two Logical Unit Numbers LUNs to control the tape drive LUN 0 and robotic LUN 1 The device requires an HBA with multiple LUN support and multiple LUN support must be enabled on the host computer When multiple LUN support is not enabled the host computer can see the tape drive but not the Autoloader NOTE Many RAID or array controllers do not provide multiple LUN support If the application...

Страница 109: ...until snug The supplied terminator is dual mode and works on both Low Voltage Differential LVD and Single Ended SE SCSI buses Check all parallel SCSI and power connections and confirm that the unit is attached to a valid SCSI SE or LVDS bus Detection problems after installing a SAS device Problems encountered after installation are often caused by improper SAS cable connections application softwar...

Страница 110: ...he motherboard slot and the operating system correctly detects the host adapter Verify that the proper device driver is installed for the SAS host adapter If the Autoloader is detected by the operating system but not by the application software Refer to the documentation included with your backup application for instructions on how to verify proper installation Some backup software packages requir...

Страница 111: ...be replaced If the screen shows ALPA Conflict There might be a conflict with the ALPA address on Loop ports Select Soft for the Loop mode to allow the system to select an available address each time the tape drive connects to the FC fabric If your server configuration does not support changing addresses try using the Hard Auto Select option for the Loop mode This allows the system to select an ava...

Страница 112: ...und Once the tape is rewound the eject cycle will take fewer than 16 seconds The READY light flashes while the tape rewinds Wait for the tape to finish rewinding before attempting another operation 1 Attempt to unload the tape from your backup software 2 Shut down the backup software and stop the operating system s re movable storage services From the OCP attempt to unload or move the tape to a sl...

Страница 113: ...tor control panel see Unlocking removing and replacing magazines Operations Unlock Left or Right Magazine on page 97 To use the RMI see Releasing and replacing the magazines on page 75 If neither one of these processes works see Releasing the magazines manually on page 127 3 Manually remove the cartridge from the magazine by inserting a finger in the hole at the back of the magazine Some tapes nee...

Страница 114: ...del LTO tape drives can read data cartridges from two generations back and write to data cartridges one generation back See Backward read compatibility on page 47 Make sure you are using an Ultrium cartridge that has not been de gaussed Do not degauss Ultrium cartridges Make sure that the cartridge has not been exposed to harsh environ mental or electrical conditions and is not physically damaged ...

Страница 115: ...s and has a SCSI ID of 8 or greater the host server will not detect the drive If you must use SCSI IDs 8 or greater use a wider bus Reboot the host server Changed drive SCSI ID but the host server does not recognize the new ID Table 23 Attention LED is lit Solution Problem This is most likely caused by a dirty drive that cannot read a tape and marks the tape invalid 1 View the inventory with the R...

Страница 116: ...g cartridge see Tape cartridges on page 43 The Attention LED is lit but the Cleaning LED is not lit after a cartridge load The cleaning cartridge is expired A cleaning cartridge will expire after 50 cleaning cycles The Cleaning LED is lit after using a cleaning cartridge If the Media Attention LED is cleared and the drive has been cleaned and then immediately re displays each time a particular car...

Страница 117: ...th the LAN See your network administrator for help Verify that the device has been configured with a valid static network address or DHCP has been enabled so the device can obtain a net work address If using DHCP write down the device s network address from the OCP Information menu If the device did not obtain a valid address via DHCP verify that the DHCP server is up and the device has network ac...

Страница 118: ...the lower the performance To determine the average file size divide the size of the backup by the number of files See the performance impact of your system s average file size in Table 27 Table 27 Performance impact of various file sizes Recommendations Performance impact Average file size If possible do NOT use a file by file backup method For backups with an average file size 64 k HP recommends ...

Страница 119: ...ring the backup and close down programs such as virus scanners which check each file that is opened VARIABLE RAID uses a group of disks to improve performance and in the case of RAID 5 provides some parity protection in case one of the drives fail Server or workstation with RAID Upgrade to a disk array or RAID 5 with the minimum number of disks needed for your tape drives or use concurrency or mul...

Страница 120: ...sed a 2 Gb fibre connection can provide enough bandwidth for 4 LTO 2 tape drives LTO 3 GOOD When fully used a 2 Gb fibre connection can provide enough bandwidth for an LTO 3 tape drive LTO 4 HH GOOD When fully used a 2 Gb fibre connection can provide enough bandwidth for an LTO 4 HH tape drive LTO 5 POOR A 2 Gb fibre connection is inad equate for an LTO 5 tape drive Fibre 2 Gb GOOD When fully used...

Страница 121: ...onnection to the disks does not force the speed to a lower parallel SCSI type an Ultra 160 connection can provide enough bandwidth for two LTO 2 tape drives LTO 3 MARGINAL An Ultra 160 connection is barely adequate for an LTO 3 tape drive The bus would be saturated when providing 2 1 compressible data to an LTO 3 tape drive LTO 4 HH MARGINAL An Ultra 160 connec tion is barely adequate for an LTO 4...

Страница 122: ...not have enough bandwidth to support any of the drives and would require too many streams to make concurrency practical Ethernet 100 Base T 10 Base T Use a dedicated disk array or upgrade to RAID 5 POOR Add in RAID controllers RAID on a chip ROC RAID on the mother board ROMB internal parallel SCSI and internal IDE non RAID are inadequate transport mechanisms for LTO tape drives Internal disks on b...

Страница 123: ...e the value for the MAXIMUM on the backup server and any remote servers that are backed up The MAXIMUM DIRECTORY CACHE BUFFERS and MINIMUM DIRECTORY CACHE BUFFERS parameters may need to be increased if currently maxed out try setting the MINIMUM to the current MAXIMUM and then double the value for the MAXIMUM on the backup server and any remote servers that are backed up Set TCP DELAYED ACKNOWLEDG...

Страница 124: ...he tape drive File by file with a full featured backup application Performance impact VARIABLE File by file backup with a full featured backup application can be fast enough if the average file size is at least 64 k and there are not too many fragmented files Full featured backup applications also offer the best speeds for single file restores and allows for backing up only specific data Check the...

Страница 125: ...f you are more concerned about backup performance than single file restore disk image or sequential backups can offer a real performance benefit The disadvantage is that backup and restore operations work on an entire disk partition or LUN You might not be able to backup a subset of files or restore a single file If you can restore a single file the restore process will be slow Database backup Per...

Страница 126: ...orce the speed to a lower parallel SCSI type an Ultra 160 connection can provide enough bandwidth for two LTO 2 tape drives LTO 3 MARGINAL An Ultra 160 connection is barely adequate for an LTO 3 tape drive The bus would be saturated with 2 1 compressible data LTO 4 POOR An LTO 4 tape drive is unable to sustain maximum transfer speeds with 2 1 compressible data Parallel SCSI Ultra 160 Upgrade to Ul...

Страница 127: ...lean the tape drive See Tape cartridges on page 43 for instructions Service and repair Releasing the magazines manually If you cannot remove the magazines via the OCP or RMI do the following 1 Unplug the power cord from the device 2 From the back of the device find the access holes for the right and left magazines See Figure 63 Figure 63 Access holes for the right and left magazine Right magazine ...

Страница 128: ...anually remove the magazines and drive contact HP customer service for further instructions See HP technical support on page 169 The wellness test The wellness test exercises all Autoloader and tape drive hardware except the external connections and is useful for verifying that a device is working correctly The wellness test requires operator interaction with the mailslot so cannot be initiated fr...

Страница 129: ...tain a tape cartridge the device will skip that location If none of the top row corner slots contain a tape cartridge the device displays an error message 9 If additional cycles remain to be run the test will return to step 7 if there is a tape cartridge in the mailslot or step 8 if there is not a cartridge in the mailslot 10 At the conclusion of the test the device pops open the mailslot and wait...

Страница 130: ...n Figure 68 Figure 68 No additional information in the OCP error log If you press Next again the OCP will display the date and time in the format YYYY MM DD followed by the time in 24 hour clock format where 1 00 pm is 13 00 as shown in Figure 69 Figure 69 Date and time in the OCP error log Finding error code information on the RMI You can find error codes on the RMI Support Autoloader Logs page T...

Страница 131: ...ut must be generated and read on the host computer The support ticket can be downloaded from the device and then viewed on any computer with L TT installed To generate and view a report or support ticket from L TT 1 In the L TT By Product or By Connection tab select the device from the device list 2 Click the Health button on the main toolbar to generate and display a standard report or click the ...

Страница 132: ...cket file in the browser The top of the support ticket contains basic configuration information about the device as shown in Figure 71 Figure 71 Support ticket in viewer Expand HP Event Logs to see events divided into three categories Events in the last 24 hours Events in the last 31 days Events older than 31 days Set the Current Detail Level to see additional types of events Normal will only show...

Страница 133: ...on of the main error code The main error code 0x83 is displayed in parenthesis as the Global error code The error codes are described in Main error codes The text after the main error code Robotic controller generic problem in this example is the text description for the error code The error sub code 0x02 is displayed in parenthesis as the Module error code The error sub codes are described in Err...

Страница 134: ...rom EEPROM on robotic controller 82 Power cycle the unit and retry the opera tion Update the firmware to the latest version Setting of gripper1 motor parameters failed 84 Setting of slider2 motor parameters failed 85 Setting of elevator3 motor parameters failed 86 Setting of rotation4 motor parameters failed 87 Setting of sled5 motor parameters failed 88 Ensure that nothing is obstructing the grip...

Страница 135: ...with a flashlight For increased visibility also remove the tape drive If this error occurs on a tape load or un load power off the tape drive Remove the drive and inspect the front of the drive for any obstructions such as an improp erly placed label Run the wellness test Slider2 obstructed 8A Update the firmware to the latest version There have been a few firmware enhance ments to reduce the occu...

Страница 136: ...ver ensure that the six support feet are installed and that all of them are standing on a flat surface The device must be supported under both of its side edges or the bottom can bow and impede robotic movement Remove all magazines and look for any obstructions to the robot Run the wellness test Sled5 obstructed 8D Remove all magazines and look for any obstructions to the robot Run the wellness te...

Страница 137: ...tridge present sensor not found 98 Slider2 home sensor not found 99 Rotation4 home sensor not found 9A Power cycle the device and retry the op eration Remove the magazines and verify that all the clear plastic inserts in the magazine storage slots except the mailslots are present and firmly seated Run the wellness test Sled5 position sensor not found 9B Remove all magazines and look for any obstru...

Страница 138: ...ler failed B2 Check that all magazines are completely inserted and retry the operation If this error was caused by a manual magazine removal replace the magazine and try the operation again In earlier firmware versions the device could appear unresponsive if a magazine was left out of the device too long Power cycle the device to restore operation Update to the latest firmware version to prevent t...

Страница 139: ... write data to failure C5 Check the network cable Check that the network configuration is correct Power cycle the device and try again Ping command did not reach target C6 Ensure that the correct file was selected Retry firmware upgrade If not successful attempt a different firm ware upgrade method Cannot upgrade firmware from USB C7 Cannot upgrade firmware from FTP C8 Retry firmware upgrade If no...

Страница 140: ...8 Check the bar code label for proper ap plication and damage Run the wellness test again When running the wellness test the bar code did not match the previous value for that tape DA Power cycle the device I2C Bus failure DC Retry the backup with a token with space for more keys NOTE Each token can hold 100 keys Keys cannot be overwritten or deleted only unique keys will be written to the token K...

Страница 141: ...erly Drive exceeded temperature specification F0 Power cycle the device and retry the op eration Update Autoloader and drive firmware to the latest versions Re seat the tape drive to ensure a good connection to the device If possible try the drive in another drive bay Autoloader controller lost communication with the drive F1 Drive sled5 not present F2 Cycle power after several occurrences contact...

Страница 142: ... firmware to the current version Try the operation again If the error occurs again contact HP cus tomer support Invalid drive command F8 Invalid drive parameter F9 SDCI microcode error FA Update the tape drive firmware to the current version Try the operation again If the error occurs again contact HP cus tomer support Drive logged out FB Internal SCSI command failed with check condition FC Intern...

Страница 143: ...B Error during sled5 movement to rotation4 position 0C Error during rotation4 to slide position 0D Error slider2 init get range failed 0E Error during slider2 forward movement 0F Error gripper1 init get range failed 10 Error during slider2 home movement 11 Error during rotation4 to FAR position 12 Error sled5 init move to sensor failed 13 Error during sled move check shipping lock 14 Error invento...

Страница 144: ... Error during elevator3 movement in FLMoveRotation function 35 Error during sled5 movement in FLMoveSled function 36 Error during sled5 positioning to sensor in FLMoveSled function 37 Error during sled5 positioning to mailslot in FLMoveSled function 38 Error during sled5 positioning without sensor 39 Error during elevator movement without sensor 3A Error slot position sensor not found 3B Movement ...

Страница 145: ...ment 61 Error during first gripper1 movement 62 Error during second slider2 movement 63 Error during second gripper1 movement get range failed 64 Error during third slider2 movement move home failed 65 Release magazine failed 70 Error during sled5 movement to rotation4 position 71 Error during rotation4 to unlock position 72 Error during move sled5 to block 73 Opening mailslot failed 80 Error duri...

Страница 146: ... configuration settings not enough internal memory available for creating the file and restoring the file respectively B1 Save restore configuration settings restore buffer corrupted checksum calculation failed B2 Save restore configuration settings database field corrupted B3 Save restore configuration settings invalid personality B4 Save restore configuration settings invalid file B5 Check on ma...

Страница 147: ...y after Load command 91 Time out while loading tape 92 No activity after load command 93 Time out drive Unload 94 Drive terminated unsuccessfully 95 Tape not ejected at robot unload 96 Slot not free at robot unload 97 Cartridge not seated in load phase 1 98 Drive error codes Table 35 Drive error codes Description Error code Drive broken 01 Temperature exceeds limit 02 Tape error 03 Cleaning cartri...

Страница 148: ...list error invalid field 39 SCSI parameter list error parameter not supported 3A The application software made an illegal request SCSI parameter value invalid 3B SCSI saving parameters not supported 3C SCSI invalid ID message 3D SCSI destination element full 3E SCSI source slot or drive empty 3F SCSI wrong checksum 40 SCSI command sequence error 41 The application software requested to use a drive...

Страница 149: ...has an HP MSL G3 or 1 8 G2 firmware revision If firmware is not the correct type the wrong tape drive has been installed Use only HP approved support to insure that the correct tape drives are used SCSI tape drive not supported by this library 48 Verify that a supported magazine for that slot is inserted If the magazine is in the lower left position verify that the type of magazine is consistent w...

Страница 150: ...or 58 Error log overflow 59 Disable encryption before downgrading firmware Unable to downgrade firmware while encryption enabled 5A Verify that the tape cartridge is supported Update the tape drive firmware to the latest version to use LTO3 media Invalid cartridge LTO3 media is not supported with encryption enabled 5B Change the network settings to IPv4 before downgrading firmware IPv6 will not be...

Страница 151: ...c test Diagnostic tape write protect 66 The drive tried to read or write data from a tape from an incompatible LTO generation For compatibility information see Backward read compatibility page 47 Incompatible medium 67 Check the SCSI cable connection and verify that the maximum cable length is not exceeded Verify that the SCSI bus is properly terminated SCSI message error 70 SCSI parity error 71 S...

Страница 152: ...using an alternate firmware upgrade method Drive firmware revision has not changed after a tape drive firmware upgrade 88 Install new Autoloader firmware which will install a compatible robotics firmware version Invalid robotics code does not match with the loaded Autoloader firmware 8C Obtain a new cleaning tape for use when the current cleaning tape expires Cleaning tape nearly expired Only one ...

Страница 153: ...e and time of RTC set Date time set 0x4E Barcode format alignment changed Barcode format 0x4F Default configuration set Default config set 0x50 Library firmware was upgraded FW upgrade Library 0x51 Drive firmware was upgraded FW upgrade drive 0x52 Auto cleaning switched on or off Auto clean feature set 0x53 Drive Fibre Channel parameters changed Drive FC parameters 0x54 A power supply was added to...

Страница 154: ...he inventory was rescanned Inventory rescan 0x02 Drive cleaning process Drive clean 0x03 Open mailslot command Mailslot open 0x04 Close mailslot Mailslot close 0x05 Magazine remove event Magazine remove 0x06 Magazine insertion event Magazine reinsertion 0x07 Power on event Power on 0x08 Power off event Power off 0x09 User login at interface RMU OCP SERIAL User login 0x0A User logout at interface R...

Страница 155: ...contains keys that have not been backed up 0x1C Using HP Library Tape Tools to diagnose problems With HP Library Tape Tools installed on the host server you can Identify all parallel SCSI devices connected to your system View detailed configuration identification inventory and drive information for the device Easily update device and drive firmware Run advanced diagnostic tests including connectiv...

Страница 156: ...Troubleshooting 156 ...

Страница 157: ...ing a static sensitive component or as sembly Avoid touching pins leads or circuitry Use conductive field service tools WARNING The HP StorageWorks 1 8 G2 Tape Autoloader weighs 11 5 kg 25 4 lb without media and 13 1 kg 28 9 lb with media 8 cartridges When moving the Autoloader to reduce the risk of personal injury or damage to the Autoloader 1 observe local health and safety requirements and guid...

Страница 158: ...e products L TT includes several features designed for use by both HP storage customers and trained service personnel L TT is available for download at the following HP website at no cost http www hp com support TapeTools Frequent firmware image updates to the website are released on the Internet For optimal performance HP recommends that you update your system periodically with the latest device ...

Страница 159: ...rews on the tape drive 6 Pull straight back on the tape drive handle to remove the tape drive from the Autoloader see Figure 76 Figure 76 Removing the tape drive To replace a tape drive 1 Before installing the new drive inspect the connectors on the tape drive Ensure that the connectors are intact free of any foreign objects and have no cracks or deformed or bent contacts HP StorageWorks 1 8 G2 Ta...

Страница 160: ...ve 3 Tighten the blue captive thumbscrews by hand until the drive is secure 4 Attach the cords and terminator if necessary that you removed from the old tape drive 5 Power on the tape drive 6 If necessary upgrade the Autoloader and drive firmware using HP Library Tape Tools the RMI or a USB flash drive NOTE If you are upgrading a parallel SCSI drive be sure to use supported cabling configurations ...

Страница 161: ...ss Enter to select 3 Press Previous or Next until the screen displays either Unlock Left Magazine or Unlock Right Magazine 4 Press Enter to select the desired magazine to unlock 5 Enter the administrator password if requested 6 The display reads Left Magazine Unlocked or Right Magazine Unlocked 7 Pull the released magazine out of the device 8 The screen displays Insert Left Magazine or Insert Righ...

Страница 162: ...Autoloader Figure 79 Operations Magazines page Using the manual magazine release 1 From the back of the Autoloader determine which magazine needs to be removed using Figure 80 Figure 80 Manual magazine release holes Right magazine release 1 Left magazine release 2 Upgrading and servicing the Tape Autoloader 162 ...

Страница 163: ...e the Autoloader from the rack or tabletop conversion cover Replace the base chassis Reinstall the Autoloader into the rack or tabletop conversion cover if the support feet have not been applied Replace the cables tape drive and magazines Reconfigure the Autoloader WARNING The HP StorageWorks 1 8 G2 Tape Autoloader weighs 11 5 kg 25 4 lb without media and 13 1 kg 28 9 lb with media 8 cartridges Wh...

Страница 164: ... CAUTION If you cannot remove the tape cartridge from the tape drive handle the tape drive gently during the rest of the procedure to avoid damaging the tape and losing data Removing the cables magazines and tape drive If the OCP or RMI are operational remove the magazines using the RMI or OCP Power off the Autoloader Remove the power cord and other cables from the Autoloader If the magazines have...

Страница 165: ...mage the Autoloader To remove the base chassis from the rack or table top conversion cover 1 Obtain adequate assistance to lift and stabilize the Autoloader during removal and replacement 2 If the Autoloader is mounted in a rack or tabletop conversion cover from the front of the Autoloader see Figure 84 1 loosen the screws inside the left and right front bezel these are captive screws and cannot b...

Страница 166: ... shipment You must remove the shipping lock before powering on the device The shipping lock is held in place with a piece of tape and is located in the top center of the new chassis After the shipping lock is removed it should be stored on the back panel of the chassis for future use To remove and store the shipping lock a Locate the tape and lock at the top of the chassis see Figure 85 Figure 85 ...

Страница 167: ...ure 86 Securing the Autoloader to the rack To replace the tabletop conversion cover a Set the new base chassis on a sturdy surface in front of the cover b Slide the chassis into the cover until the front panel of the chassis is aligned with the cover c Tighten the captive screws on the chassis front panel until the cover is secure Figure 87 Sliding the Autoloader into the cover 3 Replace the tape ...

Страница 168: ...Upgrading and servicing the Tape Autoloader 168 ...

Страница 169: ...mprovement calls may be recorded or monitored HP websites For additional information see the following HP websites http www hp com HP corporate website http www hp com go storage HP storage products http www hp com go ebs compatibility information http www hp com service_locator HP Support website http www hp com support mslg3tstree interactive troubleshooting tool http www hp com support manuals ...

Страница 170: ...t failure to follow directions could result in bodily harm or death CAUTION Indicates that failure to follow directions could result in damage to equipment or data IMPORTANT Provides clarifying information or specific instructions NOTE Provides additional information TIP Provides helpful hints and shortcuts Customer Self Repair HP customer self repair CSR programs allow you to repair your StorageW...

Страница 171: ...Chassis Optional CSR Rack mount kit Mandatory CSR Rack to tabletop conversion kit Subscription service HP recommends that you register your product at the Subscriber s Choice for Business website http www hp com go e updates After registering you will receive e mail notification of product enhancements new driver versions firmware updates and other product resources HP authorized reseller For the ...

Страница 172: ...Support and other resources 172 ...

Страница 173: ...s Weight Environmental specifications Table 42 Environmental specifications Specification Characteristic Temperature 10º to 35º C Operating 30º to 60º C Non operating 10º to 35º C Recommended operating temperature 10º C per hour Temperature shock immunity maximum rate of change Miscellaneous less than 200 microgram cubic meter Dust concentration 3050 meters 10 000 ft Altitude Humidity 20 to 80 RH ...

Страница 174: ...Technical specifications 174 ...

Страница 175: ...ectronic devices including computers generate RF energy incidental to their intended function and are therefore covered by these rules These rules place computers and related peripheral devices into two classes A and B depending upon their intended installation Class A devices are those that may reasonably be expected to be installed in a business or commercial environment Class B devices are thos...

Страница 176: ...e equipment into an outlet on a circuit that is different from that to which the receiver is connected Consult the dealer or an experienced radio or television technician for help Declaration of Conformity for products marked with the FCC logo United States only This device complies with Part 15 of the FCC Rules Operation is subject to the following two conditions 1 this device may not cause harmf...

Страница 177: ... 336 EEC or 2004 108 EC Compliance with these directives implies conformity to applicable harmonized European standards European Norms which are listed on the EU Declaration of Conformity issued by Hewlett Packard for this product or product family This compliance is indicated by the following conformity marking placed on the product This marking is valid for non Telecom products and EU harmonized...

Страница 178: ...notices Class A equipment Class B equipment Taiwanese notices BSMI Class A notice Taiwan battery recycle statement Recovery text Please recycle waste batteries Recovery mark Four in one recycling symbol Regulatory compliance and safety 178 ...

Страница 179: ...HP StorageWorks 1 8 G2 Tape Autoloader User and service guide 179 ...

Страница 180: ...exposure to hazardous radiation Do not try to open the module enclosure There are no user serviceable components inside Do not operate controls make adjustments or perform procedures to the laser device other than those specified herein Allow only HP Authorized Service technicians to repair the unit The Center for Devices and Radiological Health CDRH of the U S Food and Drug Administration impleme...

Страница 181: ...French laser notice German laser notice Italian laser notice HP StorageWorks 1 8 G2 Tape Autoloader User and service guide 181 ...

Страница 182: ...Japanese laser notice Spanish laser notice Recycling notices English notice Regulatory compliance and safety 182 ...

Страница 183: ...Bulgarian notice Czech notice Danish notice Dutch notice HP StorageWorks 1 8 G2 Tape Autoloader User and service guide 183 ...

Страница 184: ...Estonian notice Finnish notice French notice German notice Regulatory compliance and safety 184 ...

Страница 185: ...Greek notice Hungarian notice Italian notice Latvian notice HP StorageWorks 1 8 G2 Tape Autoloader User and service guide 185 ...

Страница 186: ...Lithuanian notice Polish notice Portuguese notice Romanian notice Regulatory compliance and safety 186 ...

Страница 187: ...Slovak notice Spanish notice Swedish notice Turkish notice Türkiye Cumhuriyeti EEE Yönetmeliğine Uygundur HP StorageWorks 1 8 G2 Tape Autoloader User and service guide 187 ...

Страница 188: ...Battery replacement notices Dutch battery notice Regulatory compliance and safety 188 ...

Страница 189: ...French battery notice German battery notice HP StorageWorks 1 8 G2 Tape Autoloader User and service guide 189 ...

Страница 190: ...Italian battery notice Japanese battery notice Regulatory compliance and safety 190 ...

Страница 191: ...d should be greater than the voltage and current rating marked on the product In addition the diameter of the wire must be a minimum of 1 00 mm2 or 18 AWG and the length of the cord must be between 1 8 m 6 ft and 3 6 m 12 ft If you have questions about the type of power cord to use contact an HP authorized service provider NOTE Route power cords so that they will not be walked on and cannot be pin...

Страница 192: ...Regulatory compliance and safety 192 ...

Страница 193: ...static sensitive component or assembly See the next section Grounding methods There are several methods for grounding Use one or more of the following methods when handling or installing electrostatic sensitive parts Use a wrist strap connected by a ground cord to a grounded workstation or computer chassis Wrist straps are flexible straps with a minimum of 1 megohm 10 percent resistance in the gro...

Страница 194: ...Electrostatic discharge 194 ...

Страница 195: ... or drive Ultrium cleaning cartridge labels have a CLN prefix CLI Command Line Interface daisy chaining Parallel SCSI peripherals can be daisy chained together Each device has a second port used to connect the next device in line The last device in the chain must be terminated data cartridge A term used to distinguish a cartridge onto which a tape drive may write data from a cartridge used for cle...

Страница 196: ...e identification and locations of all cartridges in the Autoloader LAN Local Area Network A computer network covering a local area such as a home office or small building that is usually based on Ethernet technology LCD Liquid crystal display A type of display that uses two sheets of polarizing material with a liquid crystal solution LED Light emitting diode An electronic device that lights up whe...

Страница 197: ... robotic components and that controls the movement of the robot between storage slots drives and load ports SAS Serial Attached SCSI A computer bus technology and serial communication protocol for direct attached storage devices including disk drives and high performance tape drives SCSI Pronounced scuzzy an acronym for Small Computer System Interface a standard interface and command set for trans...

Страница 198: ...ator into the connector An appropriate terminator is shipped with parallel SCSI devices U A measure of chassis height 1U in rack measurement is 44 45 millimeters 1 75 inches USB Universal Serial Bus A serial bus standard used to interface devices World Wide Identifier A unique identifier in a Fiber Channel or SAS storage network also called a World Wide Name WWN The first three bytes are derived f...

Страница 199: ...0 configuration settings restoring from file RMI 72 saving to a file RMI 72 configure administrator password OCP 90 RMI 69 alerts RMI 72 Autoloader OCP 92 RMI 61 automatic cleaning OCP 95 RMI 61 bar code reporting format OCP 91 RMI 61 date and time OCP 93 RMI 70 error log mode RMI 71 event notification parameters RMI 72 mailslot OCP 91 RMI 61 network OCP 94 RMI 65 network management RMI 67 reserve...

Страница 200: ...ons Commission notice 175 firmware finding version RMI 77 updating OCP 103 RMI 77 floor mats dissipating 193 G ground strap specifications 193 grounding methods 193 straps wearing 193 suggested equipment for 193 H HBA requirements 18 heel straps using 193 help obtaining 169 host adapter parallel SCSI troubleshooting 108 SAS troubleshooting 110 HP technical support 169 I installing attaching the fe...

Страница 201: ...l SCSI troubleshooting backup application 108 compatibility 109 device driver 108 termination 109 parts proper handling 193 storing 193 transporting 193 password default 51 password locks enabling 100 power cord compliance notice 191 current rating 191 set 191 voltage rating 191 preventing electrostatic damage 193 product specification data storage 15 data transfer rate 15 LTO generation 15 SCSI p...

Страница 202: ...icket downloading OCP 105 RMI 79 symbols in text 170 T Taiwanese notices 178 tape cartridges labeling 45 read and write compatibility 47 types 43 using and maintaining 44 write protecting 46 tape drive cleaning OCP 97 RMI 79 force ejecting tape 105 powering on and off 101 RMI 64 TapeAssure 17 technical support HP 169 service locator website 169 termination parallel SCSI 109 text symbols 170 toe st...

Страница 203: ...y OCP 87 RMI 60 network OCP 89 RMI 56 65 network management RMI 67 status OCP 89 RMI 51 voltage compliance rating 191 W websites customer self repair 170 HP 169 HP Subscriber s Choice for Business 171 work mat static dissipating 193 wrist straps specifications 193 using 193 HP StorageWorks 1 8 G2 Tape Autoloader User and service guide 203 ...

Страница 204: ...204 ...

Отзывы: