


222
Firmware Upgrades
The Upgrade Process
1. Press the F2 key for the Terminal Properties dialog box.
2. Click on the Network tab.
3. Click on the Obtain an IP Address From DHCP Server radio button, if the
function is not enabled.
4. Click on the Apps tab.
5. Click on the DHCP Automatic Update Enable check box on the Apps
properties sheet, if the function is not enabled.
Note
You have now enabled the automatic DHCP function.
You will also need to configure your DHCP option IDs.
Make sure your DHCP options match the options on
the DHCP server.
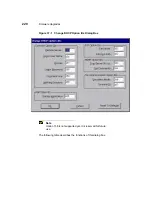
6. If you want to change the DHCP option ID values, click on the Change DHCP
Option... command button.
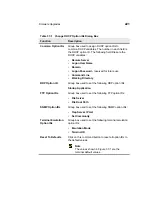
7. Use the Change Option IDs dialog box to change options, then click on OK to
save.
Note
Pay special attention to these FTP Option IDs
functions: File Server (the location of the server where
the firmware resides), and File Root Path (the location
of the firmware). If they are not correct, the upgrade will
fail.
Note
You will need the image and the params.ini files on the
FTP server to do the upgrade.
8. Shut down the terminal. See “Shutting Down the Terminal” for more information.
Your terminal will automatically upgrade itself when it is turned on again.
Содержание Compaq t1010
Страница 1: ...T1000 T1010 Series Windows based Terminal Administrators Guide Software Version 3 5 ...
Страница 2: ...T1000 T1010 Series Windows based Terminal Administrators Guide Software Version 3 5 February 2001 ...
Страница 25: ...Terminal Installation 1 Model T1000 Terminal Installation 2 Model T1010 Terminal Installation ...
Страница 27: ...4 Terminal Installation Figure 1 1 T1000 Terminal Back Panel Connectors ...
Страница 33: ...10 Terminal Installation Figure 2 1 T1010 Terminal Back Panel Connectors ...
Страница 44: ...22 Advanced User Interface Figure 3 5 Desktop and Keyboard Settings Dialog Box ...
Страница 71: ...50 Advanced User Interface Figure 6 2 Preferences Dialog Box Figure 6 3 Proxy Information Dialog Box ...
Страница 103: ...Connection Configuration 85 Figure 11 3 Dial Up Configuration Wizard 3 ...
Страница 114: ...98 Connection Configuration Figure 14 1 Script Name Dialog Box Figure 14 2 New Script Name Dialog Box ...
Страница 159: ...148 External Devices Figure 21 1 Devices Properties Sheet ...
Страница 167: ...156 External Devices Figure 23 1 Uninstall Dialog Box ...
Страница 189: ...External Devices 179 Figure 28 5 Printer Properties Dialog Box Layout Tab ...
Страница 192: ...External Devices 183 Figure 29 2 Printers Properties Sheet ...