7-5
Adjustments/Calibrations
3. Press Enter at the “Status” display.
4. Use the arrow buttons to scroll to the “Utilities” main menu. Press Enter. If not
already set to Full menu mode, scroll to Full and press Enter.
5. User accuracy:
Scroll to the “Accuracy” submenu. Press Enter.
Service accuracy:
Simultaneously press the Enter and Up Arrow buttons.
6. User accuracy:
Scroll to the “Recalibrate” submenu. Press Enter.
Service accuracy:
Scroll to the “Accuracy Calib” submenu. Press Enter.
The “Create plot / Measure plot” message displays.
7. Press the Up Arrow button to select “Create plot.”
A “Creating calibration plot” message displays while plotting.
8. Wait until the “Remove media / Continue” message displays.
9. Press the Down Arrow button to “Continue.”
The “Create plot / Measure plot” message displays.
10. Press the Down Arrow button to select “Measure plot.”
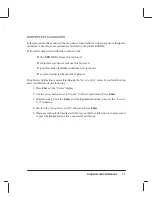
11. Rotate the plot so that the edge with arrows points to the leading edge, then reload
the plot with the arrow edge print side down.
Load arrow edge
print side down
Arrow edge
(C) C2847-15a(UM)
12. The plotter will load the plot and then measure the alignment marks using the edge
sensor on the pen carriage.
13. Press the Down Arrow button to continue when the “Calibrate done / Continue”
message is displayed and the plot is fed out. Accuracy calibration is complete.
A Calibration Plot may be saved and reused for future calibrations by selecting “Measure
plot” when calibration is necessary.
Содержание C2858A
Страница 125: ...7 10 Adjustments Calibrations Notes ...
Страница 155: ...9 4 Product History Notes ...
Страница 160: ...10 5 Parts and Diagrams Illustrated Parts Breakdown Stand Assemblies 1 2 3 4 5 6 7 8 1 3 5 3 3 3 3 3 9 9 C C2858 1 1 ...
Страница 164: ...10 9 Parts and Diagrams Illustrated Parts Breakdown C2859A Electronics Enclosure C C2858 3 1 ...
Страница 166: ...10 11 Parts and Diagrams Illustrated Parts Breakdown C2858A Electronics Enclosure C C2858 4 1 ...
Страница 176: ...10 21 Parts and Diagrams Illustrated Parts Breakdown Service Station Assembly 1 2 3 4 5 6 C C2858 9 1 7 8 9 10 11 12 ...
Страница 180: ...10 25 Parts and Diagrams 1 3 Illustrated Parts Breakdown Pen Carriage Assembly 6 C C2858 11 1 5 7 2 8 9 2 4 5 10 ...
Страница 182: ...10 27 Parts and Diagrams Illustrated Parts Breakdown Paper Drive Assemblies C C2858 12 1 ...
Страница 184: ...10 29 Parts and Diagrams Illustrated Parts Breakdown Bail and Overdrive Support Assemblies C C2858 13 1 ...
Страница 188: ...10 33 Parts and Diagrams Illustrated Parts Breakdown Starwheel Starguard and Chassis Assemblies C C2858 15 1 ...
Страница 198: ... ...

