6-45
Removal and Replacement
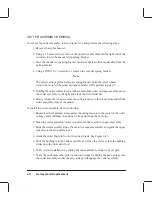
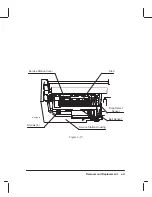
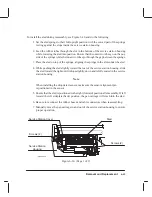
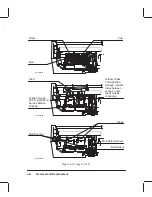
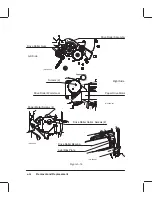
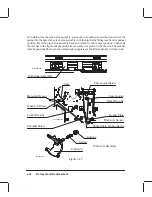
To install the sled during reassembly, see Figure 6-30 and do the following:
1. Set the sled springs to their full upright position with the curved part of the springs
resting against the stops inside the service station housing.
2. Feed the rubber tubes through the slot in the bottom of the service station housing
while lowering the sled into position. Ensure that the outer two tubes go on the out-
side of the springs while the inner two tubes go through the gap between the springs.
3. Place the sled on top of the springs, aligning the springs in the slots under the sled.
4. While pushing the sled slightly toward the rear of the service station housing, slide
the sled toward the right until it drops slightly down and is fully seated in the service
station housing.
Note
When installing the drop detect sensor, make sure the sensor alignment pin
is positioned in the sensor.
5. Ensure that the sled is positioned to the right (forward) position after assembly. If left
toward the left sideplate (back) position, the pen carriage will crash into the sled.
6. Be sure to reconnect the rubber hoses and cable connectors when reassembling.
7. Manually move the pen carriage in and out of the service station housing to ensure
proper operation.
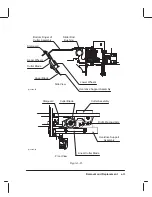
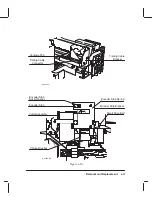
(C)C2858-78
Figure 6-30. (Page 1 of 2)
Service Station
Housing
Sled
Service Station Cover
Screws (2)
Screws (2)
Содержание C2858A
Страница 125: ...7 10 Adjustments Calibrations Notes ...
Страница 155: ...9 4 Product History Notes ...
Страница 160: ...10 5 Parts and Diagrams Illustrated Parts Breakdown Stand Assemblies 1 2 3 4 5 6 7 8 1 3 5 3 3 3 3 3 9 9 C C2858 1 1 ...
Страница 164: ...10 9 Parts and Diagrams Illustrated Parts Breakdown C2859A Electronics Enclosure C C2858 3 1 ...
Страница 166: ...10 11 Parts and Diagrams Illustrated Parts Breakdown C2858A Electronics Enclosure C C2858 4 1 ...
Страница 176: ...10 21 Parts and Diagrams Illustrated Parts Breakdown Service Station Assembly 1 2 3 4 5 6 C C2858 9 1 7 8 9 10 11 12 ...
Страница 180: ...10 25 Parts and Diagrams 1 3 Illustrated Parts Breakdown Pen Carriage Assembly 6 C C2858 11 1 5 7 2 8 9 2 4 5 10 ...
Страница 182: ...10 27 Parts and Diagrams Illustrated Parts Breakdown Paper Drive Assemblies C C2858 12 1 ...
Страница 184: ...10 29 Parts and Diagrams Illustrated Parts Breakdown Bail and Overdrive Support Assemblies C C2858 13 1 ...
Страница 188: ...10 33 Parts and Diagrams Illustrated Parts Breakdown Starwheel Starguard and Chassis Assemblies C C2858 15 1 ...
Страница 198: ... ...


