58
Programming Guide — JR™ XP783/XP347/XP388S
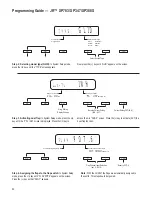
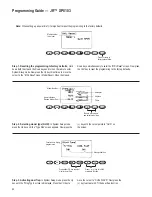
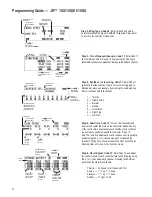
E-F.U
0
%
MIX
POS
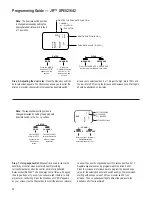
Position Indicator
Function Being
Programmed
Elevator Operating Direction
D:
Down Elevator
U:
Up Elevator
Elevator-to-Flap
Mixing Value
(Range –125%)
Increase/Decrease
Current Mixing Value
+
CLR
–
To E-F Activation
Switch Selection
UP
CH
DN
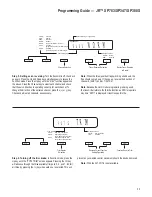
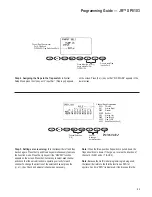
AL-F
0
%
MIX
NOTE: If OFF appears (where the mixing
value is located in our example) move the
flap switch to the opposite position.
If OFF is still on the LCD, move the mixing
switch to the opposite position.
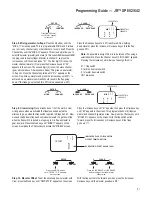
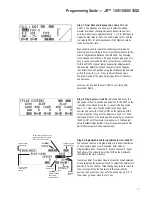
Function Being
Programmed
Mixing Value (Range –125%)
Increase/Decrease
Mixing Value
Resets Mixing Value
to Factory Default 0%
+
CLR
–
To Aileron-to-Flap
Mixing Activation
Selection
UP
CH
DN
This may show up as E-F.D
unless you hold up elevator.
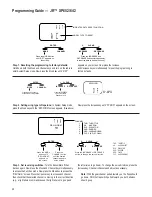
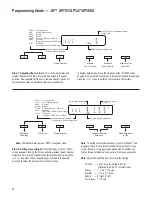
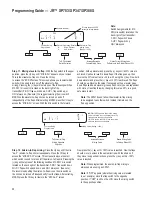
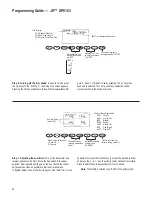
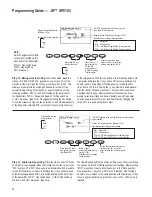
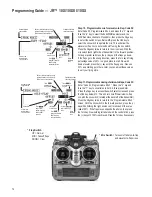
Step 11. Mixing elevator to flap:
With the flap switch in the upper
position, press the
Up
key until “MIX E-F.U” appears on your screen.
This is the elevator-to-flap mix. Press the
CH
key
to access the “EF: SW”screen. This screen allows you to select which
switch will be used to turn on/off the elevator-to-flap
mixing. Pressing the (+) key will select one of the following switches:
MX SW = mix switch (located on the back right of the
transmitter), F-DN = flap switch down, F-UP = flap switch up, or
ON = always on. (See note.) We suggest selecting the mix switch
MXSW so the elevator-to-flap mix can be turned on and off
independently of the flaps. After selecting MXSW, press the
CH
key to
access the “MIX E-F.U” screen. With the Mix switch in the forward
position, hold up elevator and press the (+) key until a 35% value is
achieved. Up should result in down flaps. If the flap goes up, then
reverse the 35% value from a +35 to a -35 using the (-) key. Now hold
down elevator and press the (+) key until 35% is achieved. The flaps
should go up. Reverse the value if necessary until up elevator gives
down flaps and down elevator gives up flaps. Later you can experiment
with more or less flap throw by changing this value. 35% is a good,
safe place to start.
Note:
The XP347 doesn’t allow the elevator-to-flap mixing
to be assigned to another switch. Instead it remains on the
flap up position.
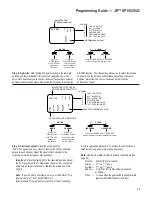
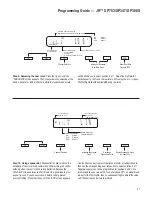
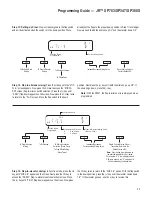
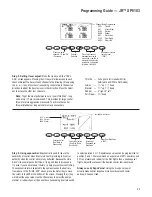
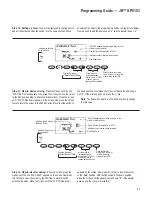
Step 12. Aileron-to-flap mixing:
Press the
Up
key until the mix
“AL-F” (aileron-to-flap mix) screen appears. Press the
CH
key to
access the “MIX AF: SW” screen. This screen allows you to select
which switch is used to turn on/off the aileron-to-flap mix. Pressing the
(+) key will select one of the following switches: MXSW = mix switch
located on the back right of the transmitter, F-DN = flap switch down,
FU+D = flap switch up and down, and ON = always on. (See note.)
We recommend putting the aileron-to-flap mix on the mix switch so
the mix can be turned off independently from the flaps. After selecting
MXSW, press the
CH
key to return to the “MIX AL-F” screen.
Now press the (+) key until +100% value is reached. Now the flaps
should move in unisonin the same direction with the ailerons. If
they move in opposite directions, press the (-) key until a -100%
value is reached.
Note:
When programmed, the aileron-to-flap mixing is
always on when using an XP347.
Note:
If “OFF” appears (where the mixing value is located
in our example), move the flap switch to the opposite
position. If “OFF” is still on the LCD, move the mixing switch
to the opposite position.
Clears Current Mixing Value
(Tx Returns to the Default Value of 0%)
Note:
Switch Assignments for MX
SW (mix switch) located on the
back right of the transmitter:
F-DN = flap switch down
F-UP = flap switch up
ON = always on

