background image

HRDV Reference Guide

Rev 1.00

119

Document 900.0261

04/05

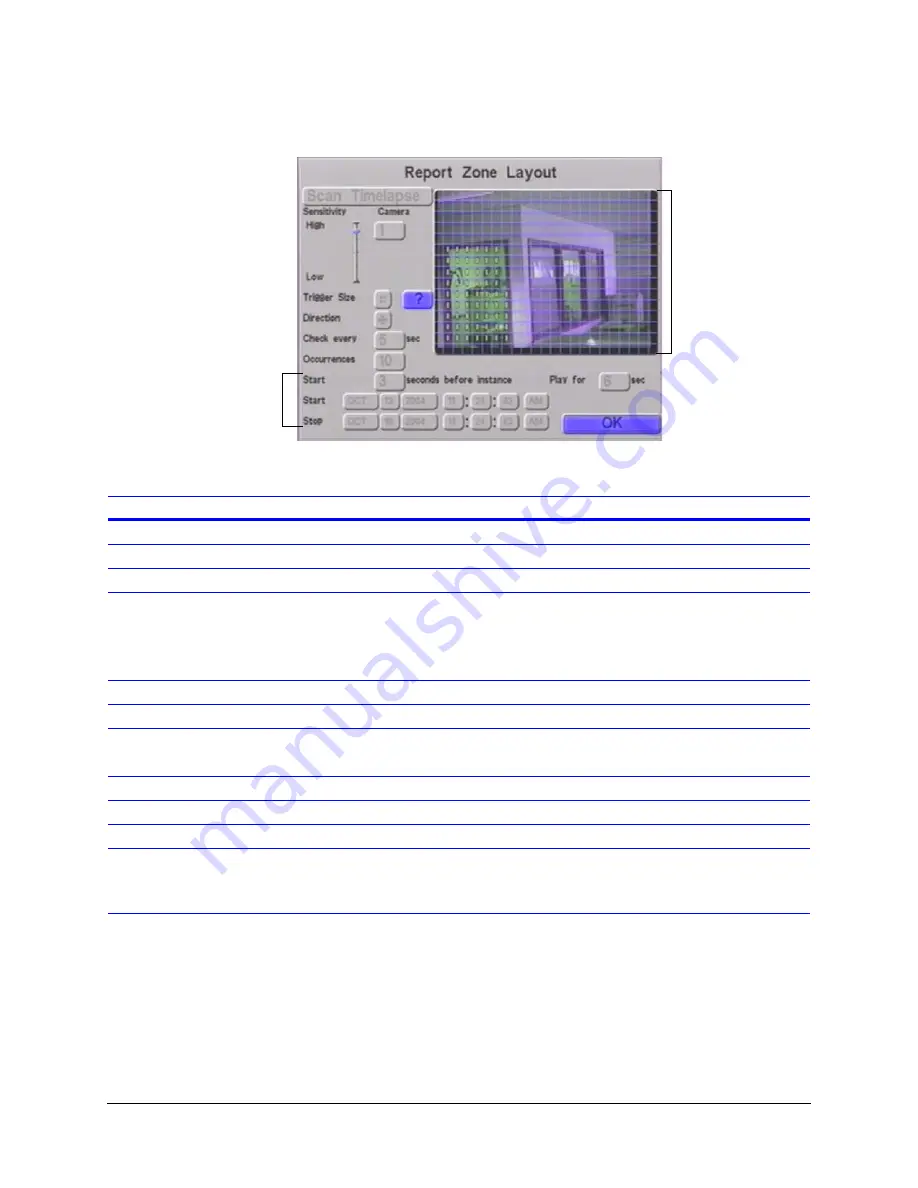
Figure 17-5

Report Zone Layout Screen

The following table describes the fields on the Report Zone Layout screen. 

Time 
criteria

Motion zone 
layout grid

Field

Description

Scan Timelapse

Searches all timelapse clips for the specified motion criteria.

Scan Events

Searches all event clips for the specified motion criteria.

Scan All Data

Searches all video clips (timelapse and event) for the specified motion criteria.

Sensitivity

Select the sensitivity of the motion detector:

High

 sensitivity will detect almost all motion but may yield too many results.

Low

 sensitivity will yield a manageable number of results but may miss the instance 

you are looking for.

Camera

Select the video clips from a specific camera to be searched for motion.

Trigger Size

Set the minimum size a moving object must be in order to be detected.

Direction

Set the direction(s) the motion must be moving to be detected. Options are:

Left, Right, Up, Down or any direction

?

Opens a small help window.

Check Every

Set how often the report should check for motion.

Occurences

Set the maximum number of instances to report and if reached, stop searching.

Time criteria

Set how many 

seconds before instance

 the beginning of each motion clip should 

Start

 at, and how long it should 

Play for

 afterwards.

Set the 

Start

 and 

Stop

 time and date for the video to be searched for motion.

Содержание HDVR

Страница 1: ...Document 900 0261 04 05 Rev 1 00 Reference Guide HRDV Digital Video Recorder ...

Страница 2: ......

Страница 3: ...HRDV Reference Guide ...

Страница 4: ...Revisions Issue Date Revisions 1 00 03 05 New rebranded document based on 900 0083 ...

Страница 5: ...r Indicators 9 3 System Startup 11 System Components 11 Performing an Initial System Check 13 Turning On the HRDV the First Time 13 Rebooting Restarting the HRDV 13 Attaching a Monitor 13 Setting the HRDV to Factory Defaults 13 Attaching a Camera 14 Initial Installation Mandatory Steps 14 Connecting the HRDV16 8 to Peripherals 15 4 Programming Overview 19 Entering Program Mode 19 Navigating in the...

Страница 6: ...Starting and Stopping Recording 57 Timelapse and Event Recording Considerations 58 Event Handling 58 12 Timelapse Recording Setup 61 Setting Up Simple Timelapse 62 Setting Simple Timelapse Mode With Motion Detect Enabled 65 Setting Advanced Timelapse Mode 68 Setting Recording Times For Holidays 74 13 Motion Event Recording Setup 77 Setting Motion Events 77 Setting Up Motion Zones 79 Setting Motion...

Страница 7: ... Swapping the Removable Drive 133 Archiving Images to a VCR 134 Format the Archive Drive 134 19 Networking on Ethernet 135 Enabling Remote Access 135 Installing an 10 100BaseT Network PCMCIA Card 138 Setting Bandwidth Throttle on the HRDV8 16 138 User Definable TCP Port Number for RAS 139 20 Text 143 Step 1 Set Up Text Ports 143 Step 2 Configure the Video Inputs 145 Step 3 Set Text Events 146 Step...

Страница 8: ... 183 Viewing System Log Information 184 Software Update 185 Downloading Software Using the CD ROM Drive 185 Downloading Software Using RAS 186 Windows Com Port Speed 187 Installing the SUU 188 Attaching the SUU Cable 188 Downloading Software Using SUU 188 Setting up the HRDV16 8 189 Appendix D Installation Scenarios 191 Appendix E Solutions 195 Appendix F S M A R T 197 Appendix G Video Formats and...

Страница 9: ...ct a User Screen 30 Figure 6 2 User Permissions Screen 31 Figure 7 1 Clock Setup Screen 33 Figure 8 1 General Setup Screen 35 Figure 8 2 Alarm Event Setup Screen 37 Figure 8 3 Alarm Event Calendar Screen 38 Figure 9 1 User Preferences Screen 43 Figure 10 1 Disk Menu 48 Figure 10 2 Disk Setup Screen 48 Figure 10 3 Disk Status Screen 52 Figure 10 4 Data Recovery Screen 53 Figure 10 5 FileSystem Veri...

Страница 10: ... Figure 17 6 Run A Report Screen 120 Figure 17 7 Setup a Report to Run Automatically Screen 123 Figure 18 1 Archive Camera Selection 129 Figure 18 2 Archive Camera Selection 132 Figure 19 1 Remote Access Screen 136 Figure 19 2 User Preferences Screen 139 Figure 19 3 Sample Multiple HRDV Units One Common IP Address 140 Figure 19 4 Network Connection Screen 140 Figure 20 1 Text Ports Screen 144 Figu...

Страница 11: ...ble 2 3 Video Monitor Record Indicators 10 Table 3 1 Rear Panel Connections 16 Table 15 1 Front Panel Function Controls 92 Table 16 1 Video Monitor Control Buttons 109 Table A 1 Advanced Remote and Email Setup 166 Table B 1 Hex to ASCII Conversion Chart 181 Table F 1 SMART Attributes 198 Table H 1 Technical Specifications 205 Table H 2 Keyboard Functions 209 ...

Страница 12: ...Rev 1 00 viii Document 900 0261 04 05 Tables ...

Страница 13: ...ures Chapter 2 Controls LCD Display and Indicators provides an overview of the front panel control buttons and describes how to use them to navigate through the menus It also describes the LCD display and video monitor indicators Chapter 3 System Startup shows the rear panel connections and tells you how to connect the HRDV16 8 to peripheral equipment Chapter 4 Programming Overview describes how t...

Страница 14: ...to save copy clips or images to a CD ROM drive removable drive or to a VCR Chapter 19 Networking on Ethernet covers how to set up network connectivity Chapter 20 Text provides instructions for setting up the four text insertion ports to interface with POS and cash registers Chapter 21 Pan Tilt Zoom PTZ describes how to use PTZ control on the HRDV Chapter 22 Evidence CD covers how to make an eviden...

Страница 15: ... contact Honeywell see Warranty and Service WARNING The HRDV16 8 is intended for indoor use To reduce a risk of fire or electric shock do not expose this product to rain or moisture Document title Part number HRDV16 8 Common Operating Procedures 900 0371 HRDV Quick Installation 900 0262 HRDV RAS User Guide 900 0279 Internal Drive Upgrade Kit for HRDV16 8 DV16 8 DUK Application Note D001186 HRDV16 ...

Страница 16: ...o frequency energy and if not installed and used in accordance with the instruction manual may cause harmful interference to radio communications Operation of this equipment in a residential area is likely to cause harmful interference in which case the user will be required to correct the interference at his own expense Caution Changes or modifications not expressly approved by the party responsi...

Страница 17: ...s document uses the following typographical conventions Font What it represents Example Lucida Values of editable fields that are mentioned in the body text of the document for reference purposes but do not need to be entered as part of a procedure The Daylight Savings Time field can be set to North America Text strings displayed on the screen The message Exit this menu displays Lucida Bold Words ...

Страница 18: ...Rev 1 00 900 0261 04 05 About This Document xiv ...

Страница 19: ...preview video immediately after changing date time and camera values Go To function If Timelapse is selected and a Go To performed you can play back video like one big VCR tape without having to jump from clip to clip If Event is selected and a Go To performed you may only be able to play back video from within a single short video clip QNX real time operating system HRDV firmware stored in flash ...

Страница 20: ...edded viewer for authorities Alarm and e mail notification over TCP IP Single IP addresses for multiple HRDV units Adjustable Ethernet packet size Simultaneous live and remote viewing 200 250 GB IDE drive support Configurable auto delete Playback lock to one camera Automatic switch to live camera on alarm Administrator password recovery Auto record after 60 seconds Timelapse search options Autobre...

Страница 21: ...t a stored bmp or jpg image file directly from RAS Use RAS Viewer to read CD ROMs Upgrade your firmware without disturbing system settings Optimized RAS HRDV protocol increases the refresh rate for live viewing and playback Audio support for live monitoring Support for HRDV16 HRDV8 Multiple RAS user access PTZ camera support Pelco D Kalatel Cyberdome and VCL Encrypted remote password management su...

Страница 22: ...Rev 1 00 4 Document 900 0261 04 05 Features Overview ...

Страница 23: ...he system It allows overall control of What is displayed through the monitor Whether live or previously recorded video is displayed Adjusting the configuration settings to adapt to changing requirements of the security application During programming you control the cursor on the screen with the control buttons on the HRDV16 8 front panel Use these control buttons to Navigate through the menus Move...

Страница 24: ...next menu item Increment to a larger value FUNCTION Move down through the menu structure Decrement to a smaller value Activates secondary functions when combined with other control buttons PLAY Move right through the menu structure If cursor is currently at a menu selection cycles the value backward Open the Go To search function RECORD Move left through the menu structure If cursor is currently a...

Страница 25: ...the arrow buttons at the bottom of the Text Entry screen Use the control buttons on the front panel to move to the different buttons on the Text Entry screen To use a button move to it then press Enter on the front panel Camera 1 Select camera 1 Mark a clip for archiving Camera 2 Select camera 2 Select all clips for archiving Jog wheel Enter values during Program mode Select clips Set clip playbac...

Страница 26: ...2 3 4 5 6 7 8 9 10 11 12 13 14 15 16 10 06 02 10 01 01 RECORD Time Date Options are RECORD PLAY IDLE RECPLY LCD display options Description Upper line RECORD Displays while in Record mode even when motion detect is enabled and no motion is occurring PLAY Indicates HRDV is set to Playback mode only IDLE Indicates Record is disabled or turned off RECPLY Indicates HRDV continues to record while in Pl...

Страница 27: ...o monitor Table 2 2 describes the control button functions and Table 2 3 describes the record indicators Figure 2 1 Video Monitor Indicators Record indicator Play control button indicates a PTZ camera Table 2 2 Video Monitor Control Buttons Control buttons Description Clip paused by user or clip has ended Clip playing forward or reverse in real time speed Clip playing forward or reverse with adjus...

Страница 28: ...g timelapse video Dull red with slash Simple Timelapse and motion is enabled in the Timelapse Recording screen No motion is currently detected and the HRDV is not recording timelapse clips to the timelapse disk drive partition HRDV is waiting for a motion event Flashing bright to dull red Event recording for any combination of motion text or alarm events Motion text or alarm event currently detect...

Страница 29: ...ment to connect to the HRDV16 8 to meet your individual needs This can be any combination of Video Cameras There are 16 analog video inputs and 16 analog video outputs The HRDV8 has 8 analog video inputs and 8 analog video outputs Video signal format is standard NTSC PAL color or EIA CCIR monochrome Video inputs are composite BNC with BNC loop connectors Video outputs are composite BNC or S Video ...

Страница 30: ...t The PCMCIA remote access port can be used for a PCMCIA modem or Ethernet card This port is used together with the HRDV16 8 Remote Access Software to control your HRDV unit from a PC Remote connection allows you to collect data for analysis or to access the HRDV16 8 video monitoring video playback alarm reset and Program mode from a remote site All remote access to the HRDV16 8 is protected by pa...

Страница 31: ... on the HRDV To restart it 1 Disconnect the power cable from either the HRDV or from the wall socket 2 Wait 15 seconds then re connect the power cable to apply power to the HRDV This wait allows any stored capacitance to discharge clearing memory for proper operation Attaching a Monitor 1 Plug your monitor into an AC receptacle 2 Connect a BNC cable to the Video In jack on the monitor Connect the ...

Страница 32: ...nnection This completes the initial system check You are now ready to install your HRDV system Initial Installation Mandatory Steps The initial HRDV16 8 system installation consists of the following steps 1 Power up the HRDV16 8 unit and wait two minutes 2 Log in to the HRDV see Entering Program Mode page 19 3 Set the system to the factory defaults a Press MENU on the HRDV16 8 front panel Select M...

Страница 33: ...nd outputs external storage and ATM POS interface equipment see Connecting the HRDV16 8 to Peripherals 6 Optional Connect the HRDV16 8 to a PC via a modem null modem or Ethernet for remote operation For more information refer to the HRDV RAS User Guide 7 Configure the HRDV16 8 for desired operation See Chapter 4 to Chapter 14 for detailed information or see Chapter 5 Easy Configurator for an overv...

Страница 34: ...his output always provides full screen sequential switching views of some or all cameras This display is completely independent of the Monitor 1 display Note This output does NOT display configuration menus S Video Connect the primary monitor to the digitally processed S Video output This output is an S Video output with full or multiscreen views and displays the user interface during Menu mode an...

Страница 35: ...Video Systems web site SCSI Connect an external RAID device to this SCSI connector 1 Connect an external SCSI device to the 68 pin SCSI control port on the rear panel Set the SCSI ID in the range of 4 to 6 The SCSI ID must not conflict with the ID of internal SCSI devices 2 Apply power to the external device prior to turning the HRDV on This HRDV queries the device during start up to ensure it is ...

Страница 36: ...Rev 1 00 18 Document 900 0261 04 05 System Startup ...

Страница 37: ...ode Note Recording stops in program mode To enter Program mode 1 Press MENU on the HRDV16 8 front panel 2 You are prompted to enter your user name and password Press one of the Camera buttons to select a user name for example Camera 1 is User 1 The factory default is User 1 3 Use the Camera buttons in sequence to enter a password for that user name The default password is 1234 As you enter each nu...

Страница 38: ...rent parts of the screen to scroll through a list or to add text to a report The part of the screen that is active and will be affected by the control buttons will always be outlined by a selection box See Table 2 1 for more information on the front panel control buttons Some Program screens have boxes where you can change the text for example the title of a new report or the camera title When you...

Страница 39: ...front panel to move to the different buttons on the Text Entry screen To use a button move to it then press Enter on the front panel 4 When you are satisfied with your changes move to the Accept button and press Enter The text will display in the box or line on the screen you are editing Activating Configuration Changes Whenever you make changes to an editable screen you must press Enter to confir...

Страница 40: ...tup Motion Events Text Events Alarm Events General Setup Pre Event Setup Calendars Create Edit Text Ports Video Inputs Display Setup User Preferences System Utilities Default Settings System Info Remote Access Storage Setup Change Password Day Schedule Holiday Setup Motion Text Alarm Delete Run Run Auto Disk Setup Disks Main Menu Advanced Setup Normal Setup Alternate Setup S M A R T Login User Per...

Страница 41: ... of fine tuning the system afterwards using the individual menu screens in the Main menu Setting Up with Easy Configurator Before starting to use the Easy Configurator you must install all the components in your system see Chapter 3 System Startup for information on installation To start the Easy Configurator 1 Press the MENU button on the HRDV front panel Figure 5 1 Initial Easy Configurator Scre...

Страница 42: ... 3 In this screen you may set up your video inputs Auto Detect will detect whether video is present or you may enable and set the camera terminations manually Dwell time for sequencing may also be set here from 1 to 30 seconds see Display Setup page 94 and Configuring the Video Inputs page 98 for more information Select Next to continue Figure 5 3 Video Setup Screen 5 The Timelapse Recording Setup...

Страница 43: ...rive and setting the Event Image Quality may all be accomplished here see Configuring Storage Setup page 47 for more information Select Next to continue Figure 5 5 Disk Setup Screen 7 The Text Event Setup 5 screen opens see Figure 5 6 In this screen you may set up your Text Event recording Setting up the Ports selection of cameras and Record Rate may all be accomplished here see Step 1 Set Up Text...

Страница 44: ...er motion the Record Rate and selected cameras to record see Setting Motion Events page 77 for more information Select Next to continue Figure 5 7 Motion Event Setup Screen 9 The Alarm Event Setup 7 screen opens see Figure 5 8 In this screen you may set up your Alarm Event Recording by enabling Alarm Inputs setting the Record Rate and selecting cameras to record see Setting Alarm Events page 37 fo...

Страница 45: ... Remote Access IP Address Gateway and other parameters see Enabling Remote Access page 135 for more information Select Accept to finish Figure 5 9 Remote Access Setup Screen 11 Your HRDV is now ready to use If you want to set up some of the advanced features not included here for example Holiday Timelapse Recording press the MENU button on the front panel and enter the Main menu ...

Страница 46: ...Rev 1 00 28 Document 900 0261 04 05 Easy Configurator ...

Страница 47: ...s and establish your initial user identification and permission levels User User level access is limited to the operational aspects of the system Camera selection for display both individual and grouping Camera buttons Go To search and Playback PLAY button Searches FUNCTION PLAY buttons Reports FUNCTION MENU buttons Administrative Administrative level allows access to all system operation and conf...

Страница 48: ...ter Figure 6 1 displays Figure 6 1 Select a User Screen 2 Press one of the Camera buttons for the desired user for example Camera 1 selects User 1 The following dialog box displays 3 Enter a new numeric password The password can be any combination of digits 1 to 4 up to 10 keystrokes long Use the Camera buttons to enter your new numeric password Note If you do not want to change your password at t...

Страница 49: ...er names can be one to eight characters long including the user number The name can be a combination of uppercase or lowercase letters numerals and symbols To change a user name 1 On the User Permissions screen press to move to the User name field then press Enter 2 The Text Entry dialog box displays see Figure 4 2 Use the control buttons to change the user name and press Accept to confirm the cha...

Страница 50: ...in recovering the Administrator password Field Description Enable user ID If this field is disabled that user has no access to the HRDV16 8 If you disable all users then the password function is disabled when you use the unit locally you are not prompted for a user name or password At least one user name must be enabled if you want to use remote access Administrative access If this field is disabl...

Страница 51: ...es connected to your Text Insertion Input ports for example an external ATM or cash register If more than one input contains clock information we recommend that you do not use this option Set the date and time format to your regional preference Changing the Clock Settings To change the clock settings 1 Access the Clock Setup screen as follows MENU Clock Setup Figure 7 1 displays Figure 7 1 Clock S...

Страница 52: ...ck format DD MM YY HH MM SS 24 hour clock format MM DD YY HH MM SS AM PM MM DD YY HH MM SS Daylight Saving Time Enable default or disable Daylight Saving Time for your geographic location Time varies from one region to another If enabled the HRDV16 8 automatically adjusts itself by one hour in the Spring and one hour in the Autumn Options are North America Europe Australia If a user is operating t...

Страница 53: ...s Note You must allocate some disk space to event recording for this to work For more information see Chapter 10 Storage Setup Access the General Setup screen as follows MENU Event Recording General Setup Figure 8 1 displays Figure 8 1 General Setup Screen The following table describes the fields on the General Setup screen ...

Страница 54: ...n alarm output to activate System Error Enables default and disables system error action processing Also selects an alarm output to activate Record Indicator Provides TTL output at an alarm output that is HI when the HRDV16 is recording and goes LO when the HRDV16 is not recording any video Options are None 1 2 3 or 4 Image Quality Sets image quality for events The higher the compression rate the ...

Страница 55: ...8 2 displays Figure 8 2 Alarm Event Setup Screen The following table describes the fields on the Alarm Event Setup screen Field Description Enable Enable or disable the Alarm Event function for up to 16 alarm events 8 for the HRDV8 Enable this field to change the settings on the screen Event Text Assign a title to each Alarm event This text is used to title the video clip see Event Report Criteria...

Страница 56: ...ied in the Length field Alarm State You must specify whether each contact is normally open NO or normally closed NC Length The length of time before the alarm inputs are reset Actions How the HRDV16 8 reacts to an alarm event Options are Beep The HRDV16 8 beeps when an alarm event is detected Output The HRDV16 8 triggers an alarm output contact activates an external light bell and so on Record cam...

Страница 57: ... appears quad 2 x 2 nine 3 x 3 or 16 4 x 4 When an alarm is removed the monitor returns to a multiscreen view of all live cameras If a single alarm occurs and you are viewing the first alarm camera view and a second alarm then occurs on a different camera the monitor shows a multiscreen display that includes both alarming cameras To enable this feature 1 Access the General Setup screen MENU Event ...

Страница 58: ...onnection The following table describes the 25 pin Alarm I O connector pinout PIN Definition 1 Alarm In 1 Alarm Inputs 1 to 16 TTL Levels 2 Alarm In 3 3 Ground Alarm Inputs To set NO NC see Alarms Normally open NO If closed alarm is detected Normally Closed NC If open alarm is detected External to HRDV Add this functionality yourself 5 VDC 10K Detector Internal to HRDV Alarm output 5 VDC Alarm GND...

Страница 59: ...m In 14 HRDV16 only 10 Alarm In 16 HRDV16 only 11 Reserved 12 Alarm Out 1 13 Alarm Out 2 Alarm Outputs 1 to 4 TTL Levels 14 Alarm In 2 15 Alarm In 4 16 Alarm In 5 17 Alarm In 7 18 Ground 19 Alarm In 10 HRDV16 only 20 Alarm In 12 HRDV16 only 21 Alarm In 13 HRDV16 only 22 Alarm In 15 HRDV16 only 23 5 VDC 5 Volts DC 100 mA 24 Alarm Out 3 25 Alarm Out 4 ...

Страница 60: ...Rev 1 00 42 Document 900 0261 04 05 Alarm Setup ...

Страница 61: ...Description Unit ID Specify the unit name Can be up to 14 alphanumeric characters Clip order Specify how stored video clips are listed Options are Reverse chronological chronological default GUI Timeout Set up the Graphical User Interface GUI inactivity time out in minutes Options are 0 to 240 Default is five minutes After this amount of inactivity time you will be automatically logged out When se...

Страница 62: ...lays back one clip at a time Autorecord Options are Enabled The HRDV automatically puts itself in record mode after 60 seconds if recording is inadvertently disabled by an operator recommended setting Disabled The HRDV will stop recording until manually reset if recording is inadvertently disabled by an operator Timelapse There are two timelapse modes available simple setup and advanced setup Simp...

Страница 63: ...ndwidth restriction can lower the fps when you view clips remotely Playback Lock to Camera Options are Enabled When you play back a video clip that has recorded multiple cameras at the same time and you select one camera to review and then press the left or right arrow to jump to the next or previous video clip you will stay locked on that one camera Disabled During playback of video clips from mu...

Страница 64: ...Rev 1 00 46 Document 900 0261 04 05 User Preferences ...

Страница 65: ... current hard drive capacity Add or replace a disk drive Restore the file system to its original state Perform a Holdup setup Configuring Storage Setup On the Disk menu you can set up configure and check the status of the disk drives used to store your digital video When a disk is installed and operating in your HRDV16 8 a button showing the disk information automatically highlights on the Disk me...

Страница 66: ...you can Determine which drives are recognized by the system Set parameters related to the file system such as Timelapse event partitioning Alarm when a drive exceeds a certain capacity percentage Archive and hot swap drives Reformat an Archive drive Access the Disk Setup screen as follows MENU Storage Setup Disk Setup Figure 10 2 displays Figure 10 2 Disk Setup Screen ...

Страница 67: ...drive as an archive drive To program an automatic transfer of selected clips to an archive drive see Setting Reports to Run Automatically page 122 For more information on archiving video clips refer to the HRDV RAS User Guide Select Hot Swap Drive Allocate one installed hard drive to be a Swap drive A Swap drive can be removed and replaced with another drive while the unit is powered on This allow...

Страница 68: ...space Event space x number of events per day x number of days Total events disk space In this example 17 5001 x 3 fps x 5 secs 262 500 bytes 262 500 x 500 x 7 918 750 000 or approximately 1 GB For total timelapse and events Timelapse disk space total events disk space Total disk space In this example 53 GB 1 GB approximately 54 GB for one week 168 hours of timelapse and events recording Total hour...

Страница 69: ...62 500 x 500 x 7 918 750 000 or approximately 1GB Viewing Current Hard Drive Capacity Use the Disks screen to see How your current hard drive capacity is proportioned How full your drives are Whether the drive is degrading and becoming unreliable if S M A R T Self Monitoring Analysis Reporting Technology is running on your system See Appendix F S M A R T for more information S M A R T is available...

Страница 70: ...er you can Add further drives for increased storage capacity while preserving video stored on the original drive s Re partition an individual disk drive video on that drive is lost Replace a single faulty drive without affecting other disk drives To view this option access the Add Disk screen MENU System Setup System Utilities Add Disk ...

Страница 71: ...Disk 3 Enable only the new drive you have added and set the desired Event percentage 4 Accept your changes to exit this screen The new drive is now operational 5 Exit Menu mode and ensure recording is enabled Data Recovery Use this screen when you want the system to attempt to restore the file system to its original state for example due to an inadvertent Format All Format Timelapse or Format Even...

Страница 72: ...nning All the data on the drive is lost Reformat and run data recovery If an error is detected the HRDV automatically reformats the drive and then immediately attempts a data recovery restores the file system to its original state Note Running a data recovery causes some data on the drive to be overwritten Reformat and schedule data recovery If an error is detected the HRDV automatically reformats...

Страница 73: ...Enable Enables or disables default the Holdup Setup feature To make changes on the screen this field must be enabled Archive previous Select the number of minutes from 1 to 60 previous to the Holdup that will be archived Clips archived Select the type of clips to be archived as a result of the Holdup Setup Options are Scan All Data Scans all recorded clips in the specified time frame Scan Timelaps...

Страница 74: ...Rev 1 00 56 Document 900 0261 04 05 Storage Setup ...

Страница 75: ... Starting and Stopping Recording To start recording video 1 Press REC left arrow on the HRDV16 8 front panel 2 Select a User ID camera buttons 1 to 16 The default User ID is 1 3 Enter your user name and password when prompted camera buttons 1 to 4 only Press Enter Default password is 1234 As soon as you enter a valid user name and password the unit starts recording according to the values entered ...

Страница 76: ...ecording when the disk is full In this case the operator sees a blue screen with a text message on the video monitor with a warning that the system needs to overwrite old data You may use the cursor controls to signal the system to re record over old data or to stop recording to allow you time to archive data to another storage device before it is lost To calculate how much disk space is required ...

Страница 77: ...t the maximum recording rate is not exceeded during a single type of event However there could be times when multiple events occur at the same time In that case the HRDV16 8 may be sent a recording request that would cause the maximum recording rate to be exceeded As events occur each event is placed in a queue and recorded at the rate set for it in Setup mode As the unit nears the maximum number ...

Страница 78: ...Rev 1 00 60 Document 900 0261 04 05 Recording Considerations ...

Страница 79: ... Select the global record rate and compression setting for timelapse recording Set the recording times for each day of the week Assign settings for up to ten holidays Set simple and advanced Timelapse mode Enable motion detect operation for timelapse clips Caution If you use your HRDV16 8 as a combined timelapse event recorder the event recording settings override the timelapse settings when an ev...

Страница 80: ...ces 2 Set the record rate and image quality MENU Timelapse Recording Figure 12 1 Timelapse Recording Screen Note When you adjust the record rate and or the image quality the approximate record time changes in real time Set to Simple Setup We recommend that you enable Autobreak Timelapse clips will be separated into searchable hourly daily or 15 minute chunks Displays disk storage recording to reco...

Страница 81: ... up to more than 30 fps for NTSC 25 fps for PAL Options are 0 1 2 5 1 to 16 5 is default 20 to 60 in increments of five The lower the record rate the longer you can record video before your storage disk is full Image Quality Set the global compression setting The higher the quality the slower the transmission of images and the faster your storage disk fills Options are High 10 1 or 15 1 Medium 20 ...

Страница 82: ...schedule will be applied Options are 1 to 16 ALL default Set Apply the start and stop time parameters you have selected to the displayed camera s and day for recording Selecting Set displays the times as green Clear Remove the start and stop time parameters you have entered from the selected day Selecting Clear displays the times as red Copy Copy the current day s display to all days If you plan t...

Страница 83: ...e 6 View the current clip being recorded a Press PLAY and enter your user name and password when prompted Press Enter b Use the jog wheel controls to review the most recent clip For more extensive clip reports see Chapter 17 Report Generation Setting Simple Timelapse Mode With Motion Detect Enabled Motion detect enabled causes the HRDV to only record timelapse clips of the individual cameras that ...

Страница 84: ...Ensure that the cameras are enabled for motion detection but are not set to record motion video clips a Go to the Motion Events screen MENU Event Recording Motion Events b Select Camera 1 and enable motion detection Repeat for each camera connected to the HRDV Enable Motion Mode De select X all cameras in Record cameras field or motion video clips will also be stored in the event partition ...

Страница 85: ...ram mode 6 Look for a dull red dot on the top right hand corner of Monitor 1 This indicates that timelapse recording is taking place and that motion is currently detected If you see a dull red dot with a slash this indicates that camera s are ready to record and are waiting for motion to be detected To set up motion sensitivity see Chapter 13 ...

Страница 86: ... Setup Select Accept to confirm the setting and exit the screen 2 From the Main Menu select Timelapse Recording to display the Timelapse Recording screen 3 Select Advanced Setup to display the Advanced Setup screen Set to Advanced Setup Legend Advanced Setup Sets Advanced schedule camera record rates image quality and motion mode Normal Setup Sets Normal schedule camera record rates image quality ...

Страница 87: ...ecording rates On the Timelapse Recording screen select Normal Setup to display the Normal Setup screen In the Normal Setup mode you can program the HRDV16 8 to use a global record rate or set a record rate for each camera The global rate is common for timelapse VCR type recording Typically 24 hour timelapse mode is equivalent to 5 fps and High Density real time timelapse recording is about 15 fps...

Страница 88: ...apse Global Rate Examples Note If you exceed the total number of fps fields per second 60 NTSC 50 PAL for the HRDV16 30 NTSC 25 PAL for the HRDV8 you see a warning message when you select Accept If this happens reduce the individual record rates so the accumulated total is 60 50 fps or less a Enter desired values based on the following field descriptions Program 2 fps for cameras 1 8 and 1 fps for...

Страница 89: ...w 30 1 35 1 40 1 Very Low 45 1 50 1 Note The size of a single high quality 10 1 compression full frame color video image is approximately 35 KB for NTSC Global Record Rate Set the global record rate in fields per second that should be recorded by all cameras Options are 0 1 2 5 1 to 16 10 is default 20 to 60 in increments of five Note When two or more cameras are set to Motion the record rate is s...

Страница 90: ...s each day During the alternate red times you may still want to record all cameras but at a different recording rate quality or you could disable some cameras from recording during certain periods of time For example do not record cameras 13 to 16 after hours from 5 00 p m to 8 00 a m 7 Ensure that the cameras are enabled Go to the Camera Setup screen MENU System Setup Video Inputs 8 If you are us...

Страница 91: ...era s field of view that meets the motion detection criteria for size sensitivity and direction This feature is typically used to record motion during the evening and on weekends and record this information in the timelapse section of the disk instead of in the event section This frees up hard drive space in the event partition that can be used to supplement text event storage Note To ensure that ...

Страница 92: ...u set this field to enable the red X changes to a green and the numbered date settings become available 3 To enable a date move to the X beside that date and press Enter 4 Move to the month box and press Enter to activate it Select the desired month using either the control buttons or the jog wheel then press Enter The month display returns to white with the selected month displayed in the box 5 S...

Страница 93: ...r to Figure 12 2 8 Set the holiday record times following the procedure in Setting Simple Timelapse Mode With Motion Detect Enabled on page 65 9 Select Accept to go back to the Timelapse Recording screen Select Accept again to save your changes and exit to the Main Menu Note The holiday time settings apply to all selected holidays Times cannot be set independently for each holiday ...

Страница 94: ...Rev 1 00 76 Document 900 0261 04 05 Timelapse Recording Setup ...

Страница 95: ...is recorded for a specific time In automatic mode the recording continues as long as the event is active Events have a record speed and quality independent of the timelapse setting During events you may specify whether the beeper should go off or if any of the alarm outputs change state You can also select which cameras are recorded during the event Setting Motion Events Before you use motion even...

Страница 96: ... review events see Playing Video Clips in a Report on page 121 To change the text use the control buttons or jog wheel Record Rate Specify the record rate in fields per second that should be recorded by each camera Options are 1 2 5 1 to 16 10 is default 20 to 60 in increments of five Note When two or more cameras are set to Motion the record rate is split between them Reset Type Events can be res...

Страница 97: ...gradually changing light conditions will not trigger a motion detection alarm This reference update process is automated for optimal system performance Access the Motion Zones screen as follows MENU Event Recording Motion Events Zone Setup Figure 13 2 displays Figure 13 2 Zone Layout Screen per Camera Actions Choose whether or not the HRDV16 8 should beep or trigger the Alarm Output contact to act...

Страница 98: ... during various activity periods This helps you verify that motion detection is performing at the desired response level The Zone screen divides the screen into small squares To set up zones for all four zones 1 Move the cursor to highlight the motion detection screen then press Enter 2 Use the front panel buttons to move to the first square you want to assign to zone 1 Use Camera button 1 to assi...

Страница 99: ...y toggle on off the beep while setting up the zones by pressing PLAY on the front panel of the HRDV16 8 7 Select Accept to activate your changes and exit this screen 8 Repeat for all cameras as required Press button To perform this action Camera 5 Erases programmed zones Camera 16 Performs full screen operation of the previously activated button For example Camera 5 button followed by Camera 16 bu...

Страница 100: ... Event Calendar screens Green areas indicate enabled recording times Red areas indicate disabled recording times Field Description Day Options are Sunday to Saturday Program each day individually ALL Program all the days of the week the same Holidays Program holiday scheduling Start Enter the time you want motion event recording to begin Stop Enter the time you want motion event recording to end E...

Страница 101: ...hat the HRDV detects events and records an event video clip There are two operating modes for pre event Storing pre event clips motion clips and timelapse clips Using this mode requires more disk drive storage space as duplicate recording occurs Storing pre event clips and motion clips Using this mode requires less storage space as no duplicate recording occurs This chapter covers how to Use the P...

Страница 102: ...g video data in a loop Length The length of time from 1 second to 9 minutes 59 seconds the HRDV16 8 records a pre event video clip Record Rate Specify the record rate in fields per second fps recorded by each camera 1 2 5 1 to 16 10 is default 20 to 60 in increments of five Note The total number of fps that can be recorded by all 16 cameras cannot add up to more than 60 fps for NTSC or 50 fps for ...

Страница 103: ...on enabled on the Timelapse Recording schedule MENU Timelapse Recording Day Schedule In this example Monday is selected 2 Enable pre event and set to record a particular camera on the Pre Event Setup screen MENU Event Recording Pre Event All cameras enabled in the Record cameras field will record video to the event partition in this example motion events for camera 1 only ...

Страница 104: ...mmediately stored in the timelapse disk partition The motion event records and when it ends it is stored in the event disk partition The HRDV extracts a pre event clip from the timelapse clip for the amount of pre event time you specified If you do a report searching for all clips you will see all three of these video clips The timelapse clip shows a start time equal to or one second prior to the ...

Страница 105: ...2 Recorded Review Clips List All Types Shown Recording Only Pre Event and Motion Event Clips To record only pre event and motion event clips 1 Disable timelapse in the Timelapse Recording schedule MENU Timelapse Recording Day Schedule In this example Monday is selected ...

Страница 106: ... set to record the desired cameras when motion is detected on the Motion Event screen MENU Event Recording Motion Text Alarm In this example Motion is selected for camera 1 3 Enable the event calendar MENU Event Recording Calendars Motion Text Alarm In this example motion is selected ...

Страница 107: ... Event Recording Pre Event When timelapse is disabled by setting the timelapse calendar to not record timelapse no timelapse clips record However pre event clips do record as well as separate motion event clips When a report is run the clips list displays similar to Figure 14 3 Figure 14 3 Recorded Review Clips List Pre Event and Motion Shown ...

Страница 108: ...Rev 1 00 90 Document 900 0261 04 05 Pre Event Recording Setup ...

Страница 109: ...your system Recording timelapse and event video Playing video clips Searching for video clips Saving video clips to an archive drive Printing still images This chapter provides an overview of the front panel controls and their functions as they apply to daily system operations Front Panel Controls Figure 15 1 shows the location of the front panel buttons and Table 15 1 describes their function Fig...

Страница 110: ...ivates full screen camera sequence on main monitor FUNCTION Camera 2 Activates the Hot Swap function This allows you to remove the removable disk drive without having to power down the HRDV16 8 1 Press FUNCTION Camera 2 This closes the device and displays a message on the screen that it is okay to remove the device 2 Remove the current device and insert a new one 3 Press Enter Caution Failure to p...

Страница 111: ...ine cameras 3 x 3 Press FUNCTION Camera 16 to select all 16 cameras 4 x 4 MENU Press FUNCTION MENU to activate the Report function without having to enter the Setup menus During Playback MENU activates archiving the clip displayed Activates the first level of menus on the HRDV16 8 See Chapter 4 Programming Overview for detailed information Use to navigate up through the menu structure Use to incre...

Страница 112: ...e primary CCTV monitor to the digitally processed Mon 1 main monitor output This output is a composite analog output with full or multiscreen views display configuration menus and a variety of text overlays during operation Mon 2 Connect an optional CCTV monitor to the Mon 2 spot monitor output This output always provides full screen sequential switching views of some or all cameras This display i...

Страница 113: ... This output always sequences whichever cameras are selected in the Display Setup menu at the specified dwell rate You cannot select an individual camera during the sequence and it does not display a multiscreen display With V1 50 and later you can set certain cameras to appear as Disabled on the main monitor and they do not appear in the spot monitor sequence Access the Display Setup screen as fo...

Страница 114: ...ultaneously Enable place a checkmark by pressing Enter each camera that you want to operate in sequence mode To skip a camera in your sequence uncheck it See Live Monitoring page 93 for more information Dwell Time Set the time the video is played for each camera before it moves to the next camera programmed in sequence mode Use the or controls or the jog wheel to change the value 1 x 1 Text Select...

Страница 115: ...n sequence mode Use the or controls or the jog wheel to change the value 3 Select Accept to accept your changes and go back to the Display Setup screen Configuring Covert Setup Cameras may be individually disabled to support a covert camera operation This prevents specific cameras from being seen even though they are recorded To select certain cameras that you do not want to appear on the Main Mon...

Страница 116: ... camera inputs and specify how the transaction text is displayed on each camera including video termination Each camera can record the text input from any one text input port Access the Camera Setup screen as follows MENU System Setup Video Inputs Figure 15 7 displays Figure 15 7 Camera Video Setup Screen Select then use the control buttons to choose a camera input to configure Camera 1 correspond...

Страница 117: ...lay Enable Enable this field to change the camera title text Activate the box by pressing Enter then edit the camera title in the text entry screen Titles can be up to 17 characters long Caution The date and title must be enabled to appear on the recorded video Position Position of the title in the camera field of view Options are Upper Left Lower Left Split Time Title for example time at the top ...

Страница 118: ...tup screens MENU System Setup Display Setup Select Main Monitor to go to the Main Monitor screen Examples For full sequencing of all 16 cameras enable all cameras in the 1 x 1 2 x 2 3 x 3 and 4 x 4 fields To sequentially display all 16 cameras in only full screen 1 x 1 followed by hex 4 x 4 mode disable cameras in the 2 x 2 and 3 x 3 fields To sequentially display only certain cameras in full scre...

Страница 119: ...o 8 Pressing these buttons a third time displays cameras 9 to 12 and so on What you see and how you view images depends on the choices you made in Setup mode For example you can Display the date and title of each camera on top of the image Display the image without a camera title Select how fast text from the Text Insertion Ports scrolls by Select how many lines of text are displayed See Configuri...

Страница 120: ...Rev 1 00 102 Document 900 0261 04 05 Daily Operation Overview ...

Страница 121: ...video clips at a time When performing searches for recent clips your search parameters must be refined so that this number is not exceeded for these clips to be displayed Using the Autoplay Function If you have enabled Autoplay see Chapter 9 User Preferences the system plays back multiple clips automatically If Autoplay is enabled you can use the and control buttons to advance or reverse one clip ...

Страница 122: ...ime frame for the clip you wish to play back select Go To and press Enter Note The Play Last Recorded Clip feature assumes user preferences clip order is set to reverse chronological order This feature plays back the first clip in the review clips list The clip can be the most current event or it could be the last timelapse clips started up to 15 minutes ago or if Autobreak is disabled the timelap...

Страница 123: ...can play back video like one big VCR tape without having to jump from clip to clip If Event is selected and a Go To performed you may only be able to play back video from within a single short video clip Choose the method you wish to use to search for video Play Latest Clip Select Play Latest Clip and press Enter to go directly to the last recorded clip assumes user preferences clip order is set t...

Страница 124: ... and a Go To performed you can play back video like one big VCR tape without having to jump from clip to clip If Event is selected and a Go To performed you may only be able to play back video from within a single short video clip Motion When selected the Report Zone Layout screen displays see Motion Report Criteria on page 118 for more information Enter the specific criteria for your motion searc...

Страница 125: ... to be played Which types of events you want to include in your play list by enabling the check boxes next to specific events Timelapse clips Clips on an archive drive Note When you place a check mark next to Check archive drive the HRDV will only search that drive To further refine your search select the desired event s and individual or all cameras Figure 16 2 Search Screen The following table d...

Страница 126: ...ead of jump searching multiple 15 minute portions of hourly clips as with the Hourly setting a user can scan through a single day clip using turbo mode on the jog wheel When viewing an incident a reviewer can slow down and view the incident as required We recommend a setting of Hourly for systems doing timelapse recording If Autobreak is disabled the timelapse clips are continuous files that could...

Страница 127: ...e first clip you can jump to the last clip To exit the clip list press to go to the Exit menu choice or press until Exit this menu displays then press Enter 2 While in the Review Clips screen after you have highlighted a video clip to play back press Enter to view it If multiple camera images appear select one camera to review Use the jog wheel to control the speed and direction of the clip The pl...

Страница 128: ... Preferences Autobreak To make searching for timelapse clips easier the HRDV16 8 has an Autobreak option that automatically stores timelapse recording into individually searchable chunks of video You can set the Autobreak option to hourly daily 15 minutes or no autobreak one continuous single clip For more information see Chapter 9 User Preferences A setting of Daily creates a single daily timelap...

Страница 129: ...rward turbo mode to advance rapidly through the selected video clip When the end of the clip is reached the HRDV automatically jumps to the next clip and continues reviewing in turbo fast forward mode without adjusting the jog wheel This enables you to continuously review all timelapse clips without jog wheel adjustment If the HRDV was set for Hourly Autobreak intervals you can scan the entire day...

Страница 130: ...Rev 1 00 112 Document 900 0261 04 05 Video Playback and Searching ...

Страница 131: ...with recording disabled see Using the Reports Menu You can save reports and run them again either manually or automatically each day After you have set up these conditions you can Quickly and easily search through recorded video Create as many reports as you want Edit delete run and automatically schedule reports Archive copy images in a report run to disk This chapter describes how to use the Rep...

Страница 132: ... text data that was found in the transaction information Event reports create a list based on clip type The search and extraction process allows you to specify the event or timelapse information for the search Motion reports create a list of clips based on specific motion criteria such as the area amount size and direction of the movement in the clips Figure 17 2 Create New Report Screen ...

Страница 133: ...y Screen page 21 for more information When you have finished select Accept to confirm the title What kind of report Options are Text Based on text data in the Text transaction information Event Based on clip type Motion Based on specific motion criteria Report Criteria Setup Takes you to either the Text Event or Motion Criteria screens where you define the search parameters on which reports are ba...

Страница 134: ... conditions for each report If you select more than one condition your search will report if any of them are found Search Data Specify text letters and or numbers you are searching for The right hand box allows you to search for numbers For example you can specify instances of a certain dollar amount Or you can specify all transactions over 100 00 between January 1 30 The center box options are de...

Страница 135: ...on page 37 Motion events are set up using the Motion Events function see Setting Motion Events on page 77 Text events are set up using the Text Events function see Step 3 Set Text Events on page 146 To set search criteria for an Event Report 1 Open the Create New Report screen MENU Reports Create New Report 2 Enable Event report 3 Select Report Criteria Setup then press Enter Figure 17 4 displays ...

Страница 136: ...ion criteria searches either timelapse event clips or both The result is based on all video clips that contain the motion criteria To set search criteria on which a Motion Report is based 1 Open the Create New Report screen MENU Reports Create New Report 2 Enable Motion report 3 Move to Text Criteria Setup then press Enter Figure 17 3 displays Field Description Alarm Searches clips based on alarm ...

Страница 137: ... many results Low sensitivity will yield a manageable number of results but may miss the instance you are looking for Camera Select the video clips from a specific camera to be searched for motion Trigger Size Set the minimum size a moving object must be in order to be detected Direction Set the direction s the motion must be moving to be detected Options are Left Right Up Down or any direction Op...

Страница 138: ...s Enter The search and extraction process based on your search criteria begins Motion Zone Layout Grid Move cursor to area to open the layout grid Press Enter to initiate a flashing cursor in the center square of the grid Squares with a 1 inside are selected to detect motion Empty squares are de selected To activate the currently selected square press camera 1 Using the directional arrows each sub...

Страница 139: ...m of the screen If you specified events the number of clips displayed is broken down between event clips and timelapse clips Playing Video Clips in a Report This section is a quick procedure For more detailed information see Chapter 16 Video Playback and Searching 1 Use the control buttons or the jog wheel to scroll through the list and select the clip you want to view 2 When you have selected the...

Страница 140: ...o return to the clip list To stop viewing highlight Exit at the bottom of the clip list and press Enter Tip Press to go directly to the Exit menu option Setting Reports to Run Automatically Use the Setup a Report to Run Automatically screen to Run a report automatically and Send extracted clips to an archive device disk or tape to place in a library or forward to an investigator To set up a report...

Страница 141: ...lect this report 5 Select and mark all reports you want to archive automatically 6 When you have selected all the desired reports press Enter 7 Set the Report Recording Time 8 Select Accept then press Enter to confirm your settings and exit this screen Using the Quick Report Function Note Live recording continues while you run a Quick Report The Quick Report function allows you to bypass the Main ...

Страница 142: ... screen 5 Enter your desired search criteria 6 Select Accept to display the desired video clips 7 Place a check mark next to the desired video clips move to the clip then press Camera 1 8 Press Play to view them Running an Existing Report Note Live recording continues 1 Press FUNCTION MENU on the front panel 2 Enter a user name and password when prompted 3 The following screen displays 4 A list of...

Страница 143: ...o scroll through the report list 3 Highlight the report you want to edit then press Enter The edit screens are the same as the ones you use to create the reports Deleting a Report To delete a report 1 Access the Delete a Report screen as follows MENU Reports Delete a Report 2 Use the control buttons to scroll through the report list 3 Highlight the report you want to delete then press Enter ...

Страница 144: ...Rev 1 00 126 Document 900 0261 04 05 Report Generation ...

Страница 145: ...rmat the archive drive Note When video is saved to an installed CD RW in the HRDV an evidence viewer program is automatically added see Viewing the Video Evidence page 160 Saving Clips to a CD ROM Drive There are three methods to save clips to a CD ROM drive From Go To From clip lists During playback of an individual clip All Methods Prepare CD ROM Drive 1 Ensure that the CD ROM drive is properly ...

Страница 146: ...e Time Date and Camera values to preview desired video Ensure Timelapse is checked 3 Select Go To 4 Use VCR like controls to find the beginning of the clip to be archived Pause the video using the outer jog wheel Use outer jog wheel to fast forward reverse play and pause video Use inner jog wheel to view video image by image 5 Press MENU to start the Easy CD Burn Wizard Outer jog wheel hand contro...

Страница 147: ...s Enter c Enter the amount of time to copy from up to 59 minutes 55 seconds and press Enter Note If you are downloading a partial clip without using the Go To search function you can only download video within the current clip even if you specify a time period that spans several clip 7 You will be asked Are you Sure Select Yes and press Enter 8 An Archive Status window displays a progress box show...

Страница 148: ...se clips Note Do NOT enable the Check Archive Drive field as the system cannot find any video on the new empty CD 3 Press PLAY to display the review list 4 Press Camera 1 to select each clip you want to archive press Camera 1 again to deselect the clip OR press Camera 2 to select all the clips in the search list A check mark appears beside those clips you have selected for archiving ...

Страница 149: ...ay it back on a PC with a CD ROM drive See Chapter 22 Evidence CD for more detailed information Secondary Method 2 While Playing an Individual Clip from a Clip List Note If you are downloading a partial clip without using the Go To search function you can only download video within the current clip even if you specify a time period that spans several clip 1 Perform a search see Secondary Method 1 ...

Страница 150: ...you specify a time period that spans several clip 6 You will be asked Are you Sure Select Yes and press Enter 7 An Archive Status window displays a progress box showing the percentages of data transferred Press OK when complete Press any control button to cancel the archive operation before completion Saving Video Clips to an Archive Drive To save video clips from the review list in a report 1 Ena...

Страница 151: ...Drive Create a report set up the run report automatically to copy to disk select the report created and set the time to archive For more information see Setting Reports to Run Automatically on page 122 Use the RAS software to save the clip to a computer disk The saved clip if not too large could then be burned to a CD copied to a Zip disk or e mailed Refer to the HRDV RAS User Guide for detailed i...

Страница 152: ...on the VCR 2 Connect the video output of the VCR to the monitor 3 Use the search options to find the images you want to use 4 Press Record on the VCR 5 Play each of the video clips you want to record Format the Archive Drive The archive drive is not recycled automatically To reuse a removable disk you must format the device before recording any video on it and reformat it after it is full 1 On the...

Страница 153: ...cess option Note To activate an Ethernet or PC Card do the following in the exact order given to avoid the HRDV16 8 failing to operate 1 Set the Method field to the correct card type IEEE 802 3 Ethernet or PC Card 2 Accept this change 3 Power down the HRDV unit 4 Insert the same card type that you programmed in the Method field 5 Power up the HRDV unit If problems occur 1 Power down the HRDV unit ...

Страница 154: ...t commands from your PC you must hook up the null modem cable to a serial communications port and use a program that sends ASCII commands to the PC communication port such as Hyper Terminal Note If you enable the keyboard you cannot use Text Insertion Port 4 for anything other than a null modem connection IP Address You must obtain a unique fixed IP address from your Network Administrator or Inter...

Страница 155: ...p Select Advanced Setup to enable alarm and e mail notification over TCP IP See page 142 for more information RS 485 Setup Allows you to control the Pelco Kalatel Vortex and VCL PTZ cameras For more information see Chapter 21 Pan Tilt Zoom PTZ Baud Rate The data transmission speed HRDV Address Sets the HRDV Address 1 to 254 This address is typically predetermined by a system plan Options are HRDV ...

Страница 156: ... Power down the HRDV unit 2 Remove the card 3 Power up the unit For a list of tested and currently supported PCMCIA interface modules see HRDV Network Card and Dial up Modem Card Compatibility Product Bulletin Setting Bandwidth Throttle on the HRDV8 16 When the HRDV is connected to a PC using a network connection video and audio traffic is transmitted over the LAN Local Area Network You can contro...

Страница 157: ...gher bandwidth utilization Therefore HRDV16 8 units connected by an Ethernet LAN have faster image updates per second User Definable TCP Port Number for RAS Situation A customer wants to install multiple HRDV16 8 units behind a common IP address The customer s IT department will use TCP port forwarding to accomplish this They will assign a different destination TCP port number for each HRDV16 8 So...

Страница 158: ...ork Connection 2 Press Add or Edit to program the TCP port numbers Figure 19 4 Network Connection Screen Note The factory default TCP port number is 44442 If you do not require port forwarding you do not need to change the RAS TCP port or the HRDV TCP port Router firewall 192 168 1 223 44442 HRDV16 HRDV16 192 168 1 224 44443 192 168 1 254 205 24 56 173 PC running RAS ...

Страница 159: ...ort forwarding In the port forwarding table When destination TCP port 44442 is detected the destination IP will be converted to HRDV 1 IP address 192 168 1 223 When destination TCP port 44443 is detected the destination IP will be converted to HRDV 1 IP address 192 168 1 224 You must also program the HRDV16 8 units to decode these TCP destination port numbers in the Remote Access screen as shown a...

Страница 160: ...n HRDV 2 is connected via RAS it will send its packets to the gateway with the destination IP of the RAS PC but with a source IP of the HRDV 2 of 192 168 1 224 The gateway will then convert this source address to 205 24 56 173 before forwarding it on to the RAS PC ...

Страница 161: ...ted to event recording for this to work For more information see Chapter 10 Storage Setup Step 1 Set Up Text Ports For each connected Text Insertion port you need to enter the technical data associated with the input device Each camera can record the text input from any one port Use the Text Port screen to Set up the baud rates Set all the associated configuration data for each of the connected tr...

Страница 162: ... the desired parity Flow Control Options are None Hardware default XON XOFF Scroll The display text scroll rate Options are 0 to 10 default is 2 Control Character Filter Enables the text port filter In situations where POS transaction data displays all over the video that is the POS server or cash register mixes all transaction data and sends it out one common serial port you can eliminate the con...

Страница 163: ...input 1 and so on Field Description Camera Enable You must enable this box for each camera that is connected to the HRDV Note Disable unused video inputs to prevent a video loss alarm from occurring Overlay Enable Enable this field to change the camera title text Activate the box by pressing Enter then edit the camera title in the text entry screen Titles can be up to 17 characters long Caution Th...

Страница 164: ...port basis For example you can set Recording rate Recording time Text trigger strings Which cameras to record This port is limited to asynchronous RS232 data that is line terminated carriage return or line feed with ASCII format data Note Text triggers may be set as case sensitive for better discrimination of text events Access the Text Event Setup screen as follows MENU Event Recording Text Event...

Страница 165: ...y the HRDV system to detect text input that matches the text string data selected When the HRDV detects text matches selected camera video is recorded and the text at the associated text port is recorded and can be mapped to display with the associated camera as video during playback Select Text Trigger Strings on the Text Event Setup screen to go to the screen shown in Figure 20 4 Depending on th...

Страница 166: ... to specify when text event recording is active similar to timelapse recording see Setting Simple Timelapse Mode With Motion Detect Enabled on page 65 Field Description Trigger All Enables default or disables the trigger text option To make changes on the screen this field must be enabled Case Sensitive Enables or disables default whether the system recognizes the text entered in the five text fie...

Страница 167: ...nsaction of multiple currently up to four cash registers The physical interface between the cash register server and the HRDV recorder is via the Text 1 input port Green areas indicate enabled recording times Red areas indicate disabled recording times Field Description Day Options are Sunday to Saturday Program each day individually ALL Program all the days of the week the same Holidays Program h...

Страница 168: ...isters NU00008 1 signifies a Wayne Nucleus Base 8 POS Server See Setting Wayne Dresser Nucleus POS Cash Register Interface page 152 for more information Generic is used for various cash registers and POS servers See Setting Generic Cash Register Interface For On site Cash Register and POS Server Programming page 153 for more information 4 To display or store the POS data you must program the follo...

Страница 169: ...he actual recording of the event will terminate earlier than the time window specified after all the transaction data is received at text port 1 If the end of the transaction data is not received for example a cash register drawer is left open recording stops after the set length duration has elapsed 7 Select Text Trigger Strings to display the Enter Trigger Text Port 1 screen 8 Ensure that Trigge...

Страница 170: ...te the transaction data for individual indoor payment terminals and store the data with a specific live camera video as specified by the user To enable this feature 1 Access the Text Parsing screen MENU System Setup Text Ports Text Parsing 2 Highlight the Cash Register field and select Multiplex 3 In the Type field select NU00008 1 for the Wayne Dresser Nucleus Base 8 POS server 4 In the Terminal ...

Страница 171: ...n data and sends it out one common serial port Requirements The following is required to successfully use this feature The data output of the POS device is RS232C ASCII data or the data from the POS device must be converted to RS232C ASCII formatted data The transaction data must be sent out in real time to record a live camera with the transaction text Solution Enable the generic cash register op...

Страница 172: ...cument describing the POS data output and format A sample collection of transaction data output from the POS server Solution Ideally you should obtain an actual sample trace of a series of transactions from the POS server or cash register Sometimes the documentation does not include all the information required In this case 1 Insert a data analyzer or PC running Hyper Terminal on the output 2 Gene...

Страница 173: ...to 249 Typically this address is predetermined by a system plan 3 Set HRDV is Master when the HRDV is controlling the dome Set HRDV is Slave if an external controller for example a Quarterback is controlling the dome 4 In the Baud Rate field select a baud rate that is identical to the operational baud rate of the PTZ camera 5 In the Dome Address field a Select a camera 1 to 16 b Set the dome addre...

Страница 174: ...amera number on the video monitor 3 Press FUNCTION Camera 3 to display the PTZ control menu Use the following table to navigate through the PTZ control menus using the front panel control buttons just as you would in Program mode Enter manual PTZ control Field Description PTZ Indicates this is a Pan Tilt Zoom control camera Preset Pattern Preset Use this option to set or recall 1 to 100 specific v...

Страница 175: ...terns 5 Press the Camera icon to return to the PTZ menu This stores the pattern you have just defined 6 To play back select the pattern number then press Execute Recall Go to the preset camera view from 1 to 100 Execute Follow the pattern from 1 to 3 Enter manual control of PTZ camera or return to the PTZ camera menu To control a PTZ camera move the camera using the arrow control buttons on the HR...

Страница 176: ...Rev 1 00 158 Document 900 0261 04 05 Pan Tilt Zoom PTZ ...

Страница 177: ...CD RW see HRDV16 8 Common Operating Procedures for a brief procedure or HRDV RAS User Guide Note Use only name brand CDs when burning clips Note When video is saved to an installed CD RW in the HRDV an evidence viewer program is automatically added see Viewing the Video Evidence page 160 Locating Video to Save Search and save video to a blank CD in your CD RW in the HRDV using procedures from HRDV...

Страница 178: ...ast forward 4 32x Next image Fast reverse 4 32x Play forward Play reverse Pause Press To do this Insert Evidence CD in a Windows PC Windows 98 2nd edition NT 2000 XP Professional Viewer will automatically launch and list video clips on the CD Click on a clip and press Play Clip starts playing back in the RAS viewer VCR like controls Review video as desired Click Close Close the viewing window Remo...

Страница 179: ... image you wish to authenticate 2 Pause on the selected image for saving 3 Select Authenticate Image from the File drop down menu 4 When prompted enter the HRDV Secret Key The system will return if the image created by the HRDV unit is unchanged Technical Support For additional information regarding the image authentication process please contact Technical Support toll free at 1 800 796 CCTV optio...

Страница 180: ...tem performance we recommend that you ensure your system is operating at this minimum configuration Operating system Software version Microsoft Windows XP Professional Microsoft Windows 98 Second edition Microsoft Windows NT Service pack 6 or later Microsoft Windows 2000 Service pack 2 or later ...

Страница 181: ...rity you need a secret key available by calling Honeywell Technical Service The secret key is unique for each HRDV unit This key is entered into the appropriate RAS field to verify that the image is unaltered and original Obtaining the Secret Key To acquire the secret key please follow these steps 1 Make a note of the serial number of the original HRDV unit You can find the serial number either by...

Страница 182: ...CR like playback controls located at the bottom of the RAS Viewer screen Press Pause to select the image you wish to authenticate then select File Authenticate Image from the main RAS menu 3 At the prompt enter the secret key that you previously obtained from Honeywell Technical Support 4 If the secret password matches the embedded key then the image is considered secure A message onscreen tells y...

Страница 183: ... attach an image of the event from a camera provided this feature is enabled Requirements The HRDV unit Must have an Ethernet PCMCIA card installed Be enabled for remote access via Ethernet see Chapter 19 Networking on Ethernet Be connected to a network The customer must have a PC with an e mail service installed The Honeywell monitoring E Mail Alert program must be installed on a customer s netwo...

Страница 184: ...ail Alert program We recommend that you have the default TCP port of 44446 as this will match the default TCP port of the Honeywell monitoring program If you do change this setting you must ensure that the port numbers match both in the E Mail Alert program and in the IP address on this screen Options Set the options you wish reported Motion Reports start and stop of motion events Attach Image Att...

Страница 185: ...ting systems Windows 98 Second Edition Windows NT 4 0 Service Pack 6a or higher Windows 2000 Service Pack 2 or higher Windows XP Professional HRDV with alarm notification enabled Power up Reports unit has had power applied Config changed Reports unit configuration has been changed MB enable Used specifically for Mexico Bank requirements Text Reports text event detection Video Loss Reports the came...

Страница 186: ... CD that came with the HRDV16 8 unit in the E Mail Alert 1 0 folder You can also find the setup program on the Honeywell web site at www honeywellvideo com To install the E Mail Alert program 1 Insert your RAS CD into a Windows based PC that has a CD ROM drive 2 When the RAS auto install window displays click Cancel and then Finish to exit 3 Using Windows Explorer navigate to the E Mail Alert fold...

Страница 187: ...ou can save all alarms reported to a text file in a directory you specify The file will be saved with the current date Each day a new file will be created Send Report Daily Time to Send You can define a daily time that the HRDV will send an Alarm event log file to up to three e mail addresses To forward immediate alarm notifications set the e mail addresses 1 5 on the Setup Email screen MENU Syste...

Страница 188: ...port where alarm notification packets are received from the HRDV This TCP port must match the port set in the Advanced Setup screen The factory default sets both of these to 44446 see page 166 After you enable alarm monitoring the alarm monitoring program forwards messages received to the e mail recipients you defined on the HRDV Examples of typical alarm notification messages are shown below ...

Страница 189: ...HRDV Reference Guide Rev 1 00 171 Document 900 0261 04 05 Alarm Recipient ...

Страница 190: ...Rev 1 00 172 Document 900 0261 04 05 E Mail Alert Program Installation ...

Страница 191: ...one common serial port Requirements The following is required to successfully use this feature The data output of the POS device is RS232C ASCII data or the data from the POS device must be converted to RS232C ASCII formatted data The transaction data must be sent out in real time to record a live camera with the transaction text Solution Enable the generic cash register option and use the Text Pr...

Страница 192: ...actual sample trace of a series of transactions from the POS server or cash register Sometimes the documentation does not include all the information required In this case 1 Insert a data analyzer or PC running Hyper Terminal on the POS device output 2 Generate several transactions 3 Collect the data in a file E mail this information to Honeywell Technical Support for recommendations 4 Alternative...

Страница 193: ... and Strt Trans Str 2 will be mutually exclusive The cash register number is 27 and it is one byte offset from the beginning of each TX line User should select CASHREG OFFSET AT BEGIN and 1 byte offset Other offset selection will be mutually exclusive User input the End Trans Str to indicate the end of each transaction A total of 4 strings CASE SENSITIVE can be identified as transaction terminatio...

Страница 194: ...nning will be associated with virtual port 1 To display or store this data you must program the following additional screens 1 Set the correct communications parameters on the Text Port screen MENU System Setup Text Ports Set the Baud rate stop bits data bits and parity 2 Set which camera will display the text on the Video Input screen MENU System Setup Video Inputs 3 Program to record the require...

Страница 195: ...hould de select the CONTROL CHAR ENABLE button There is no specific START transaction User should disable Strt Trans Str 1 and Strt Trans Str 2 The cash register number is 2 and it is 3 byte offset from the end of each TX line User should select OR FROM END and 3 byte offset User input the End Trans Str to indicate the end of each transaction A total of 4 strings CASE SENSITIVE can be identified a...

Страница 196: ...l transactions with 2 starting at the 4th byte from the data string end will be associated with virtual port 1 To display or store this data you must program the following additional screens 1 Set the correct communications parameters on the Text Port screen MENU System Setup Text Ports Set the Baud rate stop bits data bits and parity 2 Set which camera will display the text on the Video Input scr...

Страница 197: ... be disabled The cash register number is 2 and it is prefixed by a letter t User should select OR CASHREG PREFIX enabled Enable the End Trans Str to indicate the end of each transaction The total of 4 strings CASE SENSITIVE can be identified as transaction termination This helps the HRDV to stop recording and to store each transaction as a separated video clip In this case the end transaction stri...

Страница 198: ...ove example All transactions with t2 starting at the 5th byte from the data string end will be associated with virtual port 1 To display or store this data you must program the following additional screens 1 Set the correct communications parameters on the Text Port screen MENU System Setup Text Ports Set the Baud rate stop bits data bits and parity 2 Set which camera will display the text on the ...

Страница 199: ... Byte Most Significant Byte 0 1 2 3 4 5 6 7 8 9 A B C D E F 0 NUL SOH STX ETX EOT ENQ ACK BEL BS HT LF VT FF CR SO SI 1 DLE DC1 DC2 DC3 DC4 NAK SYN ETB CAN EM SUB ESC FS GS RS US 2 SP 3 0 1 2 3 4 5 6 7 8 9 4 A B C D E F G H I J K L M N O 5 P Q R S T U V W X Y Z _ 6 a b c d e f g h i j k l m n o 7 p q r s t u v w x y z DEL Hex ASCII Description 00 NUL null 01 SOH start of heading 02 STX start of te...

Страница 200: ...he left 0B VT vertical tab 0C FF form feed Advances paper to the top of the next page if the output device is a printer 0D CR carriage return Moves the cursor all the way to the left but does not advance to the next line 0E SO shift out Switches the output device to alternate character set 0F SI shift in Switches the output device back to the default character set 10 DLE data link escape 11 DC1 de...

Страница 201: ... ROM drive on your HRDV the Remote Access Software or the Software Update Utility Viewing System Information This screen displays current system information Access the System Information screen as follows MENU System Setup System Info Figure C 1 displays Figure C 1 System Information Screen This information is useful when contacting Technical Support for assistance ...

Страница 202: ... may have occurred during the course of operation The system log can be long Use the control buttons to scroll through system log entries and the Next and Previous buttons on the screen to move between log pages The HRDV16 8 stores up to 1000 system log entries When the system log is full the oldest 500 entries are overwritten Access the System Log screen as follows MENU System Log Figure C 2 disp...

Страница 203: ...ne load operation To use the SUU you must connect your HRDV16 8 to a local PC using a null modem cable Note The HRDV16 8 does not record digital video while you are downloading software Caution Powering down during the flash update requires a service card to restore the unit to operational state It may also require a service call Downloading Software Using the CD ROM Drive 1 Download the HRDV16 8 ...

Страница 204: ...Screen 7 After the download is complete the HRDV recorder is rebooted Downloading Software Using RAS From time to time a new version of the HRDV16 8 software may be available from Honeywell You may update your HRDV16 8 from a PC using either the Software Update Utility SUU or Remote Access Software RAS SUU is a Windows based application that writes the data to the HRDV16 8 memory via an RS232 conn...

Страница 205: ...nit and stop recording 4 From the Action menu select Download HRDV8 HRDV16 Software selection may change depending on the HRDV model number 5 Find and select the binary upgrade file 16il_xxg bin for example and click OK 6 After the download is complete you are prompted to reboot the HRDV recorder Click OK RAS automatically disconnects Close RAS For detailed instructions on downloading software usi...

Страница 206: ...k of your HRDV16 8 unit Downloading Software Using SUU To download the most current software update 1 Start the Software Update Utility application by double clicking on the shortcut that was placed on your desktop during installation OR Start the application using the Windows Start menu on the taskbar Start Programs Gyyr Software Update Utility 2 After the SUU starts select Action Connect from th...

Страница 207: ... indicating that the update was successful and the SUU automatically terminates your computer s connection with the HRDV16 8 The HRDV16 8 also displays a message that the software update was successful and reminds you to Reboot your unit to have the new software take effect Use the cursor buttons to highlight the Reboot button then press Enter The HRDV16 8 reboots and the new software takes effect...

Страница 208: ...Rev 1 00 190 Document 900 0261 04 05 Maintenance ...

Страница 209: ...Rev 1 00 191 Document 900 0261 04 05 D Installation Scenarios This appendix shows the following typical installation scenarios TCP IP Ethernet Network Telco or LAN Network ...

Страница 210: ... 04 05 Installation Scenarios Figure D 1 TCP IP Ethernet Network ATMs up to 4 Drive up windows Tellers vault lobby MPT 400N 4 port Protocol translator HRDV16 8 PC Main system monitor Bank branch up to 16 cameras Ethernet Hub WAN LAN ...

Страница 211: ...RDV16 with Conventional ATMs Multidrop ATM 1 ATM 2 ATM 3 ATM 4 Modem sharing device RS232 Gyyr Y cable TELCO or LAN Modem or router ATM cameras MPT 400 4 port Protocol translator Up to 16 cameras 4 output cable RS232 Text insertion ports Power Legend Async Unfiltered Sync SDLC Async Filtered ...

Страница 212: ...Rev 1 00 194 Document 900 0261 04 05 Installation Scenarios ...

Страница 213: ...e menu select the video option and then select the video detect option Unit not recording Record light is on LCD says record but there are no clips on the hard drive Check the various calendars to ensure recording is enabled during the current time period Also check that the triggers for motion or text events are properly set up Storage drives fill up too quickly Check the compression ratio see Se...

Страница 214: ...can expedite call processing by providing our support staff with the current hardware and software versions of the system This information is available in the system information screen If you see this screen It means A user has attempted to log in to the HRDV unit locally while another user is connected remotely via HRDV RAS ...

Страница 215: ... Main Storage Setup Disk To view click S M A R T A screen displays listing the Attribute id current value and the threshold value The drive is considered degrading and becoming unreliable when any one of the current value drops below the threshold value The Status options that display on the Disk Status screen are Good Need Service One or more attributes have dropped below the threshold indicating...

Страница 216: ...If there is a failure in the mechanical positioning system a seek error arises The more seek errors lower attribute value the worse the condition of a disk surface and disk mechanical subsystem 8 Seek Time Performance Shows how fast seek operations are going 9 Power on Hours Count Count of hours in power on state 10 Spin up Retry Count Count of retry of spin start attempts If the HDD cannot start ...

Страница 217: ...on drive caused by the general operating time of hours it stores 223 Load Retry Count Errors Repaired WDC Loading on drive caused by numerous recurrences of operations for example reading recording positioning of heads 224 Load Friction Errors Not Repaired WDC Loading on drive caused by friction in mechanical parts of the store Errors found that have not been repaired There were too many errors fo...

Страница 218: ...Rev 1 00 200 Document 900 0261 04 05 S M A R T ...

Страница 219: ...ion of screen flicker is reduced and the eye is fooled into seeing smooth motion when the picture changes NTSC and PAL There are many possible ways to combine the luminance and chrominance information of a video signal into a single composite signal Broadcast standards have been developed so that composite broadcast signals can be received and decoded by televisions that use the same standard NTSC...

Страница 220: ...site Video and S Video Color video picture signals have four basic components Luminance brightness Three chrominance color values red green blue These four elements can be combined in several different ways to produce a video signal Composite Video Composite video combines both luminance and chrominance portions of the signal into one signal for transmission along one wire This is the most common ...

Страница 221: ...There are 30 frames per second A little arithmetic gives a total data rate of approximately 20 MBs To achieve this speed you need several disks ganged together along with an array of hardware and software to manage them The cost of this kind of multi disk arrangement would be too expensive for most applications A far more practical solution is to compress the data so that it can be sent at the dis...

Страница 222: ...ull in approximately one hour To select a compression ratio you must balance the desired picture quality against the hard drive storage available Wavelet Compression The HRDV16 8 uses Wavelet video compression to reduce the size of recorded video files This advanced method of compression maintains a high image quality level while achieving high compression ratios Wavelet compression features Elimi...

Страница 223: ...es or SCSI RAID devices Video Horizontal resolution 520 TV lines color or monochrome Standard color NTSC or PAL Monochrome EIA or CCIR Operates in either field or frame mode Signal to Noise Ratio Greater than 45 dB Resolution 720 x 486 NTSC per field frame 720 x 576 PAL per field frame Record Speeds Adjustable from 1 fields second to 60 fields second NTSC 30 fps for HRDV8 Adjustable from 1 fields ...

Страница 224: ...e programming Camera titling up to 24 characters Optional date time burned into image before digitization Alarm Inputs 16 external alarm inputs 8 for HRDV8 Alarm activation configurable to NO NC contacts or TTL open collector Max input voltage 24 VCD Search to any alarm frame date time Alarm Output Four alarm outputs 0V in active 5V active Max current 25mA Audio Input output levels consumer audio ...

Страница 225: ...HRDV DB25 to a PC COM Port for Remote Access Software RAS Use the following table pinouts to connect a DB25 on the HRDV directly to a COM port on a PC or laptop Alarm In Out 25 pin terminal block screws accessible from rear Text In four ports RS485 and RS232 control SCSI high density 68 pin connector PC Card slot PCMCIA Type 2 Table H 1 Technical Specifications Cont d DB25 female DB9 female cable ...

Страница 226: ...Signal direction DTR 2 DSR 6 DCD 9 TXD 5 RXD 12 GND 13 CTS 8 RTS 3 1 DCD 6 DSR 4 DTR 2 RXD 3 TXD 5 GND 7 RTS 8 CTS port DB9 Female end R1 22 9 Ri Signal direction DTE Remote control port and external modem connection Remote control port DTE COM connector 1 Ground 2 232 DTR 3 232 RTS 4 Ground 5 232 TX 6 232 DSR 7 Ground 8 232 CTS 9 232 DCD 10 Ground 11 232 RI 12 232 RX 13 Ground POS ATM 1 SUU 14 AT...

Страница 227: ...ertion Port 4 for anything other than this null modem connection POS ATM 2 16 ATM 2 RX RS232 port 17 ATM 2 TX RS232 port POS ATM 3 18 ATM 3 RX RS232 port 19 ATM 3 TX RS232 port POS ATM 4 Remote Keypad 20 ATM 4 RX RS232 port 21 ATM 4 TX RS232 port PTZ Control DTE 22 485 RX RS485 port four wire 23 485 RX RS485 port four wire 24 485 TX RS485 port four wire 25 485 TX RS485 port four wire Note For a gr...

Страница 228: ...OWN D Jog wheel position 9 j LEFT L Jog wheel position 10 j RIGHT R Jog wheel position 11 l ENTER E Jog wheel position 12 m Jog wheel position 13 n Jog wheel position 14 o Jog wheel position 15 right p Note The jog wheel position numbers indicate the positions located on the jog wheel on the front panel of the HRDV unit Position 0 is all the way to the left and position 15 is all the way to the ri...

Страница 229: ...The data transmission speed BNC Bayonet Neill Concelman connector A bayonet locking connector for slim coaxial cables like those used with Ethernet C CCTV Closed circuit Television Compression Reducing the representation of the information but not the information itself Compression saves transmission time or capacity It also saves storage space on storage devices such as hard disks tape drives and...

Страница 230: ...rnetwork addresses for different nodes routes outgoing messages and recognizes incoming messages It allows a data packet datagram to traverse multiple networks on the way to its final destination IP supports higher level protocols such as TCP and UDP ISP Internet Service Provider A vendor who provides access for customers to the Internet and World Wide Web The user typically reaches his ISP by eit...

Страница 231: ...ch as a credit card scanner used for authorization when a purchase is made PTZ Pan Tilt Zoom Camera adjustment functions Q QNX A Unix like operating system R RA Return Authorization Number Contact Honeywell Customer Service RAID Redundant Array of Inexpensive Disks A RAID device allows you to write your data over disk drives in a single housing in such a way that if you lose one or more of the dri...

Страница 232: ...Rev 1 00 214 Document 900 0261 04 05 Glossary V VCR Video Cassette Recorder VHS Video Home System Video cassette format using half inch tape VHS HD VHS High Density A video cassette format ...

Страница 233: ...compression audio 204 description 203 ratio 204 wavelet 204 compression rate setting 63 71 configuration alarm events 37 baud rates 143 camera recording 146 easy 23 log ins 184 recording rate 146 user preferences 43 connections analog video inputs 16 ATMs 16 audio in out 16 CCTV monitor 16 94 PC card 17 peripherals 15 rear panel 15 17 SCSI 17 serial interface 16 S video 16 connector pinouts 41 208...

Страница 234: ...nitor screen 96 100 Main Setup screen 20 menu tree 22 menus Alarm 37 Change Password 31 Event Recording 77 Motion 77 System Log 184 monitor display setting 135 motion reports 114 motion detection described 1 Motion Event Setup screen 78 Motion menu 77 multiplexed video described 1 N network interface 138 NTSC described 201 O operation 91 101 overview functions 1 P PAL described 202 password changi...

Страница 235: ...6 119 Text Entry 7 21 Text Event Setup 147 151 Text Ports 144 Timelapse Recording 62 User Permissions 31 User Preferences 43 61 Zone Layout 79 SCSI connection 17 search 92 quick report 123 Search screen 107 searching Go To 105 sequence mode 94 serial interface connection 16 service contact numbers xiii software updating 186 spot monitor 97 Spot Monitor screen 97 101 storage setup 47 SUU Software U...

Страница 236: ...Rev 1 00 4 Document 900 0261 04 05 Index V video inputs connection 16 video loss 195 video text display setting 98 W wavelet compression 204 Z Zone Layout screen 79 ...

Страница 237: ......

Страница 238: ...ll Security South Africa Unit 6 Galaxy Park Galaxy Avenue Linbro Business Park P O Box 59904 Kengray 2100 South Africa www honeywell co za 27 11 574 2500 Honeywell Security Germany Großenbaumer Weg 8 40472 Düsseldorf Germany www honeywell security de 49 211 415 090 Honeywell Security Poland Chmielewskiego 22a 70 028 Szczecin Polska www ultrak pl 48 91 485 40 60 Honeywell Security Czech Republic Ha...

Отзывы: