background image

Copyright © 2019, 2021, Hitachi, Ltd.

DKC910I

Hitachi Proprietary

[INST(IN)07-01-20]

2.  Fixing Controller Chassis

(1) 

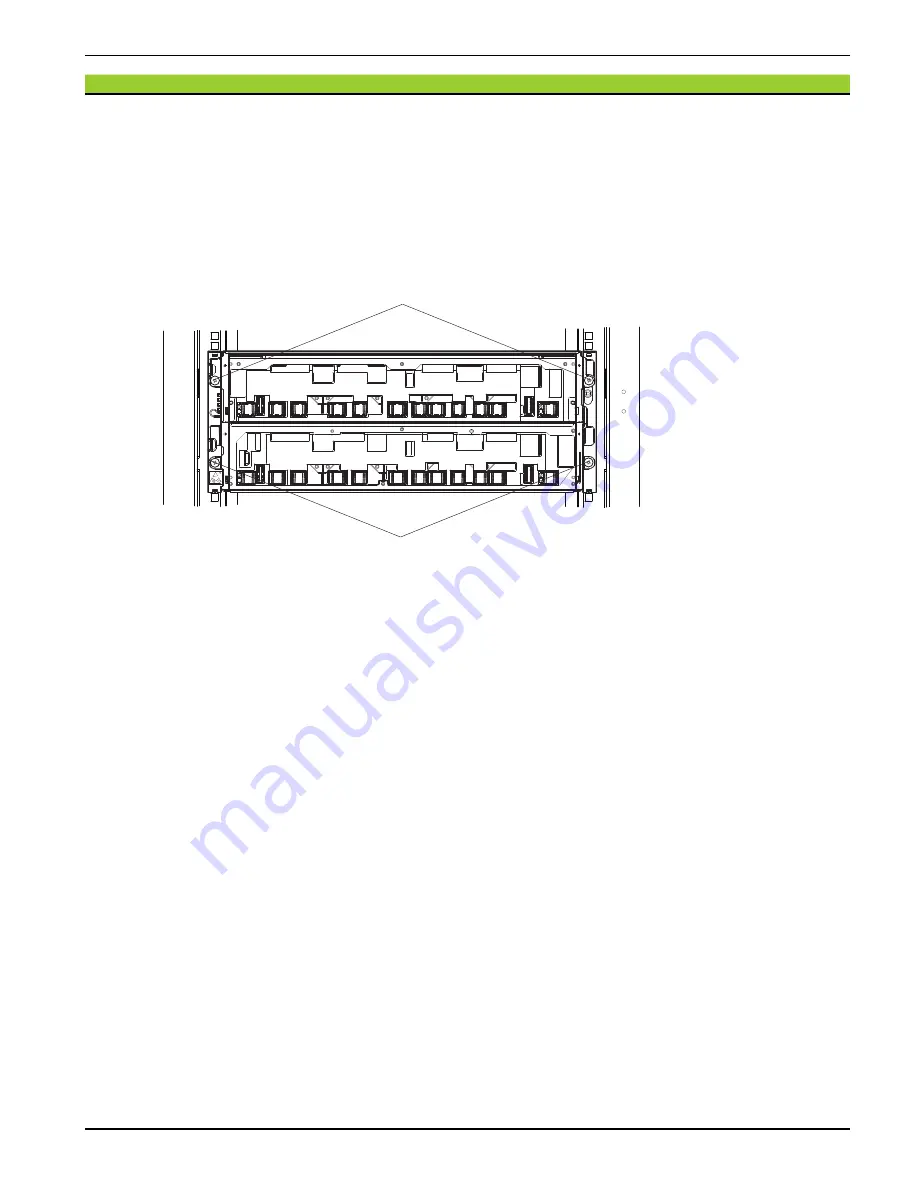
When installing DKC, fix each of the right and left places on the front side of DKC with four bind 

screws.

(2)  For the rail type without a stopper, go to 

Step 3

 to install the stoppers.

Figure 7-2  Fixing the Front Side of DKC

Binding screws

Binding screws

Rev.1

INST(IN)07-01-20

Содержание DKC910I

Страница 1: ...Copyright 2019 2021 Hitachi Ltd DKC910I Hitachi Proprietary INST IN 00 00 00 Rev 2 INST IN 00 00 00 INSTALLATION SECTION Installation Procedures ...

Страница 2: ... Supply INST IN 05 04 10 5 4 1 Removing Power Supply DKCPS for DKC INST IN 05 04 10 5 4 2 Removing Power Supply DBPS for SBX UBX FBX NBX INST IN 05 04 20 6 Mounting on a Rack Frame INST IN 06 01 10 6 1 Mounting Storage System on a Special Lifter INST IN 06 01 10 6 2 Mounting Storage System on Rack Frame INST IN 06 02 10 7 Fastening Storage System INST IN 07 01 10 7 1 Fixing Controller Chassis INST...

Страница 3: ...ower Cable INST IN 09 05 10 9 6 Connecting Power Cables Rack Frame PDU INST IN 09 06 10 10 Attaching Decoration Panels INST IN 10 01 10 11 Setting External Covers INST IN 11 01 10 12 Attaching Logo INST IN 12 01 10 13 Connecting the Maintenance PC to SVP with LAN Cables INST IN 13 01 10 13 1 Specifications for the Maintenance PC INST IN 13 01 10 13 2 Attachment Removal Procedure of Maintenance PC ...

Страница 4: ... System See 4 Unpacking Storage Systems Work 1 Unpacking and installing rack frame See 2 Unpacking and Installing the Rack Frame Work 4 Removing components See 5 Removing Components Work 5 Mounting on rack frame See 6 Mounting on a Rack Frame Work 7 Installing Components See 8 Installing Components See 9 Connecting Cables Work 9 Attaching Decoration Panels See 10 Attaching Decoration Panels Work 1...

Страница 5: ...ips screwdriver No 2 Fixing of Storage System Allen wrench No 3 Fixing of cable cramps Allen wrench No 4 Fixing of rail connection of power cable Spanner No 22 Adjustment of leveling bolts Tool of other Wrist strap Band for protecting the Storage System from the static electricity LAN cross cable Category 5e or more For connecting a Maintenance PC and the Storage System PC for Maintenance PC More ...

Страница 6: ...te the sum of the storage system weight and the rack weight and then consult with the person in charge of the building to which the storage system is carried about the procedure 2 1 Unpacking the RKU Rack Frame Figure 2 1 shows the packed status of the RKU Rack Frame 1 Unpacking NOTE Unpack it indoors Especially do not unpack it in such places with the outdoor dust the direct sunlight and the infi...

Страница 7: ...21 Hitachi Ltd DKC910I Hitachi Proprietary INST IN 02 01 20 Figure 2 1 RKU Rack Frame Packed Status Leveling bolt RKU rack frame Crepe tape Cotton tape Polyethylene bag Wooden cap Moving direction Rev 1 INST IN 02 01 20 ...

Страница 8: ...rnal appearance of the rack frame for distortion or damage owing to the transport Figure 2 2 External Appearance of Rack Frame 3 Checking the Storage System configuration and supplements Check if the components of the Storage System their model names product serial numbers and quantities agree with those in the packing list shipped Rear view Front view RKU rack frame ...

Страница 9: ...ldings Figure 2 3 Installation and Maintenance Areas of Rack Frame When the RKU racks are installed the right and left side clearance a and the front and rear side clearance b must be secured The clearance a and the clearance b are calculated from the total weight of the storage system and the floor load capacity When installing one RKU rack calculate the total weight of the storage system accordin...

Страница 10: ... Weight of 43U rack without side covers Side covers 40 Weight of only side covers for 43U rack CBX VSP 5500 5500H 75 Two CBXs are required per CBX pair Two Controller Boards are installed per CBX CBX VSP 5100 5100H 60 Two CBXs are required per CBX pair One Controller Board is installed per CBX HSNBX 15 Two HSNBXs are required for the first CBX pair only No HSNBX is required for the second or third...

Страница 11: ... weight of the storage system when two SBXs and one UBX are installed in the single CBX pair configuration is calculated as follows RKU rack 213 kg DKC 75 kg 2 HSNBX 15 kg 2 SBX 96 kg 2 UBX 216 kg maintenance equipment 75 kg 876 kg DKC 0 4U DKC 1 4U HSNBX 0 1U HSNBX 1 1U DKU 00 SBX FBX 8U DKU 01 SBX FBX 8U DKU 02 UBX 16U ...

Страница 12: ...e 250 x 350 200 mm or more 200 mm or more 200 mm or more 350 x 450 310 mm or more 250 mm or more 200 mm or more 450 x 550 510 mm or more 430 mm or more 370 mm or more 550 x 650 700 mm or more 610 mm or more 530 mm or more 650 x 750 890 mm or more 790 mm or more 700 mm or more 750 x 850 1080 mm or more 970 mm or more 870 mm or more 850 x 1270 mm or more 1140 mm or more 1030 mm or more Table 2 2 Rig...

Страница 13: ... and rear side clearance b is 1 800 mm or more When the front and rear side clearance b is 2 000 mm or more x 250 200 mm or more 200 mm or more 200 mm or more 250 x 350 200 mm or more 200 mm or more 200 mm or more 350 x 450 200 mm or more 200 mm or more 200 mm or more 450 x 550 200 mm or more 200 mm or more 200 mm or more 550 x 650 200 mm or more 200 mm or more 200 mm or more 650 x 750 230 mm or m...

Страница 14: ...mm or more 200 mm or more 200 mm or more 750 x 850 200 mm or more 200 mm or more 200 mm or more 850 x 210 mm or more 200 mm or more 200 mm or more Table 2 7 Right and Left Side Clearance a for Floor Load Capacity of 4 900 Pa 500 kgf m2 or more Total weight of storage system x unit kg Right and left side clearance a When the front and rear side clearance b is 1 600 mm or more When the front and rea...

Страница 15: ...nce mm Total weight of storage system kg 1 15 b Front and rear side clearance mm 1000 Floor load capacity kgf m2 10 1000 600 Number of connected racks Example where the total weight of the storage system is 1 000 kg including maintenance equipment the front and rear side clearance is 1 600 mm the floor load capacity is 300 kgf m2 and the number of connected racks is two 1000 1 15 1600 1000 300 10 1...

Страница 16: ...Copyright 2019 2021 Hitachi Ltd DKC910I Hitachi Proprietary INST IN 02 02 10 Rev 1 INST IN 02 02 10 2 2 Size 1 Rack frame Figure 2 4 Rack Size Unit mm Top view Front view Side view ...

Страница 17: ...ack frame is not a rotary type but a fixed type not to incline the equipment at over the tipping angle Therefore the equipment should not be rotated quickly Moving the equipment normally Move the rack frame only from the front face in principle Push the rack frame slowly with thumbs and the bases of them on both ends of the front face When changing moving direction do so little by little in cooper...

Страница 18: ...st cooperate One pulls the front face of the rack frame in the direction of the installation location and the other pushes the rear face of the rack frame with hands on the both ends of the rear door at the position that is more than 50mm far from the door lock holding side covers Do not push the door lock directly Figure 2 6 Forward Movement Operation 40mm 40mm 40mm Front View of Rack Frame Rear ...

Страница 19: ...he rack frame slowly with thumbs and bases of them on both edges of the side cover of the middle rack Do not push the side face when the equipment is in a sloping place Some of the equipment that has an upper center of gravity may fall down Pushing the central part of the side cover excluding the part within 40mm from the edge or boundary part of the side cover strongly may make the side cover cav...

Страница 20: ... of Rack Frames Installation Location 1 Confirm the Rack Frames installation location and the Side Covers installation position 2 When the Side Covers are needed to remove remove the Side Covers referring to Figure 2 15 Figure 2 8 Removal and Re installation of Side Cover Side Cover Side Cover Side Cover Side Cover ...

Страница 21: ... 2 Earthquake resistant Plan Figure 2 9 shows a cross sectional diagram of the floor of the A 6516 RKU3 rack frame Refer to it for the earthquake resistant plan Figure 2 9 Cross sectional View of Floor of A 6516 RKU3 Rack Frame 3 Move the unpacked RKU rack frame to the site where it is to be installed ...

Страница 22: ...ment is moved by two or more persons Also be sure to keep the stability of the equipment to prevent the overturning of it 1 Move the Rack Frames to the installation location 2 Line up the position between the rack frames to connect 3 Adjust the height and the inclination of the Rack Frames by the four screw jacks in the lower part of the Rack Frames Figure 2 10 Storage system Side to Side Height T...

Страница 23: ... the screw jacks shall be adjusted in 1 4 rotations evenly into the four places in order Failure to do this may put too much stress on the connecting bolts and jam the bolts making it impossible to remove them in the worst case scenario Caution of Breakage This equipment is very heavy and applies pressure to screw jacks If you fail to jack up the equipment by rotating the four screw jacks in 1 4 t...

Страница 24: ...ack Frames If you install multiple rack frames connect them If the connection work is not required go to Step 8 1 Remove the two screws from the front side of the Rack Frames to be connected and then remove the two panels by moving them upward Figure 2 12 Removal of Panels Rack Frame Panel Panel Front View Panel Screw ...

Страница 25: ...oprietary INST IN 02 03 90 Rev 1 INST IN 02 03 90 2 Connect the front of the rack frames with the two joint plates and the eight screws Figure 2 13 Connection of Rack Frames Front Rack Frame Screw SC520N Front View Joint Plate Joint Plate Screw SC520N ...

Страница 26: ...ct the rear of the rack frames with the two joint plates and the eight screws 4 Reinstall the two panels that is removed on the procedure a and secure them with the two screws Refer to Figure 2 12 Figure 2 14 Connection of Rack Frames Rear Rack Frame Screw SC520N Rear View Joint Plate Joint Plate Screw SC520N ...

Страница 27: ...side covers remove them in order from the upper part 1 Hang the hook of the side cover on the lower part of the left side of the rack frame slide the side cover to the front of the rack frame and then secure the side cover with the four screws and the two screws 2 Hang the hook of the side cover on the upper part of the left side of the rack frame slide the side cover to the front of the rack fram...

Страница 28: ...2 Attach the two FG cables for rack frame connection and secure them with the two lock washers and the two screws while bundling the FG cable for the rear door with the one of the FG cables for rack frame connection Figure 2 16 Attachment of FG Cable A A Rear View Detail A Screw SB406N Rear View Rear View Screw SB406N Lock Washer Lock Washer Screw SB406N FG Cable FG Cable Rear Door FG Cable For Re...

Страница 29: ...30 8 Removing the decoration panels 1 U When the decoration panels have been attached it is necessary to remove the decoration panel of installation position 1 Pull the decorative panel toward you 2 The decorative panel is removed Figure 2 17 Removing Decoration Panels Decoration Panel RKU rack frame ...

Страница 30: ... 680 mm 860 mm Figure 3 1 Dimension from Front Post to Rear Post EIA units and intervals of mounting holes of RKU rack frame conforming to EIA standard A unit U space conforming to EIA standard is 44 5 mm as shown in the figure below The boundary of the unit falls on the middle of the interval of 12 7 mm The boundary of the unit 1 U 1 EIA is from the center of the interval of 12 7 mm to the center...

Страница 31: ...r every 1U and the U number is marked for every 5U Count the address from the marked U number according to the installation The total weight of Storage Systems that can be installed in the RKU rack is 600 kg Do not install Storage Systems that are heavier than described above Figure 3 3 shows the whole layout of installing position addresses in the RKU rack frame Total of the installation addresse...

Страница 32: ...Copyright 2019 2021 Hitachi Ltd DKC910I Hitachi Proprietary INST IN 03 01 30 Rev 0 INST IN 03 01 30 Figure 3 3 Whole Layout of Diagram Addresses of installation positions Area for installing the chassis ...

Страница 33: ...t Rail R and Rail L 2 Screw etc 1 3 Rack nut 5510146 1 4 1 For fixing Storage System and rail 2 4 Cage nut 5528564 1 4 1 For fixing Storage System and rail 2 5 KS PIN 5557433 1 8 1 Pin for circular hole 2 6 Binding screw M5 10 SB510N 8 1 For fixing rail and Storage System 2 7 LL washer M5 5513553 513 4 1 For fixing rail for square hole 2 8 Loop cable tie 5552567 1 2 For fixing the cable 1 2 spares...

Страница 34: ... the rear side of the rail R with the loop cable tie LL washer and binding screw M5 10 The fixing position is the fourth hole from the bottom of the unit boundary line 3 When installing a Controller Chassis attach rack nuts for circular holes and cage nuts for square holes For the rail type with a stopper the nut attachment location is the tenth hole from the bottom of the unit boundary line on th...

Страница 35: ... without Stopper Rack frame rear side Binding screw M5 10 Clip Pin Clip Pin Rail R Rack frame front side Unit boundary Unit boundary Unit boundary Unit boundary Unit boundary Cage nut or rack nut LL washer Pin Pin Unit boundary Unit boundary Unit boundary Unit boundary Cage nut or rack nut Loop cable tie Rev 2 INST IN 03 01 51 ...

Страница 36: ...troller Chassis with Stopper Rack frame rear side Binding screw M5 10 Clip Pin Clip Pin Rail R Rack frame front side Unit boundary Unit boundary Unit boundary Unit boundary Unit boundary Cage nut or rack nut LL washer Pin Pin Unit boundary Unit boundary Unit boundary Stopper Loop cable tie Rev 2 INST IN 03 01 52 ...

Страница 37: ...ole on the rack Check the holes on the rack before the installation work Table 3 2 shows the components for the rails for Drive Box SBX UBX Table 3 2 Components for Rail RRDB Per Unit Item No Part Name Part No Quantity Comment Remarks 1 Slide Rail 2853847 C 1 set Rail 2 2 Screw SBB RAIL 4 1 3 Pin Screw 4 Pin for circular hole 1 4 Loop cable tie 5552567 1 2 For fixing the cable 1 These parts are in...

Страница 38: ...n the length of the rail does not need to be adjusted or when the rail is installed in the RKU rack leave the screw and nut stopper as they are and go to Step 2 2 When the rack installation hole is circular replace positioning pin with the supplied pin screw φ 6 8 head screw When the rack installation hole is rectangular go to Step 3 remain the guide screw φ 9 2 head screw as is 3 When the rack in...

Страница 39: ...n total on the front and back edge into holes on the right side of the rack at the position where you want to install the Drive Box 8 Raise the Clips of the rail to fix the rail to the rack Figure 3 8 Installing Rails Positioning pin Rail Unit boundary Clip Clip Positioning pin Frame front right side Frame rear right side Unit boundary Unit boundary Unit boundary Unit boundary Unit boundary Right ...

Страница 40: ...ils for Drive Box FBX The rail install procedure is different depending on the hole shape square or circular hole on the rack Check the holes on the rack before the installation work Table 3 3 shows the components for the rails for Drive Box FBX Table 3 3 Components for Rail RRDBF Per Unit Item No Product name Parts No Quantity Comment Remarks 1 Slide Rail 2854551 A 1 set Rail R and Rail L 2 Access...

Страница 41: ... These rails extend or shorten back and forth 1 Open two clips on the front and back of the rail R 2 When the rack installation hole is rectangular replace positioning pins and with the supplied screws M4 FLAT φ 9 2 head screw Figure 3 10 Work before Installing Rails Rail R Positioning pin Clip Clip Positioning pin Positioning pin Screw M4 FLAT Positioning pin In case of square hole ...

Страница 42: ...l R in the rack 6 Tighten the four screws on the side of the rail R 7 Fix the rear side of rail R with screw and loop cable tie The fixing position is the third hole from the bottom of the unit boundary line 8 Install a rail L on the left side of the rack in the similar procedure Figure 3 11 Installing Rails 1 Lowest unit of installing position Unit Frame Rear view Positioning pin Rail R 1 Unit 1 ...

Страница 43: ...lide Rail 2853847 E 1 set Rail R and Rail L 2 Screw SBB RAIL 4 1 3 Pin Screw 8 Pin for circular hole 1 4 Loop cable tie 5552567 1 2 For fixing the cable 1 These parts are included in Slide Rail Item No 1 NOTE Front rails have two types R and L Check that with the marking on the rail These rails extend or shorten back and forth 1 When the rack installation hole is circular replace positioning pin w...

Страница 44: ...back edge into holes on the right side of the rack at the position where you want to install the Drive Box 4 Raise the Clips of the rail to fix the rail to the rack Figure 3 13 Installing Rails Positioning pin Rail Unit boundary Clip Clip Positioning pin Frame front right side Frame rear right side Unit boundary Unit boundary Unit boundary Unit boundary Unit boundary Right side of rack Rev 1 INST ...

Страница 45: ...l to fix the rail to the rack The fixing position is the fourth hole from the bottom of the unit boundary line Figure 3 14 Fixing the Rails 6 Install a rail L on the left side of the rack in the similar procedure Screw SBB RAIL Rail Frame front right side Unit boundary Unit boundary Unit boundary Frame rear right side Right side of rack Loop cable tie Screw SBB RAIL Loop cable tie ...

Страница 46: ...s for HSNBX Table 3 5 shows components for the Rail RRHSN for HSNBX Table 3 5 Components for Rail RRHSN RRHSNE Per Unit Item No Parts name Parts No Quantity Comment Remarks 1 Rail 3292455 1 2857745 A 1 set Rail R and Rail L 2 Binding Screw M5 10 SB510N 4 For fixing rail 3 Loop cable tie 5552567 1 2 For fixing the cable ...

Страница 47: ... positions are the first and third holes from the bottom of the unit boundary line on the rack for both front and back 2 Fix the rear side of the rail R with binding screw M5 10 and loop cable tie The fixing position is the third hole from the bottom of the unit boundary line 3 For the rail type with a stopper slide the stopper to the rear side of the rack frame see Figure 3 16 4 Install the rail ...

Страница 48: ...140 Figure 3 16 Installing Rails for HSNBX with Stopper Rack frame rear side Stopper Rack frame rear side Binding screw M5 10 Clip Pin Clip Pin Rail R Rack frame front side Unit boundary Unit boundary Unit boundary Unit boundary Pin Pin Loop cable tie Rev 2 INST IN 03 01 140 ...

Страница 49: ...on of rainwater Work on the unpacking in the place where a rapid difference of temperature does not occur It may have dew condensation when it is unpacked in the place where a difference of temperature is extreme Figure 4 1 shows the packed Storage System status 1 Remove the outer package and packing materials 2 Take the Storage System out of the polyethylene bag 3 Remove tapes etc applied to the St...

Страница 50: ...2857688 1 3 CBXA for Hitachi Vantara Nameplate DKC910I CBX 2857688 51 3 CBX for Hitachi Vantara 2 Nameplate MDKC910I CBX 2857688 27 1 for Hitachi Vantara 3 Nameplate MDKC910I HSNBX 2857688 28 2 for Hitachi Vantara 4 Nameplate R0K82 63001 2857688 56 1 for HPE only CBX 5 Nameplate R0K80 63002 2857688 21 2 for HPE 6 Nameplate R0K80 63001 2857688 12 1 for HPE 7 Label Regulatory V 3292680 101 3 for Hit...

Страница 51: ... No 6 2 Attach the nameplates and label showing corresponding locations to top side and rear side of the HSNBX 3 Attach the nameplates and label to the other HSNBX in the same manner HPE Hitachi Vantara Hitachi Vantara HPE LABEL REGULATORY NAMEPLATE Controller Chassis MDKC9101 CBX 2857688 027 Primary Controller Chassis DKC9101 CBXA 2857688 001 XXXXXXXX Primary Controller Chassis 2857688 011 R0K82 ...

Страница 52: ...lates and Label HSNBX Item No 3 Item No 1 Item No 5 Item No 7 Item No 8 Rear Front Top View HPE HPE Hitachi Vantara Hitachi Vantara LABEL REGULATORY NAMEPLATE HSN Box Chassis MDKC9101 HSNBX 2857688 028 Primary Controller Chassis DKC9101 CBXA 2857688 001 XXXXXXXX HSN Box Chassis 2857688 021 R0K80 63002 LABEL BIS Item No 9 Front Rear ...

Страница 53: ...te DKC F910I CBX2 2857688 53 1 CBX2 for Hitachi Vantara 2 Nameplate MDKC910I CBX 2857688 27 1 for Hitachi Vantara 3 Nameplate R0K80 63001 2857688 14 1 CBXB for HPE Nameplate R0K82 63001 2857688 57 1 CBX2 for HPE 4 Nameplate R0K81 63001 2857688 23 1 CBXB for HPE Nameplate R0K83 63001 2857688 61 1 CBX2 for HPE 5 Nameplate R0K81 63001 2857688 26 1 CBXB for HPE Nameplate R0K83 63001 2857688 63 1 CBX2 ...

Страница 54: ... CBX DKC 1 HPE Hitachi Vantara Hitachi Vantara HPE LABEL REGULATORY NAMEPLATE Controller Chassis MDKC9101 CBX 2857688 027 Secondary Controller Chassis DKC F910I CBX2 2857688 053 Secondary Controller Chassis 2857688 063 XXXX XX XX R0K82 63001 XXXXXX Item No 1 Item No 2 Item No 3 Item No 6 Item No 7 Top View Rear Front LABEL BIS Item No 8 Front Rear ...

Страница 55: ... or DKC 4 HPE Hitachi Vantara Hitachi Vantara HPE LABEL REGULATORY NAMEPLATE Controller Chassis MDKC9101 CBX 2857688 027 Secondary Controller Chassis DKC F910I CBX2 2857688 053 Secondary Controller Chassis 2857688 061 XXXX XX XX R0K83 63001 XXXXXX AXXXXXX Item No 1 Item No 2 Item No 4 Item No 6 Item No 7 Top View Rear Front LABEL BIS Item No 8 Front Rear ...

Страница 56: ...DKC 3 or DKC 5 HPE Hitachi Vantara Hitachi Vantara HPE LABEL REGULATORY NAMEPLATE Controller Chassis MDKC9101 CBX 2857688 027 Secondary Controller Chassis DKC F910I CBX2 2857688 053 Secondary Controller Chassis 2857688 063 XXXX XX XX R0K83 63001 XXXXXX Item No 1 Item No 2 Item No 5 Item No 6 Item No 7 Top View Rear Front LABEL BIS Item No 8 Front Rear ...

Страница 57: ...ate MDKC910I UBX 2857688 30 8 for Hitachi Vantara Nameplate MDKC910I UBXE 2857688 30 8 for Hitachi Vantara 3 Nameplate R0K91 63001 2857688 18 8 for HPE 4 Label Regulatory V 3292680 101 8 for Hitachi Vantara 5 Label Regulatory H 3292681 301 8 for HPE 6 Label BIS 2857728 001 8 for Hitachi Vantara Attach BIS label to chassis shipped from UMCH Figure 4 7 Attachment of Nameplates and Label UBX HPE HPE ...

Страница 58: ...e MDKC910I SBX 2857688 29 4 for Hitachi Vantara 3 Nameplate R0K90 63001 2857688 16 4 for HPE 4 Label Regulatory V 3292680 101 4 for Hitachi Vantara 5 Label Regulatory H 3292681 301 4 for HPE 6 Label BIS 2857728 001 4 for Hitachi Vantara Attach BIS label to chassis shipped from UMCH Figure 4 8 Attachment of Nameplates and Label SBX HPE HPE Hitachi Vantara Hitachi Vantara LABEL REGULATORY NAMEPLATE ...

Страница 59: ...her FBX in the same manner Table 4 5 Nameplate and Label List FBX Item No Parts name Parts No Quantity Comment 1 Nameplate DKC F910I FBX 2857688 33 4 for Hitachi Vantara 2 Nameplate MNF100R9 BOX 2857688 32 4 for Hitachi Vantara 3 Nameplate R0K93 63001 2857688 34 4 for HPE 4 Label Regulatory V 3292680 101 4 for Hitachi Vantara 5 Label Regulatory H 3292681 301 4 for HPE 6 Label BIS 2857728 001 4 for...

Страница 60: ...antara LABEL REGULATORY NAMEPLATE Flash Drive Chassis 2U MNF100R9 BOX 2857688 032 Flash Drive Chassis DKC F9101 FBX 2857688 033 XXXXXXXX Flash Drive Chassis 2857688 034 R0K93 63001 Item No 1 Item No 2 Item No 3 Item No 4 Item No 5 Top View Rear Front Attachment Locations of Nameplates Protection sheet NOTE Do not attach nameplates on the protection sheet LABEL BIS Item No 6 Front Rear ...

Страница 61: ...KC910I NBX 2857688 31 4 for Hitachi Vantara 3 Nameplate R0K92 63001 2857688 20 4 for HPE 4 Label Regulatory V 3292680 101 4 for Hitachi Vantara 5 Label Regulatory H 3292681 301 4 for HPE 6 Label BIS 2857728 001 4 for Hitachi Vantara Attach BIS label to chassis shipped from UMCH Figure 4 10 Attachment of Nameplates and Label NBX HPE HPE Hitachi Vantara Hitachi Vantara LABEL REGULATORY NAMEPLATE NVM...

Страница 62: ...gree with those in the packing list shipped 2 The key supplied with the Storage System must be kept by service personnel in order to prevent users from maintaining the Storage System The key for Front Bezel is used to mount and dismount Front Bezel for Storage System Keep the key carefully Figure 4 11 Position of Storage System Serial Numbers Markings a DKC Storage System serial number b SBX UBX N...

Страница 63: ...e way that fingertips of the hand putting the wrist strap on touches the metallic portion of the side NOTICE To prevent part failures caused by static electrical charge built up on your own body be sure to wear a wrist strap connected to the Storage System before starting and do not take it off until you finish Refer to Note when Installing and Removing Parts INST GE 01 01 10 Be sure to wear a wri...

Страница 64: ... of the dummy Drive to the direction of the arrow hold the right side of the dummy Drive and pull it out and then remove it NOTE When handling the Drive hold the RAIL side because the SHIELD SPRING is subject to breakage 3 Keep the Drive of dummy Drive that has been removed temporarily in the component safekeeping container at the location shown on the address label with its handle returned to its...

Страница 65: ...ing the latch at the lower part of the dummy Drive to the direction of the arrow hold the upper part and pull it out and then remove it 3 Keep the Drive of dummy Drive that has been removed temporarily in the component safekeeping container at the location shown on the address label with its handle returned to its original state locked by the stopper It is to be installed in the Storage System aft...

Страница 66: ...yright 2019 2021 Hitachi Ltd DKC910I Hitachi Proprietary INST IN 05 01 40 Rev 0 1 INST IN 05 01 40 Figure 5 3 Removing Drive FBX Drive Rail Stopper Handle Drive Safekeeping box Address label SHIELD SPRING ...

Страница 67: ...sk Board 5 2 1 Removing Controller Board for DKC and Built in Parts 1 Removing BKMF DKC 1 Loosen the screw blue fixing the BKMF 2 Open the lever and pull out the BKMF to remove Figure 5 4 Removing BKMF DKC NOTE Components of BKMF FANM are different from those of BKMF The above illustrations are for VSP 5500 and VSP 5500H For VSP 5100 and VSP 5100H only CTL01 and CTL12 are installed BKMF FANM DKC BK...

Страница 68: ...ked on the Controller Board top when sliding the Controller Board out of the array past this mark keep a firm hold on the Controller Board Red line 1 Loosen the right and left screws blue and open the lever 2 Open the lever completely and pull out the Controller Board toward you to remove Figure 5 5 Removing Controller Board DKC Controller Board 2 Screw blue Lever Screw blue Lever Controller Board...

Страница 69: ...ve the Channel Board HIE or Disk Board 1 Loosen two screws blue fixing the Board 2 Hold the screws blue and pull out the Channel Board HIE or the Disk Board to remove Figure 5 6 Removing Channel Board HIE or Disk Board Channel Board Screw blue DKC Screw blue Channel Board Disk Boaard Screw blue Screw blue HIE ...

Страница 70: ...e it is breakable Be careful not to hit the connector when placing the ENC temporarily ENC Main edge connector 1 Push the latch on the ENC toward the arrow direction to unlock the lever 2 Raise the right and left levers fixing the ENC toward you When the lever is completely opened the ENC comes out forward 3 Hold the ENC with both hands and pull it out to remove Figure 5 7 Removing ENC SBX UBX NBX...

Страница 71: ...Copyright 2019 2021 Hitachi Ltd DKC910I Hitachi Proprietary INST IN 05 03 20 Rev 0 1 INST IN 05 03 20 Figure 5 8 Removing ENC FBX ENC1 Lever Lever ENC2 Latch ...

Страница 72: ...to mount the Power Supply in the specified position 5 4 1 Removing Power Supply DKCPS for DKC 1 Loosen the screw blue fixing the Power Supply DKCPS 2 Open the lever completely and pull out to remove it When the lever is completely opened the Power Supply DKCPS comes out forward 3 Pull out and remove the Power Supply DKCPS while holding the body with both hands Figure 5 9 Removing Power Supply DKCP...

Страница 73: ...the lever open while pressing the latch on the Power Supply DBPS inward with right thumb When the lever is completely opened the Power Supply DBPS comes out forward 2 Pull out and remove it while holding the body of the Power Supply DBPS with both hands Figure 5 10 Removing Power Supply DBPS Latch Lever DBPS1 DBPS2 Lever Latch Latch and lever operation of DBPS ...

Страница 74: ...Storage System could turn over or a worker could be caught under the Storage System Be sure to perform the operation with two or more workers Work carefully because the mass of the single DKC is about 75 kg SBX is about 24 kg UBX is about 27 kg FBX is about 38 kg NBX is about 21 kg and HSNBX is about 15 kg Figure 6 1 shows the external appearance of the special lifter Figure 6 1 External Appearanc...

Страница 75: ...remove the Front Bezel beforehand 2 Put the Storage System on the special lifter Put the Storage System with its Front Bezel removed on the lifter 3 Secure the Storage System to the lifter with a band of the lifter Bind the Storage System with the band tightly by fitting the length of the belt to the Storage System Figure 6 2 Setting the Storage Systems on Special Lifter Handle Valve Stopper Band ...

Страница 76: ...ure to install it in order from the bottom to prevent the falling of the rack when you install the Storage System on the rack 1 Take off the stopper of the special lifter on which the Storage System has been put and move the lifter close to the rack frame 2 Adjust the position of the Storage System so that it is seated in the center of the rack frame Be careful not to lift the elevating base too hi...

Страница 77: ...er the elevating base to the lowermost position by gently opening the up down valve of the special lifter and take off the stopper of the lifter 6 Move the special lifter to the place where the lifter does not disturb the following works Figure 6 3 Mounting Storage System on Rack Frame Handle Valve Stopper Base Storage System to be mounted Rack frame Push in ...

Страница 78: ...he washers 7 1 Fixing Controller Chassis Table 7 1 Front Bezel Components List Per One Unit Item No Parts name Parts No Quantity Comment 1 Front Bezel 5559126 A 1 Front Bezel DKC 2 Binding Screw M5 10 SB510N 8 For fixing the Controller Chassis and the bracket 1 Checking stoppers For the rail type without a stopper go to Step 2 For the rail type with a stopper check that the rear right and left of ...

Страница 79: ...troller Chassis 1 When installing DKC fix each of the right and left places on the front side of DKC with four bind screws 2 For the rail type without a stopper go to Step 3 to install the stoppers Figure 7 2 Fixing the Front Side of DKC Binding screws Binding screws Rev 1 INST IN 07 01 20 ...

Страница 80: ...er for DKC 2 Stopper L 3293036 1 1 Stopper for DKC 3 Binding Screw NI SB516N 4 For fixing the Stopper 1 Fix the stopper L with the two binding screws temporarily 2 Fix the stopper R with the two binding screws temporarily Figure 7 3 Installing Stoppers for Rail Type without a Stopper Rack frame rear side Stopper L Binding screw Binding screw Binding screw Binding screw Stopper R Stopper L Stopper ...

Страница 81: ...e stopper L and the stopper R without gaps The stoppers might be rotated and raised by tightening the binding screws NOTE When the installation of the stoppers is difficult because the space between the Controller Chassis and the Chassis above it is too narrow contact the Technical Support Division to resolve the problem Stopper L Rack frame rear side Pressing the stopper downward Pressing the stopp...

Страница 82: ...rts No Quantity Comment 1 Front Bezel 5560002 A 1 Front Bezel SBX UBX NBX 2 Side bezel R 2855176 001 1 For right hand side For SBX UBX NBX 3 Side bezel L 2855177 001 1 For left hand side For SBX UBX NBX 4 Bracket R 3290548 001 1 For right hand side 5 Bracket L 3282470 001 1 For left hand side 6 Binding Screw M5 10 SB510N 5 1 For fixing the Drive Box and the bracket 7 COINLOCK MINI R KEY 3276491 00...

Страница 83: ...the figure below If the positions of the nuts stoppers are not correct remove the Drive Box and correct the positions of them For NBX From the rear of the rack check whether the stoppers fit the parts of the Drive Box as shown in the figure below If the positions of the stoppers are not correct remove the Drive Box and reinstall it in the correct position The stopper of the rail for NBX is fixed t...

Страница 84: ...n the Drive Box to the rack frame with the M5 10 binding screws temporarily two places each at right and left 5 Tighten the bind screws pressing the bracket in the direction of and to fix the bracket Figure 7 6 Fixing the Front Side of the Drive Box Drive Box SBX UBX NBX Bracket L Fixing position Bracket R Binding screws M5 10 Binding screws M5 10 ...

Страница 85: ...ng the Side Bezels Drive Box SBX UBX NBX 2 Removing the side bezel When removing the side bezel perform the removing in the following procedure a Hold the bottom of the left side bezel L on the front side of the Drive Box while opening outward and then tilt and remove the bottom of the left side bezel L by pulling it toward you b Hold the bottom of the right side bezel R on the front side of the D...

Страница 86: ...s of Front Bezel Item No Parts name Parts No Quantity Comment 1 Front Bezel FBX 3286818 A 1 FBFB Including screws plates side covers 2 COINLOCK MINI R KEY 3276491 001 1 Key for Front bezel 1 When installing Drive Box fix each of the right and left places on the front side of Drive Box with two screws Figure 7 9 Fixing Drive Box FBX Rail Drive Box Rail Rack frame front view Stopper Stopper Rear vie...

Страница 87: ...N 07 03 20 2 Attach the plate to the left side of the front of the Drive Box Figure 7 10 Attachment of Plate 3 Attach the side cover to the left side of the front of the Drive Box Figure 7 11 Attachment of Side Cover Drive Box Plate Front view Plate Drive Box Side cover Front view Side cover ...

Страница 88: ...the front side of HSNBX Fix each of the right and left places on the front side of HSNBX with two binding screws Figure 7 12 Fixing the Front Side of HSNBX 2 Fixing the rear side of HSNBX For the rail type without a stopper go to Step 3 to install the stoppers For the rail type with a stopper push the stoppers to secure the right and left sides of HSNBX see Figure 7 13 Figure 7 13 Fixing Stoppers ...

Страница 89: ... Figure 7 14 Removing Binding Screws Fixing Rails 2 Fix the stopper L and the loop cable tie with the two binding screws temporarily Tighten the binding screw in the lower hole on the stopper L to fix the loop cable tie 3 Fix the stopper R and the loop cable tie with the two binding screws temporarily Tighten the binding screw in the lower hole on the stopper R to fix the loop cable tie Figure 7 1...

Страница 90: ...n the stopper L and the stopper R without gaps The stoppers might be rotated and raised by tightening the binding screws NOTE When the installation of the stoppers is difficult because the space between the Controller Chassis and the Chassis above it is too narrow contact the Technical Support Division to resolve the problem Stopper L Rear view of rack Stopper R Binding screws Pressing the stopper d...

Страница 91: ...ting the wrist strap on touches the metallic portion of the side NOTICE To prevent part failures caused by static electrical charge built up on your own body be sure to wear a wrist strap connected to the Storage System before starting and do not take it off until you finish Refer to Note when Installing and Removing Parts INST GE 01 01 10 Be sure to wear a wrist strap connected to the Storage Sys...

Страница 92: ...position where a hook of the handle can be entered into the square hole on the frame 3 Pull the stopper lightly and close the handle and then have the lock on by pressing the stopper NOTE If the handle is closed in the state in which its hook cannot be entered into the square hole the Drive cannot be installed correctly because it runs into the frame of the Storage System 3 Pull the handle lightly...

Страница 93: ...me as yy in HDDxxx yy NOTE Turn on the LOCATE LED by using Maintenance Utility during maintenance work If you cannot turn on the LOCATE LED check the number 2 shown on the label attached to the lower left part of the front side of UBX so that you do not confuse the maintenance target For correspondence of DKU DKU xy n to DB DB zzz and HDD location see Correspondence of DKU to DB and HDD Location L...

Страница 94: ... of the Storage System 3 Close the opened stopper and then have the lock on by pressing the stopper NOTE If the handle is closed in the state in which its hook cannot be entered into the square hole the Drive cannot be installed correctly because it runs into the frame of the Storage System 3 Pull the handle lightly to make sure that the Drive cannot be pulled out 4 Attach the dummy Drive to the e...

Страница 95: ...zzz 00 HDD zzz 07 HDD zzz 01 HDD zzz 02 HDD zzz 03 HDD zzz 04 HDD zzz 05 HDD zzz 06 HDD zzz 08 HDD zzz 1 03 HDD zzz 09 HDD zzz 10 HDD zzz 11 HDD zzz 1 00 HDD zzz 1 01 HDD zzz 1 02 HDD zzz 1 04 HDD zzz 1 11 HDD zzz 1 05 HDD zzz 1 06 HDD zzz 1 07 HDD zzz 1 08 HDD zzz 1 09 HDD zzz 1 10 0 1 2 3 4 5 6 7 8 9 10 11 DB zzz 0 1 2 3 4 5 6 7 8 9 10 11 DB zzz 1 DKU xy n A label is attached Printed slot number...

Страница 96: ...ntenance work If you cannot turn on the LOCATE LED check the number 2 shown on the label attached to the lower left part of the front side of SBX NBX so that you do not confuse the maintenance target For correspondence of DKU DKU xy n to DB DB zzz and HDD location see Correspondence of DKU to DB and HDD Location LOC02 84 Rev 7 INST IN 08 01 42 ...

Страница 97: ...INST IN 08 01 50 Figure 8 6 Installing the Drive Dummy Drive FBX Address label Drive The procedure for installing a Drive Safekeeping box Handle Stopper Drive Rail Dummy Drive Hook The procedure for installing a dummy Drive SHIELD SPRING Rev 1 1 INST IN 08 01 50 ...

Страница 98: ... 7 NOTE Turn on the LOCATE LED by using Maintenance Utility during maintenance work If you cannot turn on the LOCATE LED check the number 2 shown on the label attached to the lower left part of the front side of FBX so that you do not confuse the maintenance target For correspondence of DKU DKU xy n to DB DB zzz and HDD location see Correspondence of DKU to DB and HDD Location LOC02 84 DB zzz HDD ...

Страница 99: ...at the main edge connector of the Controller Board has no deformation damage or sticking of dust before installing the Controller Board When installing the Controller Board hold it with both hands and install it straight not to apply a shock to with any components 1 With the Controller Board lever opened completely insert the Controller Board into the slot position of the DKC 2 Push the Controller...

Страница 100: ...ST IN 08 02 20 Rev 1 INST IN 08 02 20 Figure 8 8 Installing the Controller Board DKC NOTE The above illustrations are for VSP 5500 and VSP 5500H For VSP 5100 and VSP 5100H only CTL01 and CTL12 are installed Lever Lever DKC Controller Board Screws blue Screws blue ...

Страница 101: ... toward you b Insert the BKMF up to the front of the shield finger c Insert the BKMF while pushing the side of its lever to the left until the pin of the lever goes through the cutout of the chassis and stops d Raise the BKMF lever and tighten the screws blue and fix it Figure 8 9 Installing BKMF DKC Lever DKC Screw blue BKMF Shield finger Side of lever Pin Cut BKMF FANM BKMF FANM ...

Страница 102: ...annel Board HIE or Disk Board 2 Push the Channel Board HIE or Disk Board in all the way NOTICE Push the front side of each board all the way to insert it to the end 3 Tighten the two screws blue to fix the Channel Board HIE and Disk Board Figure 8 10 Installing the Channel Board HIE or Disk Board DKC Channel Board Screw blue DKC Screw blue Channel Board Disk Board Screw blue Screw blue HIE ...

Страница 103: ...ectly because it is breakable Be careful not to hit the connector when inserting the ENC ENC Main edge connector 1 Open the right and left levers of the ENC to be installed toward you and open them completely 2 Install the ENC in the set position Insert the ENC until its right and left levers are slightly closed and then push the levers toward the ENC Figure 8 11 Installing ENC ENC1 Lever ENC2 Lev...

Страница 104: ...Copyright 2019 2021 Hitachi Ltd DKC910I Hitachi Proprietary INST IN 08 03 20 Rev 0 1 INST IN 08 03 20 Figure 8 12 Installing ENC FBX ENC1 Lever ENC2 Lever ...

Страница 105: ... and then slide the cable holder forward 2 With the lever completely opened insert the Power Supply DKCPS into the slot If you cannot insert the Power Supply DKCPS into the slot easily insert it after adjusting the position by slightly returning the lever NOTE Power Supply DKCPS1 and Power Supply DKCPS2 have different insertion directions 3 Push the Power Supply DKCPS in all the way 4 Close the lev...

Страница 106: ...he lever completely opened insert the Power Supply DBPS into the slot If you cannot insert the Power Supply DBPS into the slot easily insert it after adjusting the position by slightly returning the lever 2 Push the Power Supply DBPS in all the way 3 Close the lever completely to fix the Power Supply DBPS Figure 8 14 Installing Power Supply DBPS Lever DBPS2 DBPS1 ...

Страница 107: ...FC 9E BE DEFE 9G BGDGFG 9B BB DBFB 9H BHDHFH 9D BDDDFD 9F BF DF FF AA CAEA GA ACCCECGC AE CEEE GE AGCGEGGG AB CBEB GB AHCHEHGH ADCDEDGD AF CF EF GF 1A 3A 5A 7A 1C 3C 5C 7C 1E 3E 5E 7E 1G 3G 5G 7G 1B 3B 5B 7B 1H 3H 5H 7H 1D 3D 5D 7D 1F 3F 5F 7F DKC 0 CTL01 CHB Port Number DKC 0 CTL02 CHB Port Number DKC 1 CTL11 CHB Port Number DKC 1 CTL12 CHB Port Number DKC 2 CTL21 CHB Port Number DKC 2 CTL22 CHB ...

Страница 108: ...G 1D 3D 5D 7D 1F 3F 5F 7F DKC 0 CTL02 CHB Port Number 1A 3A 5A 7A 1C 3C 5C 7C 1E 3E 5E 7E 1G 3G 5G 7G DKC 0 CTL01 CHB Port Number 2B 4B 6B 8B 2H 4H 6H 8H 2D 4D 6D 8D 2F 4F 6F 8F DKC 1 CTL12 CHB Port Number 2A 4A 6A 8A 2C 4C 6C 8C 2E 4E 6E 8E 2G 4G 6G 8G DKC 1 CTL11 CHB Port Number 1B 3B 5B 7B Rear view of DKC 0 1D 3D 5D 7D 1F 3F 5F 7F 1H 3H 5H 7H 1A 3A 5A 7A 1C 3C 5C 7C 1E 3E 5E 7E 1G 3G 5G 7G Rea...

Страница 109: ...Q DKC 2 CTL21 CHB Port Number 2K 4K 6K 8K 2R 4R 6R 8R 2M4M6M8M 2P 4P 6P 8P DKC 3 CTL32 CHB Port Number 2J 4J 6J 8J 2L 4L 6L 8L 2N 4N 6N 8N 2Q 4Q 6Q 8Q DKC 3 CTL31 CHB Port Number 1K 3K 5K 7K Rear view of DKC 2 1M 3M 5M 7M 1P 3P 5P 7P 1R 3R 5R 7R 1J 3J 5J 7J 1L 3L 5L 7L 1N 3N 5N 7N 1Q 3Q 5Q 7Q Rear view of DKC 3 2K 4K 6K 8K 2M 4M 6M 8M 2P 4P 6P 8P 2R 4R 6R 8R 2J 4J 6J 8J 2L 4L 6L 8L 2N 4N 6N 8N 2Q ...

Страница 110: ...GFG DKC 4 CTL41 CHB Port Number AB CBEB GB AHCHEHGH ADCDEDGD AF CF EF GF DKC 5 CTL52 CHB Port Number AA CAEA GA ACCCECGC AE CEEE GE AGCGEGGG DKC 5 CTL51 CHB Port Number 9B BB DB FB Rear view of DKC 4 9D BD DD FD 9F BF DF FF 9H BH DH FH 9A BA DA FA 9C BC DC FC 9E BE DE FE 9G BG DG FG Rear view of DKC 5 AB CB EB GB AD CD ED GD AF CF EF GF AH CH EH GH AA CA EA GA AC CC EC GC AE CE EE GE AG CG EG GG R...

Страница 111: ...ach other Do not connect a cable to the console port of the ENC SBX UBX FBX Otherwise a failure might occur The cable connection of the Storage System that is mounted on the rack frame is shown in Figure 9 1 or later Table 9 1 shows the types of the cables to be connected Table 9 1 Types of Cables to be Connected No Cable name Remarks 1 Fibre Channel cable See 9 1 1 Connecting Fibre Channel Cables...

Страница 112: ...prietary INST IN 09 01 20 Rev 0 5 INST IN 09 01 20 Figure 9 1 Cable Connection CHB Fibre Channel DKC 2 HSNBX 2 SBX FBX 1 This is a connection example when connecting a power cable to PDU6 breaker rating 10 A Fibre Channel cables SAS cables Power cables ...

Страница 113: ... Proprietary INST IN 09 01 30 Rev 0 5 INST IN 09 01 30 Figure 9 2 Cable Connection CHB Fibre Channel DKC 2 HSNBX 2 SBX FBX 1 This is a connection example when connecting a power cable to PDU6 breaker rating 10 A iSCSI cables SAS cables Power cables ...

Страница 114: ...Copyright 2019 2021 Hitachi Ltd DKC910I Hitachi Proprietary INST IN 09 01 40 Rev 0 5 INST IN 09 01 40 Figure 9 3 Cable Connection CHB Fibre Channel DKC 2 HSNBX 2 X path cables ...

Страница 115: ...el Board side for Controller Chassis side Host computer side HBA Host Bus Adapter SW Types of Cables to be Connected Parts name of connected cable plug Model Connector form Connector form Cable connector type Cable model Channel Board DKC F910I 4HF32R DKC F910I 2HS10S DKC F910I 4MS16 DKC F810I 1PS16 DKC F810I 1PS32 LC LC LC LC cable Multi mode A 6515 GMzL 1 A 6515 HMzL 1 A 6515 JMzL 1 DKC F910I 4M...

Страница 116: ...ius not less than 40 mm so as not to apply the cable and the connector excessive stresses Figure 9 4 Connection Port for Fibre Channel Cables 16 Gbps 4 Port FICON 16 32 Gbps 4 Port FC 1 2 CHB Port Number Rear view of DKC 0 1B 3B 5B 7B 1D 3D 5D 7D 1F 3F 5F 7F 1A 3A 5A 7A 1E 3E 5E 7E 1H 3H 5H 7H 1C 3C 5C 7C 1G 3G 5G 7G Rear view of DKC 1 2B 4B 6B 8B 2D 4D 6D 8D 2F 4F 6F 8F 2A 4A 6A 8A 2E 4E 6E 8E 2H...

Страница 117: ...2 Gbps 4 Port FC 2 2 CHB Port Number Rear view of DKC 4 9B BB DB FB 9D BD DD FD 9F BF DF FF 9A BA DA FA 9E BE DE FE 9H BH DH FH 9C BC DC FC 9G BG DG FG Rear view of DKC 3 2K 4K 6K 8K 2M 4M 6M 8M 2P 4P 6P 8P 2J 4J 6J 8J 2N 4N 6N 8N 2R 4R 6R 8R 2L 4L 6L 8L 2Q 4Q 6Q 8Q Rear view of DKC 5 AB CB EB GB AD CD ED GD AF CF EF GF AA CA EA GA AE CE EE GE AH CH EH GH AC CC EC GC AG CG EG GG ...

Страница 118: ...uggable SFP the Controller Board continues to detect the Fibre Channel cable failures and the I O processing of the Controller Board may be deteriorated The location of Fibre Channel cable connectors is different depending on Controller Board Check the location before connecting a cable Check that Fibre Channel cable latch clicks and the cables are surely connected 4 Fix the Fibre Channel cables wi...

Страница 119: ...he iSCSI cable to connect it give it a bend with a long radius not less than 40 mm so as not to apply the cable and the connector excessive stresses Figure 9 7 Connection Port for iSCSI Cables 1 2 1 The figure shows DKC with 10 G bps iSCSI installed CHB Port Number Rear view of DKC 0 1B 3B 1D 3D 1F 3F 1A 3A 1E 3E 1H 3H 1C 3C 1G 3G Rear view of DKC 1 2B 4B 2D 4D 2F 4F 2A 4A 2E 4E 2H 4H 2C 4C 2G 4G ...

Страница 120: ...e 9 8 Connection Port for iSCSI Cables 2 2 CHB Port Number Rear view of DKC 4 9B BB 9D BD 9F BF 9A BA 9E BE 9H BH 9C BC 9G BG Rear view of DKC 3 2K 4K 2M 4M 2P 4P 2J 4J 2N 4N 2R 4R 2L 4L 2Q 4Q Rear view of DKC 5 AB CB AD CD AF CF AA CA AE CE AH CH AC CC AG CG Rev 0 5 INST IN 09 01 100 ...

Страница 121: ... Form Factor Pluggable SFP the Controller Board continues to detect the iSCSI cable failures and the I O processing of the Controller Board may be deteriorated The location of iSCSI cable connectors is different depending on Controller Board Check the location before connecting a cable Check that optional cable latch clicks and the cables are surely connected 4 Fix the iSCSI cables with binders giv...

Страница 122: ...path cable plug is not designed to distinguish between input and output The plug can be inserted in both the input port and the output port Be careful when connecting the X path cable The tip of the X path cable might be inserted into a gap around the X path port and damaged Confirm that the X path cable latch clicks and the cable is firmly connected Figure 9 10 Note on Connecting the X Path Cable...

Страница 123: ... Optical 6 DKC F910I MPC10 MPC10P SQSFP SQSFPP 10 8 Optical 7 DKC F910I MPC20 MPC20P SQSFP SQSFPP 20 8 Optical 8 DKC F910I MPC30 MPC30P SQSFP SQSFPP 30 8 Optical 9 DKC F910I MPC1H MPC1HP SQSFP SQSFPP 100 8 Optical 2 The copper cables can be used only when all the following conditions are met For the other cases use the optical cables a Connection between DKC 0 and HSNBX and connection between DKC ...

Страница 124: ...ary INST IN 09 02 21 c The rack depth between the rack front mount angle and rack rear surface is 960 mm or more For the rack with a depth less than 960 mm use the optical cables because the copper cables touch the rack rear surface Rev 0 1 INST IN 09 02 21 ...

Страница 125: ...sponding cable color code among the labels that come with a DKC 3 Attach cable color codes to an X path cable same color for IN and OUT 4 Attach cable color codes to all the other X path cables Figure 9 12 Attachment of Cable Color Codes 1 N 1 N 1 N 1 N 1 N 1 N 1 N 1 N 1 N 1 N 1 N Copper Cable Cable color code Optical Cable Copper cable DKC No PATH No IN Cable color code DKC No PATH No Cable color...

Страница 126: ... Location Label Color Color Name Remarks DKC No DKC 0 Node0 Red DKC 1 Node1 Orange DKC 2 Node2 Yellow DKC 3 Node3 Green DKC 4 Node4 Light blue DKC 5 Node5 Blue PATH No PATH 1 Red PATH 2 Orange PATH 3 Yellow PATH 4 Green PATH 5 Light blue PATH 6 Blue PATH 7 Purple PATH 8 Pink IN IN White No color for OUT Rev 0 INST IN 09 02 40 ...

Страница 127: ...to the socket do not rotate the connector 90 degrees or more When rotating 90 degrees or more rotate the connector and the cable together match the insertion direction of the connector and connect it Before wiring X path cables unwind stretch and untwist them 1 X path cable connection Connect the X path cables by following the procedure below Check the connection locations of the connectors referr...

Страница 128: ...clicks so that it is fixed firmly 2 Connect the X path cables described in Step 1 to each ISW Eight cables need to be connected for VSP 5100 and 5100H while 16 cables need to be connected for VSP 5500 and 5500H For example connect the X path cable to which the red red label is attached to the ISW01 0 port to which the red red label is attached NOTE Insert the X path cable until its latch clicks so...

Страница 129: ...0 2 X path cable routing 1 Copper X path cable routing A routing example of the copper X path cables is shown in the figure below Figure 9 14 X Path Cable Routing Example X path cable HSNBX 1 HSNBX 0 DKC 1 DKC 0 MCC2 MCC45 MCC1 MCC60 Rear view of rack Rev 0 5 INST IN 09 02 70 ...

Страница 130: ... optical X path cables is shown in the figure below Figure 9 15 X Path Cable Routing Example 1 2 HSNBX 1 HSNBX 0 DKC 0 DKC 1 Figure 9 16 X path Cable Optical Rear view of rack X path Cable Optical Clamp Tape Figure 9 16 X Path Cable Routing Example 2 2 DKC 2 DKC 3 DKC 4 DKC 5 Figure 9 15 X path Cable Optical Rev 0 1 INST IN 09 02 80 ...

Страница 131: ...Ltd DKC910I Hitachi Proprietary INST IN 09 02 90 Figure 9 17 X Path Cable Routing Example 1 2 HSNBX 1 HSNBX 0 DKC 0 DKC 1 Figure 9 18 X path Cable Optical X path Cable Optical Clamp Tape Rear view of rack Rev 0 1 INST IN 09 02 90 ...

Страница 132: ...021 Hitachi Ltd DKC910I Hitachi Proprietary INST IN 09 02 91 Rev 0 INST IN 09 02 91 Figure 9 18 X Path Cable Routing Example 2 2 DKC 2 DKC 3 DKC 4 DKC 5 Figure 9 18 X path Cable Optical X path Cable Optical Clamp Tape ...

Страница 133: ...ction Destination Required Quantity of Options DKC F910I LC LCP LC06 LC5 LC5P LC10 LC10P LC20 LC20P LC30 LC30P LC1J LC1JP SSVP0 HSNBX 0 Upper four ports U0 to U3 DKC 0 DKC 1 or SSVP1 when DKC F910I HUB is installed 1 2 Lower four ports L0 to L3 DKC 2 DKC 3 DKC 4 or DKC 5 1 2 or 4 SSVP1 HSNBX 1 Upper four ports U0 to U3 DKC 0 DKC 1 or SSVP0 1 2 or 4 Lower four ports L0 to L3 DKC 2 DKC 3 DKC 4 or DK...

Страница 134: ...erting two LAN cable kits in one HSNBX pay attention to which kit connects to the upper ports U0 through U3 or the lower ports L0 through L3 In later steps you will attach the labels to distinguish upper and lower ports VSP5500 and 5500H in which SSVP1 is not installed HSNBX 0 HSNBX 1 Cable duct LAN cable kit Rear view To ports U0 U3 To ports L0 L3 VSP5500 and 5500H in which SSVP1 is installed HSN...

Страница 135: ...kit Rear view To ports U0 U3 VSP5100 and 5100H in which SSVP1 is installed HSNBX 0 HSNBX 1 Cable duct LAN cable kit Rear view To ports U0 U3 To ports U0 U3 Figure 9 20 Installing LAN Cable Kit Pass the LAN cable kit through the cable duct with the protection bag attached to the LAN cable kit HSNBX Cable duct Protection bag LAN cable kit Rear view Rev 2 INST IN 09 03 21 ...

Страница 136: ... the LAN cable kit to the LAN ports on SSVP 4 If there are multiple LAN cable kits connect all the kits in the same way Figure 9 21 Installing LAN Cable Kit Connection to Upper Four Ports Connection to Lower Four Ports U3 U2 U1 U0 L3 L2 L1 L0 SSVP HSNBX Front view LAN cable kit U2 U1 U0 U3 U3 U2 U1 U0 L3 L2 L1 L0 SSVP HSNBX Front view LAN cable kit L2 L1 L0 L3 Rev 2 INST IN 09 03 30 ...

Страница 137: ...ction per LAN cable kit Figure 9 22 Attaching Labels LAN Cable Kit Connected to Upper Four Ports LAN Cable Kit Connected to Lower Four Ports Rear view LAN cable kit U3 clear U2 blue U1 yellow U0 green U0 U1 DKC0 U2 U3 DKC1 Label Label Label Label Rear view LAN cable kit L3 clear L2 blue L1 yellow L0 green Label Label Label Label L0 DKC2 L1 DKC3 L2 DKC4 L3 DKC5 ...

Страница 138: ...cable between the LAN port U1 on SSVP0 and the LAN board 1 Management LAN port on DKC 0 b Connect the LAN cable between the LAN port U3 on SSVP0 and the LAN board 1 Management LAN port on the LAN board 1 in DKC 1 Figure 9 23 Connecting LAN Cables U0 U1 U2 U3 HSNBX 0 前面 SSVP 0 U0 U1 DKC0 U2 U3 DKC1 L0 L1 L2 L3 Front view of HSNBX 0 SSVP1 HSNBX 1 HSNBX 0 LAN cable Rear view LAN cable kit SSVP0 U0 U3...

Страница 139: ... LAN port on DKC 3 When DKC 2 DKC 3 are not installed this step is not necessary c Connect the LAN cables between the LAN port L2 on SSVP0 and the LAN board 1 Management LAN port on DKC 4 When DKC 4 DKC 5 are not installed this step is not necessary d Connect the LAN cables between the LAN port L3 on SSVP0 and the LAN board 1 Management LAN port on DKC 5 When DKC 4 DKC 5 are not installed this ste...

Страница 140: ... 09 03 52 Figure 9 24 Connecting LAN Cables L0 DKC2 L1 DKC3 L2 DKC4 L3 DKC5 HSNBX 0 前面 SSVP 0 L0 L1 L2 L3 Front view of HSNBX 0 SSVP0 HSNBX 1 HSNBX 0 LAN cable Rear view LAN cable kit SSVP0 L0 L3 LAN cable LAN bord 2 Management LAN port LAN board 1 Management LAN port DKC 3 DKC 5 DKC 2 DKC 4 ...

Страница 141: ...AN port U3 on SSVP0 and the LAN board 1 Management LAN port on DKC 1 2 Connect the LAN cables to the upper LAN ports on SSVP1 via the LAN cable kit a Connect the LAN cables between the LAN port U1 on SSVP1 and the LAN board 2 Management LAN port on DKC0 b Connect the LAN cables between the LAN port U3 on SSVP1 and the LAN board 2 Management LAN port on DKC 1 c Connect the LAN cables between the LA...

Страница 142: ...X 0 前面 HSNBX 1 前面 SSVP 0 SSVP 1 DKC 5 DKC 4 U0 U1 DKC0 U2 U3 DKC1 U0 U1 DKC0 U2 U3 DKC1 HSNBX 1 HSNBX 0 LAN cable kit SSVP1 U0 U3 LAN cable Rear view LAN cable kit SSVP0 U0 U3 LAN cable LAN board 2 Management LAN port LAN board 1 Management LAN port Front view of HSNBX 1 SSVP1 Front view of HSNBX 0 SSVP0 DKC 1 DKC 0 Rev 2 INST IN 09 03 54 ...

Страница 143: ...not necessary When only DKC 0 and DKC 1 are installed do not connect the connectors for the rear connection on the LAN cable kit that is connected to the lower LAN ports on SSVP0 to anything 4 Connect the LAN cables to the lower LAN ports on SSVP1 via the LAN cable kit When SSVP1 is not installed this step is not necessary a Connect the LAN cables between the LAN port L0 on SSVP1 and the LAN board...

Страница 144: ...L1 L2 L3 L0 L1 L2 L3 HSNBX 0 前面 HSNBX 1 前面 SSVP 0 SSVP 1 L0 DKC2 L1 DKC3 L2 DKC4 L3 DKC5 L0 DKC2 L1 DKC3 L2 DKC4 L3 DKC5 HSNBX 1 HSNBX 0 LAN cable kit SSVP1 L0 L3 LAN cable Rear view LAN cable kit SSVP0 L0 L3 LAN cable Front view of HSNBX 1 SSVP1 Front view of HSNBX 0 SSVP0 DKC 3 DKC 5 DKC 2 DKC 4 LAN board 2 Management LAN port LAN board 1 Management LAN port ...

Страница 145: ...e LAN cable between the LAN port U3 on SSVP0 and the Management LAN port on the LAN board 2 in DKC 1 c Connect the LAN cable between the Maintenance LAN port on the LAN board 1 in DKC 0 and the Maintenance LAN port on the LAN board 2 in DKC 1 Figure 9 27 Connecting LAN Cables U0 U1 U2 U3 HSNBX 0 前面 SSVP 0 DKC 1 DKC 0 U0 U1 DKC0 U2 U3 DKC1 HSNBX 1 HSNBX 0 LAN cable Rear view LAN cable kit SSVP0 U0 ...

Страница 146: ...ct the LAN cable between the LAN port U3 on SSVP1 and the Management LAN port on the LAN board 2 in DKC 1 When adding SSVP1 disconnect the LAN cable from the LAN port U3 on SSVP0 and then connect it to the LAN port U3 on SSVP1 b Connect the LAN cables between the LAN ports U0 and U2 on SSVP0 and the LAN ports U0 and U2 on SSVP1 Figure 9 28 Connecting LAN Cables U0 U1 U2 U3 U0 U1 U2 U3 HSNBX 0 前面 H...

Страница 147: ...shown in Figure 9 29 and Figure 9 30 Figure 9 29 When Routing LAN Cables under the Racks Figure 9 30 When Routing LAN Cables over the Racks HSNBX 1 HSNBX 0 DKC 1 DKC 0 DKC 3 DKC 2 DKC 5 DKC 4 Loop cable tie LAN Cable LAN Cable HSNBX 1 HSNBX 0 DKC 1 DKC 0 DKC 3 DKC 2 DKC 5 DKC 4 Loop cable tie LAN Cable LAN Cable Rev 2 INST IN 09 03 90 ...

Страница 148: ...ternal LAN Cable No Part Name Port Name Use Purpose Reference Page for Cable Routing Note 1 SVP PUBLIC Using SNMP Web Console INST IN 09 03 110 Connected to both SVP BASIC and SVP OPTION 2 SSVP INTERNAL Connecting other devices INST IN 09 03 110 Only connected to SSVP0 SVP BASIC side Unnecessary to connect to SSVP1 SVP OPTION side 3 SSVP CONSOLE Using Maintenance PC INST IN 09 03 110 Generally onl...

Страница 149: ...HSNBX 0 see How to Attach Remove the Front Bezel INST GE 04 05 10 When connecting the LAN cable to SVP OPTION or SSVP1 1 Remove the Front Bezel from HSNBX 1 see How to Attach Remove the Front Bezel INST GE 04 05 10 2 Inset the LAN cable into the cable duct on the rear left side of HSNBX 1 and pull it out from the front side 3 Connect the LAN cable to SVP OPTION or SSVP1 4 Attach the Front Bezel to...

Страница 150: ...re installing the SAS cable The plugs of the SAS cable have no distinction between IN and OUT They can be inserted in both IN and OUT Be careful when connecting the SAS cable The tip of the SAS cable may be inserted into a gap between the SAS port and the chassis and damaged Check that optional cable latch clicks and the cables are surely connected Figure 9 33 Note on Connecting the SAS Cable SAS ...

Страница 151: ...td DKC910I Hitachi Proprietary INST IN 09 04 11 Rev 1 INST IN 09 04 11 NOTE The NVMe cable consists of two cables attached to connectors Be careful not to pass another cable between the two cables Figure 9 34 Note on the NVMe Cable ...

Страница 152: ...wist while wiring untwist and wire them When inserting the connector into the socket do not rotate the connector 90 degrees or more When rotating 90 degrees or more rotate the connector and the cable together match the insertion direction of the connector and connect it Before wiring SAS cables NVMe cable unwind stretch and untwist them 1 Cable types and selection criteria 1 There are two types of...

Страница 153: ... 9 SAS Cable NVMe Cable Connection and Copper Cable Length DKC Controller chassis DKB DBx Copper Cable length DKC 1 CTL12 12D 0 DB004 005 ENC2 IN1 1 2 m 12D 1 DB006 007 ENC2 IN1 1 2 m 12H 0 DB000 001 ENC2 IN1 1 2 m 12H 1 DB002 003 ENC2 IN1 1 2 m CTL11 11D 0 DB004 005 ENC1 IN1 1 5 m 11D 1 DB006 007 ENC1 IN1 1 5 m 11H 0 DB000 001 ENC1 IN1 1 5 m 11H 1 DB002 003 ENC1 IN1 1 5 m DKC 0 CTL02 02D 0 DB004 ...

Страница 154: ...071 ENC2 IN0 1 2 m 22H 0 DB064 065 ENC2 IN0 1 2 m 22H 1 DB066 067 ENC2 IN0 1 2 m CTL21 21D 0 DB068 069 ENC1 IN0 1 5 m 21D 1 DB070 071 ENC1 IN0 1 5 m 21H 0 DB064 065 ENC1 IN0 1 5 m 21H 1 DB066 067 ENC1 IN0 1 5 m Table 9 11 SAS Cable NVMe Cable Connection and Copper Cable Length CBX Pair 2 DKC Controller chassis DKB DBx Copper Cable length DKC 5 CTL52 52D 0 DB132 133 ENC2 IN1 1 2 m 52D 1 DB134 135 E...

Страница 155: ... INST IN 09 04 50 SBX FBX and SBX FBX are adjacently installed Cable length 1 m SBX FBX and UBX are adjacently installed Cable length 1 5 m Both the connection from SBX FBX to UBX and the connection from UBX to SBX FBX are allowed UBX and UBX are adjacently installed Cable length 1 5 m ...

Страница 156: ...orresponding cable color code among the color codes that come with a DKC 3 Attach cable color codes to a SAS cable NVMe cables same color for IN and OUT 4 Attach cable color codes to all the other SAS cables NVMe cables Figure 9 35 Attachment of Cable Color Codes SAS Copper Cable Cable color code Optical Cable Copper cable PATH No IN Cable color code PATH No Cable color code PATH No IN Cable color...

Страница 157: ...9 2021 Hitachi Ltd DKC910I Hitachi Proprietary INST IN 09 04 61 Rev 1 INST IN 09 04 61 Figure 9 36 Attachment of Cable Color Codes NVMe Copper Cable Cable color code Copper cable PATH No IN Cable color code PATH No ...

Страница 158: ...PATH 3 Yellow PATH 4 Green PATH 5 Light blue PATH 6 Blue PATH 7 Purple PATH 8 Pink PATH No DKC 1 3 5 PATH 1 Red With oblique lines PATH 2 Orange With oblique lines PATH 3 Yellow With oblique lines PATH 4 Green With oblique lines PATH 5 Light blue With oblique lines PATH 6 Blue With oblique lines PATH 7 Purple With oblique lines PATH 8 Pink With oblique lines IN IN White No color for OUT Rev 0 INST...

Страница 159: ...ing Check the connection locations of the connectors referring to Storage System Cable Diagram LOC05 10 Table 9 13 Types of SAS Cables NVMe Cables No Model Shape 1 DKC F910I SCCS SCCSP DKC F910I SCQ1 SCQ1P DKC F910I SCQ1F SCQ1FP 2 DKC F910I SCQ5A SCQ5AP DKC F910I MPC10 MPC10P SQSFP SQSFPP DKC F910I MPC20 MPC20P SQSFP SQSFPP DKC F910I MPC30 MPC30P SQSFP SQSFPP DKC F910I MPC1H MPC1HP SQSFP SQSFPP 3 ...

Страница 160: ... for VSP 5100 and 5100H while 16 cables need to be connected for VSP 5500 and 5500H Example of the cable Connect the cable to which the red and white label is attached to the ENC000 1 IN0 port red and white label If there is another SBX UBX FBX in the configuration perform Step 3 and later NOTE The number of NBX that can be installed is one Figure 9 37 SAS Cable NVMe Cable Connection The connectio...

Страница 161: ... 5 LOC05 40 for UBX Example of the cable Connect the cable to which the red and white label is attached to the ENCyyy 1 IN0 port red and white label If there are other SBX UBX FBX repeat Step 3 and Step 4 to connect the SAS cables to all Figure 9 38 SAS Cable Connection The connection for SBX is illustrated in the figure below The connection for FBX is also the same ENCyyy 1 1 Red and white label ...

Страница 162: ...ble NVMe cables keep a length approx 350 mm to 400 mm to insert pull out the cables and fix it by omega clips NOTE Do not fix the SAS cables NVMe cables and the power cables together Figure 9 39 SAS Cable Routing The illustrated cables are SAS cables The cable routing of NVMe cables is the same as that of SAS cables Clamp tape Rear view of Rack Frame SAS cable SAS cable Clamp tape ...

Страница 163: ...pyright 2019 2021 Hitachi Ltd DKC910I Hitachi Proprietary INST IN 09 04 111 Figure 9 40 SAS Cable Routing Example 1 2 DKC 0 DKC 1 DKU DKU SAS Cable SAS Cable Clamp Tape Clamp Tape Rev 0 INST IN 09 04 111 ...

Страница 164: ...pyright 2019 2021 Hitachi Ltd DKC910I Hitachi Proprietary INST IN 09 04 112 Figure 9 41 SAS Cable Routing Example 2 2 DKC 0 DKC 1 DKU DKU SAS Cable SAS Cable Clamp Tape Clamp Tape Rev 0 INST IN 09 04 112 ...

Страница 165: ...e of the PDU xx1 If they are plugged in the receptacles of the PDUs on the same side the function of the duplicated power supply does not work Do not plug any cable other than the power cable of the mounted Storage System in the outlet of the PDU Connect DKC 0 DKC 1 HSNBX 0 and HSNBX 1 to the same PDUs two PDUs in total on the right and left sides Connect DKC 2 and DKC 3 to the same PDUs two PDUs ...

Страница 166: ...6A 9 6 A 7 2A DKC 1 1 2A HSNBX 2 DKC F910I CBXB CBX2 PS 1 DKC PS 2 7 2A 7 2A CBXB CBX2 7 2A 7 2A 7 2 A 7 2A DKC 1 DKC F910I SBX PS 1 DBS2 PS 2 3 2A 3 2A PS 1 DBS2 PS 2 3 2A 3 2A PS 1 DBS2 PS 2 3 2A 3 2A PS 1 DBS2 PS 2 3 2A 3 2A SBX 12 8A 12 8A 12 8 A 3 2A DBS2 4 DKC F910I UBX PS 1 DBL PS 2 2 0A 2 0A PS 1 DBL PS 2 2 0A 2 0A PS 1 DBL PS 2 2 0A 2 0A PS 1 DBL PS 2 2 0A 2 0A PS 1 DBL PS 2 2 0A 2 0A PS ...

Страница 167: ...yright 2019 2021 Hitachi Ltd DKC910I Hitachi Proprietary INST IN 09 05 21 Rev 4 INST IN 09 05 21 Figure 9 42 Connecting Power Cables to the RKU Rack Frame Power cable Cable clamp Power cable Repeat binder ...

Страница 168: ...ight 2019 2021 Hitachi Ltd DKC910I Hitachi Proprietary INST IN 09 05 30 Figure 9 43 Power Cable Routing Example DKCx2 HSNBXx2 UBXx4 Repeat binder Power cable Power cable Repeat binder Rev 2 INST IN 09 05 30 ...

Страница 169: ...cal Code ANSI NFPA 70 and the Canadian Electrical Code Part 1 CSA C22 1 Section 14 1 Open the rear door Refer to How to Open Close the Door of the RKU Rack Frame INST GE 04 06 10 2 Check that the breakers of the PDUs are turned off 3 Put out the power cables of PDUs through the Cable passing opening at the bottom of the Rack 4 Remove the cable holders from the rack frame by removing the hexagon soc...

Страница 170: ...stall the decoration panels there 1 Fit the decoration panels to the front side of the rack frame one by one starting from the top 2 The decoration panel can be installed when the two protrusions of it are aligned with the holes which are prepared on the rack frame with intervals of one EIA unit and then pressed into the holes Figure 10 1 Attaching Decoration Panel Protrusions Decoration panel ...

Страница 171: ... IN 11 01 10 Rev 0 INST IN 11 01 10 11 Setting External Covers 1 Close the rear door of the rack frame Refer to How to Open Close the Door of the RKU Rack Frame INST GE 04 06 10 2 Attach the Front Bezel Refer to How to Attach Remove the Front Bezel INST GE 04 05 10 ...

Страница 172: ... should be applied at the time of shipment in the factory 1 Attach the logo to the Front bezel of the DKC 1 2 After attaching the logo peel off the clear protection film of the logo Figure 12 1 Attaching Logo Label Table 12 1 Logo Labels No Model Name Parts No 1 VSP 5000 Series 3292735 5 Logo label Front Bezel 4U for DKC 1 Locating lines ...

Страница 173: ...intenance PC A laptop PC that can be used as the Maintenance PC must meet specifications shown in Table 13 1 Table 13 1 Maintenance PC Specifications Item Specification OS Windows 7 Windows 8 Windows 10 Drive Available hard disk space 500MB or upper Display 1024 768 XGA or higher resolution 1280 1024 SXGA Recommendation DVD Drive Need LAN Ethernet 10Base T 100Base TX 1000Base T USB Need ...

Страница 174: ...the LAN cable to the CONSOLE port on SSVP0 next to SVP BASIC 4 Connect the power cable to the power supply 5 Power on the Maintenance PC 6 After Windows is started perform the remote desktop connection of the Maintenance PC to the SVP using the connection utility For details see SVP01 30 If the remote desktop connection to the SVP fails perform either of the following When the SVP High Reliability...

Страница 175: ...y is installed in each of SSVP1 and SVP OPTION 2 Removal Procedure of Maintenance PC 1 Quit the remote desktop function and then power off the Maintenance PC 2 Disconnect the power cable from the power supply 3 Disconnect the LAN cable from the CONSOLE port of the SSVP0 SVP BASIC side or the CONSOLE port of SSVP1 SVP OPTION side 4 Disconnect the power cable and LAN cable from the Maintenance PC HSN...

Страница 176: ...14 1 1 Application These procedures are applied to a new installation without the pre installation at a customer site or the pre installation at the warehouse as shown below Installing the micro programs into the storage system Its version must be appropriate one Installing the configuration information which is appropriate to the customer If these procedures are used in other cases their processe...

Страница 177: ...dures can be used in the following conditions 1 The installation of the Hardware parts for example the connections of cables power supplies and so on have been finished For the Hardware installation refer to Procedures for Installing Storage System INST IN 01 01 10 2 The PC SVP is installed and can be used For the SVP installation refer to REP RSVP 05 12 ...

Страница 178: ...esses 1 Pre processing the installation of the micro programs into the SVP HD 1 8 in the following flow 2 Execution of New Installation by the SVP By this procedure the customerʼs configurations are defined and the micro programs are installed 9 11 in the following flow 3 Others 12 29 in the following flow 2 Processing Flow The processing flow of the new installation is as follow ...

Страница 179: ...for the SVP ready to use Donʼt turn on the POWER ON OFF switch on the HSNPANEL Power ON Procedure of Storage system INST GE 05 01 10 3 Set the SVP PS ON OFF INH switch SVP RAS SW 1 on the SSVP to ON lower position When the Additional SVP is installed set the SVP PS ON OFF INH switch SVP RAS SW 1 on the SSVP1 to ON lower position LOC03 40 SVP procedure 4 Set TOD At this time Communication Error may...

Страница 180: ...tion information when the message CNF4055i and then click OK 8 RAID Manager and OSSs are being installed at this step Do not change any parameters during install leave unchanged values step6 Remove the media from the Maintenance PCʼs drive This operation causes the SVP Reboot Then wait few minutes and reconnect by the remote desktop SVP procedure 6 Set IP Address IP Address must be 126 255 254 15 ...

Страница 181: ...formation DKC Serial No INST IN 14 02 90 10 Before starting the following procedure you need to enable the CE mode For the procedure for enabling the CE mode see Setting the jumper used for initial installation CEMD MU02 200 12 Connect the LAN cables disconnected at 1 4 if it is necessary 13 Wait till the READY LED is lit and Power Event Log SYSTEM ON is reported from all installed MPs 14 STORAGE ...

Страница 182: ... status Storage system status MU02 10 22 Set IP Address 4 INST IN 14 02 40 SVP procedure 25 Delete error logs Log delete SVP02 03 10 SIM Log Complete SVP02 08 10 2 23 Is the SVP High Reliability Kit installed 24 1 Work to Do before Adding the SSVP Hardware INST AD 10 01 10 NOTE However the IP address used for access is not 126 255 254 15 Please use IP address of the Additional SVP 24 2 Procedure f...

Страница 183: ...cifying the IP Address according to the DKC Serial Number Select Based on Serial Number and the IP Address will be assigned automatically 2 Specifying in option Select Specified and specify the optional address for the IP Address 5 For the password ask the technical support division And use it with their approval 6 The SIM bf85a3 Basic SVP SVP RAS Switch 1 remains SVP PS ON OFF INH SW may be repor...

Страница 184: ...ration key code 00 VSP5 10 XP8 9 Please contact the Technical Support Division to request the password 10 The executable file name varies depending on the micro program version DKCMAIN version Executable file name 90 01 01 x0 xx or later and less than 90 01 51 x0 xx setup exe 90 01 51 x0 xx or later and less than 90 01 61 x0 xx svpsetup exe 90 01 61 x0 xx or later setup exe ...

Страница 185: ...0 14 2 Procedure of New Installation of the Micro program 14 2 1 TOD Setting and Set IP Address 1 TOD Setting Turn on storage system power before TOD Setting 1 Open the Control Panel window Click Start and then select Control Panel from Windows System Rev 0 1 INST IN 14 02 10 ...

Страница 186: ...2019 2021 Hitachi Ltd DKC910I Hitachi Proprietary INST IN 14 02 20 Rev 0 1 INST IN 14 02 20 2 Open Date and Time Click Date and Time in the Control Panel window 3 Selecting Change time zone Click Change time zone ...

Страница 187: ...e the storage system is placed UTC Coordinated Universal Time 5 Set Date and Time Settings Click Change date and time in Date and Time window 6 Check if the ʻDate and Time Settingsʼ is set to the current time and date If not reset it correctly Then click OK 7 Close Control Panel Select File and then Close from Control Panel 8 Change the mode to Modify Mode from View Mode 9 Click Initial Setting ...

Страница 188: ... 02 30 Rev 0 INST IN 14 02 30 10 Click Set Subsystem Time in the Install window 11 Select TOD Change in the Set Subsystem Time window and then click OK 12 Specify the date year month and day and time hour minute and second and click OK 13 Close the Initial Setting window ...

Страница 189: ...7ff200 and 7ff201 might occur during setting operation If the SIMs occur complete them after performing the procedure in this section and then execute the LAN check DIAG03 10 If there is a blinking part in the result window of the LAN check see Recovery Procedure for Error Parts Detected by LAN Check TRBL02 04 440 Do not change the Internal LAN setting from Auto Negotiation 1 Change the mode to Mo...

Страница 190: ... setting External IP Address NOTE In case of setting Subnet Mask of internal IP Address the previous address may be displayed if you set an address that is different than the value of DKC If the displayed address is different from what you have set make the setting again to match the value of DKC The value that can be set for Subnet Mask of internal IP Address varies depending on the value set for I...

Страница 191: ...rietary INST IN 14 02 60 The SVP High Reliability kit un setting up The SVP High Reliability kit setting up Master SVP The SVP High Reliability kit setting up Standby SVP 2 Click OK in response to the confirmation message INS3325W Rev 0 INST IN 14 02 60 ...

Страница 192: ...isplayed Select SSVP and then click OK NOTE When you change the IP address of Standby SVP backup of the configuration information is unnecessary Click Cancel The message INS1105i This will reboot SVP in Step 4 is displayed b When backup of configuration information is completed the message CNF3188i is displayed Click OK Rev 7 INST IN 14 02 70 ...

Страница 193: ...ng the operation reconnect by changed IP address it to continue the operation Please perform a remote desktop reconnection after more than five minutes from pushing down the OK button of a INS1105i message Operation for connection to SVP refer to SVP01 30 5 When a Use Duplex SVP or SVP Kind of External IP Address is changed it is necessary to execute the following operation Setting an external IP ...

Страница 194: ...de is shown as Initial Setting Unlocked NOTE The mode changes to Initial Setting Unlocked when the storage system is in CE MODE If the Storage System was started with the state that the jumper used for the initial installation is enabled the confirmation message 4283 The available maintenance operations are limited due to lock process failure If you want to make all the maintenance operations oper...

Страница 195: ...ht 2019 2021 Hitachi Ltd DKC910I Hitachi Proprietary INST IN 14 02 100 2 Click Initial Setting The Initial Setting window opens 3 Click NEW Installation in the Initial Setting window Rev 0 1 INST IN 14 02 100 ...

Страница 196: ... Click OK in response to the confirmation message 2583 Important CAUTION This operation is a procedure of a new installation or configuration restoration A procedure of installation or removal is a different operation Select Cancel to stop the process and execute from Initial Setting or Maintenance Utility 5 Click OK in response to the confirmation message 2584 Important CAUTION When you continue t...

Страница 197: ...8 In response to the message Select the number of target DKC for New Installation select the number of DKCs and then click OK NOTE Selection items in the pull down menu and target storage system configurations are shown below Selection item Storage system configuration 2 2CTL VSP 5100 5100H 2 4CTL VSP 5500 5500H 1CBX Pair 4 VSP 5500 5500H 2CBX Pair 6 VSP 5500 5500H 3CBX Pair Rev 1 1 INST IN 14 02 ...

Страница 198: ...he CE mode Select No when the storage system is not running in the CE mode or if you execute without a switch setting of the CE mode When Yes is clicked go to Step 10 When No is clicked go to Step 11 10 Click Yes or No in response to the message INS4466i When all CTLs are displayed Click Yes and go to Step 11 When some CTLs are not displayed or when none of CTLs are displayed Click No to terminate...

Страница 199: ... program media is inserted and then click OK 12 Make a copy of the configuration information During the copying the CNFCPY Wait window is displayed 13 After removing the media 1 by responding to the message 3188 The processing is complete Remove the media of the configuration information if necessary click OK 1 A micro program is initialized using the configuration information in the media in this...

Страница 200: ...am product installation again NOTE When information of DP VOL implementation or progressing status of quick format is not included go to Step 15 15 DKC Configuration window NOTE Check the nameplate of the Storage System and then enter the serial number When the DKC Configuration window is displayed enter the serial number Click Next This procedure is completed when Cancel is clicked 16 Set the cur...

Страница 201: ...fully 18 Click Yes in response to the confirmation message 0462 Are you sure you want to install the defined configuration Clicking No cancels the configuration change processing and terminates the installation procedure 19 Click OK in response to the confirmation message 2584 Important CAUTION When you continue this operation finally you need DKC PS OFF Are you sure you want to continue this oper...

Страница 202: ...on 21 Click OK in response to the confirmation message 2586 Important CAUTION When you continue this operation configuration data will be changed Are you sure you want to continue this operation 22 Click OK in response to the confirmation message 2587 Important CAUTION When you select OK you canʼt cancel this operation Are you sure you want to continue this operation If you terminate this operatio...

Страница 203: ...ionary message 2588 Important CAUTION You must not RE BOOT SVP 24 Compressing of the configuration information The configuration information is compressed The dialog of Config Compressing is displayed After the compressing is completed go to Step 25 25 Download Objects window To download a micro program select All Microprogram and click OK ...

Страница 204: ...e forward is completed go to Step 27 If you want to confirm the transfer status click Detail Go to Step a a Details of transfer situation are confirmed on the Detail Status window When you close the Detail Status window click Close NOTE Be sure to close the Details Status window after the confirmation If the window is left open the transfer of the configuration information does not complete ...

Страница 205: ...rator b In Command Prompt enter shutdown r t 0 and press the Enter key 29 Changing the set values for Internal IP Address to default After the SVP reboot reconnect the Maintenance PC to the SVP because they are disconnected Check that the READY LED LOC03 70 on the DKC is turned on and then change the set values of IP Address and Subnet Mask for Internal IP Address to the default values Default val...

Страница 206: ... DKC910I Hitachi Proprietary INST IN 14 02 210 Rev 0 INST IN 14 02 210 14 2 3 Post Processing Check the completion of the storage system setup 1 Logging in to the Maintenance Utility window Click Maintenance Utility in the SVP window ...

Страница 207: ...dy In SVP window check SIM 1 Warning There are some failed parts Check the MAIN windows and SIM then take a necessary action 1 2 Power on in progress The Storage System power on is in progress Log out of it once and log in to the Maintenance Utility window after a while 1 Refer to SIM Log SVP02 02 70 for how to check SIMs 2 Refer to SIMRC00 00 for the contents of SIMs NOTICE SIM 47ec00 may be noti...

Страница 208: ...Running tab and the MP Ver Curt FM tab to check that the error icon is not displayed See Version of Microprogram SVP03 05 10 To display the Version window click Version in the Maintenance Utility Sub Panel window 3 Delete error log Power ON OFF the Storage System to make sure that the Storage System starts normally Confirm that MESSAGE LED LOC03 20 of the HSNPANEL is off Delete all error log inform...

Страница 209: ... GUM MU02 130 2 Reboot the SVP 3 Execute 14 New Installation SVP Procedure again 3 The Download Microprograms and Config dialog box displayed Communication error has occurred and the new installation ended abnormally Communication between SVP and DKC can not be performed 1 Execute Reboot GUM MU02 130 2 Execute Storage System Power Off Planned Shutdown INST GE 05 02 10 and Power On Off Procedure INST...

Страница 210: ...d Prompt cd C DKC200 mp pc 3 Enabling the HSTS setting Run the following command in the Command Prompt setHSTSEnable bat 4 When Press any key to continue is displayed in the Command Prompt press the Enter key to close the Command Prompt 5 Confirming that HSTS is enabled a Launching the Command Prompt as administrator Select Start Windows System right click the displayed Command Prompt and then sel...

Страница 211: ...o close the Command Prompt 5 Confirming that HSTS is disabled a Launching the Command Prompt as administrator Select Start Windows System right click the displayed Command Prompt and then select More Run as administrator b Changing the current directory Run the following command in the Command Prompt cd C DKC200 mp pc c Checking whether HSTS is disabled Run the following command in the Command Pro...

Страница 212: ... select More Run as administrator 2 Changing the current directory Run the following command in the Command Prompt cd C DKC200 mp pc 3 Checking that HSTS setting Enter the following command in the Command Prompt hstsState bat If hsts on is displayed HSTS is enabled If hsts off is displayed HSTS is disabled If The system cannot find the file specified is displayed HSTS is not set 4 Press any key to ...

Отзывы: