HIKVISION DS-K1T341C Series Скачать руководство пользователя страница 34

Note

You should set the face recognition terminal's Wiegand direction as Input to connect to a

Wiegand card reader. If connects to an access controller, you should set the Wiegand direction as

Output to transmit authentication information to the access controller.

For details about Wiegand direction settings, see Set Wiegand Parameters .

Do not wire the device to the electric supply directly.

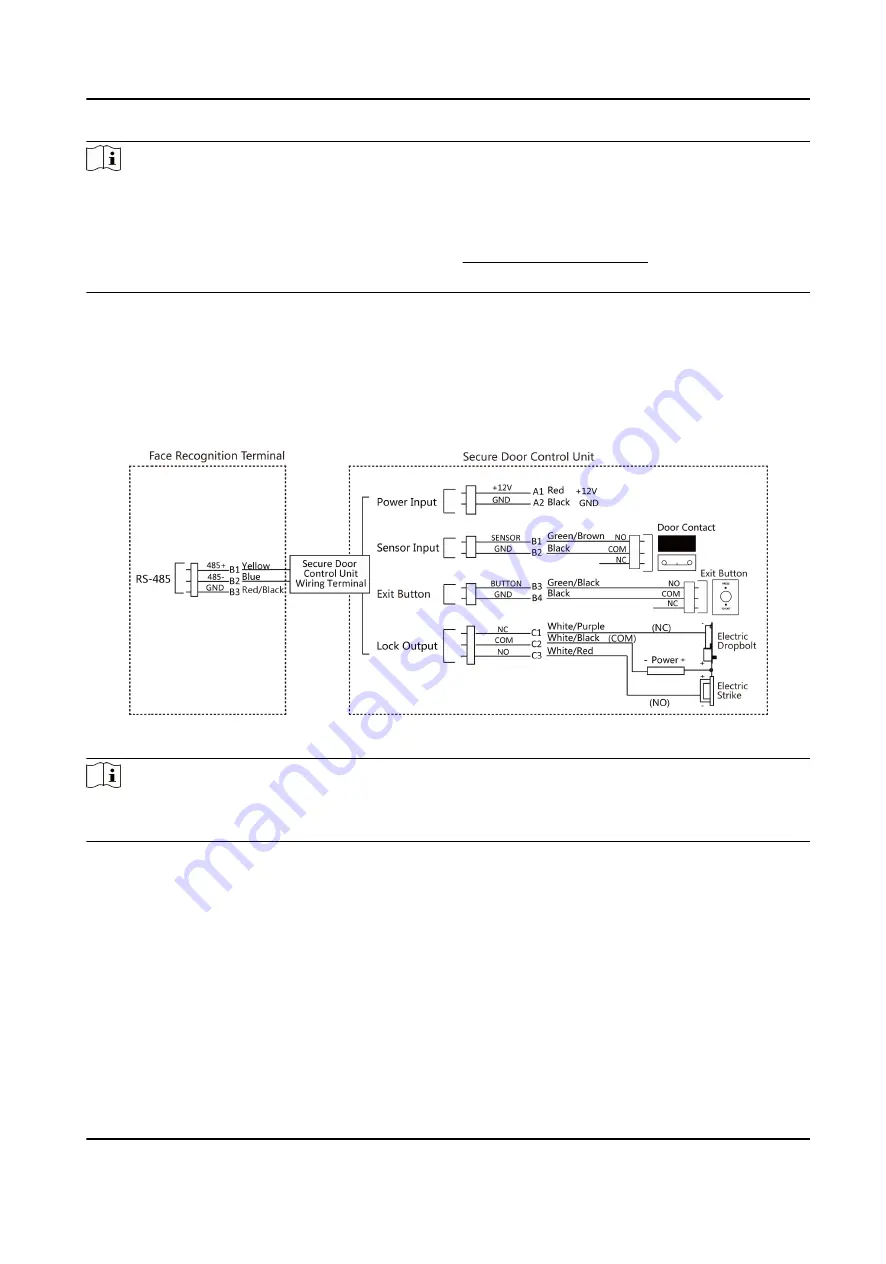
4.3 Wire Secure Door Control Unit

You can connect the terminal with the secure door control unit.
The wiring diagram is as follows.

Figure 4-2 Secure Door Control Unit Wiring

Note

The secure door control unit should connect to an external power supply separately. The suggested

external power supply is 12V, 0.5A.

4.4 Wire Fire Module

4.4.1 Wiring Diagram of Door Open When Powering Off

Lock Type: Anode Lock, Magnetic Lock, and Electric Bolt (NO)
Security Type: Door Open When Powering Off
Scenario: Installed in Fire Engine Access

DS-K1T341C Series Face Recognition Terminal User Manual

18

Содержание DS-K1T341C Series

Страница 1: ...DS K1T341C Series Face Recognition Terminal User Manual...

Страница 2: ...AT YOUR OWN RISK IN NO EVENT WILL HIKVISION BE LIABLE TO YOU FOR ANY SPECIAL CONSEQUENTIAL INCIDENTAL OR INDIRECT DAMAGES INCLUDING AMONG OTHERS DAMAGES FOR LOSS OF BUSINESS PROFITS BUSINESS INTERRUP...

Страница 3: ...design principles For example for device with facial recognition features biometrics data is stored in your device with encryption method for fingerprint device only fingerprint template will be saved...

Страница 4: ...will or could result in death or serious injury Caution Indicates a potentially hazardous situation which if not avoided could result in equipment damage data loss performance degradation or unexpecte...

Страница 5: ...be determined by turning the equipment off and on the user is encouraged to try to correct the interference by one or more of the following measures Reorient or relocate the receiving antenna Increase...

Страница 6: ...tion points For more information see www recyclethis info 2006 66 EC battery directive This product contains a battery that cannot be disposed of as unsorted municipal waste in the European Union See...

Страница 7: ...g the device shall be firmly fixed If smoke odors or noise rise from the device turn off the power at once and unplug the power cable and then please contact the service center 1 Risk of explosion if...

Страница 8: ...r because the acidic sweat of the fingers may erode the surface coating of the device cover Please use a soft and dry cloth when clean inside and outside surfaces of the device cover do not use alkali...

Страница 9: ...s Model Manufacturer Standard ADS 26FSG 12 12024EPG Shenzhen Honor Electronic Co Ltd PG MSA C2000IC12 0 24P DE MOSO Technology Co Ltd PDE ADS 26FSG 12 12024EPB Shenzhen Honor Electronic Co Ltd PB ADS...

Страница 10: ...4 Wire Fire Module 18 4 4 1 Wiring Diagram of Door Open When Powering Off 18 4 4 2 Wiring Diagram of Door Locked When Powering Off 20 Chapter 5 Activation 22 5 1 Activate via Device 22 5 2 Activate vi...

Страница 11: ...52 7 2 4 Set Wiegand Parameters 54 7 2 5 Set ISUP Parameters 56 7 2 6 Platform Access 58 7 3 User Management 59 7 3 1 Add Administrator 59 7 3 2 Add Face Picture 61 7 3 3 Add Fingerprint 63 7 3 4 Add...

Страница 12: ...84 7 11 Preference Settings 86 7 12 Video Intercom 88 7 12 1 Call Client Software from Device 89 7 12 2 Call Center from Device 89 7 12 3 Call Device from Client Software 90 7 12 4 Call Room from Devi...

Страница 13: ...Time and Attendance Settings 107 8 5 18 General Settings 110 8 5 19 Access Control Settings 114 8 5 20 Video Intercom Settings 118 8 5 21 Set Biometric Parameters 120 8 5 22 Set Theme 123 Chapter 9 C...

Страница 14: ...13 Import and Export Person Identify Information 147 9 4 14 Import Person Information 147 9 4 15 Import Person Pictures 148 9 4 16 Export Person Information 148 9 4 17 Export Person Pictures 149 9 4...

Страница 15: ...Configure Device Actions for Access Event 179 9 8 3 Configure Device Actions for Card Swiping 180 9 8 4 Configure Device Actions for Person ID 181 9 9 Control Door Status 182 9 10 Event Center 183 9 1...

Страница 16: ...llecting Comparing Face Picture 197 Appendix C Tips for Installation Environment 199 Appendix D Dimension 200 Appendix E Communication Matrix and Device Command 201 DS K1T341C Series Face Recognition...

Страница 17: ...r export pictures events from the device to the USB flash drive Stand alone operation Manage search and set device data after logging in the device locally Connects to one external card reader via RS...

Страница 18: ...2 1 Face Recognition Terminal Diagram Table 2 1 Description of Face Recognition Terminal No Description 1 microUSB Interface Note USB to micro USB cable is included in the package 2 Loudspeaker 3 Net...

Страница 19: ...witching off before handling parts It is to indicate that the marked item can be hot and should not be touched without taking care For device with this sticker this device is intended for installation...

Страница 20: ...s etc within 1 m of the field of view of the device Avoid device reflection Face recognition distance shall be greater than 30 cm Keep the camera clean Note For details about installation environment...

Страница 21: ...Figure 3 1 Install Gang Box 2 Use 2 supplied screws SC K1M4 6 SUS to secure the base plate on the gang box DS K1T341C Series Face Recognition Terminal User Manual 5...

Страница 22: ...Figure 3 2 Secure Base Plate 3 Use another 4 supplied screws KA4 22 SUS to secure the mounting plate on the base plate DS K1T341C Series Face Recognition Terminal User Manual 6...

Страница 23: ...cable through the cable hole of the mounting plate and connect to corresponding external devices cables 5 Align the device with the mounting plate and hang the device on the mounting plate DS K1T341C...

Страница 24: ...Figure 3 4 Hang Device 6 Use 1 supplied screw SC KM3X6 H2 SU to secure the device and the mounting plate DS K1T341C Series Face Recognition Terminal User Manual 8...

Страница 25: ...ecure Device 7 Apply Silicone sealant among the joints between the device rear panel and the wall except the lower side to keep the raindrop from entering DS K1T341C Series Face Recognition Terminal U...

Страница 26: ...e equal to three times the weight of the equipment The equipment ad its associated mounting means shall remain secure during the installation After the installation the equipment including any associa...

Страница 27: ...Figure 3 7 Mounting Template DS K1T341C Series Face Recognition Terminal User Manual 11...

Страница 28: ...ting plate and connect to corresponding external devices cables 4 Align the holes to the mounting plate and secure the mounting plate on the wall with the 4 supplied screws Figure 3 8 Install Mounting...

Страница 29: ...Figure 3 9 Hang Device 6 Use one supplied screw to secure the device and the mounting plate DS K1T341C Series Face Recognition Terminal User Manual 13...

Страница 30: ...ecure Device 7 Apply Silicone sealant among the joints between the device rear panel and the wall except the lower side to keep the raindrop from entering DS K1T341C Series Face Recognition Terminal U...

Страница 31: ...Silicone Sealant on the Side 8 After installation for the proper use of the device outdoor use stick the protection film parts of models supplied on the screen DS K1T341C Series Face Recognition Termi...

Страница 32: ...d be no more than 60 m when wiring a single device And the door lock and the other peripherals should connect to a 12 VDC external power supply If connecting to a 12 VDC door lock the distance between...

Страница 33: ...iring NO D4 Yellow Green SENSOR Door Contact D5 Black GND Ground D6 Yellow Gray BUTTON Exit Door Wiring D7 Yellow Black GND Ground 4 2 Wire Normal Device You can connect the terminal with normal perip...

Страница 34: ...ctly 4 3 Wire Secure Door Control Unit You can connect the terminal with the secure door control unit The wiring diagram is as follows Figure 4 2 Secure Door Control Unit Wiring Note The secure door c...

Страница 35: ...4 4 Wire Secure Door Control Unit Type 2 Note The fire system NO and COM normally open when powering off is connected with the lock and the power supply in series When an fire alarm is triggered the d...

Страница 36: ...4 4 2 Wiring Diagram of Door Locked When Powering Off Lock Type Cathode Lock Electric Lock and Electric Bolt NC Security Type Door Locked When Powering Off Scenario Installed in Entrance Exit with Fir...

Страница 37: ...lly closed when powering off is connected with the lock and the power supply in series When an fire alarm is triggered the door remains open In normal times NC and COM are open Figure 4 7 Device Wirin...

Страница 38: ...ault values of the device are as follows The default IP address 192 0 0 64 The default port No 8000 The default user name admin 5 1 Activate via Device If the device is not activated you can activate...

Страница 39: ...you should edit the device IP address For details see Set Network Parameters After activation if you need to operate the device remotely via APP you should scan the QR code to link to the APP For deta...

Страница 40: ...and IP addresses modification refer to User Manual of SADP for details Steps 1 Run the SADP software and search the online devices 2 Find and select your device in online device list 3 Input new passw...

Страница 41: ...reate the password to activate them before they can be added to the software and work properly Steps Note This function should be supported by the device 1 Enter the Device Management page 2 Click on...

Страница 42: ...ncrease the security of your product And we recommend you change your password regularly especially in the high security system changing the password monthly or weekly can better protect your product...

Страница 43: ...k Operation 6 1 Select Language You can select a language for the device system After the device activation you can select a language for the device system DS K1T341C Series Face Recognition Terminal...

Страница 44: ...6 1 Select System Language By default the system language is English Note After you change the system language the device will reboot automatically DS K1T341C Series Face Recognition Terminal User Man...

Страница 45: ...address or security questions Once you forgot the device password you can change the password via the selected change type Change Password via Email Address If you need to change password via reserve...

Страница 46: ...ty Questions If you need to change password via security questions you can tap Change to Security Questions on the right corner Select the security questions and enter the answers Click Next DS K1T341...

Страница 47: ...to set both of the changing types 6 3 Set Application Mode After activating the device you should select an application mode for better device application Steps 1 On the Welcome page select Indoor or...

Страница 48: ...ave Note You can also change the settings in System Settings If you install the device indoors near the window or the face recognition function is not working well select Others DS K1T341C Series Face...

Страница 49: ...s remotely the system will select Indoor as the application mode by default 6 4 Set Network Parameters After activation and select application mode you can set the network for the device Steps 1 When...

Страница 50: ...Select Network Note Disconnect the wired network before connecting a Wi Fi 2 Tap Next Wired Network Note Make sure the device has connected to a network DS K1T341C Series Face Recognition Terminal Use...

Страница 51: ...connected Or tap Add Wi Fi and enter the Wi Fi s name and the password to get connected 3 Optional Tap Skip to skip network settings 6 5 Access to Platform Enable the function and the device can commu...

Страница 52: ...Figure 6 5 Access to Hik Connect 2 Tap Next 3 Optional Tap Skip to skip the step 4 Optional Tap Previous to go to the previous page DS K1T341C Series Face Recognition Terminal User Manual 36...

Страница 53: ...er Wi Fi to enter the platform page again 6 6 Privacy Settings After activation selecting application mode and selecting network you should set the privacy parameters including the picture uploading a...

Страница 54: ...pload the pictures captured when authenticating to the platform automatically Save Captured Pic When Auth Save Captured Picture When Authenticating If you enable this function you can save the picture...

Страница 55: ...tures After Linked Capture If you enable this function you can save the picture captured by linked camera to the device Tap Next to complete the settings 6 7 Set Administrator After device activation...

Страница 56: ...ntial should be added Face forward at the camera Make sure the face is in the face recognition area Click to capture and click to confirm Press your finger according to the instructions on the device...

Страница 57: ...connected not connected enabled but not connected Shortcut Keys Description Note You can configure those shortcut keys displayed on the screen For details see Basic Settings Scan QR code to authentic...

Страница 58: ...strator If you have added an administrator for the device only the administrator can login the device for device operation Steps 1 Long tap on the initial page for 3 s and slide to the left right by f...

Страница 59: ...Figure 7 1 Admin Login 2 Authenticate the administrator s face fingerprint or card to enter the home page DS K1T341C Series Face Recognition Terminal User Manual 43...

Страница 60: ...ked for 30 minutes after 5 failed fingerprint or card attempts 3 Optional Tap and you can enter the device activation password for login 4 Optional Tap and you can exit the admin login page DS K1T341C...

Страница 61: ...to login Steps 1 Long tap on the initial page for 3 s and slide to the left right by following the gesture to enter password entering page 2 Tap the Password field and enter the device activation pas...

Страница 62: ...Figure 7 3 Home Page 7 1 3 Forgot Password If you forget the password during authentication you can change the password DS K1T341C Series Face Recognition Terminal User Manual 46...

Страница 63: ...nd log in the page 2 Optional If you have set an administrator tap in the pop up admin authentication page Figure 7 4 Password Authentication Page 3 Tap Forgot Password 4 Answer the security questions...

Страница 64: ...tion settings page 7 2 1 Set Wired Network Parameters You can set the device wired network parameters including the IPv4 IPv6 IP address the subnet mask the gateway and DNS parameters Steps 1 Tap Comm...

Страница 65: ...the system will assign IP address subnet mask and gateway automatically Disable DHCP and you should set the IP address subnet mask and gateway manually Note The device s IP address and the computer IP...

Страница 66: ...arameters You can enable the Wi Fi function and set the Wi Fi related parameters Steps Note The function should be supported by the device 1 Tap Comm Communication Settings on the Home page to enter t...

Страница 67: ...ter the Wi Fi s name and password And tap OK Note Only digits letters and special characters are allowed in the password 5 Set the Wi Fi s parameters By default DHCP is enable The system will allocate...

Страница 68: ...n terminal can connect external access controller secure door control unit or card reader via the RS 485 terminal Steps 1 Tap Comm Communication Settings on the Home page to enter the Communication Se...

Страница 69: ...Figure 7 7 Set RS 485 Parameters 3 Enable RS 485 Settings 4 Select an peripheral type according to your actual needs DS K1T341C Series Face Recognition Terminal User Manual 53...

Страница 70: ...5 Tap the back icon at the upper left corner and you should reboot the device if you change the parameters 7 2 4 Set Wiegand Parameters You can set the Wiegand transmission direction Steps 1 Tap Comm...

Страница 71: ...e recognition terminal can connect an external access controller And the two devices will transmit the card No via Wiegand 26 or Wiegand 34 Input A face recognition terminal can connect a Wiegand card...

Страница 72: ...s the device will reboot automatically 7 2 5 Set ISUP Parameters Set ISUP parameters and the device can upload data via ISUP protocol Before You Start Make sure your device has connect to a network St...

Страница 73: ...ion and set the ISUP server parameters ISUP Version Set the ISUP version according to your actual needs Central Group Enable central group and the data will be uploaded to the center group DS K1T341C...

Страница 74: ...account name or the key when the device should communicate with other platforms via ISUP protocol ISUP key range 8 to 32 characters 7 2 6 Platform Access You can change the device verification code an...

Страница 75: ...search the user 7 3 1 Add Administrator The administrator can log in the device backend and configure the device parameters Steps 1 Long tap on the initial page and log in the backend 2 Tap User to en...

Страница 76: ...s than 32 characters And it can be a combination of lower letters upper letters and numbers The employee ID should not be duplicated 4 Tap the Name field and input the user name on the soft keyboard D...

Страница 77: ...Permission function Enable Administrator Permission The user is the administrator Except for the normal attendance function the user can also enter the Home page to operate after authenticating the pe...

Страница 78: ...pecial characters are allowed in the user name The suggested user name should be within 32 characters 5 Tap the Face Picture field to enter the face picture adding page Figure 7 10 Add Face Picture DS...

Страница 79: ...operate after authenticating the permission Normal User The User is the normal user The user can only authenticate or take attendance on the initial page 10 Tap to save the settings 7 3 3 Add Fingerpr...

Страница 80: ...also enter the Home page to operate after authenticating the permission Normal User The User is the normal user The user can only authenticate or take attendance on the initial page 8 Tap to save the...

Страница 81: ...e to operate after authenticating the permission Normal User The User is the normal user The user can only authenticate or take attendance on the initial page 10 Tap to save the settings 7 3 5 View PI...

Страница 82: ...he user s face picture password or other credentials you should set the authentication mode and the user can authenticate his her identity via the configured authentication mode Steps 1 Long tap on th...

Страница 83: ...n the device will be deleted 7 4 2 Import Data Steps 1 Plug a USB flash drive in the device 2 On the Home page tap Data Import Data 3 Tap User Data Face Data or Access Control Parameters Note The impo...

Страница 84: ...in the device 2 On the Home page tap Data Export Data 3 Tap Face Data Event Data User Data or Access Control Parameters Note The exported access control parameters are configuration files of the devi...

Страница 85: ...password to authenticate via password If authentication completed a prompt Authenticated will pop up 7 5 2 Authenticate via Multiple Credential Before You Start Set the user authentication type befor...

Страница 86: ...f authentication succeeded the prompt Authenticated will pop up 7 6 Basic Settings You can set the shortcut key theme voice settings time settings sleeping s community No building No Unit No and beaut...

Страница 87: ...Settings Page Voice Settings You can enable disable the voice prompt function and adjust the voice volume Note You can set the voice volume between 0 and 10 DS K1T341C Series Face Recognition Termina...

Страница 88: ...Community No Set the device installed community No Building No Set the device installed building No Unit No Set the device installed unit No Beauty You can enable the beauty function and set the smoo...

Страница 89: ...with details Face 1 N Security Level Set the matching threshold when authenticating via 1 N matching mode The larger the value the smaller the false accept rate and the larger the false rejection rat...

Страница 90: ...can set face with mask face 1 N level and the strategy Reminder of Wearing If the person do not wear a face mask when authenticating the device prompts a notification and the door will open Must Wear...

Страница 91: ...Figure 7 12 Access Control Parameters The available parameters descriptions are as follows DS K1T341C Series Face Recognition Terminal User Manual 75...

Страница 92: ...Enable the function and you can present the NFC card to authenticate Enable M1 Card Enable the function and you can present the M1 card to authenticate Door Contact You can select Open Remain Open or...

Страница 93: ...dance mode and the system will not display the attendance status on the initial page Tap T A Status to enter the T A Status page Figure 7 13 Disable Attendance Mode Set the Attendance Mode as Disable...

Страница 94: ...ndance via Device Set the attendance mode as manual and you should select a status manually when you take attendance Before You Start Add at least one user and set the user s authentication mode For d...

Страница 95: ...a group of attendance status Note The Attendance Property will not be changed 5 Optional Select an status and change its name if required The name will be displayed on the T A Status page and the aut...

Страница 96: ...ttendance mode as auto and you can set the attendance status and its available schedule The system will automatically change the attendance status according to the configured schedule Before You Start...

Страница 97: ...a group of attendance status Note The Attendance Property will not be changed 5 Optional Select an status and change its name if required The name will be displayed on the T A Status page and the auth...

Страница 98: ...t the Break Out as Monday 11 00 and Break In as Monday 12 00 the valid user s authentication from Monday 11 00 to 12 00 will be marked as break 7 9 4 Set Manual and Auto Attendance via Device Set the...

Страница 99: ...a group of attendance status Note The Attendance Property will not be changed 5 Optional Select an status and change its name if required The name will be displayed on the T A Status page and the auth...

Страница 100: ...o take attendance manually the authentication will be marked as the edited attendance status Example If set the Break Out as Monday 11 00 and Break In as Monday 12 00 the valid user s authentication f...

Страница 101: ...details Capacity You can view the number of user face picture card event and fingerprint Note Parts of the device models support displaying the fingerprint number Refers to the actual page for detail...

Страница 102: ...efault settings The system will reboot to take effect Restore to Factory Settings All parameters will be restored to the factory settings The system will reboot to take effect Reboot Reboot the device...

Страница 103: ...e Settings Shortcut Key Choose the shortcut key that displayed on the authentication page including the call function call type and the password entering function DS K1T341C Series Face Recognition Te...

Страница 104: ...g function on the authentication interface The device will upload the information associated with the obtained QR code to the platform Theme You can set the theme of the prompt window on the authentic...

Страница 105: ...client software added the device will pop up the call receiving window 7 12 2 Call Center from Device Steps 1 Get the client software from the supplied disk or the official website and install the so...

Страница 106: ...device and the client software 7 12 4 Call Room from Device Steps 1 Get the client software from the supplied disk or the official website and install the software according to the prompts 2 Run the c...

Страница 107: ...rompts 2 Run the mobile client and add the device to the mobile client Note For details see the user manual of the mobile client 3 Enter Basic Settings Shortcut Key and enable Call APP 4 Go back to th...

Страница 108: ...Download and open the client software After adding the device click to enter the Configuration page 8 2 Live View You can view the live video of the device After logging in you will enter the live vi...

Страница 109: ...person s basic information including the employee ID the person s name the and the user role If you select Visitor as the user role you can set the visit times Click OK to save the settings Set Permi...

Страница 110: ...fingerprint function can add the fingerprint Click User Add to enter the Add Person page Click Add Fingerprint and press your finger on the fingerprint module of the device to add your fingerprint Cl...

Страница 111: ...right panel 8 5 Configuration 8 5 1 Set Local Parameters Set the live view parameters record file saving path and captured pictures saving path Set Live View Parameters Click Configuration Local to e...

Страница 112: ...input IO output lock RS 485 and alarm output device capacity etc Click Configuration System System Settings Basic Information to enter the configuration page You can view the device name language mod...

Страница 113: ...e 2 Check Enable DST 3 Set the DST start time end time and bias time 4 Click Save to save the settings 8 5 5 View Open Source Software License Go to Configuration System System Settings About Device a...

Страница 114: ...default settings except for the device IP address and the user information Unlink APP Account Unlink the Hik Connect account from the platform Import and Export Parameters Click Configuration System M...

Страница 115: ...user information the remote host IP etc 8 5 8 Security Mode Settings Set the security mode for logging in the client software On the Device for Management page click Configuration System Security Secu...

Страница 116: ...uter 7 Send the asking file to a certification authority for signature 8 Import the signed certificate 1 Select a certificate type in the Import Passwords area and select a certificate from the local...

Страница 117: ...east three kinds of following categories upper case letters lower case letters numbers and special characters in order to increase the security of your product And we recommend you change your passwor...

Страница 118: ...e drop down list By default it is Auto DNS Server Set the preferred DNS server and the Alternate DNS server according to your actual need Set Port Parameters Set the HTTP RTSP HTTPS and Server port pa...

Страница 119: ...t the ISUP parameters for accessing device via ISUP protocol Steps Note The function should be supported by the device 1 Click Configuration Network Advanced Settings Platform 2 Select ISUP from the p...

Страница 120: ...tocol Before You Start The destination IP or host name should support the HTTP protocol to receive the alarm information Note The function should be supported by the device Steps 1 Click Configuration...

Страница 121: ...prompt from local PC 2 You can view the inporting status of the custom prompts in the list Note The audio file shall be in WAV format and mono and the sampling rate shall be 8 K or 16 K The amplitude...

Страница 122: ...take effect PAL 25 frames per second Suitable for mainland China Hong Kong China the Middle East countries Europe countries etc NTSC 30 frames per second Suitable for the USA Canada Japan Taiwan China...

Страница 123: ...nce Settings If you want to track and monitor when the persons start stop work and monitor their working hours and late arrivals early departures time taken on breaks and absenteeism you can add the p...

Страница 124: ...t Steps 1 Click Configuration Attendance to enter the settings page 2 Set the Attendance Mode as Manual 3 Enable the Attendance Status Required and set the attendace status lasts duration 4 Enable a g...

Страница 125: ...one user and set the user s authentication mode For details see User Management Steps 1 Click Configuration Attendance to enter the settings page 2 Set the Attendance Mode as Manual and Auto 3 Enable...

Страница 126: ...uthentication Select an authentication mode according to your actual needs from the drop down list Multiple People Authentication Multiple people can be authenticated at the same time Recognition Inte...

Страница 127: ...ured value the card presenting is invalid Alarm of Max Failed Attempts Enable to report alarm when the card reading attempts reach the set value Max Authentication Failed Attempts Enable to report ala...

Страница 128: ...when the system detects the stored events has been over 95 of the full space Authentication Settings Display Authentication Result You can check Face Picture Name and Employee ID to display the authe...

Страница 129: ...credential for accessing Click Save to save the settings after the configuration Set Card Security Click Configuration General Card Security to enter the settings page Set the parameters and click Sav...

Страница 130: ...card reading content when authenticate via card on the device Go to Configuration General Card Authentication Settings Select a card authentication mode and click Save Full Card No All card No will b...

Страница 131: ...eds By default it is Remain Closed Exit Button Type You can set the exit button as Remain Open or Remain Closed according to your actual needs By default it is Remain Open Door Lock Powering Off Statu...

Страница 132: ...ion type from the drop down list for elevator communication If you select RS 485 make sure you have connected the device to the elevator controller with RS 485 wire If you select Network Interface ent...

Страница 133: ...eeds Note If you select Access Controller If connect the device to a terminal via the RS 485 interface set the RS 485 address as 2 If you connect the device to a controller set the RS 485 address acco...

Страница 134: ...meters the device will reboot automatically 8 5 20 Video Intercom Settings Set Video Intercom Parameters The device can be used as a door station outer door station or access control device You should...

Страница 135: ...n No ranges from 1 to 16 Community No Set the device community No Building No Set the device building No Unit No Set the device unit No Note If you change the No you should reboot the device If set th...

Страница 136: ...l Steps 1 Click Configuration Intercom Press Button to Call 2 Set the parameters Edit call No for every button Check Call Management Center to set the button calling center Note If you check Call Mana...

Страница 137: ...the time interval between two continuous face recognitions when authenticating Pitch Angle The maximum pitch angle when starting face authentication Yaw Angle The maximum yaw angle when starting face...

Страница 138: ...open Must Wear If the person do not wear the face mask when authenticating the device will pop up a prompt and the door will keep closed ECO Mode After enabling the ECO mode the device will use the IR...

Страница 139: ...When you select Advertisement the advertisement will be displayed in the screen Sleep Enable Sleep and the device will enter the sleep mode when no operation within the configured sleep time Theme Ma...

Страница 140: ...ide show interval The picture will be changed according to the interval Add Media Click Configuration Media Database Click Add and select picture to add to the media database Click Upload DS K1T341C S...

Страница 141: ...llow the flow diagram below to configure on the client software Figure 9 1 Flow Diagram of Configuration on Client Software 9 2 Device Management The client supports managing access control devices an...

Страница 142: ...og function can be enabled or disabled by right clicking Online Device Add Single Online Device You can add single online device to the client software Steps 1 Enter the Device Management module 2 Opt...

Страница 143: ...heck Synchronize Time to synchronize the device time with the PC running the client after adding the device to the client 8 Optional Check Import to Group to create a group by the device name Note You...

Страница 144: ...rt to Group to create a group by the device name Note You can import all the channels of the device to the corresponding group by default 9 Click OK to add the devices Add Device by IP Address or Doma...

Страница 145: ...Check Synchronize Time to synchronize the device time with the PC running the client after adding the device to the client 7 Optional Check Import to Group to create a group by the device name 8 Finis...

Страница 146: ...device port No The default value is 8000 User Name By default the user name is admin Password Enter the device password Caution The password strength of the device can be automatically checked We hig...

Страница 147: ...ecording status signal status hardware status etc Edit Device Information Click on Operation column to edit the device information such as IP address user name and password Check Online User Click on...

Страница 148: ...me account 8 Optional Perform the following operation s Device Status Click on Operation column to view device status Edit Device Information Click on Operation column to edit the device information s...

Страница 149: ...password If you set 1 as the adding mode enter the EHome key Caution The password strength of the device can be automatically checked We highly recommend you change the password of your own choosing...

Страница 150: ...wn choosing using a minimum of 8 characters including at least three kinds of following categories upper case letters lower case letters numbers and special characters in order to increase the securit...

Страница 151: ...porting the resources to the group you can edit the resource parameters For access points you can edit the resource name Before You Start Import the resources to group Refer to Import Resources to Gro...

Страница 152: ...n the left column and click Add in the upper left corner to add an organization 3 Create a name for the added organization Note Up to 10 levels of organizations can be added 4 Optional Perform the fol...

Страница 153: ...lose the Add Person window Click Add and New to add the person and continue to add other persons 9 4 3 Issue a Card by Local Mode If a card enrollment station is available you can issue a card by loca...

Страница 154: ...Currently the supported card enrollment station models include DS K1F100 D8 DS K1F100 M DS K1F100 D8E and DS K1F180 D8E Card Type This field is only available when the model is DS K1F100 D8E or DS K1F...

Страница 155: ...al PC to the client as the person s profile Steps 1 Enter Person module 2 Select an organization in the organization list to add the person and click Add Note Enter the person s basic information firs...

Страница 156: ...basic information first For details refer to Configure Basic Information 3 Click Add Face in the Basic Information area 4 Select Take Photo to enter Take Photo window 5 Optional Enable Verify by Devi...

Страница 157: ...e client which supports facial recognition function Steps 1 Enter Person module 2 Select an organization in the organization list to add the person and click Add Note Enter the person s basic informat...

Страница 158: ...ou can collect the fingerprint via the fingerprint recorder connected directly to the PC running the client The fingerprints recorded can be used as credentials of the persons to access the authorized...

Страница 159: ...ation list to add the person and click Add Note Enter the person s basic information first For details about configuring person s basic information refer to Configure Basic Information 3 In the Creden...

Страница 160: ...ntrol Information 4 Set a unique PIN code for the person which can be used for access authentication Manually enter a PIN code containing 4 to 8 digits Note Persons PIN codes cannot be repeated Click...

Страница 161: ...ol devices Note The Super User Extended Door Open Time Add to Blocklist and Mark as Visitor functions cannot be enabled concurrently For example if one person is set as super user you cannot enable ex...

Страница 162: ...nd click Add Note Enter the person s basic information first For details about configuring person s basic information refer to Configure Basic Information 3 In the Resident Information panel select th...

Страница 163: ...ltiple persons in a predefined template CSV Excel file to import the information to the client in a batch Steps 1 Enter the Person module 2 Select an added organization in the list or click Add in the...

Страница 164: ...file Note The folder of face pictures should be in ZIP format Each picture file should be in JPG format and should be no larger than 200 KB Each picture file should be named as Person ID_Name The Per...

Страница 165: ...cture is named as Person ID_Name_0 0 is for a full frontal face 9 4 18 Delete Registered Pictures You can delete face picture file of the added persons automatically Before You Start Make sure you hav...

Страница 166: ...Click Import to start importing the person information to the client Note Up to 2 000 persons and 5 000 cards can be imported The person information including person details person s fingerprint infor...

Страница 167: ...ion will be inactive Steps 1 Enter Person module 2 Select the person you want to report card loss for and click Edit to open the Edit Person window 3 In the Credential Card panel click on the added ca...

Страница 168: ...elect the card type as EM card or IC card according to the actual card type Buzzing Enable or disable the buzzing when the card number is read successfully Card No Type Select the type of the card num...

Страница 169: ...ations to edit the time durations Move the cursor to the time duration and drag the time duration on the timeline bar to the desired position when the cursor turns to Click the time duration and direc...

Страница 170: ...timeline bar Note Up to 8 time duration s can be set for each day in the week schedule 3 Optional Perform the following operations to edit the time durations Move the cursor to the time duration and d...

Страница 171: ...lude changes of template access group settings person s access group settings and related person details including card number fingerprint face picture linkage between card number and fingerprint link...

Страница 172: ...ces and then apply the new access group to the device Apply Changes to Devices This operation will not clear the existed access groups of the selected devices and only apply the changed part of the se...

Страница 173: ...ess control to meet some special requirements in different scene Note For the card related functions the type of access control card only the card s with access group applied will be listed when addin...

Страница 174: ...formation page click More to edit the parameters Voice Prompt If you enable this function the voice prompt is enabled in the device You can hear the voice prompt when operating in the device Upload Pi...

Страница 175: ...ect a door or floor to show its parameters on the right page 4 Edit the door or floor parameters Note The displayed parameters may vary for different access control devices Some of the following param...

Страница 176: ...doors Note The door s status duration settings will be copied to the selected door s as well Configure Parameters for Card Reader After adding the access control device you can configure its card read...

Страница 177: ...en Entering PWD When you inputting the password on the card reader if the interval between pressing two digits is larger than the set value the digits you pressed before will be cleared automatically...

Страница 178: ...5 Optional Click Copy to and then select the card reader s to copy the parameters in the page to the selected card reader s 9 7 2 Configure Remaining Open Closed You can set the status of the door as...

Страница 179: ...me the configured access group is activated Note Up to 8 time durations can be set to one holiday period 5 Perform the following operations to edit the time durations Move the cursor to the time durat...

Страница 180: ...elect the person card group s and then click Delete to delete it them 7 Optional Select the person card group s and then click Apply to re apply access group that failed to be applied previously to th...

Страница 181: ...uth Times column Note The authentication times should be larger than 0 and smaller than the added personnel quantity in the personnel group The maximum value of authentication times is 16 6 Click Save...

Страница 182: ...ntrol Advanced Function Custom Wiegand to enter the Custom Wiegand page 2 Select a custom Wiegand on the left 3 Create a Wiegand name Note Up to 32 characters are allowed in the custom Wiegand name 4...

Страница 183: ...n Authentication Mode You can set the passing rules for person to the specified the access control device according to your actual needs Before You Start Add access control device to the client and ma...

Страница 184: ...and then click Apply to apply the person authentication mode to the device Note Person authentication has higher priority than other authentication mode When the access control device has been configu...

Страница 185: ...e selected modes list 3 Click OK After selecting the modes the selected modes will display as icons with different color 4 Click the icon to select a card reader authentication mode and drag the curso...

Страница 186: ...ss group and apply the access group to the access control device For details refer to Set Access Group to Assign Access Authorization to Persons Perform this task when you want to configure opening do...

Страница 187: ...k The anti passback feature is designed to minimizes the misuse or fraudulent use of access credentials such as passing back card to an unauthorized person or tailed access The anti passback function...

Страница 188: ...be supported by the device 9 7 9 Configure Device Parameters After adding the access control device you can set its parameters such as network parameters Set Multiple NIC Parameters If the device sup...

Страница 189: ...the uploading mode from the drop down list Enable N1 or G1 for the main channel Select Close to disable the main channel 7 Click Save Create ISUP Account in Wired Communication Mode You can set the a...

Страница 190: ...ed Capture Parameters When an event occurs the camera of the access control device can be triggered to capture picture s to record what happens when the event occurs You can view the captured pictures...

Страница 191: ...Enter the Access Control module 2 On the navigation bar on the left enter Advanced Function More Parameters Capture 3 Select an access control device in the device list and select Manual Capture 4 Sel...

Страница 192: ...enabled the captured face picture when authenticating will be saved on the device MCU Version View the device MCU version 5 Click Save Set RS 485 Parameters You can set the access control device s RS...

Страница 193: ...Wiegand channel No and the communication mode from the drop down list Note If you set Communication Direction as Sending you are required to set the Wiegand Mode as Wiegand 26 Wiegand 34 Wiegand 27 o...

Страница 194: ...r away from an access point you can still know what happens and how urgent the event is via the client by configuring client actions for the access event Client actions here refer to the actions autom...

Страница 195: ...Device Actions for Access Event You can set the access control device s linkage actions for the access control device s triggered event When the event is triggered it can trigger the alarm output hos...

Страница 196: ...he access control device from the list on the left 3 Click Add button to add a new linkage 4 Select the event source as Card Linkage 5 Enter the card number or select the card from the drop down list...

Страница 197: ...the person from the drop down list 6 Select the card reader where the card swipes 7 In the Linkage Target area set the property target to enable this action Buzzer on Controller The audible warning o...

Страница 198: ...upper right corner Note For managing the access point group refer to Group Management The doors in the selected access control group will display 3 Click a door icon to select a door or press Ctrl an...

Страница 199: ...ays In the Event Center you can check the detailed information of the real time and historical events view the event linked video handle the events and so on Before the client can receive the event in...

Страница 200: ...ty etc Before You Start Enable receiving events from devices before the client can receive event from the device see Enable Receiving Event from Devices for details Steps 1 Click Event Center Real tim...

Страница 201: ...atically Check Auto Select Latest Event to select the latest event automatically and the event information details is displayed Clear Events Click Clear to clear the all the events in the event list S...

Страница 202: ...et the followings Include Sub Node Search the events of the device and all resource channels Device Type Select the device from which you want to search events Group Search the events by resource chan...

Страница 203: ...n 3 Click Search to search the events according the conditions you set Figure 9 13 Search Historical Events Note If you have selected Access Control as device type in Step 2 you can view extra informa...

Страница 204: ...hen click Handle in the event information details page and enter the handling suggestion Note After an event is handled the Handle button will become Add Remark click Add Remark to add more remarks fo...

Страница 205: ...d icon on the lower right corner of the picture to download it to the local PC Download Event Triggered Video Hover the cursor on the recorded video click to download the video 30s before the event ha...

Страница 206: ...PC running the client at a specified time point Auto Upgrade Device Set the upgrading mode after the new version of device are detected Disable After enabled the client will not download the firmware...

Страница 207: ...he sound of the audible warning in this section Steps 1 Open the System Configuration page 2 Click Alarm Sound tab to enter the Alarm Sound Settings page 3 Optional Click and select the audio files fr...

Страница 208: ...r station and the client can be set from 90s to 120s Max Speaking Duration with Access Control Device Specify the seconds that the call with access control device will last for at most The maximum spe...

Страница 209: ...nter the password of the sender Email address if Server Authentication is checked Receiver 1 to 3 Enter the email address of the receiver Up to 3 receivers can be set 4 Optional Click Send Test Email...

Страница 210: ...es Batch Time Sync Synchronize selected devices time with your PC time Message Queue After configuring email linkage the triggered event s will be displayed here Select an event and cancel sending the...

Страница 211: ...re displayed below is the correct way to scan your finger You should press your finger on the scanner horizontally The center of your scanned finger should align with the scanner center Incorrect Scan...

Страница 212: ...successfully You can blow your finger and scan again Others If your fingerprint is shallow or it is hard to scan your fingerprint we recommend you to use other authentication methods If you have injur...

Страница 213: ...ctures just like the expression in the picture below Do not wear hat sunglasses or other accessories that can affect the facial recognition function Do not make your hair cover your eyes ears etc and...

Страница 214: ...Size Make sure your face is in the middle of the collecting window DS K1T341C Series Face Recognition Terminal User Manual 198...

Страница 215: ...e Value Candle 10Lux Bulb 100 850Lux Sunlight More than 1200Lux 2 Install the device at least 2 meters away from the light and at least 3 meters away from the window or door 3 Avoid backlight direct a...

Страница 216: ...Appendix D Dimension Figure D 1 Dimension DS K1T341C Series Face Recognition Terminal User Manual 200...

Страница 217: ...sion access control and video intercom devices Figure E 1 QR Code of Communication Matrix Device Command Scan the following QR code to get the device common serial port commands Note that the command...

Страница 218: ...UD27829B...

Отзывы: