Section 5-3
19
MLSM2003-09-03
Procedure K
- Gas Conversion
Serial number of range must be
provided to ensure correct kit is
ordered. See Table below.
Conversion Steps:
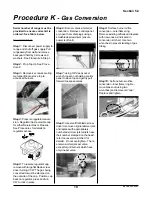
Step 1: Disconnect power supply to
range and shut off gas supply. Pull
range away from wall and remove
backguard held by 3 screws and
washers. See Procedure A Step 1.
Step 2: Prop Top Up. See Proce-
dure P.
Step 3: Remove 4 screws securing
metal partition to stove top to
access all burners.
Step 4: Pressure regulator conver-
sion. Regulator has reversible cap
for either Natural Gas or Propane.
See Procedure J for details on
regulator access.
Step 5: To reverse regulator cap,
remove with large flat blade screw-
driver turning CCW. The gas being
converted to must be stamped on
the outside of the cap. Position cap
back on regulator, press and turn
CW to lock in place
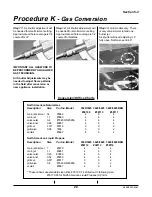
Step 6: Burner valves simmer jet
conversion. Remove control panel:
pry open the metal plugs using a
small blade screwdriver (ensure
power is off unit).
Step 7: using 3/8” deep socket
wrench, loosen nut holding control
panel to stove top and gently pull
forward to expose valves.
Step 8: Use small flat blade screw-
driver to remove original simmer jets
and replace with appropriately
numbered simmer jets (all jets have
their number stamped on the head -
refer to conversion kit chart for
details). Do not overtighten. There
are two simmer jets per valve,
except for grill burners which have
only one per valve.
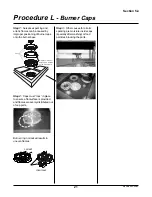
Step 9: Surface burner orifice
conversion - outer flame ring.
Remove existing orifices and replace
with new ones as indicated in
conversion kit chart. Use two
wrenches to prevent twisting of gas
tubing.
Step 10: Surface burner orifice
conversion - inner flame ring. Re-
move brass nut (using two
wrenches) and remove old “cap”.
Replace and tighten.


