background image

20    

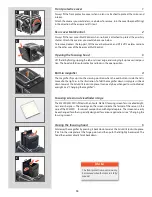
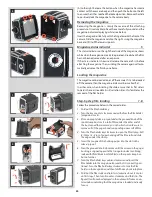
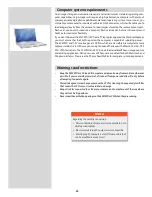
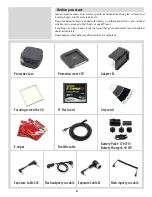
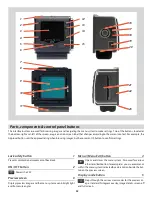
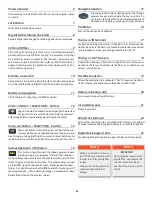
(A) to the right. Release the button when the magazine has made 
contact with the camera body, and then push the button to the left 
to ensure that it has reached the locked position. Remove the slide 
to positively lock the magazine to the camera body.

Removing the magazine

Removing the magazine is simply the reverse of the attaching 
procedure. It is advisable to have the camera fully wound and the 
magazine indicator displaying white (see below).
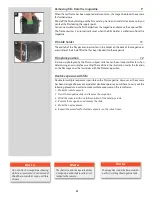
Insert the magazine slide fully with the hinge towards the front of the 
camera. Slide the magazine catch to the right, swing the magazine 
back and lift it off the lower supports.

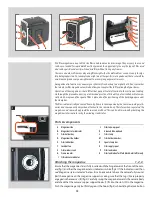
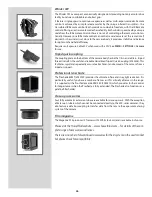
Magazine status indicator 

5

The status indicator on the right hand side of the magazine shows 
white when the magazine is ready to operate and red when the film 
has not been advanced after an exposure. 
If the status indicator shows red, release the camera first before 
attaching the magazine. Then, winding the camera again will auto-
matically advance the film by one frame. 

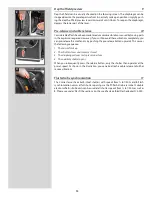
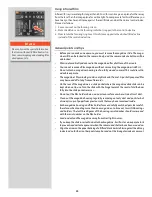
Loading the magazine

The magazine can be loaded on, or off the camera. If it is to be loaded 
off the camera, then the magazine slide must be inserted first. 
In either case, when inserting the slide ensure that its flat side is 
towards the rear (see detail in illustration 4) as this facilitates the 
removal of the film holder.

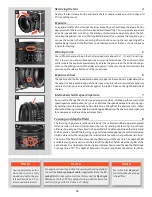
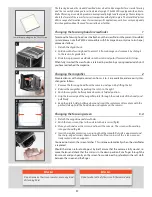
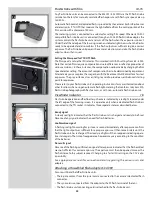
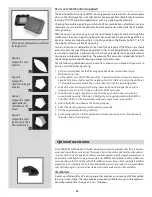
Step-by-step film loading 

1

8

Follow the procedure below in the correct order.

1.  Fold out the film holder key. 
2.  Turn the key counter-clockwise and withdraw the film holder 

(magazine insert). 

3.  Place an empty take-up spool under the grooved knob of the 

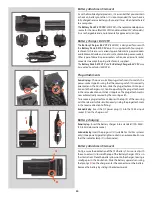
spool clamp bar. Insert a roll of film under the other end of 
the bar, turned the same way as in the illustration. Be sure to 
remove all of the paper band surrounding a new roll of film. 

4.  Turn the film holder key clockwise to open the film clamp. Pull 

8 -10 cm (3 - 4 in.) of paper backing off the film roll and slide 
the edge under the clamp. 

5.  Insert the tongue of the backing paper into the slot in the 

take-up spool. 

6.  Turn the grooved knob clockwise until the arrow on the paper 

backing is aligned opposite the triangular index (or oblong 
index with Ilford black & white film) on the spool clamp bar, 
but no further. 

7.  Turn the film holder key counter-clockwise and insert the 

film holder into the magazine. Ensure that it is correctly posi-
tioned. Turn the film holder key clockwise to lock the film 
holder in the magazine and then fold the key back into place. 

8.  Fold out the film crank and rotate it clockwise about ten turns 

until it stops. Then turn it counter-clockwise and fold it in. The 
figure (1) will now be displayed in the automatic frame-coun-
ter window indicating that the magazine is loaded and ready 
for use.

3

4

5

A

A

C

C

D

B

B

D

1

2

3

4

5

6

7

8

Содержание CFV

Страница 1: ...User Manual 503CW 503CWD CFV CFVII CFV 39 CFV 50 Version 10 ...

Страница 2: ...2 Welcome to Hasselblad 503CW 503CWD CFV ...

Страница 3: ...ra operation and control the menu system and suchlike details regarding these products It is assumed that reasonable levels of general analogue and digital photographic knowledge as well as computer skills are already acquired so these are not dealt with here 7 Settings 72 User interface 74 Camera 75 About 82 Custom options 83 8 Cleaning 85 9 Appendix 87 Technical specifications 88 Equipment care ...

Страница 4: ...sselblad503CWDcomes in Itoffersthebestfrombothworlds mechanicalandelectronic Andforthose whoalreadyownV Systemcamerasanddon twanttochange theCFVoffersthe chancetogodigitalinthemostconvenientandeconomicalmanner Hasselbladisthechoiceoftheworld sleadingphotographers andthenameis synonymouswithcompatibility reliabilityandimagequality reachingbeyondthe endsoftheearthandintospace Congratulations therefo...

Страница 5: ...nhanceddisplayscreensonthenewHasselbladproductsprovidearealistic highqualityand perfectcontrastimageview eveninbrightsunlight toallowinstanton siteimageapproval 3FRformat InordertoincorporatetheuniqueHNCSfeaturewehavedevelopedacustomHasselblad rawfileformatcalled3FRAW 3FR Thenew3FRfileformatisdesignedtoensurethatimages capturedonHasselbladdigitalproductsarequickly effectivelyandsafelystoredontheav...

Страница 6: ...6 1 General Information Photo JoaoCarlos HasselbladMasters ...

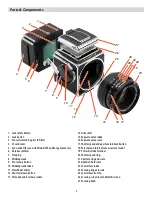
Страница 7: ...g and scale 22 Depth of field scale 23 Central lens index 24 Focusing ring and scale 25 Lens release button 26 Focusing screen Acute Matte D screen 27 Focusing hood 1 Lock safety button 2 Lock button 3 Sensor covered by glass IR filter 4 CF card cover 5 Sync socket for use with Winder CW and EL type cameras 6 Databus contacts 7 Strap lug 8 Winding crank 9 Pre release button 10 Winding crank index ...

Страница 8: ... Display button 54 Menu button 55 ON OFF button 56 Flash sync OUT terminal 57 Flash sync IN terminal 58 Firewire 800 socket 59 Ventilator 28 Focusing hood magnifier 29 Magazine hook 30 Auxiliary shutter 31 Film speed selector 32 Strap lug 33 Accessory rail 34 Lens locating index 35 Dedicated flash strobe connector 36 Lens drive shaft 37 Camera support 38 Quick coupling plate 39 Tripod threads 1 4 ...

Страница 9: ...p by step to avoid damaging the equip ment Check that the winding crank on the right hand side of the camera is locked thus ensuring that the camera is fully wound If the crank is not locked rotate it clockwise until it does lock thereby winding the camera Photo BangPeng HasselbladMasters ...

Страница 10: ...agnifier by pressing it back down towards the lid until it locks into place Pinch in the side plates at the hinge points and then push the lid lightly backwards The hood then automatically folds back down Focusing screen and viewfinder image The 503CW 503CWD is fitted with an Acute Matte D focusing screen for unrivalled bright ness and sharpness The markings on the screen indicate the format of th...

Страница 11: ... until it is free Accessory rail 8 The camera has an accessory rail on the left hand side for the spirit level and the adjustable flash shoe for small flash units Winding crank 6 7 The winding crank can be removed Push the catch lever downwards while rotating the crank counter clockwise and pull the crank straight out from the shaft To attach it align the small triangular index mark against the re...

Страница 12: ...nses are the latest developments and are mentioned and illus tratedhereastheconventionalchoice C CFandCBlenses although differing in specification and appearance to CFi CFElenses areoperatedinaverysimilarmannerbutplease see the relevant instruction manuals for complete details Photo Alexandfelix HasselbladMasters ...

Страница 13: ...d index on the lens with the one on the camera illus 3 the lens will drop easily into the bayonet fitting You can then rotate it clockwise until it stops with a faint click as the lens catch locks it in place Shutter speed and aperture 1 The shutter speed selector ring is the ring located closest to the front of the lens To set the speed turn the ring until the desired marked shutter speed positio...

Страница 14: ...rubber grip and engraved distance scales in feet and metres Focus the lens by rotating the focusing ring until you obtain a sharp image of the subject in the viewfinder The distance between the subject and the film plane is read off the focusing ring s distance scale opposite the central lens index Objects closer or further away than the selected distance will be sharp within certain limits The li...

Страница 15: ...ions completely you can pre release the mechanism by pushing the pre release button upwards This causes the following sequence 1 The mirror folds up 2 The shutter closes and remains closed 3 The diaphragm closes to its preset aperture 4 The auxiliary shutter opens When you subsequently press the release button only the shutter then operates at the preset speed As shown in the illustration you can ...

Страница 16: ...iewfinder providing a through the lens laterally reversed image It is easily interchangeable with alternative viewfinders including the prism finders which produce a laterally corrected image Please see Accessories for further details about prism finders Photo LyleOwerko HasselbladMasters ...

Страница 17: ...ng and this can easily be changed to suit individual eyesight The 503CW is equipped with an Acute MatteDfocusingscreenwhichproducesanexceptionallybrightandsharpimage Themarkingsin dicate the format of the sensor for correct composition with digital capture The Hasselblad system offers a range of alternative screens for various specific applications each item easily and quickly interchangeable with...

Страница 18: ... number of different film magazines were produced over the years to accommodate various film types and formats The film magazine described here is the most recent and common version Photo ClaudioNapolitan HasselbladMasters ...

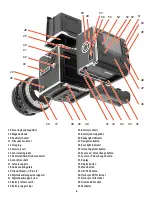
Страница 19: ...ne by the camera winding mech anism and consequently only when attached to the camera body Therefore when separated the magazine and camera body could become unmatched This can be determined by checking the magazine status indicator or by the winding crank status Parts components A Magazineslide J Filmtake upspool B Magazinestatusindicator K Groovedtake upknob C Filmholderkey L Filmclamp D Magazin...

Страница 20: ...ation 4 as this facilitates the removal of the film holder Step by step film loading 1 8 Follow the procedure below in the correct order 1 Fold out the film holder key 2 Turn the key counter clockwise and withdraw the film holder magazine insert 3 Place an empty take up spool under the grooved knob of the spool clamp bar Insert a roll of film under the other end of the bar turned the same way as i...

Страница 21: ...ing The red line in the illustration marks the location on the film magazines that coincides with the film plane position Double exposure with film Double or multiple exposure is possible with a film magazine However as the camera has been designed to prevent accidental double exposure you will have to carry out the following procedure in order to make multiple exposures on the same frame 1 Make t...

Страница 22: ...sh strobe unit s operating instructions for more information about other functions when using an automatic flash light metering that conforms to System SCA flash strobe photography with flash sensors or with non automatic flash strobe units Attaching a Hasselblad flash adaptor SCA 390 For use with hand held flash strobe units The 6 pole contact from the spiral cord is connected to the camera s ded...

Страница 23: ... matched pair Be careful therefore when loading more than one magazine at a time not to switch housings and holders The last three figures of the housing serial number should correspond with the serial number on the film holder Load and unload the magazine away from direct light sources If you keep the slide inserted in an attached magazine it will act as an exposure lock topreventinadvertentexpos...

Страница 24: ...24 6 Accessories Some accessories are still currently available for the 503CW to expand your system and tailor it to suit your needs Photo StephanZirwes HasselbladMasters ...

Страница 25: ...ease to lock the released position 3 Look at the lens exit pupil Use the stop down button and change the aperture noticing as you do so the changes in the size of the exit pupil 4 Look now at an angle roughly in a line from the exit pupil to one corner of the camera back opening This helps in finding the exit pupil again when the RCMC is attached which can be troublesome with wide angle lenses in ...

Страница 26: ... of discontinued accessories for the V system on the used market but please check for compatibility Film magazine The Magazine A12 produces 12 frames with 120 film 6x6 cm and is available in chrome Close up accessories Four fully automatic extension tubes are available for close up work With the exception of Extension tube 8 which cannot be connected directly to the 200 series cameras they also fe...

Страница 27: ...g screen Technical specifications 503CW camera body Problem Possible cause Remedy Complete the camera release and rewind the camera Wind the lens Complete the camera release and rewind the camera Complete the camera release and rewind the camera Complete the camera release and rewind the camera Remove the lens cap The camera body is in the pre released or released position The lens is in the relea...

Страница 28: ...28 1 Overview Photo ClaudioNapolitan HasselbladMasters ...

Страница 29: ...aning or maintenance by a user Do not attempt any such action as you will almost certainly damage it irreparably As is the case with all electronic devices pay extra care when working in damp en vironments and avoid damp conditions for storage In keeping with Hasselblad s modular design philosophy the CFV is an independent com ponent In this way it can be used with view large format cameras to opt...

Страница 30: ...l enable you to load images directly from the camera To load images stored on the removable compact flash card you could instead use a compact flash card reader but we still recommend FireWire for maximum flexibility If you want to power the 503CWD CFV from a PC laptop as opposed to a Macintosh laptop you must ensure that the FireWire port on the computer is capable of supplying power The 503CWD a...

Страница 31: ...ngst other things a copy of Phocus If anything is missing or seems faulty in any way then you should contact your Hasselblad dealer immediately Please keep purchase details and the warranty in a safe place Protective Case Protection cover CFV Adapter EL Focusing screen 36x48 CF Flash card Grey cards E wipes FireWire cable Exposure Cable 503 Flash output sync cable Exposure Cable EL Flash input syn...

Страница 32: ...nd the menu system even in bright light and from acute angles ON OFF button 2 Powers the CFV Lock safety button 1 Prevents unintentional movement of back lock Parts components control panel buttons The interface buttons are used for browsing images and navigating the menu system to make settings Two of the buttons located at the bottom right and left of the screen are given an on screen label that...

Страница 33: ...button for some types of menu operations such as deleting images indicated by a label beside the button on the preview screen Zoom out button SELECTION button 13 Zoom out button to make the view smaller for the pre view image You can continue to zoom out to view several small images at once and finally to view and select batches and media Also acts as a selection button for value setting on the me...

Страница 34: ...secured by the securing catch To remove a plug attachment depress the top B of the securing catch to release it while simultaneously sliding the plug attachment in the reverse direction to fitting Automobile plug Insert the DC power plug C into the 12 24v input socket D on the charger unit Battery charging Domesticplugs Insert the battery charger into a standard 100 240V 50 60 Hz domestic socket A...

Страница 35: ...temporarylossofbatteryperformancemightbenoticedatveryhighorlowtemperat ures Taketheappropriate measuresifthisisthecase Ifyoudonotintendtousethebatteryforawhile itisbesttostoreitinacoolplace inadomesticrefrigeratorisideal Thebatteryshouldhaveausableservicelifeofaround300recharge dischargecycles BatteryPackF 570CFV precautions ConnectthebatterytotheCFVcorrectly Donotusethebatteryforanythingotherthan...

Страница 36: ...e battery as in the illustration 3 Press the battery towards the camera C This automatically depresses the battery retaining catch Slide the battery into the final position D ensuring the contact prongs on the camera are inserted into the battery The battery retaining catch will now return to the safety position Powering the CFV 2 4 The CFV requires power either from the battery 7 2V Sony InfoLith...

Страница 37: ...e compensation that suits you is recommended See section on 503CW Viewfinder indicator in this manual for further details Modified cameras with portable flash strobe units with F and CF type lenses a Connect the standard PC flash strobe sync cable from the sync contact PC connec tor on the camera body to the unit b Use F type or CF type lenses at the F mode setting c Use a shutter speed no faster ...

Страница 38: ... setting Modified and unmodified 2000 FC FCM 2003 FCW 201 F 203 FE 205 TCC FCC with C type lenses C mode setting FlexBody ArcBody Any view camera with Hasselblad V system adapter 500 C CM 501 C CM 503 CX CXi CW 555 ELD 500 EL ELM 500 553 ELX SWC SWC M 903 SWC 905 SWC PORTABLE FLASH tethered Standardflash strobesynccable Standardflash strobesynccable Standardflash strobesynccable Flashoutputsynccab...

Страница 39: ...mbol on the navigation button or on the EXIT MENU button again Pressing the EXIT MENU button will then confirm the new set ting In the next example on the left the name of a new batch is changed by pressing a combination of the Zoom in Zoom out SELECTION buttons as well as the navigation button You can then confirm your choice with the OK Approve button or re vert to the previous status by pressin...

Страница 40: ...ityof thesensor Equivalentto filmspeed BROWSE Setstheapprovalstatus clas sification filterforeasierand quickerimagebrowsing MEDIA 16 39Mpixmodelsonly Determineswherefiles willbestored CFcardor ImageBank II BATCH Usedtocreatenewstorage folders batches andname them DEFAULT APP LEVEL Assignsadefaultapproval status classification toall newimages COPY 16 39Mpixmodelsonly CopiesfilesfromaCFcardto anImag...

Страница 41: ...ns are situated with regard to each other Accessing them is just a matter of tracing along the paths using the Navigation button You can revert by either pressing the Navigation button in the opposite direction or the Menu Exit button Thisscreenwillvaryaccordingtomodel seelatersectionfordetails ...

Страница 42: ...42 2 Getting Started Photo MarkHolthusen HasselbladMasters ...

Страница 43: ...See Phocus user manual about how to select or create a new storage folder When using an ImageBank II see next page for storage media selection details Hasselblad 3FR 3F files 3FR is a proprietary Hasselblad format for the temporary storage of captures A 3FR contains the complete digitized raw image exactly as it was captured by the camera 3FR information requires further computing power typically ...

Страница 44: ...ities with the two general types of back See the later sections in this manual for further details regarding file copying etc Please note that as the ImageBank II is a discontinued product general support is no longer available from Hasselblad ImageBank II Media appears on the menu lists of the 16 and 39 Mpix models When a CF card is in place and an ImageBank II is attached either Card or ImageBan...

Страница 45: ... each capture can vary thereby affecting the total number of shots you can fit on a card It is good practice to regularly reformat CF cards This is a quick and easy process with the CFV see under Format To format media 1 If you have more than one type of medium connected e g a compact flash card and ImageBank II then start by select ing the medium you wish to format using the Storage item of the m...

Страница 46: ... loading activity has finished Connecting to a computer To connect to a computer simply attach a FireWire cable from the FireWire port on your computer to the port on the side of the CFV The port is protected behind a sliding cover Tethered to a computer Even if you never shoot while connected you will probably connect the camera to your computer each time you want to download your images though y...

Страница 47: ...b menu 5 Press either ZOOM button or to choose a new lan guage in this case Spanish 6 Press the MENU EXIT button again to close the menu Tip If you find the CFV has been set to a language you don t understand a rented camera for example you can use the procedure above to get back to your preferredlanguagejustbyfollowingtheactionsand appearance in the illustrations here Note NotethattheMenu andAppr...

Страница 48: ...he default sensitivity of the CCD sensor is ISO 50 Higher ISO settings result in progressively noisier images just as higher ISO film becomes grainer It is recommended that you use the lowest ISO setting the lighting situation allows To select a preset white balance 1 Press the MENU button on the CFV 2 Use and to select the White Bal sub menu 3 Use the or button to step through the available choic...

Страница 49: ...all rectangle appears on the display marking that particular area Calculations then take place automatically so that the following shots use the area chosen as the new white balance standard Using this method you can also read off the screen what the color temperature of the light source has been judged to be in degrees Kelvin 4 Press the MENU button to exit the menu system and keep your setting N...

Страница 50: ...out IAA rating 2 1 1 1 4 3 Shortcuts To help you work faster the CFV provides shortcuts to some of the most commonly used menu commands that do not otherwise have a dedi cated button on the front panel Try to memorize these quick actions to save time and effort later Select the target image and then press and hold until the delete dia log opens See MENU Delete for full details Press and hold until...

Страница 51: ...51 3 Previews Photo MarkZibert HasselbladMasters ...

Страница 52: ...rdpreviewmode Histogram mode Histogramandfulldetailsmode Batterysavermode Preview Modes View Mode button The standard preview display is the one shown when you first turn on the camera and is prob ablytheviewyouwillusemostoften Itfeaturesa preview of your most recent shot and basic infor mation about the settings and the image itself Several other display modes are also available including histogr...

Страница 53: ...ell exposed shot usually has a full range of levels while under and overexposed shots tend to show levels concentrated at the left or right part of the scale respectively Note The histogram is only an indicator thatshouldbeinterpreted thereare situations in which a doubtful histo gram will match an exposure that is verygood fortheintendedeffect and vice versa Regardless of the current mode if you ...

Страница 54: ...ndard preview resolution without any distracting data surrounding them Because the current approval setting is not shown in full screen mode the approval button has no effect This will prevent you from accidentally assigning the wrong status without realizing it Tip Overexposure indicator shortcut There is a one button shortcut for toggling the overexposure marker on and off To use it press and ho...

Страница 55: ...55 4 Batches Browsing Photo BangPeng HasselbladMasters ...

Страница 56: ...p you to organize your shots as you work and function exactly as folders on a computer Batches have the following properties When you create a new batch you assign a name to it Whenyoucopyimagesfromacompact flashcard eachbatch is saved as a sub folder on the destination disk When deleting multiple images you are able to restrict the delete command so that it affects just a single batch Whenbrowsin...

Страница 57: ... name Current remaining capacity on medium The MEDIA screen Displays information about the Current Medium Batch name Date the batch was created Current batch capacity The BATCH screen The blue frame around a folder tells you that it is the Current Batch Creating new batches ...

Страница 58: ...lements the instant approval system by enabling you to browse through images according to their approval status You have the following choices All browses all of the images in the current batch regardless of their approval status This is the default Red browses only red status images from the current batch These are images that you have marked for likely deletion You might browse these images to m...

Страница 59: ... a red frame outlining the portion of the images currently shown Browsing To browse the captures in the current batch simply press the left and right arrows of the navigator button 3 You can now do the following as needed Use the navigator button to move the zoom area if you wish to inspect a different part of the image Zoom further by pressing the zoom in button more times Zoom back out one step ...

Страница 60: ...zoom in on it using the zoom in button or delete it using MAIN MENU STORAGE Delete see also MAIN MENU STORAGE Delete for a detailed procedure Use and to scroll the thumbnails when you have more shots than can be shown Viewing modes Various amounts of information can be displayed when viewing previews This ranges from histograms to a set of metadata There are five modes See Preview Modes for detail...

Страница 61: ...61 5 IAA Instant Approval Architecture Photo LyleOwerko HasselbladMasters ...

Страница 62: ...epre sent the current approval status This letter will change if the status is changed In this example the capture is green so therefore the file name starts with A The coding is as follows GREEN files start with A YELLOW files start with B RED files start with C Standard Instant Approval workflow The standard method of working with the Instant Approval Architecture is as follows 1 Take a shot 2 T...

Страница 63: ...ored dot as you browse your images at the single image four thumbnail or nine thumbnail level you can easily see the current ap proval status of each of them To change the approval status of the currently displayed selected image simply press the approval button until the desired approval status is shown Press the approve button to change the status of the currently selected image Changing the IAA...

Страница 64: ...efault status assigned to each new image 1 Press the MENU button 2 Press to navigate down and select the Storage level Press and then to navigate down and select Default Appr level 3 Use the or button to step through the available settings until the default status you wish to use is shown Auto works as described in Standard Instant Approval Workflow Green gives all new images a green status regard...

Страница 65: ... not show red status images These are probably images that you have either decided to keep or not yet checked for approval status There are many ways to make use of this feature For example Setthefiltertoshowonlyyellowimages Thenstepthrougheach image and decide whether any of them should be promoted to green or demoted red If you are running out of space set the filter to show only red images and ...

Страница 66: ...66 6 Delete Format Copy Photo JoaoCarlos HasselbladMasters ...

Страница 67: ...lected image and asked to confirm the delete note that the dialog reads This image Press OK 6 You now return to the main menu Notice that the unwanted image has been deleted and the batch only contains the three remaining images Press the menu button to exit the menu system or 1 Make an initial search as above 1 Press the button to reach full size preview 2 Use the Delete shortcut 1 3 4 2 6 Tip 5 ...

Страница 68: ...d in batch deletes all red images in the current batch C All yellow red in batch deletes all yellow and red images in the current batch D All in batch deletes all images in the current batch 4 Press OK to confirm the delete to exit without delete press EXIT 5 You now return to the main menu Press the menu EXIT button to exit the menu system A B C D 1 2 3 4 5 Menus for deleting several images by Ap...

Страница 69: ...t A This image deletes the current image only B All red in batch deletes all red images in the current batch C All yellow red in batch deletes all yellow and red images in the current batch D All in batch deletes all images in the current batch 7 Press OK to confirm the delete to exit without delete press EXIT 8 You now return to the main menu Press the menu EXIT button to exit the menu system Men...

Страница 70: ...he card B All red and yellow deletes all red and yellow files on the card C All deletes all files on the card When you have made the selection press to open the delete dialog for the selected status 5 Press OK to confirm the delete to exit without delete press EXIT 6 You now return to the main menu Press the menu EXIT button to exit the menu system A B C 4 5 6 1 2 3 Menus for deleting selected ima...

Страница 71: ...hout any format ting or you might want to convert media that are currently using a format that the camera cannot read COPY 16 and 39 Mpix only Files can be copied to an ImageBank II to free up space on a CF card All batches and files remain on the card until deleted To copy files With an ImageBank II attached to the camera by a FireWire cable and turned on 1 Navigate MENU STORAGE COPY 2 Press the ...

Страница 72: ...72 7 Settings Photo NinaBerman HasselbladMasters ...

Страница 73: ...73 Navigating the USER INTERFACE settings ...

Страница 74: ...t keeping the internal battery charged to maintain Date Time settings Sound Audio feedback helps let you know if each new image is exposed correctly This is described in Standard Instant Approval Workflow This menu item has Volume choose between High Low and Off Key Click choose between On and Off and Exposure Warning choose between On and Off Mark Overexp This feature helps draw your attention to...

Страница 75: ... sub menu 3 Press to open the SETTINGS menu 4 Press to select the USER INTERFACE sub menu 5 Use and to select the required item Press either the or button to make the new settings in the case of Language Power Down and Mark Overex or press again to access Sound Date Time and Display 6 Press the EXIT button again to save the new settings and close the menu Setting the options under the User Interfa...

Страница 76: ...apter FlexBody ArcBody Not recommended for critical use No Exposure cable required except for long exposures Exposure cable always required Exposure cable required for control from Phocus NOTE only these cam eras combinations can be controlled from Phocus Connectivity diagram 503 CW Winder CW 500 EL ELM 500 553 ELX Flash input sync cable Exposure cable 503 CW required for Phocus control of 503CW W...

Страница 77: ...re Time setting The maximum exposure time remains at 32 seconds however Only the single shot function A or AS mode camera settings should be set on the camera Rapid sequence shots are not possible UsetheAdapterEL supplied toprovidethenecesssaryextensionbeyondthemotorhousingof theELmodelsforbatteryattachment ItisattachedtotheCFVinthesamemannerasabattery andthebatteryitselfisthenattachedtotheadapter...

Страница 78: ... 200 setting A Flash sync input cable should not be used All exposures times including the B setting function correctly without having to alter the Exposure Time setting Do not use a winder at rapid sequence setting SWC For use with the 903 SWC and 905 SWC models not recommended for critical use Make an SWC setting PLEASE NOTE Due to the mechanical design of the SWC pressing the exposure release b...

Страница 79: ...sub menu 3 Press to open the SETTINGS menu 4 Use and to select CAMERA 5 Press to open the CAMERA menu 6 Press either the or button to select camera model 7 Use and to select SHUTTER DELAY or EXPOSURE TIME if required 8 Press either the or button to make new settings if required 9 Press the menu EXIT button to exit the menu system and keep your settings ...

Страница 80: ... Press either or to make an exposure time setting 5 Press to open the CAMERA menu 6 Press either the or button to select PINHOLE 3 Press to open the SETTINGS menu 4 Use and to select CAMERA Setting EXPOSURE TIME and CAPTURE SEQUENCE Proceed as follows 1 Press the menu MENU button to open the menu 2 Use and to select the SETTINGS sub menu ...

Страница 81: ...15 Press either or to make a COUNT setting This setting controls the number of exposures in the sequence 16 Press OK to confirm all the settings 13 Press either or to make a DELAY setting This setting controls the amount of time between each exposure in the sequence 14 Press to select COUNT 11 Press either the or button to make an INITIAL DELAY setting This setting controls the amount of time that...

Страница 82: ...u need assistance from Hasselblad technical support it facilitates the situation to know the serial number and current firmware vision of the unit To find this out 1 Select MENU SETTINGS ABOUT See also Navigating the Menu System or details about how to find this setting 2 Press to open the About dialog which shows the serial number and firmware version When you are done reading the information pre...

Страница 83: ...ll but are tagged to produce a cropped square format Naturally you can retain this cropping in Phocus but if you wish you can move it or even remove it to reveal the full image again This facility might be advantageous for those who prefer the square format but who would like the option to adjust the exact placing at the editing stage In normal orientation the cropped areas are to the left and rig...

Страница 84: ...t 180 degrees and Lock at 270 degrees 4 Press EXIT to save Copy to I Bank 16 39 Mpix only Allows you to create new batches or add files to the last batch on an ImageBank II 1 Select MENU SETTINGS CUSTOM OPTIONS 2 Press the button to reach Copy to I Bank 3 Press either or to choose between Entire card or Active batch only 4 Press EXIT to save I B Connection 16 39 Mpix only Allows you to create new ...

Страница 85: ...85 8 Cleaning Photo DirkRees HasselbladMasters ...

Страница 86: ...es in your images then you may need to clean the outer surface of CFV s infrared IR filter In most cases the careful use of compressed air will be adequate but sometimes small particles will get stuck to the surface of the IR filter requiring for a more thorough cleaning involving either fluid or wipes For a good safe cleaning follow descriptions below Removing and attaching the CFV 1 2 When remov...

Страница 87: ...87 9 Appendix Photo MarkHolthusen HasselbladMasters ...

Страница 88: ...Wire 800 IEEE1394b 0 45 deg C 32 113 deg F 530 g excluding battery and CF card 91 x 90 x 61 mm W x H x D All Hasselblad V System cameras manufactured since 1957 2000 cameras and 201F with C lenses only 202FA 203FE and 205FCC camera types need a minor camera modification to use F FE lenses The ArcBody is not compatible SWC M and newer can be used but has limitations on image quality due to lens des...

Страница 89: ...theft Never leave it visible in an unattended car for exam ple Separate and specific camera insurance cover should be considered by professional users World class results are possible with Hasselblad equipment witnessed by so many front covers international advertising campaigns famous portraits his torical events etc But it is the combination of this fine equipment and the abili tiesofthephotogra...

Страница 90: ...36 Battery saver mode 53 Browsing 56 Browsing by IAA approval status 58 Capture destination 43 Capture sequence 79 Cleaning 88 Compact flash memory cards 45 Connecting to a computer 46 Copy to I Bank 16 39 Mpix only 86 Creating a new batch 72 Current batch 56 Custom Options 85 Default approval status 62 Deleting by Approval status 66 Deleting several images from a batch 67 Deleting several images ...

Страница 91: ...o took them All text in this manual Victor Hasselblad AB Hasselblad A S Unless otherwise stated all images in this manual Jens Karlsson David Jeffery and Ove Bengtson Victor Hasselblad AB Hasselblad A S assumes no responsibility or liability for any errors or inaccuracies that may appear in this manual Victor Hasselblad AB Hasselblad A S assumes no responsibility or liability for loss or damage in...

Страница 92: ...Hasselblad A S Hejrevej 30 DK 2400 Copenhagen Denmark Victor Hasselblad AB Box 220 SE 401 23 Göteborg Sweden 11 11 UK v10 ...

Отзывы: