Archive Service
48
Vision
2
Instruction Manual
Archive Service
The Vision
2
Archive service provides a multi-format, multi-bitrate storage system for video or audio files. Video in the archive can
be accessed on demand by PC users, from tablets, or set-top boxes. Users can attach metadata to each video containing
information about the video contents. This metadata can be customized by the system administrator. Vision
2
provides some built in
metadata sections such as synopsis to provide an overview of the video and credits to detail the authors of the video. The Vision
2
search feature can be used to search videos by the contents of the metadata. One or more archive licenses can be added to a server
to provide more than one storage area on that server. Vision
2
also allows an archive to point to a NAS/SAN to add extra storage to
a Vision
2
system. Archive video/music files can be used as the source for a Producer service, which provides a scheduled multicast
TV channel. The Archive service supports MP3 audio and four types of video file: WMV, MPEG2, MPEG4, and Flash Video (FLV). A
Live Channel can also be recorded and the resulting video saved into an Archive.
Setting Up an Archive
In order to setup an Archive, first decide whether to store the videos on a Vision
2
server, a SAN, or a NAS. The latter option is called
a NAS archive and is only permitted on Master servers.
If the former, look at the amount of free space on each available server. Once the appropriate server is found, use the
Manage Licensing screen to add an Archive license to the server. See Configuring a Standard (non-NAS) archive below for
more details.
If the latter see Setting Up a NAS Archive on page 49 for more details.
If needing to store videos on a SAN the process is similar to configuring a NAS archive. See Configuring a SAN Archive on
page 60 for more details.
Configuring a Standard Vision
2
Server (non NAS) Archive
Configure a Standard Vision
2
Server (non NAS) Archive on one of your Vision
2
servers as follows:
1.
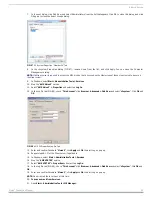
Go to Manage System > Manage Licensing.
2.
Drag an Archive license on to the server to host that Archive.
NOTE: Record and Producer services can only use archives which are located on the same server. This restriction does not apply
to NAS archives. Recorder and Producer services on either Master or
Client
can use the NAS archive even though the NAS archive
can only be licensed on the Master.
3.
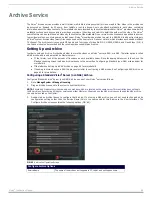
Double-click an Archive license to configure that Archive. If not using a NAS archive, you will not need to change Archive
configuration settings other than the Service Name (this is the name used for this Archive in the User Interface). The
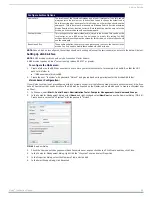
Configure Archive screen contains the following options (FIG. 65):
FIG. 65
Archive Configuration Screen
Configure Archive Options
Service Name
The name of the archives as it appears to PC, tablet, and set-top box users.

