Harman Kardon DVD 20 Скачать руководство пользователя страница 22

SYSTEM SETUP  

21

System Setup

c) Dynamic compression is activated only

when Dynamic Range on DVD 20 is on AND
“Night Mode” on the decoder is on.
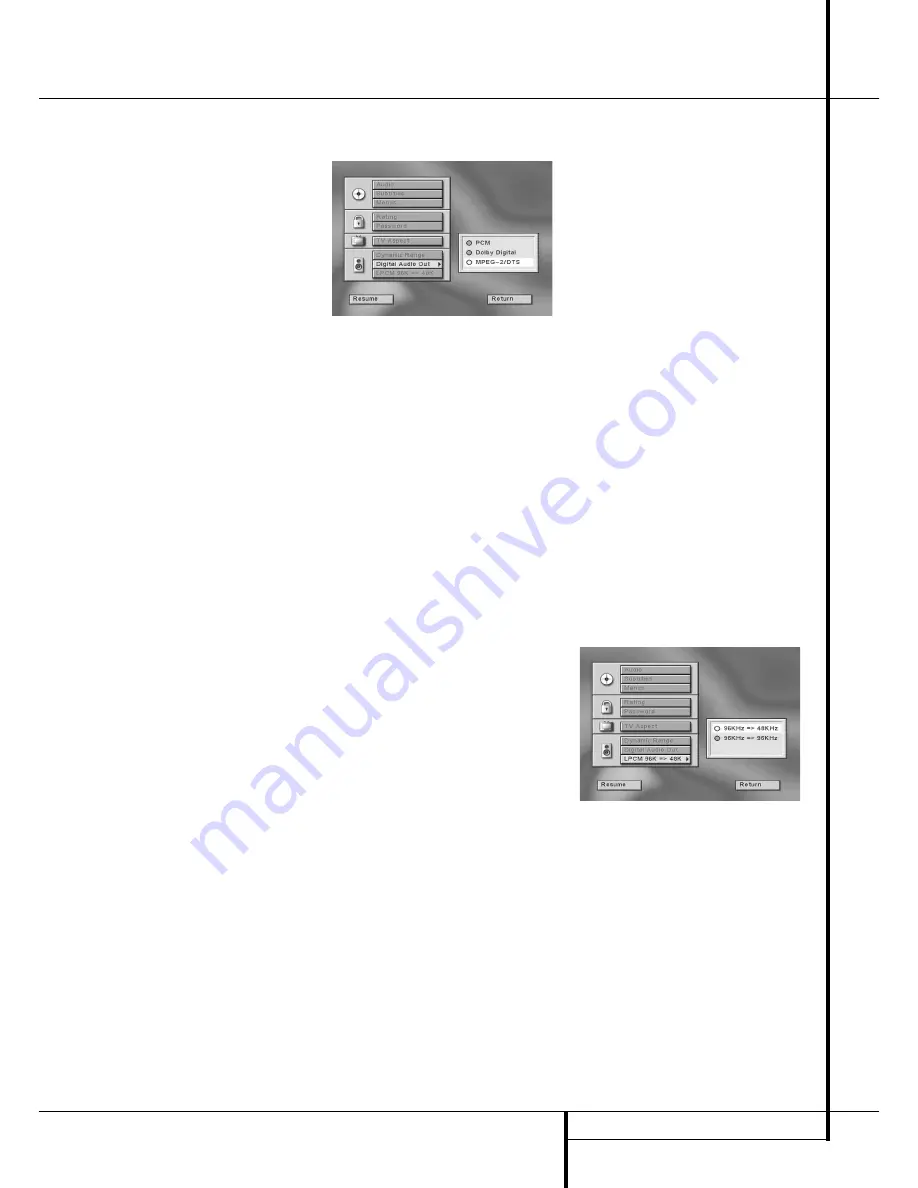
Digital Audio Out

This setting determines the digital signal format
to be output from the optical/coaxial digital
audio output of the DVD 20. The optimal setting
will depend on the digital decoder connected to
that output.

PCM:

Choose this setting if you are using only

the left/right analog AUDIO OUT connectors of
the DVD 20 or if the decoder connected to the
digital output is able to decode only normal
PCM data (only left and right front channels)
rather than Dolby Digital or DTS. PCM, MPEG
(see Note below) and Dolby Digital tracks will
be output as PCM datastream only, DTS tracks
will output no signal (see also comment in
”Dolby Digital”below).

Dolby Digital:

Choose this setting if you’ve

connected a Dolby Digital receiver or decoder
to your DVD player, but without DTS decoder.
PCM and Dolby Digital tracks will be output
originally, MPEG audio tracks will be output as
PCM (see Note below). DTS tracks will output
no signal (see also note below). But with virtu-
ally all DTS discs a 2-channel digital audio
track (Dolby Digital 2.0 or PCM) can be select-
ed as alternative Audio Track (by pressing the
Audio button on remote, see page 23), to feed
a PCM signal to the digital output.

MPEG-2/DTS:

Choose this setting if you’ve

connected a receiver or decoder with Dolby
Digital and DTS decoding to your DVD player.
Then all recordings will be output and played 
with their original format, whether PCM,
MPEG (see Note below), Dolby Digital or DTS.

To select Digital Audio Output format follow
these steps:

1. Press ARROW (UP or DOWN) on the remote to

select ”Digital Audio Out” on the Set Up Menu
Display.

2. Press ENTER or ARROW (right), Digital Audio

Out Display appears.

3. Press ARROW (UP or DOWN) on the remote to

select specific Digital Audio Out format.

4. Press ENTER.

5. Press PLAY to resume normal playback or

RETURN to delete Set Up Display from screen.

Important Note for DTS

If you set the Digital Audio Out Menu to MPEG-
2/DTS, to listen to DTS you must have your DVD
player connected to a receiver or DTS decoder
with DTS decoding and the disc you play must
contain DTS audio. If you choose MPEG-2/DTS
and you play a DTS disc, but your receiver or
decoder doesn’t support DTS, you won’t hear any
audio when you play the disc.

Important Note for MPEG Audio:

Though the

MPEG-2 multichannel digital audio standard isn´t
used in Europe, some DVD’s use MPEG-1 alterna-
tive audio tracks, the same as MPEG 2/0 (2-chan-
nel stereo). The audio format of any DVD track
selected will be indicated on the screen when you
press the AUDIO button on the remote. Note that
when the digital output of the DVD 20 is set to
"PCM" or "Dolby Digital", MPEG audio tracks
will be output in PCM format and can be decod-
ed with any digital Receiver/Amplifier connected
to the DVD 20. But when "MPEG-2/DTS" is
selected, they will be output as an original MPEG
datastream, and an MPEG-Decoder is needed to
convert the digital signal.

Sampling Frequency Setting
(LPCM)

Once a selection has been made for the type of
digital audio data streams that the DVD 20 out-
puts, you may also need to adjust the way it han-
dles the various sampling frequencies used in the
production of digital audio for DVD. The DVD 20
is compatible with both 48kHz and 96kHz sam-
pling, but some early A/V receivers and surround
processors are not.

If your A/V receiver or surround processor is NOT
capable of handling 96kHz signals, select the
48kHz option, if not so already (set defaultwise).
When this choice is made, the DVD 20 will auto-
matically convert any 96kHz signals to a 48kHz
output so that your system is capable of decoding
them.

If your A/V receiver or surround processor IS
capable of handling 96kHz signals, select the
96kHz option to achieve the greatest audio fideli-
ty available. When this choice is made, the DVD
20 will pass each type of signal through without
any further processing.

To select the Sample Frequency follow these
steps:

1. Press ARROW (UP or DOWN) on the remote to

select "LPCM 96K -> 48K" on the Set Up
Menu.

2. Press ENTER or ARROW (right), Sample

Frequency Menu appears.

3. Press ARROW (UP or DOWN) on the remote to

select the specific frequency option.

4. Press ENTER, the screen will return to the Set

Up Menu, the sample frequency selected will
be shown down at its right side.

At this point you will have completed all of the
steps needed to configure the DVD 20 for the
specifics of your system. Press PLAY to resume
normal playback or RETURN to delete the Set Up
Menu from the screen.

Содержание DVD 20

Страница 1: ...250 Crossways Park Drive Woodbury New York 11797 www harmankardon com Harman Consumer International 2 Route de Tours 72500 Ch teau du Loir France 2001 Harman Kardon Incorporated Part 0000000000...

Страница 2: ...DVD20 Digital Versatile Disc Player OWNER S MANUAL DVD 20 STOP DIMMER TEST SKIP PL Power for the Digital Revolution...

Страница 3: ...Repeat Play 24 A B Repeat Play 24 Random Play 25 Programmed Play with DVD 27 CD Playback 27 Compatibility of Discs 27 To Load and Play an Audio CD 27 Audio CD Playback Features 27 Using the Banner Di...

Страница 4: ...ery nine units of height making them more like the screen in a movie theater The program material on a DVD may be recorded in either format and in addi tion you may configure the DVD 20 to play back i...

Страница 5: ...unsuitable for some audiences DVD only Intuitive menu operating system Separate Buttons for convenient Fast Forward Fast Reverse Search and Track Skip 2x 4x Zoom during play and pause selection movab...

Страница 6: ...eans that playback will stop but as long as the tray is not opened or the disc changed DVD playback will continue from the same point on the disc when the Play Button is pressed again Resume will also...

Страница 7: ...en the programming functions are in use H Intro Indicator This indicator lights when the Intro Scan function is active I Repeat Indicators These indicators light when any of the Repeat functions are i...

Страница 8: ...REV SLOW 0 7 A H AUDIO 5 2 9 C PLAY D F NEXT I K M 1 2 7 5 6 8 9 0 4 Q P O N L J G E B 8 6 1 4 3 SUBTITLE ANGLE 3 0 1 2 3 4 5 6 7 8 9 A B C D E F G H I J K L M N O P Q POWER ON POWER OFF AUDIO SUBTITL...

Страница 9: ...this button search speed changes as below DVD F SEARCH1 F SEARCH2 F SEARCH3 F SEARCH4 F SEARCH1 CD F SEARCH1 F SEARCH2 F SEARCH3 F SEARCH1 F OPEN CLOSE Press to open or close the disc tray G PAUSE Fre...

Страница 10: ...o your DVD Player The SCART cable carries both audio and video sig nals of the external unit These signals will be routed through the SCART connector of the DVD to the TV automatically when the DVD pl...

Страница 11: ...outputs Video and S Video to your TV or AV Receiver only one of them Most European TV s are equipped with SCART connectors rather than with a normal video input yellow cinch In that case the SCART co...

Страница 12: ...input on your device and the video S video output of this device to your TV For more details see the manual of your Audio Video amplifier receiver Note for Analog Audio The connection from Audio Out t...

Страница 13: ...site video signal the S Video signal or the direct RGB signal delivering the best video performance possible all selectable in the Setup menu To view RGB video on your TV the RGB compatible SCART conn...

Страница 14: ...e with any local regulations Do not simply throw them away but return to your dealer or special battery disposal centers Remote control operation range Point the remote control unit from no more than...

Страница 15: ...r with an opti cal coaxial digital input which does not con tain a Dolby Digital AC 3 or DTS decoder be sure to select PCM as initial setting in the Digital Audio Output menu see also page 21 Otherwis...

Страница 16: ...arch x2 the and Playback Mode Indicators will both light steadily In Fast Search x4 the outside or Playback Mode Indicator will flash and the inside indicator will remain steadily lit In Fast Search x...

Страница 17: ...RROW UP or DOWN on the remote to select Audio on the Set Up Menu Display selected as default after the Set Up Menu appears 2 Press ENTER or ARROW right the Audio Menu appears 3 Press ARROW UP or DOWN...

Страница 18: ...l require a password before being played all those with rating levels within the green number area will have free access 4 Press ENTER The rating menu will disappear and rating level selected will be...

Страница 19: ...ENTER Enter Password Display appears again see right down on page 17 7 Enter new password then press ENTER Confirm Password Display appears 8 Press the ARROW UP or DOWN or NUMBER 0 9 buttons on the re...

Страница 20: ...setting you can define the video format output by the TV SCART connector on the rear of the DVD 20 As the SCART connector can output Video Composite S Video or RGB video signals you must define which...

Страница 21: ...ecrease the sharpness of the script then the Contrast has been turned up too much Reduce the contrast until these effects will disappear and the video still looks realistic 3 If you are watching TV wi...

Страница 22: ...st contain DTS audio If you choose MPEG 2 DTS and you play a DTS disc but your receiver or decoder doesn t support DTS you won t hear any audio when you play the disc Important Note for MPEG Audio Tho...

Страница 23: ...Title icon after a disc was read and the player is in Stop or Resume mode To return to the normal display press RETURN To select a specific title use the Title section in the Banner Display 1 During d...

Страница 24: ...US on the remote the Banner Display appears 2 Press the ARROW LEFT OR RIGHT until the Camera icon is highlighted and press ENTER the Angle menu appears 3 Press ENTER or ANGLE on the remote to change a...

Страница 25: ...he Front Information Display go out Repeat Play may be stopped by pressing the Stop Button twice A B Repeat Play The Repeat A B function allows you to select any portion of a DVD and have it repeat co...

Страница 26: ...t to the Playlist 2 Press ARROW UP or DOWN to select the Title Chapter to be deleted When it is selected numbers will turn from white to black press CLEAR or select DELETE icon on the Program Edit Dis...

Страница 27: ...a new program to add items to a current program or to delete items from a program list possible during resume or stop mode only Press CHECK until TITLE blinks in the display the first Location Number...

Страница 28: ...M is pressed see page 29 and the Banner Display shown below appearing auto matically when the CD is played let you choose various playback features Track The number shown indicates the number of the t...

Страница 29: ...works on both DVD and CD discs To Enter a Bookmark Follow These Steps 1 While a disc is playing press STATUS on the remote to see the Banner Display if not already shown 2 Use the ARROW RIGHT or LEFT...

Страница 30: ...unction allows you to select any portion of a CD and have it repeat continually unit the unit is manually stopped To initiate a Repeat A B playback sequence fol low these steps while a disc is playing...

Страница 31: ...re any new selections will be inserted remains high lighted in white numbers 4 Press PROGRAM to insert the selection Or select INSERT with ARROW right or ENTER and press ENTER Selected track will be i...

Страница 32: ...D 20 Due to the differences in various versions of the MP3 format and the many differences between the CD R machines used to record MP3 discs on a computer it is possible that some MP3 discs may not p...

Страница 33: ...te however that when the PBC is on some features are not available with that VCD they will be shown with grey background on the Status Bar rather than green Use of functions when the PBC is on will va...

Страница 34: ...7185 Hausa 7265 Hebrew 7387 Hindi 7273 Hungarian 7285 Icelandic 7383 Indonesian 7378 Interlingua 7365 Interlingue 7369 Iunpiak 7375 Irish 7165 Italian 7384 Japanese 7465 Javanese 7487 Kannada 7578 Kas...

Страница 35: ...ast or slow mode There is no audio playback on DVD discs during fast or slow modes Picture is distorted or jumps during MPEG 2 decoding It is a normal artifact of DVD playback for pictures fast forwar...

Страница 36: ...Limits AC Power 220 240 V 50 Hz Power Consumption 12 Watts On 20 Watts Max Dimensions WxHxD 440x100x330 mm Weight 7 Kg All specifications subject to change without notice Harman Kardon and Power for...

Отзывы: