Harman Kardon DVD 20 Скачать руководство пользователя страница 20

SYSTEM SETUP  

19

System Setup

portion of the screen, with black bars at the
top and bottom of the screen.

4 x 3 Pan Scan: Choose this setting if the DVD
20 is connected to a conventional (4:3) TV set
and you want widescreen movies to fill the
entire screen. Note that this setting is effective
only with a few widescreen DVD’s recorded
with the Pan and Scan mode. With those
movies you won’t see parts of the picture (par-
ticularly the right and left edges).
Most discs produced in a widescreen format
can’t be cropped in this fashion, which means
the black bars will appear at the top and bot-
tom of the screen (letterbox format). Some
widescreen DVD’s, particulary anamorphic
types (with full vertical line resolution, see sec-
tion ”16x9”below), may be shown with origi-
nal width but spread vertically. With these disc,
the letterbox format must be selected.
This setting is usefull only with a few DVD’s,
with all others the letterbox format fits best.

16 x 9 Widescreen: Choose this setting if your
DVD player is connected to a widescreen TV, or
to a conventional (4:3) TV set to widescreen
(16:9) mode.
With this set up, discs recorded with 4:3
aspect ratio will appear as a boxed image in
the center of a 16:9 widescreen TV, with black
bars to the left and right of the image (not
with 4:3 TVs set to 16:9 mode). True
widescreen (anamorphic) DVD’s i.e. those
shown spread vertically when the DVD 20 is
set to "16:9" and your TV is set to "4:3", will
be shown optimally with full vertical resolu-
tion. With some 4:3 TV’s, set to 16:9 format,
discs with 4:3 format may be played com-
pressed vertically. With those discs the TV must
be set to 4:3 format.

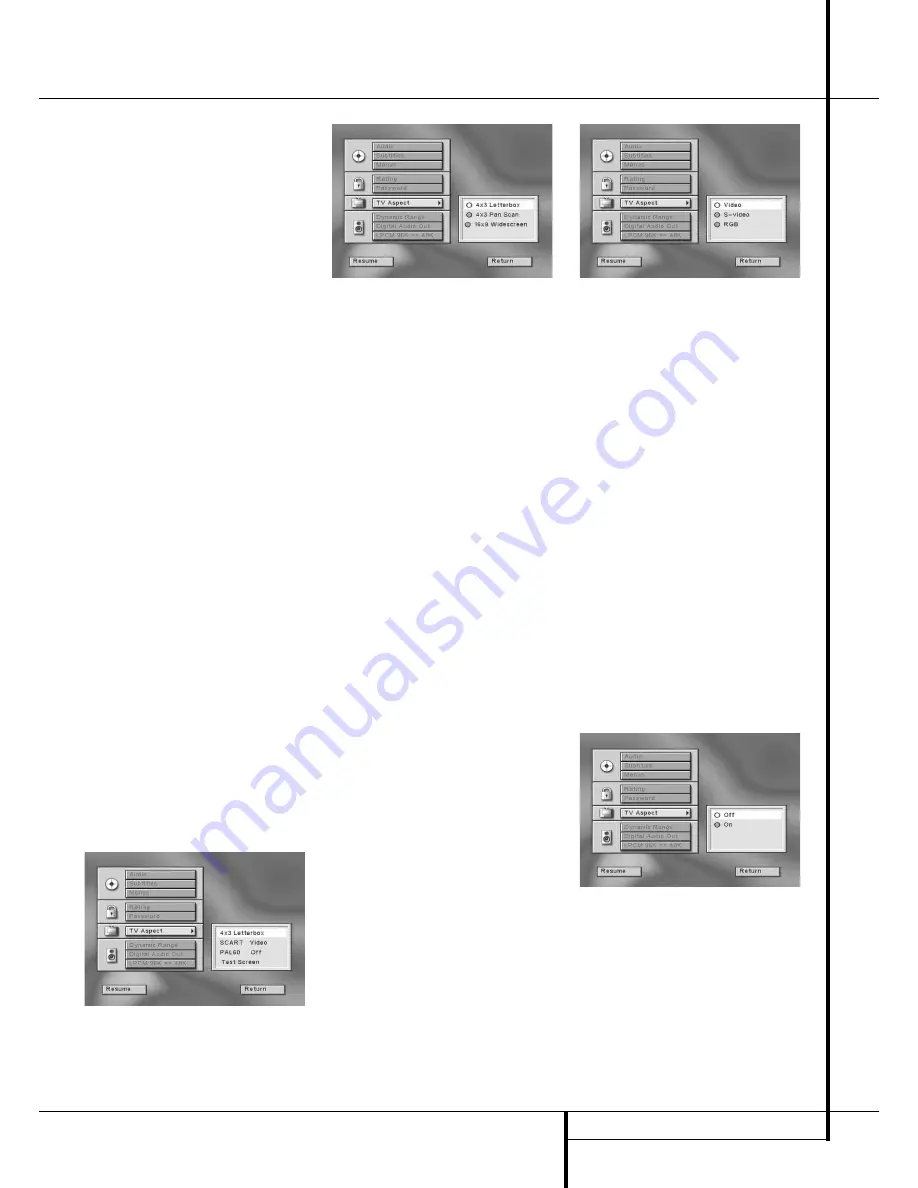
To select TV Aspect follow these steps:

1. Press ARROW (UP or DOWN) on the remote to

select ”TV Aspect” on the Set Up Menu 
Display.

2. Press ENTER or ARROW (right), TV Aspect

Menu appears.

3. In that menu the currently selected TV Aspect

ratio will be displayed and highlighted. Press
ENTER or ARROW (right) again to open the TV
Aspect Ratio Menu.

4. Press ARROW (UP or DOWN) on the remote to

select desired TV Aspect Ratio.

5. Press ENTER. The previous TV Aspect Menu

appears again with the screen shape selected
highlighted.

6. Press PLAY to resume normal playback,

ARROW (Up or DOWN) to select another Set
Up Menu item or RETURN to delete Set Up
Display from screen.

SCART Connector

With this setting you can define the video format,
output by the TV SCART connector on the rear of
the DVD 20. As the SCART connector can output
Video (Composite), S-Video or RGB video signals,
you must define which video signal should be fed
to the TV through this connector, depending on
the TV used.

In addition to the video signal selected, the TV
SCART connector will output specific signals that
automatically turn the TV to the appropriate
Video Input, as soon as the DVD 20 is turned on,
and that automatically set the TV to sense only
RGB video from the SCART connector when the
DVD 20 is set to RGB (see below).

Notes:

When your TV has a SCART input, only

the DVD 20’s  TV SCART output should be con-
nected to your TV, no other video connections
additionally (see page 12). Moreover, the control
signals mentioned above can be fed to the TV
only when connected direct to the DVD 20 via
SCART, without the use of any SCART <-> Cinch
Adapters.

To select the video format output by the TV
SCART connector follow these steps:

1. Select "TV Aspect" on the Set Up Menu, than

press ENTER or ARROW (right), the TV Aspect
Menu appears (see left).

2. Press ARROW (DOWN) on the remote to select

"SCART".

3. Press ENTER or ARROW (right), Video Format

Menu appears.

4. Press ARROW (UP or RIGHT) on the remote to

select the video format desired.

5. Press ENTER, the display will return to the TV

Aspect Menu, highlighting the video format
selected.

6. Press, ARROW (Up or DOWN) to select another

TV Aspect Menu item, ARROW (left) to return
to Set Up Menu, RETURN to delete Set Up
Menu from screen or PLAY to resume normal
playback.

PAL 60 

If the TV is not compatible with the NTSC stan-
dard, NTSC discs will only be seen in black and
white. With PAL 60 the NTSC video format can be
modified so that it can be viewed also on non-
NTSC TV’s. Otherwise, NTSC signals are output
with their original NTSC format. Note that for
viewing the PAL 60 format, the TV must be com-
patible at least with PAL 60 (which are the most
nowadays), unless with NTSC.

To select the PAL 60 mode follow these steps:

1. Press ARROW (Up or DOWN) on the remote to

select "PAL 60" on the TV Aspect Menu.

2. Press ENTER or ARROW (right), PAL60 Menu

appears.

3. Press "ARROW (UP or DOWN) on the remote

to select the PAL 60 mode (on or off).

4. Press ENTER, the display will return to the TV

Aspect Menu, highlighting the PAL 60 mode
selected.

5. Press, ARROW (Up or DOWN) to select another

TV Aspect Menu item, ARROW (left) to return
to Set Up Menu, RETURN to delete Set Up
Menu from screen or PLAY to resume normal
playback.

Содержание DVD 20

Страница 1: ...250 Crossways Park Drive Woodbury New York 11797 www harmankardon com Harman Consumer International 2 Route de Tours 72500 Ch teau du Loir France 2001 Harman Kardon Incorporated Part 0000000000...

Страница 2: ...DVD20 Digital Versatile Disc Player OWNER S MANUAL DVD 20 STOP DIMMER TEST SKIP PL Power for the Digital Revolution...

Страница 3: ...Repeat Play 24 A B Repeat Play 24 Random Play 25 Programmed Play with DVD 27 CD Playback 27 Compatibility of Discs 27 To Load and Play an Audio CD 27 Audio CD Playback Features 27 Using the Banner Di...

Страница 4: ...ery nine units of height making them more like the screen in a movie theater The program material on a DVD may be recorded in either format and in addi tion you may configure the DVD 20 to play back i...

Страница 5: ...unsuitable for some audiences DVD only Intuitive menu operating system Separate Buttons for convenient Fast Forward Fast Reverse Search and Track Skip 2x 4x Zoom during play and pause selection movab...

Страница 6: ...eans that playback will stop but as long as the tray is not opened or the disc changed DVD playback will continue from the same point on the disc when the Play Button is pressed again Resume will also...

Страница 7: ...en the programming functions are in use H Intro Indicator This indicator lights when the Intro Scan function is active I Repeat Indicators These indicators light when any of the Repeat functions are i...

Страница 8: ...REV SLOW 0 7 A H AUDIO 5 2 9 C PLAY D F NEXT I K M 1 2 7 5 6 8 9 0 4 Q P O N L J G E B 8 6 1 4 3 SUBTITLE ANGLE 3 0 1 2 3 4 5 6 7 8 9 A B C D E F G H I J K L M N O P Q POWER ON POWER OFF AUDIO SUBTITL...

Страница 9: ...this button search speed changes as below DVD F SEARCH1 F SEARCH2 F SEARCH3 F SEARCH4 F SEARCH1 CD F SEARCH1 F SEARCH2 F SEARCH3 F SEARCH1 F OPEN CLOSE Press to open or close the disc tray G PAUSE Fre...

Страница 10: ...o your DVD Player The SCART cable carries both audio and video sig nals of the external unit These signals will be routed through the SCART connector of the DVD to the TV automatically when the DVD pl...

Страница 11: ...outputs Video and S Video to your TV or AV Receiver only one of them Most European TV s are equipped with SCART connectors rather than with a normal video input yellow cinch In that case the SCART co...

Страница 12: ...input on your device and the video S video output of this device to your TV For more details see the manual of your Audio Video amplifier receiver Note for Analog Audio The connection from Audio Out t...

Страница 13: ...site video signal the S Video signal or the direct RGB signal delivering the best video performance possible all selectable in the Setup menu To view RGB video on your TV the RGB compatible SCART conn...

Страница 14: ...e with any local regulations Do not simply throw them away but return to your dealer or special battery disposal centers Remote control operation range Point the remote control unit from no more than...

Страница 15: ...r with an opti cal coaxial digital input which does not con tain a Dolby Digital AC 3 or DTS decoder be sure to select PCM as initial setting in the Digital Audio Output menu see also page 21 Otherwis...

Страница 16: ...arch x2 the and Playback Mode Indicators will both light steadily In Fast Search x4 the outside or Playback Mode Indicator will flash and the inside indicator will remain steadily lit In Fast Search x...

Страница 17: ...RROW UP or DOWN on the remote to select Audio on the Set Up Menu Display selected as default after the Set Up Menu appears 2 Press ENTER or ARROW right the Audio Menu appears 3 Press ARROW UP or DOWN...

Страница 18: ...l require a password before being played all those with rating levels within the green number area will have free access 4 Press ENTER The rating menu will disappear and rating level selected will be...

Страница 19: ...ENTER Enter Password Display appears again see right down on page 17 7 Enter new password then press ENTER Confirm Password Display appears 8 Press the ARROW UP or DOWN or NUMBER 0 9 buttons on the re...

Страница 20: ...setting you can define the video format output by the TV SCART connector on the rear of the DVD 20 As the SCART connector can output Video Composite S Video or RGB video signals you must define which...

Страница 21: ...ecrease the sharpness of the script then the Contrast has been turned up too much Reduce the contrast until these effects will disappear and the video still looks realistic 3 If you are watching TV wi...

Страница 22: ...st contain DTS audio If you choose MPEG 2 DTS and you play a DTS disc but your receiver or decoder doesn t support DTS you won t hear any audio when you play the disc Important Note for MPEG Audio Tho...

Страница 23: ...Title icon after a disc was read and the player is in Stop or Resume mode To return to the normal display press RETURN To select a specific title use the Title section in the Banner Display 1 During d...

Страница 24: ...US on the remote the Banner Display appears 2 Press the ARROW LEFT OR RIGHT until the Camera icon is highlighted and press ENTER the Angle menu appears 3 Press ENTER or ANGLE on the remote to change a...

Страница 25: ...he Front Information Display go out Repeat Play may be stopped by pressing the Stop Button twice A B Repeat Play The Repeat A B function allows you to select any portion of a DVD and have it repeat co...

Страница 26: ...t to the Playlist 2 Press ARROW UP or DOWN to select the Title Chapter to be deleted When it is selected numbers will turn from white to black press CLEAR or select DELETE icon on the Program Edit Dis...

Страница 27: ...a new program to add items to a current program or to delete items from a program list possible during resume or stop mode only Press CHECK until TITLE blinks in the display the first Location Number...

Страница 28: ...M is pressed see page 29 and the Banner Display shown below appearing auto matically when the CD is played let you choose various playback features Track The number shown indicates the number of the t...

Страница 29: ...works on both DVD and CD discs To Enter a Bookmark Follow These Steps 1 While a disc is playing press STATUS on the remote to see the Banner Display if not already shown 2 Use the ARROW RIGHT or LEFT...

Страница 30: ...unction allows you to select any portion of a CD and have it repeat continually unit the unit is manually stopped To initiate a Repeat A B playback sequence fol low these steps while a disc is playing...

Страница 31: ...re any new selections will be inserted remains high lighted in white numbers 4 Press PROGRAM to insert the selection Or select INSERT with ARROW right or ENTER and press ENTER Selected track will be i...

Страница 32: ...D 20 Due to the differences in various versions of the MP3 format and the many differences between the CD R machines used to record MP3 discs on a computer it is possible that some MP3 discs may not p...

Страница 33: ...te however that when the PBC is on some features are not available with that VCD they will be shown with grey background on the Status Bar rather than green Use of functions when the PBC is on will va...

Страница 34: ...7185 Hausa 7265 Hebrew 7387 Hindi 7273 Hungarian 7285 Icelandic 7383 Indonesian 7378 Interlingua 7365 Interlingue 7369 Iunpiak 7375 Irish 7165 Italian 7384 Japanese 7465 Javanese 7487 Kannada 7578 Kas...

Страница 35: ...ast or slow mode There is no audio playback on DVD discs during fast or slow modes Picture is distorted or jumps during MPEG 2 decoding It is a normal artifact of DVD playback for pictures fast forwar...

Страница 36: ...Limits AC Power 220 240 V 50 Hz Power Consumption 12 Watts On 20 Watts Max Dimensions WxHxD 440x100x330 mm Weight 7 Kg All specifications subject to change without notice Harman Kardon and Power for...

Отзывы: