5
Installation and Maintenance Manual, Compact CA
3.1.5 Removing the motor from the driven shaft
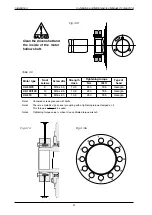
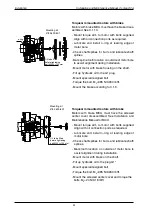
- Slacken the shaft coupling screws gradually;
see Fig. 3.14 and 3.14a.
Each screw should
be slackened only about a quarter of a
turn each time. Thus tilting and jamming
of the collars or thread stretching will be
avoided. The screws must be slackened until
the coupling ring is fully released.
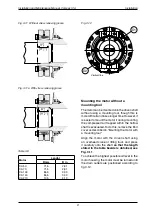
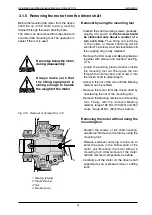
- Remove the End cover and Bearing retainer
together with screws and washers; see Fig.
3.15.
- Locate the existing plastic washer outside
the mounting tool nut.Then pass the tool
through the centre shaft, and screw it into
the driven shaft to stated depth.
- Screw in the nut of the tool until the Bearing
retainer can be refitted.
- Remove the motor from the driven shaft by
unscrewing the nut of the mounting tool.
- Remove the Bearing retainer and mounting
tool. Finally, refit the removed Bearing
retainer, torque 136 Nm (100 lbf·ft) and End
cover, torque 81 Nm (59 lbf·ft) as before.
Before dismounting the motor from the driven
shaft the oil in the motor housing must be
drained through the lower draining hole.
The motor can be removed from the shaft with
or without the mounting tool. The operation is
easier if the tool is used.
Removal by using the mounting tool
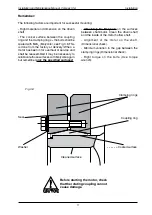
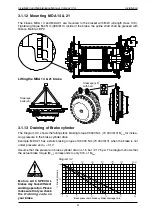
Fig. 3.15 Removal of Compact 50...210
2; Plastic Washer
4; Mounting tool
3; Nut
1; Bearing retainer
4
3
1
Installation
Always make sure that
the lifting equipment is
strong enough to handle
the weight of the motor
Never stay below the motor
during disassembly
Removing the motor without using the
mounting tool
- Slacken the screws of the shaft coupling,
see above "Removal of motors by using the
mounting tool".
- Remove endcover and plug to allow air to
enter the space in the hollow shaft of the
motor; see “Mounting the motor without a
mounting tool“. After removal of the motor,
refit the removed components as before.
- Carefully pull the motor off the driven shaft
supported by an overhead crane or a lifting
truck.

