


Instrument Setup
(continued)
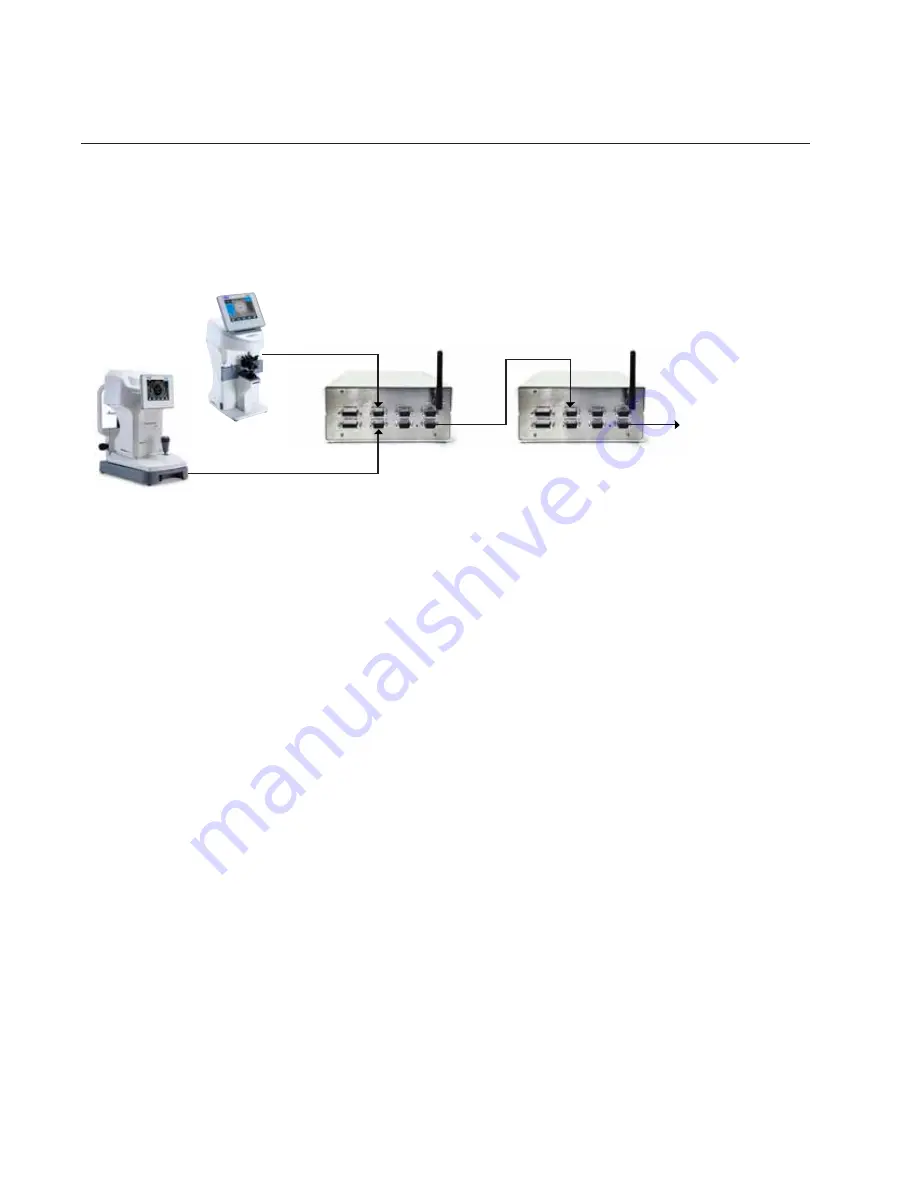
Daisy Chaining Multiple Visutron 900
Touch
Systems
When an EMR system only supports one way communication in a setup with multiple Visutron 900
Touch
units, Daisy chaining is required to get the pre-test data to all of the Visutron 900
Touch
units. Pre-
test equipment is sent to the first Visutron 900
Touch
in the chain, and the data is then sent to all of the
other Visutron 900
Touch
systems via the Instrument 1 or 2 and Transfer ports as shown in Figure IS-28.
Lensmeter Data Goes
TO
Instrument 1 Port
Autorefractor Data Goes
TO
Instrument 2 Port
Data Goes
OUT
Transfer Port
Data Goes
IN
Instrument 1 Port
Data Goes
OUT
Transfer Port
To Next Visutron 900
Touch
Instrument 1 Port
Figure IS-28, Daisy Chain Setup Diagram
Visutron 1
Visutron 2
1. Tap
Settings
, located at the top right of the Controller screen.
2. Tap
Ports
on the Settings menu.
3. Setup the Auto Refractor and Lensmeter to communicate with the Visutron 900
Touch
closest to that
location, using the Instrument 1 and Instrument 2 ports. Refer to the
Connecting the Visutron 900
Touch System
section of this manual for setup instructions for the pre-test equipment.
4. For both Instrument 1 and Instrument 2 section of the Ports page, check off both Store and Transfer
in the Port Settings panel.
5. Connect the
Transfer
port
on Central Unit of the first Visutron 900
Touch
to the
Instrument 1 Port
on the Central Unit of the Visutron 900
Touch
next in line, using a cable, Bluetooth dongle, or internal
Bluetooth connection. Refer to Figure IS-28.
a. Refer to the
Connecting with Cables
section if connecting with a cable.
b. If connecting with Bluetooth dongles, refer to the
Connecting With Bluetooth Dongles
section of
this manual.
c. If connecting with internal Bluetooth, refer to the
Connecting With Internal Bluetooth
section of this
manual.
Note:
The Transfer port on the first Visutron 900
Touch
is the
data output
port, and the Instrument 1
port on the next Visutron 900
Touch
is the
data input
port.
6.
In the first Visutron 900
Touch
of the chain, for the
Transfer
port of the Port Settings panel, select
VRx Transfer
as the device, then tap
Apply.
7. In the second Visutron 900
Touch
in the chain, for the
Instrument 1
port of the Port Settings panel,
select
AutoPhor Receive
as the device then tap
Apply
. For the
Transfer
port of the Port Settings
panel, select
VRx Transfer
as the device, then tap
Apply
.
8. Continue this process until all exam rooms with Visutron 900
Touch
systems are connected.
Note:
The last Visutron 900
Touch
in the chain does not need to have the Transfer port configured,
only the Instrument 1 port. Under Instrument 1, the Transfer box does not need to be checked
off, only the Store box.
Note:
There is no limit to the number of Visutron 900
Touch
units that can be linked together.
22
16243-101 Rev. G
Содержание VISUTRON 900 Touch
Страница 1: ...VISUTRON 900 Touch User s Guide ...
Страница 85: ...Notes 85 16243 101 Rev G ...
Страница 86: ...Notes 86 16243 101 Rev G ...
Страница 87: ...Notes 87 16243 101 Rev G ...


