background image

-4-

g0679 stroke/Edge sander

MODEL G0679

STROKE/EDGE SANDER

8jhidbZgHZgk^XZ/*,%*)+".++(™IdDgYZg8Vaa/-%%*'("),,,™;Vm/-%%)(-"*.%&

MACHINE DATA 

SHEET

Product Dimensions:

LZ^\]i########################################################################################################################################################################### +%-aWh#
AZc\i]$L^Yi]$=Z^\]i####################################################################################################################################.-m),

*

¿

-

m+,

&

¿

'

;ddiEg^ciAZc\i]$L^Yi]########################################################################################################################################## +.

&

¿

)

m(&

Shipping Dimensions:

IneZ######################################################################################################################################################################## LddY8gViZ
8dciZci########################################################################################################################################################################## BVX]^cZ
LZ^\]i############################################################################################################################################################################ ,*+aWh#
AZc\i]$L^Yi]$=Z^\]i###################################################################################################################################-+

*

¿

-

m(+

&

¿

)

m'(

*

¿

-

Electrical:

Hl^iX]#################################################################################################################### BV\cZi^Xl^i]I]ZgbVaDkZgadVYEgdiZXi^dc
Hl^iX]KdaiV\Z################################################################################################################################################################### ''%K
8dgYAZc\i]##########################################################################################################################################################################+[i#
8dgY<Vj\Z#################################################################################################################################################################&)\Vj\Z
B^c^bjb8^gXj^iH^oZ######################################################################################################################################################(%Vbe
>cXajYZYEaj\######################################################################################################################################################################### Cd
GZXdbbZcYZYEaj\##########################################################################################################################################################A+"(%

Motor:

IneZ######################################################################################################################################### I:;88VeVX^idgHiVgi>cYjXi^dc
=dghZedlZg#########################################################################################################################################################################(=E
KdaiV\Z############################################################################################################################################################################### ''%K
EgZl^gZY############################################################################################################################################################################# ''%K
E]VhZ################################################################################################################################################################################H^c\aZ
6beh#################################################################################################################################################################################### &,6
HeZZY#########################################################################################################################################################################&,*%GEB
8nXaZ################################################################################################################################################################################# +%=o
CjbWZgD[HeZZYh###################################################################################################################################################################&
EdlZgIgVch[Zg########################################################################################################################################################9^gZXi9g^kZ
7ZVg^c\h######################################################################################################################### H]^ZaYZYVcYEZgbVcZcianAjWg^XViZY

Main Specifications:

Table Information

IVWaZL^Yi]################################################################################################################################################################# *.
IVWaZAZc\i]############################################################################################################################################################ '(

(

¿

)

IVWaZI]^X`cZhh############################################################################################################################################################ (
=dg^odciVaIVWaZIgVkZa############################################################################################################################################### &-
KZgi^XVaIVWaZ=Z^\]i6Y_jhibZci################################################################################################################################ '&
;addg"id"IVWaZ=Z^\]i##################################################################################################################################### '&

(

¿

-

¶)'

(

¿

)

Model G0679

Page 1 of 2

Machine Data Sheet

Содержание G0679

Страница 1: ...SANDER OWNER S Manual Copyright OCTOBER 2008 By Grizzly Industrial Inc Warning No portion of this manual may be reproduced in any shape Or form without the written approval of Grizzly Industrial inc J...

Страница 2: ...ERSONAL PROTECTIVE EQUIPMENT 4HE MANUFACTURER WILL NOT BE HELD LIABLE FOR INJURY OR PROPERTY DAMAGE FROM NEGLIGENCE IMPROPER TRAINING MACHINE MODIFICATIONS OR MISUSE 3OME DUST CREATED BY POWER SANDING...

Страница 3: ...22 Operation Safety 22 Basic Controls 22 Table Movement 23 Workstops 24 Stroke Edge Sander Conversion 25 Belt Replacement 27 Platen Press Movement 28 Basic Operations 28 SECTION 5 ACCESSORIES 29 SECT...

Страница 4: ...ndle with the other then applies pressure by pulling the platen press handle downward while sliding the handle back and forth along the entire length of the workpiece To sand the full width of the wor...

Страница 5: ...laten Press D Platen Press Handle E Belt Tension Handwheel F Idler Wheel Cover G Sanding Belt H Table I Adjustable Foot J Table Handle K Table Travel Lock L Table Elevation Handwheel M Work Stops N Du...

Страница 6: ...VY EgdiZXi dc Hl iX KdaiV Z K 8dgY AZc i i 8dgY Vj Z Vj Z B c bjb 8 gXj i H oZ Vbe cXajYZY Eaj Cd GZXdbbZcYZY Eaj A Motor IneZ I 8 8VeVX idg HiVgi cYjXi dc dghZedlZg E KdaiV Z K EgZl gZY K E VhZ H c a...

Страница 7: ...dc l i EVgi XaZ 7dVgY Ldg Hjg VXZ gVbZ 8dchigjXi dc HiZZa IjWZ EV ci EdlYZg 8dViZY Other Related Information CjbWZg d 9jhi Edgih 9jhi Edgi 9 VbZiZg Other Specifications HD VXidgn HD 8djcign D Dg c IV...

Страница 8: ...2EAD NSTRUCTION ANUAL EFORE PERATING THIS ACHINE 4HE PURPOSE OF SAFETY SYMBOLS IS TO ATTRACT YOUR ATTENTION TO POSSIBLE HAZARDOUS CONDITIONS 4HIS MANUAL USES A SERIES OF SYMBOLS AND SIGNAL WORDS INTE...

Страница 9: ...dch dg ajWg XVi c VcY X Vc c VXXZhhdg Zh 352 5 2 3 2 0 7 2 22 4 9 2 53 29 3AFETY NSTRUCTIONS FOR ACHINERY 2 6 534 93 72 3 BV Z V VW i d X ZX c dg Znh VcY VY_jhi c lgZcX Zh WZ dgZ ijgc c bVX cZgn 2 0 2...

Страница 10: ...TOR AND SAFETY GLASSES Always wear a respirator and safety glass es while operating the machine Dust and chips are created when sanding Some debris will be ejected becoming hazards to the eyes and lun...

Страница 11: ...machine near a power source If you must use an extension cord Use at least a 12 gauge cord that does not exceed 50 feet in length The extension cord must also have a ground wire and plug pin A qualifi...

Страница 12: ...lexible Dust Hoses 4 2 Hose Clamp 4 2 Items Needed for Setup Your machine was carefully packaged for safe transportation Remove the packaging materials from around your machine and inspect it If you d...

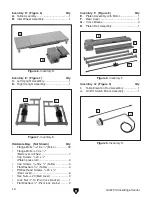
Страница 13: ...Tilt Lock Knobs 2 I Hex Wrenches 4 5 6 8mm 1 Ea Figure 3 Inventory A A B C D E G F H I Figure 4 Inventory B J K L M Figure 5 Inventory C N O P Q R S Inventory B Figure 4 Qty J Platen Press Assembly 1...

Страница 14: ...y with Motor 1 F Rear Cover 1 G Cross Braces 3 H Platen Rail Assembly 1 Inventory G Figure 9 Qty I Table Elevation Rod Assembly 1 J On Off Switch Boom Assembly 1 Hardware Bag Not Shown Qty Flange Bolt...

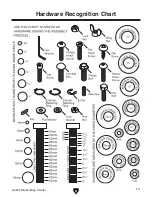
Страница 15: ...G0679 Stroke Edge Sander 13 Hardware Recognition Chart...

Страница 16: ...s 115 47 The unpainted surfaces are coated with a waxy oil to prevent corrosion during shipment Remove this protective coating with a solvent cleaner or degreaser such as shown in Figure 10 For thorou...

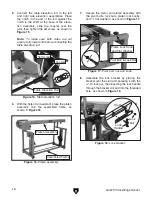
Страница 17: ...en the bolts Figure 12 Cross brace attachment 2 Connect a second cross brace in the same manner 4 Attach the third cross brace to the top loca tion of the uprights with 8 5 16 18 x 1 2 flange bolts as...

Страница 18: ...sembly onto the assembled frame as shown in Figure 16 7 Secure the motor and platen assembly with the pivot bolts lock nuts platen lock knobs and 1 2 flat washers as shown in Figure 17 Figure 15 Table...

Страница 19: ...cure the two together with 3 1 4 20 x 1 2 flange bolts and 3 1 4 20 hex nuts as shown in Figure 22 Close and latch the platen cover Figure 19 Lid latches Figure 20 Idler wheel assembly Figure 21 Idler...

Страница 20: ...e table over the table rails and secure it with the 4 5 16 18 x 3 4 cap screws and 5 16 flat washers Figure 25 16 Attach the rear cover to the left and right uprights with the 6 1 4 20 x 1 2 Phillips...

Страница 21: ...shaft then secure each by tightening the set screws and lock nuts Figure 29 18 Insert the platen press assembly and the platen press counterweight into the platen press slide then tighten the lock le...

Страница 22: ...into the platen assembly as shown in Figure 32 Figure 32 Belt tilt lever Belt Tilt Lever Once assembly is complete move your machine into position then level it Use a level to check from side to side...

Страница 23: ...w the Troubleshooting on Page 33 If you still cannot remedy a problem contact our Tech Support at 570 546 9663 for assistance To test run the machine 1 Make sure you have read the safety instruc tions...

Страница 24: ...onal injury Keep these items away from moving parts at all times to reduce this risk To reduce the risk of serious injury when using this machine read and understand this entire manual before beginnin...

Страница 25: ...wanted move ment during use Figure 36 Basic controls continued Table Travel Lock Belt Tension Handwheel Platen Press Handle Table Movement Handle Table Movement The table on the Model G0679 can be mov...

Страница 26: ...stops must be placed on the right side of the machine Table Workstop 1 Loosen the flange bolts that hold the work stop to the table Figure 39 If the workstop must be repositioned to the other side of...

Страница 27: ...s Stroke Edge Sander Conversion For maximum versatility the Model G0679 func tions both as a stroke sander and an edge sander Conversion from one to the other takes only a few minutes and requires rem...

Страница 28: ...lt the entire belt assembly Figure 43 9 Replace the belt tilt lock knobs into the edge sanding position Figure 44 10 Pull the table all the way forward lock it in place with the table travel locks the...

Страница 29: ...of a different grit is desired To replace the sanding belt 1 DISCONNECT SANDER FROM POWER 2 Use the belt tension handwheel to release tension from the belt 3 Open the belt cover drive wheel cover and...

Страница 30: ...roxi mately 1 4 1 2 below the surface of the sand ing belt 5 Turn the machine ON 6 Grasp the platen press handle and pull it downward to apply sanding pressure to the workpiece Move the platen press a...

Страница 31: ...ator T20516 Large Half Mask Respirator T20511 Pre Filter P100 T20539 Cartridge Filter 2PK P100 T20541 Cartridge Filter 2PK P100 O Vapor Wood and other types of dust can cause severe respiratory damage...

Страница 32: ...2754 4 Floor Dust Collection Attachment These attachments are indispensable for collect ing excess dust The rolling floor sweep is also a convenient way to keep the shop floor or work bench top clean...

Страница 33: ...urs Refill table elevation gearbox Schedule Cleaning the Model G0679 is relatively easy Vacuum sawdust and wipe off the remaining dust with a dry cloth If any resin has built up use a resin dissolving...

Страница 34: ...e complete cleaning of the chain raise and lower the table to expose the entire length of chain Dry the chain then spray on a chain lubricant Raise and lower the table several times to disperse the lu...

Страница 35: ...ge 38 4 Ensure circuit size is suitable for this machine replace weak breaker 5 Check for broken wires or disconnected corroded connections and repair replace as necessary 6 Replace faulty ON OFF swit...

Страница 36: ...n folded or smashed 1 Store sanding belt away from extreme ly dry hot or damp wet temperatures 2 Store sanding belt flat not folded or bent Sanding belt surface clogs quickly or burn 1 Too much pressu...

Страница 37: ...ov ing inward or outward relative to the table rod Rotate the shaft so that the bearing is snug against the table rod 3 Without rotating the shaft tighten the hex nuts 4 Repeat Steps 1 3 for the other...

Страница 38: ...ravels smoothly between the drive and idler wheels with out rubbing on the sides of the platen assembly Tools Needed Qty Safety Glasses 1 Pair Wrench 19mm 1 To adjust the sanding belt tracking 1 Open...

Страница 39: ...ate for this wear the wear pins can be adjusted Tools Needed Qty Wrench 14mm 1 To adjust the wear pins 1 DISCONNECT SANDER FROM POWER 2 Loosen the jam nut shown in Figure 62 3 Tighten the hex bolt unt...

Страница 40: ...NS All connections must be tight to prevent wires from loosen ing during machine operation Double check all wires disconnected or connected during any wiring task to ensure tight connections 5 MODIFIC...

Страница 41: ...CD I A A CD A D View this page in color at www grizzly com WARNING SHOCK HAZARD Disconnect power before working on wiring gdjcY gdjcY di di L6 30 PLUG as recommended 220 VAC H9 8dciVXidg B6 K GZ jaVi...

Страница 42: ...40 G0679 Stroke Edge Sander Main Breakdown SECTION 9 PARTS...

Страница 43: ...4 20 X 1 2 46 P0679046 SWITCH SUPPORT 15 PFB01 FLANGE BOLT 5 16 18 X 1 2 47 PSB04 CAP SCREW 1 4 20 X 1 2 16 PW01 FLAT WASHER 1 2 48 PS08 PHLP HD SCR 10 24 X 3 4 17 P0679017 HANDWHEEL 49 P0679049 MAGN...

Страница 44: ...42 G0679 Stroke Edge Sander Belt Idler Wheel Assembly Breakdown...

Страница 45: ...5 16 18 X 3 4 114 P0679114 DRIVING WHEEL 212 PCB05 CARRIAGE BOLT 5 16 18 X 3 4 115 P0679115 LEFT COVER BOARD 213 P0679213 FRONT BELT PLATE 116 P0679116 BELT PLATE 214 P0679214 UPPER ADJUSTABLE SET 11...

Страница 46: ...RING 6202ZZ 402 P0679402 WOOD BOARD SHORT 304 PR21M INT RETAINING RING 35MM 403 PFH12 FLAT HD SCR 1 4 20 X 1 305 P0679305 REAR BUSHING 404 P0679404 TABLE FRAME 306 P0679306 GEAR SPINDLE 405 PB09 TABLE...

Страница 47: ...G0679 Stroke Edge Sander 45 Right Upright Assembly Breakdown...

Страница 48: ...35 SPINDLE FIXING BOARD 512 PR25M INT RETAINING RING 47MM 536 P0679536 SPECIAL BOLT M5 8 X 20 513 P0679513 CHAIN WHEEL ADAPTER 537 PFN04M FLANGE NUT M5 8 514 P0679514 SPROCKET 538 P0679538 ADJUSTABLE...

Страница 49: ...G0679 Stroke Edge Sander 47 Left Upright Assembly Breakdown...

Страница 50: ...6 18 X 1 2 615 P0679615 HANDWHEEL 646 PB09 HEX BOLT 5 16 18 X 1 2 616 PN08 HEX NUT 3 8 16 647 P0679647 SUPPORT FOOT LEFT 617 P0679617 INDICATOR 648 P0679648 DUST COVER 618 PLW04 LOCK WASHER 3 8 649 P0...

Страница 51: ...3 16 18 X 3 8 716 P0679716 UPPER PRESS BRACKET 705 P0679705 LOWER PRESS BRACKET 801 PLN01 HEX NUT 3 8 16 706 PFB03 FLANGE BOLT 1 4 20 X 1 2 802 P0679802 SPACER 707 P0679707 PLATEN FOAM PAD 803 P067980...

Страница 52: ...n Contact Grizzly at 800 523 4777 or www grizzly com to order new labels REF PART DESCRIPTION REF PART DESCRIPTION 901 PLABEL 63A DISCONNECT POWER LABEL VS 906 P0679906 MODEL NUMBER LABEL 902 P0679902...

Страница 53: ...TT TTTT TTTT TTTT TTTT L Vi h ndjg V Z gdje4 TTTT TTTT TTTT TTTT TTTT TTTT dl adc VkZ ndj WZZc V lddYldg Zg bZiValdg Zg4 TTTT NZVgh TTTT NZVgh TTTT NZVgh TTTT NZVgh dl bVcn d ndjg bVX cZh dg iddah VgZ...

Страница 54: ...I HI6EA DA9 6ADC 9DII 9 A C DA9 6ADC 9DII 9 A C 2 9 5342 0 8 7 EaVXZ HiVbe ZgZ CVbZTTTTTTTTTTTTTTTTTTTTTTTTTTTTTTT HigZZiTTTTTTTTTTTTTTTTTTTTTTTTTTTTTTT 8 inTTTTTTTTTTTTTTHiViZTTTTTTO eTTTTTT HZcY V g...

Страница 55: ...h Vaa WZ ig ZY c i Z HiViZ d LVh c idc 8djcin d L ViXdb LZ h Vaa c cd ZkZci WZ a VWaZ dg YZVi c_jg Zh id eZghdch dg egdeZgin dg dg cX YZciVa Xdci c Zci heZX Va dg XdchZfjZci Va YVbV Zh Vg h c gdb i Z...

Страница 56: ...RECT AND 3AVE WITH RIZZLY n 4RUSTED 0ROVEN AND A REAT 6ALUE 2 s 3 52 2 2 s 2 23 3 00 7 4 523 s 2 30 3 7 4 52 6ISIT UR 7EBSITE 4ODAY ND ISCOVER 7HY RIZZLY S 4HE NDUSTRY EADER ALL 4ODAY OR 2 ULL OLOR AT...

Отзывы: