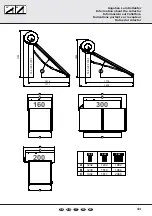
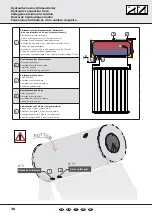
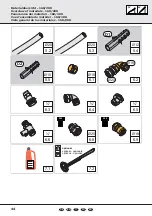
GREENoneTEC TSC160 Скачать руководство пользователя страница 32

32

30°

45°

Montagehinweise

Assembly instructions

Istruzioni di montaggio

Instructions de montage

Instrucciones de montaje

ES

3. Recomendaciones respecto al funcionamiento

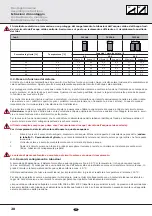
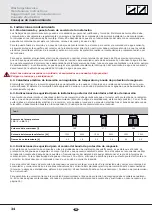
3.1. Protección frente a heladas

En zonas con riesgo de heladas es preciso proteger el sistema de termosifón de las heladas. Para ello puede montarse un calentador 

eléctrico de inmersión en el circuito de agua de consumo. El acumulador del sistema de termosifón ya se encuentra preparado de 

serie para su montaje. Se dispone asimismo de un calentador eléctrico de inmersión como juego de reequipamiento. El circuito solar 

se protege de la congelación mediante el uso de una mezcla de anticongelante y agua (véase también "Aclarado y llenado"). 

Los tubos de agua fría y caliente del circuito de agua de consumo no se protegen de la congelación mediante ca-

lentador eléctrico de inmersión. Es preciso disponer in situ del aislamiento correspondiente o de una calefacción 

auxiliar para los tubos. 
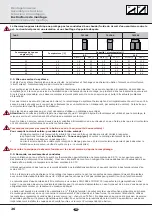
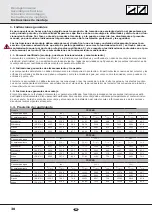
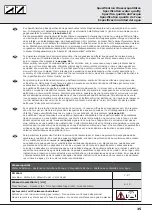
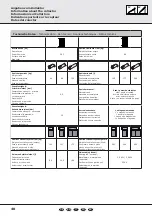
Tab.2

TSC160

TSC200

TSC300

160

200

300

Proporción porcentual 

de glicol [%]

Temperatura [°C]

Capacidad / circuito solar [l]

8,2

10,9

16,2

Glicol [l]

Agua [l]

Glicol [l]

Agua [l]

Glicol [l]

Agua [l]

23

-10

1,9

6,3

2,5

8,4

3,7

12,5

31

-15

2,5

5,7

3,4

7,5

5,0

11,2

37

-20

3,0

5,2

4,0

6,9

6,0

10,2

43

-25

3,5

4,7

4,7

6,2

7,0

9,2

48

-30

3,9

4,3

5,2

5,7

7,8

8,4

3.2. Puesta en funcionamiento del sistema

Se trata de un sistema de termosifón con dos circuitos. En combinación con el intercambiador de calor del acumulador, el colector 

conforma un circuito cerrado (circuito solar). Este circuito está completamente separado del circuito de agua de consumo.  

Para proteger los materiales de una carga térmica excesiva, el llenado y la puesta en funcionamiento de la instalación deben rea-

lizarse lo antes posible tras el montaje, a más tardar después de 4 semanas. Si esto no fuera posible, será necesario cambiar las 

MXQWDVSODQDVDQWHVGHODSXHVWDHQIXQFLRQDPLHQWRFRQHO¿QGHHYLWDUIXJDV

Por motivos de seguridad (peligro de quemaduras y escaldaduras) el llenado del sistema de termosifón debe realizarse exclusiva-

mente durante las horas sin radiación solar y con los colectores tapados (cubrir los colectores con un material no transparente, p. 

ej. cartón). De este modo se evita que el circuito solar se caliente durante la instalación.  

El uso de una mezcla de anticongelante y agua es necesario para el circuito solar, especialmente en las zonas con riesgo de hela-

da. 

Atención:

 El derecho de garantía requiere el uso obligatorio del anticongelante original del proveedor, así como la realización 

correcta del montaje, la puesta en funcionamiento y el mantenimiento.

Para la puesta en funcionamiento es preciso cerciorarse de que los tubos de alimentación para los tubos de agua fría y caliente, así 

como el circuito solar, se hayan conectado según el esquema hidráulico.

¡Comience por llenar siempre el acumulador de agua en primer lugar (circuito de agua de consumo)!

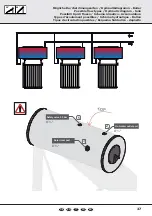
Al llenar el circuito solar debe respetarse la siguiente secuencia:

1. 

¡El concentrado de anticongelante debe mezclarse con agua antes del llenado! Para ello, observar la proporción 

GHODPH]FODHVSHFL¿FDGD

véase la tabla 2 - del contenido de glicol

) y verter lentamente en el


circuito solar para garantizar que el aire pueda salir.

2. 

El circuito solar debe llenarse por completo con la mezcla de glicol y agua 

3. 

Si el circuito solar no pudiera contener el volumen previsto, entonces será necesario comprobar si existen fallos 


en el sistema (p. ej. tubos de conexión doblados)

La válvula de seguridad del circuito solar suministrada no debe montarse hasta después del llenado.

3.3. Conexiones, uniones y tuberías

El sistema de termosifón puede alcanzar temperaturas de hasta 99 °C, en función de la aplicación, que pueden provocar lesiones 

(p. ej. escaldaduras). Por este motivo, es preciso conectar siempre a continuación de la salida de agua caliente un mezclador 

térmico adecuado que limite la temperatura del agua de consumo a un máximo de 60 °C.

8WLOLFHH[FOXVLYDPHQWHWXERV\DFFHVRULRVDGHFXDGRVSDUDLQVWDODFLRQHVVDQLWDULDV\TXHSXHGDQVRSRUWDUWHPSHUDWXUDVGHDOPH

nos 100 °C. Para minimizar la pérdida de calor y para proteger los tubos de las heladas se deben aislar los tubos de conexión con 

PDWHULDOUHVLVWHQWHDODUDGLDFLyQXOWUDYLROHWD&RQHO¿QGHJDUDQWL]DUXQIXQFLRQDPLHQWRFRUUHFWRDVHJ~UHVHGHTXHODVYiOYXODV

no estén aisladas.

Содержание TSC160

Страница 1: ...DE Handbuch EN I F E Manual Manuale Manuel Manual 30 45 160 200 300...

Страница 2: ......

Страница 3: ...lusso Schema idraulico Accumulatore 37 Collegamenti idraulici caldaia 38 Indicazioni per il Trasporto 39 Informazioni sul Collettore 40 Panoramica degli utensili 42 Panoramica dei materiali 160 200 43...

Страница 4: ...aison 30 45 300 56 Instruction pour le remplissage du thermosiphon 62 Points v rifier lors de la mise en service 69 Advertencias de seguridad 29 Instrucciones de montaje 30 Consejos de mantenimiento 3...

Страница 5: ...nsinken sichern z B durch Fu verbreiterungen dem Untergrund angepasste Leiterf e Einh nge vorrichtungen Falls keine personenunabh ngige Absturzsicherungen oder Auffangvorrichtungen vorhanden sind kann...

Страница 6: ...llektor oder Speicher darf weder an den Anschl ssen noch an den Schraubgewinden hochgehoben werden Vermeiden 6LH 6W H XQG PHFKDQLVFKH LQ VVH DXI GLH 6 VWHPNRPSRQHQWHQ LQVEHVRQGHUH DXI GDV 6RODUJODV GL...

Страница 7: ...EN1991 Mindestabstand jedoch 1 m montiert werden Vor allem bei Aufst n GHUXQJHQ GDUI GLH ROOHNWRUREHUNDQWH QLFKW EHU GHQ DFK UVW KLQDXVUDJHQ LH ROOHNWRUHQ G UIHQ QLFKW XQWHUKDOE HLQHV KHQ sprungs mon...

Страница 8: ...und ordnungsgem durchgef hrter Montage Inbetriebnahme und Wartung F r die Inbetriebnahme ist sicherzustellen dass die Versorgungsleitungen f r Kalt und Warmwasserleitungen sowie der Solar kreislauf g...

Страница 9: ...rahlung auf 4 Gew hrleistung und Haftung Gew hrleistungsanspruch besteht nur wenn bei Wareneingang bei ihnen nachweislich eine Kontrolle der Produkte erfolgt ist und uns offensichtliche M ngel unverz...

Страница 10: ...er regelm ig zu servicierenden Magnesiumopferanode ausgestattet 6 3 Sicherheitshinweise zum nachtr glichen Installieren des Elektroheizstabes F r das nachtr gliche Einbauen des Elektroheizstabes ist s...

Страница 11: ...re that ladders are put up safely Observe the correct leaning angle 68 75 Prevent ladders from sliding falling over or sinking into the ground e g using wider feet feet suited to the ground or hooking...

Страница 12: ...ions or screw threads Do not jolt the panel or allow the system components to be affected by mechanical factors This is particularly important for the solar glass the back of the panel the pipe connec...

Страница 13: ...r EN1991 but with a minimum gap of 1 m In particular in the case of elevated structures the top of a panel must not protrude above the roof ridge Panels must not be installed below a height transition...

Страница 14: ...the system has been used in conjunction with the supplier s original frost protection agents and if the system has been properly installed commissioned and maintained For commissioning you must make s...

Страница 15: ...sts only if An inspection is performed during your receiving of goods that reveals obvious defects which are immediately communicated to us 7KH LQVWDOODWLRQ FRPPLVVLRQLQJ DQG PDLQWHQDQFH RI WKH SURGXF...

Страница 16: ...D PDJQHVLXP VDFUL FLDO DQRGH ZKLFK PXVW EH VHUYLFHG RQ D UHJXODU EDVLV 6 3 Safety Instructions for Subsequent Installation of the Electric Immersion Heater For subsequent installation of the electric...

Страница 17: ...e scale da appoggio dal pericolo di scivolamento di caduta e di affossamento ad es ingrandendone i piedi adottando piedi idonei alla VXSHU FLH G DSSRJJLR XVDQGR GLVSRVLWLYL GL DJJDQ cio Qualora non es...

Страница 18: ...vere ecc 1RQ VROOHYDUH LO FROOHWWRUH R O DFFXPXODWRUH GDL FROOHJDPHQWL Qp GDOOH OHWWDWXUH YLWDUH GL VRWWRSRUUH L FRPSRQHQWL GHO VLVWHPD DG XUWL R LQ XVVL PHFFDQLFL LQ SDUWLFRODUH VXO YHWUR VRODUH VXO...

Страница 19: ...a di 1 m Il bordo superiore del collettore non deve sporgere oltre il colmo soprattutto in caso di montaggio VX VXSSRUWL HVVLELOL 1RQ PRQWDUH L FROOHWWRUL VX XQ OLYHOOR SL EDVVR ULVSHWWR DG XQ ULDO R...

Страница 20: ...la messa in servi zio e la manutenzione siano stati svolti correttamente Per la messa in funzione assicurarsi che le condutture di alimentazione delle tubazioni dell acqua fredda e dell acqua calda e...

Страница 21: ...soltanto se Al momento dell ingresso della merce presso la vostra azienda stato eseguito in modo dimostrabile un controllo dei prodotti e ci sono stati comunicati immediatamente difetti evidenti Il mo...

Страница 22: ...WHUPRVLIRQH q GRWDWR GL VHULH GL XQ DQRGR VDFUL FDOH DO PDJQHVLR FKH YD VRWWRSRVWR D UHJRODUH PDQXWHQ LRQH 6 3 Avvertenze di sicurezza per l installazione successiva di un riscaldatore elettrico a im...

Страница 23: ...iser l chelle pos e contre le mur de mani re ce qu elle ne puisse glisser tom ber ou s enfoncer dans le sol p ex en renfor ant les pieds d chelle en adaptant les pieds au sol ou l aide de dispositifs...

Страница 24: ...DOL p 7RXWHV OHV H SOLFDWLRQV GH OD SUpVHQWH QRWLFH V DGUHVVHQW H FOXVL YHPHQW j FH SHUVRQQHO TXDOL p Q SULQFLSH LO FRQYLHQW G XWLOLVHU OH PDWpULHO IRXUQL SRXU OH PRQWDJH YDQW OH PRQWDJH HW O H SORL t...

Страница 25: ...X GHVVXV 6L SRXU FHWWH UDLVRQ GHV JULOOHV j QHLJH GRLYHQW rWUH PRQWpHV VXU OD SDUWLH VXSpULHXUH GX WRLW LO FRQYLHQW GH YpUL HU OD VWDWLTXH GH ce toit 2 4 Remarque concernant le montage sur toit plat L...

Страница 26: ...emplir le ballon avec de l eau circuit d eau sanitaire Pour remplir le circuit solaire proc dez dans l ordre suivant 1 L antigel concentr doit toujours tre dilu l eau avant d tre vers dans le circuit...

Страница 27: ...FKDXIIDJLVWH RX SORPELHU HQ WHQDQW FRPSWH GHV SUHVFULSWLRQV JXUDQW GDQV OHV LQVWUXFWLRQV GH PRQWDJH HW HQ VH conformant aux normes directives en vigueur l antigel prescrit est utilis dans le bon dosag...

Страница 28: ...GRLW IDLUH O REMHW G XQ HQWUH tien p riodique 6 3 Consignes de s curit concernant l installation ult rieure du thermoplongeur lectrique Avant toute installation ult rieure d un thermoplongeur lectriq...

Страница 29: ...de mano contra posibles desliz amientos ca das escurrimientos y hundimientos p ej ampliando el pie de la escalera con pies gu a adecuados para el suelo o dispositivos de suspen si n Si no dispone de...

Страница 30: ...lvo etc El colector o acumulador no debe elevarse por las conexiones ni por las roscas de tornillo Evite los golpes y los efectos mec ni cos en los componentes del sistema especialmente en el vidrio s...

Страница 31: ...DGD SRU UHMLOODV JXDUGDQLHYH R SRU situaciones de montaje especiales no debe alcanzar los colectores Para que el colector no act e como guardanieves es preciso PRQWDU JXDUGDQLHYHV D XQD GLVWDQFLD GH P...

Страница 32: ...horas sin radiaci n solar y con los colectores tapados cubrir los colectores con un material no transparente p ej cart n De este modo se evita que el circuito solar se caliente durante la instalaci n...

Страница 33: ...colector Esta condensaci n sin embargo se disuelve tras varias horas de irradiaci n solar 4 Garant a y responsabilidad Se conservar el derecho de garant a nicamente si Al recibir la mercanc a lleva a...

Страница 34: ...WHUPRVLIyQ HVWi HTXLSDGR GH VHULH FRQ XQ iQRGR GH SURWHFFLyQ GH PDJQHVLR TXH GHEH VRPHWHUVH D mantenimiento regular 6 3 Indicaciones de seguridad para la instalaci n posterior del calentador el ctric...

Страница 35: ...O DFTXD 8Q ULHSLORJR GHL SDUDPHW ri critici dell acqua e dei valori limite consigliati contenuto nel capitolo Valori di riferimento per la qualit dell acqua delle presenti istruzioni FR 3RXU JDUDQWLU...

Страница 36: ...eductions valve max 10 bar Valvola di riduzione della pressione max 10 bar Valvula reductora de presion max 10 bar V lvula reductora de presi n m x 10 bar 6 Kombinierter R ckschlag Sicherheitsventil 1...

Страница 37: ...er 3RVVLEOH RZ W SHV GUDXOLF GLDJUDP WDQN 3RVVLELOL WLSL GL XVVR 6FKHPD LGUDXOLFR FFXPXODWRUH Types d coulement possibles Sch ma hydraulique Ballon Tipos de circulaci n posibles Esquema hidr ulico dep...

Страница 38: ...a calda Sortie eau chaude Puerto de salida del agua caliente 3 Einlassanschluss Solar Solar inlet port Raccordo di entrata solare Raccordement de sortie solaire Puerto de entrada solar 4 Auslassanschl...

Страница 39: ...39 30 45 Transporthinweis Transport note Indicazioni per il Trasporto Indications pour le transport Indicaciones para el Transporte DE EN IT FR ES...

Страница 40: ...powder coated Acciaio verniciato a polvere Acier peinture laqu e Acero con recubrimiento de polvo Druckfestigkeit Sekund rkreislauf bar Compressive strength secondary Resistenza alla pressione circuit...

Страница 41: ...lector Informazioni sul Collettore Indications portant sur le capteur Datos del colector DE EN IT FR ES 160 200 300 A 1232 1232 1982 1459 1978 1779 1711 1518 1795 45 30 C 1302 1611 2486 B 1230 1518 19...

Страница 42: ...to DE Hei e Oberfl che GB Hot surface IT Superficie calda FR surface chaude ES Superficie caliente DE Gleicher Abstand GB Equally spaced IT Distanza uguale FR Distance identique ES La misma distancia...

Страница 43: ...li 160 200 Vue d ensemble du mat riel 160 200 Vista general de los materiales 160 200 DE EN IT FR ES 1 1 1 3 3 1 M10 3 1 M8 2 4 8x40 1 6 40 45 L 1313 mm 1 7 40 L 1016 mm 30 1 8 L 1795 mm 1 9 2 2 8x60...

Страница 44: ...essit consultare un medico e mostrare l ettichetta Safety advices Consigli per la sicurezza Sicherheitsratschl ge Enth lt Propylenglykol nicht gesundheitssch dlich Darf nicht in die H nde von Kindern...

Страница 45: ...45 30 45 Wiederkehrender Hinweis Recurring note Nota ricorrente Remarque r currente Indicaci n recurrente 1190 595 15 1630 30 1332 45 1942 971 1630 30 1332 45 15 30 45 160l 200l 300l 45 30 B1 B2...

Страница 46: ...4 2 4 2 4 2 2 1 1 3 2a 2a DE EN IT FR ES Flachdachmontage 30 45 angehoben 160 200 Flat roof mounting 30 45 elevation 160 200 Montaggio su tetti piani inclinato a 30 45 160 200 Montage sur toit plat in...

Страница 47: ...3 4 13 4a 4b 2 3 4 1 3 1 3 1 4a 4b 4 1 2 3 3 1 3 1 3x 1 6 1 7 45 30 Flachdachmontage 30 45 angehoben 160 200 Flat roof mounting 30 45 elevation 160 200 Montaggio su tetti piani inclinato a 30 45 160 2...

Страница 48: ...ion 160 200 Montaggio su tetti piani inclinato a 30 45 160 200 Montage sur toit plat inclinaison 30 45 160 200 Montaje en tejados planos inclinado 30 45 160 200 DE EN IT FR ES 5 13 5a 5b 30 45 2 4 3 1...

Страница 49: ...Flat roof mounting 30 45 elevation 160 200 Montaggio su tetti piani inclinato a 30 45 160 200 Montage sur toit plat inclinaison 30 45 160 200 Montaje en tejados planos inclinado 30 45 160 200 DE EN I...

Страница 50: ...roof mounting 30 45 elevation 160 200 Montaggio su tetti piani inclinato a 30 45 160 200 Montage sur toit plat inclinaison 30 45 160 200 Montaje en tejados planos inclinado 30 45 160 200 DE EN IT FR...

Страница 51: ...45 elevation 160 200 Montaggio su tetti piani inclinato a 30 45 160 200 Montage sur toit plat inclinaison 30 45 160 200 Montaje en tejados planos inclinado 30 45 160 200 DE EN IT FR ES 11 11b 11a 9b 9...

Страница 52: ...00 Flat roof mounting 30 45 elevation 160 200 Montaggio su tetti piani inclinato a 30 45 160 200 Montage sur toit plat inclinaison 30 45 160 200 Montaje en tejados planos inclinado 30 45 160 200 DE EN...

Страница 53: ...n 160 200 Flat roof mounting 30 45 elevation 160 200 Montaggio su tetti piani inclinato a 30 45 160 200 Montage sur toit plat inclinaison 30 45 160 200 Montaje en tejados planos inclinado 30 45 160 20...

Страница 54: ...00 Vue d ensemble du mat riel 300 Vista general de los materiales 300 1 1 1 11 L 1795 mm 1 13 2 2 8x60 D2 3 1 M10 2 1 M10 D1 1 6 L 940 mm 30 1 5 L 1277 mm 45 1 2 1 4 1 3 1 7 40 45 L 1509 mm 1 8 40 L 1...

Страница 55: ...ichetta Safety advices Consigli per la sicurezza Sicherheitsratschl ge Enth lt Propylenglykol nicht gesundheitssch dlich Darf nicht in die H nde von Kindern gelangen Ber hrung mit den Augen und der Ha...

Страница 56: ...lat roof mounting 30 45 elevation 300 Montaggio su tetti piani inclinato a 30 45 300 Montage sur toit plat inclinaison 30 45 300 Montaje en tejados planos inclinado 30 45 300 DE EN IT FR ES 1 46 10 12...

Страница 57: ...ggio su tetti piani inclinato a 30 45 300 Montage sur toit plat inclinaison 30 45 300 Montaje en tejados planos inclinado 30 45 300 DE EN IT FR ES 3 13 3b 160l 1090 mm 200l 1090 mm 300l 1840 mm 3a 3b...

Страница 58: ...aggio su tetti piani inclinato a 30 45 300 Montage sur toit plat inclinaison 30 45 300 Montaje en tejados planos inclinado 30 45 300 DE EN IT FR ES 5 13 5a 5b 2 4 3 1 4 1 1 8 5a 30 45 3 1 5b 4 1 2 4 1...

Страница 59: ...45 elevation 300 Montaggio su tetti piani inclinato a 30 45 300 Montage sur toit plat inclinaison 30 45 300 Montaje en tejados planos inclinado 30 45 300 DE EN IT FR ES 7 7a 7b 1 9 1 10 2 3 7b 3 1 4 1...

Страница 60: ...c 2 4 3 1 1 13 4 1 9d 9e 9f 9a 6 7 6 7 Flachdachmontage 30 45 angehoben 300 Flat roof mounting 30 45 elevation 300 Montaggio su tetti piani inclinato a 30 45 300 Montage sur toit plat inclinaison 30 4...

Страница 61: ...10a 10b 51 53 11 7 13 19 25 31 Flachdachmontage 30 45 angehoben 300 Flat roof mounting 30 45 elevation 300 Montaggio su tetti piani inclinato a 30 45 300 Montage sur toit plat inclinaison 30 45 300 M...

Страница 62: ...aso de ingesti n enjuagar la boca y beber abundante de agua Si es necesario consultar a un m dico y mostrar esta etiqueta Conseils de s curit Consejos de seguridad NE PAS DILUER NO DILUIR 692100xxx 0...

Страница 63: ...buch verwendet 2 2 Liegt der maximale Betriebsdruck bei 4 bar 2 3 Bei einem Kaltwasserdruck in der Hauptleitung von mehr als 4 bar Haben Sie einen Druckminderer installiert 2 4 Haben Sie die statische...

Страница 64: ...en Sie das Thermosiphonsystem gem dem Handbuch montiert 2 17 Haben Sie das Montagesystem auf erkennbare Sch den berpr ft 2 18 Wurden alle Anschl sse korrekt hergestellt sind die Schrauben festgezogen...

Страница 65: ...2 1 Did you use the provided manual 2 2 Maximum operation pressure is 4 bar 2 3 If the pressure of the cold water in the main is more than 4 bar do you have installed a pressure reducer 2 4 Did you no...

Страница 66: ...cal heater 2 16 Did you mount the thermosiphon system accordingly the manual 2 17 Do you checked the mounting system for visible damage 2 18 Are all connections done correctly screws are tighten etc 2...

Страница 67: ...massima di 4 bar 2 3 Se la pressione dell acqua fredda nel corpo principale superiore a 4 bar si installato un riduttore di pressione 2 4 Ci si attenuti alle prescrizioni in fatto di statica 2 5 3HU H...

Страница 68: ...ifone seguendo il manuale 2 17 6L q YHUL FDWR FKH LO VLVWHPD GL VXSSRUWR QRQ PRVWUL VHJQL GL GDQQHJJLDPHQWR 2 18 Tutte le connessioni sono state effettuate correttamente le viti sono ben strette ecc 2...

Страница 69: ...rni 2 2 La pression de travail maximale est elle de 4 bar 2 3 Si la pression de l eau froide du circuit d alimentation est sup rieure 4 bar avez vous install un r ducteur de pression 2 4 Avez vous pri...

Страница 70: ...6 Avez vous mont le syst me de thermosiphon selon le manuel 2 17 YH YRXV YpUL p TX LO Q D SDV GH GRPPDJH YLVLEOH VXU OH V VWqPH GH PRQWDJH 2 18 Tous les raccordements ont ils bien t effectu s correcte...

Страница 71: ...xima de funcionamiento es de 4 bar 2 3 En caso de que la presi n del agua fr a del conducto principal sea superior a 4 bar ha instalado un reductor de presi n 2 4 Tom nota de los datos relativos a la...

Страница 72: ...nformidad con el manual 2 17 RPSUREy TXH HO VLVWHPD GH MDFLyQ QR WXYLHVH GDxRV YLVLEOHV 2 18 Se han ejecutado todas las conexiones de forma adecuada tornillos bien apretados etc 2 19 Se ha ejecutado l...

Страница 73: ...73 30 45 DE EN IT FR ES Notizen Notice Appunti Notes Notas...

Страница 74: ...74 30 45 DE EN IT FR ES Notizen Notice Appunti Notes Notas...

Страница 75: ......

Страница 76: ......

Отзывы: