


13-18
Step 3: Print design data.
After creating the design data, print it on the media and prepare the media to be cut.
Supplement
Pay attention to the following when printing to prevent registration mark scan from failing when cutting.
•
Set the enlarge/shrink scale to 100%.
•
Set the printing position (center/lower left etc.) so that the positional relationship between the created document and the printed
result is the same.
See "13.1 Basic operation of printing and cutting" to print design with standard bar code for printing and cutting.
Step 4: Save cutting data in USB memory.
Create an XPF file (file dedicated to saving USB memory) and save it to USB memory.
When you save cutting data and bar code information in this XPF file, the cutting plotter will be able to find the
correct cutting data.
Operation
4-
1 Insert a USB memory into the computer.
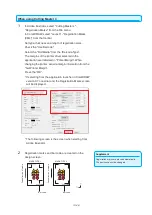
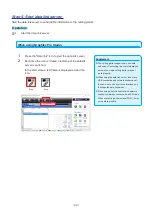
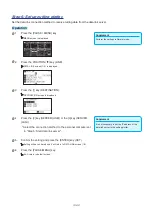
When using Graphtec Pro Studio
1
Click on the "Cut Contour" icon.
Supplement
When the "Cut Contour" screen is displayed
for the first time, the "Add Device" screen is
displayed. Follow the instructions on the screen
to select the model name to use.
•
For USB connection, select the "Graphtec
USB".
•
For network connection, select the "TCP/IP"
and then enter the IP address of the cutting
plotter.
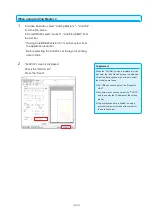
2
The "Cut Contour" screen is displayed.
Press the "Save to file".
Содержание CE7000 Series
Страница 1: ...CE7000 SERIES CUTTING PLOTTER USER S MANUAL MANUAL NO CE7000 UM 151 ...
Страница 2: ......
Страница 18: ......
Страница 104: ......
Страница 118: ......
Страница 168: ......
Страница 220: ......
Страница 232: ......
Страница 254: ......
Страница 284: ...13 30 3 Switch to Cutting Master4 Confirm that the sent file is held in the Hold item Windows Mac ...
Страница 290: ......
Страница 328: ......
Страница 339: ...A 11 3 PAUSE MENU Continued MENU screen AREA PARAMETERS 1 2 AREA PARAMETERS 2 2 Default screen Continued 1 2 3 1 2 ...
Страница 340: ...A 12 1 2 3 4 1 3 MEDIA SETTING 2 2 4 PAUSE MENU Continued MENU screen MEDIA SETTING 1 2 Default screen Continued ...
Страница 343: ...A 15 PAUSE MENU Continued MENU screen TEST 1 2 TEST 2 2 Default screen Continued 2 3 1 1 4 ...
Страница 344: ...A 16 2 3 1 2 3 1 PAUSE MENU MENU screen DATA LINK 1 2 DATA LINK 2 2 Default screen Continued Default screen Finish ...
Страница 348: ......
Страница 352: ......
Страница 354: ......


