5-17
4
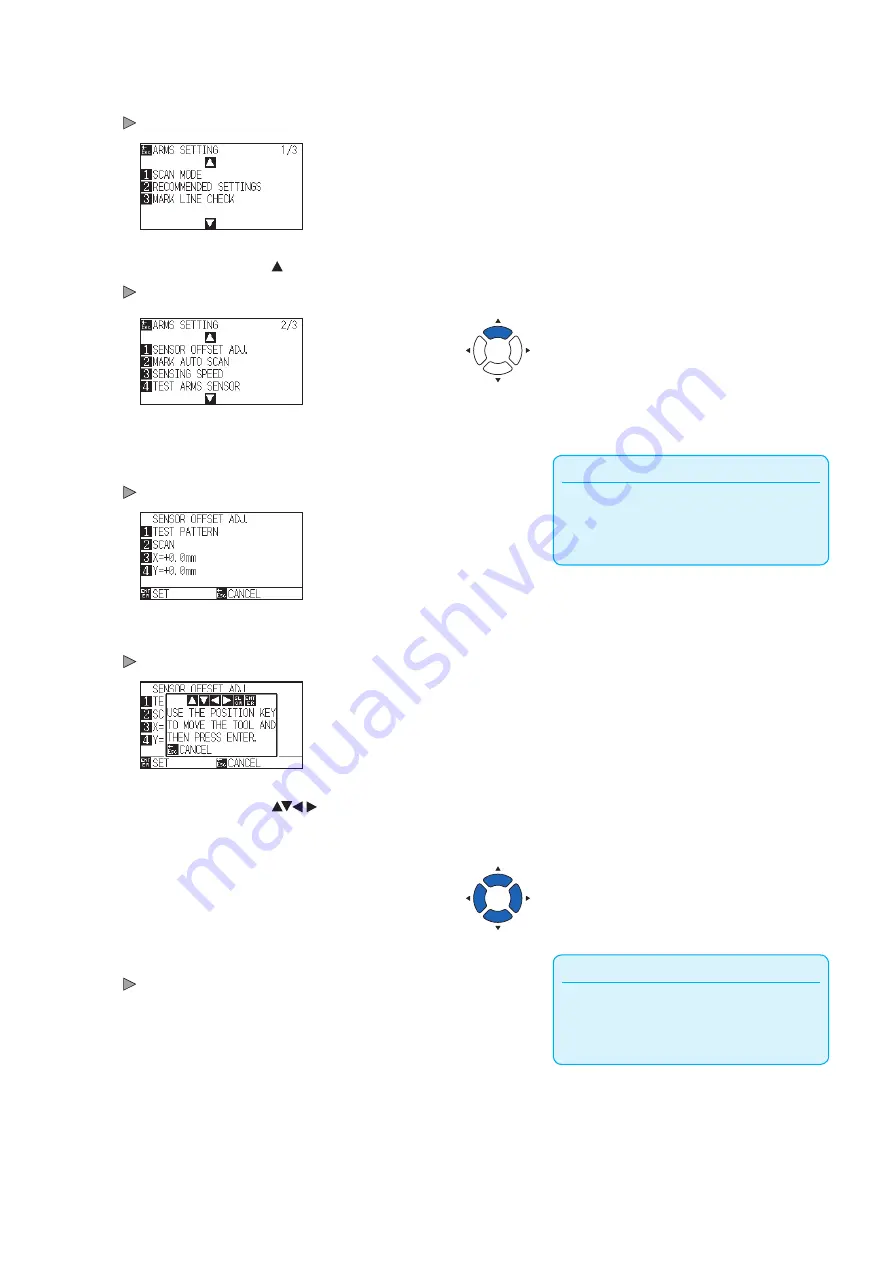
Press the [2] key (ARMS).
ARMS SETTING screen (1/3) is displayed.
5
Press the POSITION ( ) key.
ARMS SETTING screen (2/3) is displayed.
Reference
It will return to ARMS SETTING screen (2/3)
without changing the settings when you press
the [ESC] key (CANCEL).
6
Press the [1] key (SENSOR OFFSET ADJ.).
SENSOR OFFSET ADJ. screen is displayed.
7
Press the [1] key (TEST PATTERN).
Following message is displayed.
8
Press the POSITION (
) keys and move the tool
carriage to the position to plot the registration mark (position
nothing is printed).
Reference
It will return to SENSOR OFFSET ADJ. screen
without plotting by pressing the [ESC] key
(CANCEL).
9
Press the [ENTER] key.
A adjustment registration mark is created, and then it will return to
SENSOR OFFSET ADJ. screen.
Содержание CE7000 Series
Страница 1: ...CE7000 SERIES CUTTING PLOTTER USER S MANUAL MANUAL NO CE7000 UM 151 ...
Страница 2: ......
Страница 18: ......
Страница 104: ......
Страница 118: ......
Страница 168: ......
Страница 220: ......
Страница 232: ......
Страница 254: ......
Страница 284: ...13 30 3 Switch to Cutting Master4 Confirm that the sent file is held in the Hold item Windows Mac ...
Страница 290: ......
Страница 328: ......
Страница 339: ...A 11 3 PAUSE MENU Continued MENU screen AREA PARAMETERS 1 2 AREA PARAMETERS 2 2 Default screen Continued 1 2 3 1 2 ...
Страница 340: ...A 12 1 2 3 4 1 3 MEDIA SETTING 2 2 4 PAUSE MENU Continued MENU screen MEDIA SETTING 1 2 Default screen Continued ...
Страница 343: ...A 15 PAUSE MENU Continued MENU screen TEST 1 2 TEST 2 2 Default screen Continued 2 3 1 1 4 ...
Страница 344: ...A 16 2 3 1 2 3 1 PAUSE MENU MENU screen DATA LINK 1 2 DATA LINK 2 2 Default screen Continued Default screen Finish ...
Страница 348: ......
Страница 352: ......
Страница 354: ......


