


13-12
Step 2: Create design data for printing and cutting.
Design the drawing pattern that you want to print and the countour to be cut.
Operation
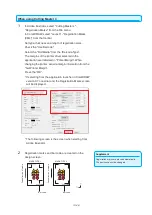
2-
1 Create print design for printing and cutting.
For cutting data, specify a color that is not used in print data.
Fe
ed d
ire
ct
io
n o
f m
ed
ia
Fe
ed d
ire
ct
io
n o
f m
ed
ia
MARK TYPE 1
MARK TYPE 2
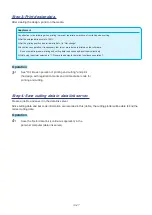
2-
2 Create cut design for printing and cutting.
It is recommended that cutting data be created by specifying
a color that is not used in print data.
Fe
ed d
ire
ct
io
n o
f m
ed
ia
Fe
ed d
ire
ct
io
n o
f m
ed
ia
MARK TYPE 1
MARK TYPE 2
Cutting data
Step 3: Print design data.
After creating the design, print it on the media.
Supplement
Pay attention to the following when printing to prevent registration mark scan from failing when cutting.
•
Set the enlarge/shrink scale to 100%.
•
Set the printing position (center/lower left etc.) to "Not change".
Operation
3-
1 Select the printer to use from the Print menu of Graphtec
Studio and print the created data.
Содержание CE7000 Series
Страница 1: ...CE7000 SERIES CUTTING PLOTTER USER S MANUAL MANUAL NO CE7000 UM 151 ...
Страница 2: ......
Страница 18: ......
Страница 104: ......
Страница 118: ......
Страница 168: ......
Страница 220: ......
Страница 232: ......
Страница 254: ......
Страница 284: ...13 30 3 Switch to Cutting Master4 Confirm that the sent file is held in the Hold item Windows Mac ...
Страница 290: ......
Страница 328: ......
Страница 339: ...A 11 3 PAUSE MENU Continued MENU screen AREA PARAMETERS 1 2 AREA PARAMETERS 2 2 Default screen Continued 1 2 3 1 2 ...
Страница 340: ...A 12 1 2 3 4 1 3 MEDIA SETTING 2 2 4 PAUSE MENU Continued MENU screen MEDIA SETTING 1 2 Default screen Continued ...
Страница 343: ...A 15 PAUSE MENU Continued MENU screen TEST 1 2 TEST 2 2 Default screen Continued 2 3 1 1 4 ...
Страница 344: ...A 16 2 3 1 2 3 1 PAUSE MENU MENU screen DATA LINK 1 2 DATA LINK 2 2 Default screen Continued Default screen Finish ...
Страница 348: ......
Страница 352: ......
Страница 354: ......


