background image

S

AFETY


P

RECAUTIONS


Do


not


operate


your


stove


if


you


smell


smoke


coming


from


it.


Turn


it


off,


monitor


it,


and


call


your


dealer.


Never


try


to


repair


or


replace


any


part


of


the


stove


unless


instructions


are


provided.


A


trained


technician


should


do


all


other


work.


Never


use


gasoline,


gasoline

type


lantern


fuel,


kerosene,


charcoal


lighter


fluid,


or


similar


liquids


to


start


or


“freshen


up”


a


fire


in


this


stove.


Keep


all


such


liquids


well


away


from


the


stove


while


in


use.


Do


not


throw


this


manual


away.


This


manual


has


important


operating


and


maintenance


instructions


that


you


will


need


at


a


later


time.


Always


follow


the


instructions


in


this


manual.


Read


the


manual


thoroughly.


Never


block


free


airflow


through


the


open


vents


of


the


stove.


Do


not


place


clothing


or


other


flammable


items


on


or


near


the


stove.


Keep


foreign


objects


out


of


the


hopper.


Be


sure


that


when


you


add


fuel


to


the


hopper,


the


pellets


or


corn


that


you


are


using


is


free


of


foreign


material.


The


viewing


door


must


be


closed


and


latched


during


normal


operation.


The


stove


will


not


operate


during


a


power


outage.


If


an


outage


does


occur,


keep


the


stove


door


closed,


and


open


a


window


if


any


smoke


spills


into


the


room.


Adequate


vertical


vent


pipe


on


the


exhaust


will


prevent


smoke


from


entering


the


home.


Do


not


operate


the


stove


if


the


flame


becomes


dark


and


sooty


or


if


the


burn


pot


overfills


with


fuel.


Turn


the


stove


off,


inspect


it,


and


call


your


dealer


or


a


qualified,


trained


technician.


Disconnect


the


power


cord


before


performing


any


maintenance


or


repairs


on


the


stove.


NOTE:


Turning


the


stove


“off”


does


not


disconnect


all


power


from


the


stove.


CAUTION:


Hot


while


in


operation.


Keep


children,


clothing,


and


furniture


away.


Contact


may


cause


skin


burns.


Educate


all


children


of


the


danger


of


a


high


temperature


stove.


Young


children


should


be


supervised


when


they


are


in


the


same


room


as


the


stove.


DO


NOT


open


the


viewing


door


during


the


start


up


period.


If


the


stove


is


installed


in


a


room


without


air


conditioning,


or


in


an


area


where


direct


sunlight


can


shine


on


the


unit,


it


is


possible


this


can


cause


the


temperature


of


the


stove


to


rise


to


operational


levels;


one


of


the


sensors


could


then


make


the


stove


start


on


its


own.


It


is


recommended


that


the


stove


be


unplugged


when


not


in


use


for


extended


amounts


of


time


(i.e.


during


the


summer


months).


Do


not


unplug


the


stove


if


you


suspect


a


malfunction.


Turn


the


stove


off,


inspect


it,


and


call


your


dealer


or


qualified,


trained


technician.


Do


not


use


an


adapter


plug


or


sever


the


grounding


plug.


Do


not


use


a


GFCI


plug


or


circuit.


Do


not


route


the


electrical


cord


underneath,


in


front


of,


or


over


the


stove.


Contact


your


local


building


officials


to


obtain


a


permit


and


information


on


any


installation


restrictions


or


inspection


requirements


in


your


area.


Notify


your


insurance


company


of


this


stove


as


well.


The


exhaust


system


must


be


completely


airtight


and


properly


installed.


The


exhaust


vent


joints


must


be


sealed


with


RTV


500°F


(260°C)


silicone


sealant,


and


with


UL

181

AP


foil


tape.


This


unit


must


be


properly


installed


to


prevent


the


possibility


of


a


house


fire.


The


instructions


must


be


strictly


adhered


to.


Do


not


use


makeshift


methods


or


compromise


in


the


installation.


Allow


the


stove


to


cool


before


carrying


out


any


maintenance


or


cleaning.


Ashes


must


be


disposed


in


a


metal


container


with


a


tight


lid


and


placed


on


a


non

combustible


surface


well


away


from


the


home


structure.


Your


stove


requires


periodic


maintenance


and


cleaning.


Failure


to


maintain


your


stove


may


lead


to


smoke


spillage


in


your


home,


or


even


a


more


dangerous


situation.


Refer


to


the


MAINTENANCE


SECTION


of


this


manual


or


our


website


for


specific


maintenance


instructions.


This


stove


is


designed


and


approved


for


pelletized


wood


fuel


and


corn


only.


Any


other


type


of


fuel


burned


in


this


heater


will


void


the


warranty


and


safety


listing,


and


may


result


in


a


hazardous


condition.


This


stove


must


be


connected


to


a


standard


3


prong


120


V.,


60


Hz


grounded


electrical


outlet.


When


installed


in


a


mobile


home,


the


stove


must


be


bolted


to


the


floor,


have


outside


air


connected


(see


page


3),


and


NOT


BE


INSTALLED


IN


A


BEDROOM


(Per


H.U.D.


requirements).


The


integrity


of


the


floor


and


ceiling


must


be


maintained.


Check


with


local


building


officials.


The


exhaust


system


should


be


checked


regularly.


It


is


recommended


that


the


exhaust


system


be


inspected


once


a


month,


or


for


every


ton


of


pellets


burned.


At


a


minimum,


even


if


burning


less


than


a


ton


per


year,


the


exhaust


should


be


checked


twice


a


burning


season.


Golden


Eagle


Stoves


grants


no


warranty,


implied


or


stated,


for


the


installation


or


maintenance


of


your


stove,


and


assumes


no


responsibility


of


any


consequential


damage(s).


Содержание MONROE

Страница 1: ...R APPLIANCE IS NOT PROPERLY INSTALLED A HOUSE FIRE MAY RESULT FOR YOUR SAFETY FOLLOW THE INSTALLATION DIRECTIONS CONTACT LOCAL BUILDING OR FIRE OFFICIALS ABOUT RESTRICTIONS AND INSTALLATION INSPECTION REQUIREMENTS IN YOUR AREA PLEASE READ THIS ENTIRE MANUAL BEFORE INSTALLATION AND USE OF THIS PELLET FUEL BURNING ROOM HEATER FAILURE TO FOLLOW THESE INSTRUCTIONS COULD RESULT IN PROPERTY DAMAGE BODIL...

Страница 2: ... 9 Clearances 9 Floor Protection 9 Combustion Air Supply 10 Electrical Installation 10 Special Mobile Home Requirements 11 Example Installations 12 OPERATION 16 Button Controls 16 Proper Fuel 18 Pre Start Up Check 18 Building a Fire 19 Damper Control 19 Optional Thermostat 22 Operating Safety Precautions 23 MAINTENANCE 24 Ash Removal 24 Cleaning 26 Blowers 27 Chimney Cleaning 28 TROUBLESHOOTING GU...

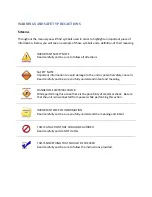
Страница 3: ...unit or potential safety concern Read carefully and be sure you fully understand intent and meaning DANGER OF ELECTRICAL SHOCK While performing this action there is the possibility of electrical shock Be sure that the unit is disconnected from power while performing this action IMPORTANT PIECE OF INFORMATION Read carefully and be sure you fully understand the meaning and intent THIS IS AN ACTION T...

Страница 4: ...be unplugged when not in use for extended amounts of time i e during the summer months Do not unplug the stove if you suspect a malfunction Turn the stove off inspect it and call your dealer or qualified trained technician Do not use an adapter plug or sever the grounding plug Do not use a GFCI plug or circuit Do not route the electrical cord underneath in front of or over the stove Contact your l...

Страница 5: ...p the burn pot and eventually cut off the combustion air supply PLEASE READ THIS ENTIRE MANUAL BEFORE INSTALLATION AND USE OF THIS PELLET FUEL BURNING ROOM HEATER FAILURE TO FOLLOW THESE INSTRUCTIONS COULD RESULT IN PROPERTY DAMAGE BODILY INJURY OR EVEN DEATH Keep this manual handy for future reference THIS PELLET STOVE WHEN INSTALLED MUST BE ELECTRICALLY GROUNDED IN ACCORDANCE WITH LOCAL CODES OR...

Страница 6: ... SPECIFIED BY THE VENT MANUFACTURER Equivalent Vent Length EVL Prior to purchasing your pellet vent pipe type L you should plan your venting scenario in to determine the diameter of vent pipe you should use Pellet vent pipe comes in 3 and 4 diameter In order to determine if you can use 3 diameter pipe you need to calculate your EVL Equivalent Vent Length To properly calculate your EVL you should m...

Страница 7: ...hree elbows You should always avoid using four or more elbows You also want to avoid having elbows too close together Ideally any elbows in the exhaust configuration will be separated by 3 or more of straight pipe If the elbows cannot be spaced at least 3 apart you should use 4 diameter pipe to help reduce some of the restriction created by having elbows spaced so closely The increased pipe diamet...

Страница 8: ...3 Use only quality materials from known manufacturers and distributors 4 It is best to have the unit vented on the low pressure side of the house This is the side opposite of prevailing winds 5 Flex pipe is only approved for use inside of a masonry fireplace 6 Eliminate as much horizontal pipe and elbows as possible 7 Use the same size pipe diameter for your entire exhaust system 8 Do NOT plug the...

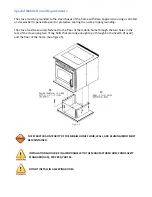
Страница 9: ...ve body Floor Protection Freestanding installations require a minimum 21 wide by 28 deep floor protection The stove must be placed on a continuous grouted joints noncombustible material such as ceramic tile cement board brick 3 8 millboard or equivalent or other approved or listed material suited for floor protection THE MATERIAL S USED MUST HAVE OR COMBINE TO HAVE A MINIMUM INSULATIVE RATING OF R...

Страница 10: ...at combustion air is easily available to the air inlet A closeable outside air register can be used in tightly insulated homes FOR A MOBILE HOME INSTALLATION THE STOVE MUST BE CONNECTED TO AN OUTSIDE SOURCE OF COMBUSTION AIR FOR MOBILE HOME INSTALLATIONS NO COMBUSTION AIR SUPPLY MAY EXCEED 10 FEET Electrical Installation Voltage variations can lead to serious performance problems The electrical sy...

Страница 11: ...fastened to the floor of the mobile home through the two holes in the rear of the stove using two lag bolts that are long enough to go through both a hearth if used and the floor of the home See figure 5 Figure 5 THE STRUCTURAL INTEGRITY OF THE MOBILE HOME FLOOR WALL AND CELINING ROOF MUST BE MAINTAINED INSTALLATION SHOULD BE IN ACCORDANCE WITH THE MANUFACTURED HOME AND SAFETY STANDARD HUD CFR 328...

Страница 12: ...ality fuel and proper damper control The further you deviate from this recommended installation the less efficiently your unit will function NOTE Follow L Vent chimney manufacturer s instructions 1 Position stove adhering to clearances shown in Figure 1 2 Locate position of hole in wall directly behind stove exhaust vent refer to figure 3 3 Always maintain 3 clearance from combustible materials 4 ...

Страница 13: ...und or square hole in roof always 3 larger all the way around pipe Install upper edge and sides of flashing under roofing materials nail to the roof along upper edge Do not nail lower edge Seal nail heads with non hardening waterproof mastic 3 Apply non hardening waterproof mastic where the storm collar will meet the vent and flashing Slide storm collar down until it sits on the flashing Seal and ...

Страница 14: ...igure 9 4 Attach the L vent adapter a section of pipe and clean out tee making sure the clean out tee is centered in the chimney flue area Use RTV metallic tape and a minimum of three self taping screws at all joint connections to ensure a tight seal 5 Position the stove adhering to the clearances in Figure 1 6 Measure and build chimney top plate Cut out holes for chimney pipe and if used the outs...

Страница 15: ...0 5 Install and seal the top plate from step 3 with non hardening mastic Slip the storm collar over the pipe and while holding the pipe at the proper elevation affix the collar with a minimum of three stainless steel sheet metal screws Seal all joints and seams around the collar 6 Connect the horizontal pipe by pushing it through the hole in the masonry and lining it up with the branch in the tee ...

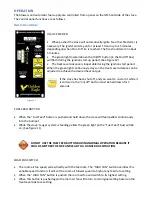
Страница 16: ...put If the stove has been shut off and you want to re start it while it is still warm the on off button must be held down for 2 seconds FUEL FEED BUTTON When the Fuel Feed button is pushed and held down the stove will feed pellets continuously into the burnpot While the stove s auger system is feeding pellets the green light in the Fuel Feed box will be on See figure 11 DO NOT USE THE FUEL FEED BU...

Страница 17: ...etting with the damper completely closed then you should use the Low Feed Adjustment button so that when the unit is on the number one heat level setting the 1 and 4 lights are on This will feed just a little bit more fuel to the fire You should also do this if you are using the unit with a thermostat in the High Low thermostat mode The Low Feed Adjustment button only changes the fuel feed rate fo...

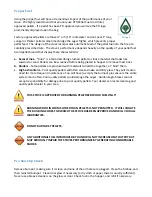
Страница 18: ... or bind them c High ash content Poor quality pellets will often create smoke and dirty glass They will create a need for more frequent maintenance You will have to empty the burnpot plus vacuum the entire system more often Poor quality pellets could damage the auger Golden Eagle Stoves cannot accept responsibility for damage due to poor quality pellets Your dealer can recommend a good quality pel...

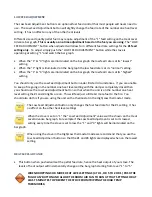
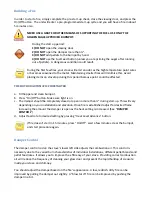
Страница 19: ... Make sure light is on c The damper should be completely closed or open no more than during start up This will vary depending on your installation and elevation Once fire is established adjust for desired flame increasing the amount the damper is open as the heat setting is increased See DAMPER CONTROL d Adjust feed rate to desired setting by pressing Heat Level Advance button If fire doesn t star...

Страница 20: ...warm the on off button must be held down for 2 seconds IF STOVE RUNS OUT OF PELLETS The fire goes out and the auger motor and blowers will run until the stove cools This will take 30 to 45 minutes After the stove components stop running the On Off and the BAR GRAPH lights stay on for 10 minutes After the 10 minutes the 3 light on the bar graph will flash and the On Off light will go off To restart...

Страница 21: ...n overheat situation in the stove and shut down the fuel feed or auger system 2 In case of a malfunctioning convection blower the high temperature thermodisc will automatically shut down the auger preventing the stove from overheating b If the combustion blower fails an air pressure switch will automatically shut down the auger Opening the stove door for more than 30 seconds during operation will ...

Страница 22: ...N section of this owner s manual HIGH LOW THERMOSTAT MODE When engaged in this mode the stove will automatically switch between two settings When warm enough it will switch to the 1 or low setting The room air blower will also slow to its lowest speed The Heat Level Advance setting on the bar graph will stay where it was initially set When the house cools below the thermostat setting the stove wil...

Страница 23: ...T OF THE UNIT BEGINS TO GLOW YOU ARE OVERFIRING Immediately press the POWER switch on the control panel H KEEP ALL LOOSE OR MOVEABLE HOUSEHOLD COMBUSTIBLES SUCH AS FURNITURE DRAPES TOYS ETC AT LEAST THREE FEET FROM THE OPERATING STOVE I Maintain proper ventilation It is important that adequate oxygen be supplied to the fire for the combustion process Modern houses are often so well insulated that ...

Страница 24: ...r Brushed Ashes Emptied Interior Chambers Vacuumed Heat Exchange Tubes Two Passes Combustion Blower Blades Vacuumed Brushed Convection Blower Impeller Vacuumed Brushed Vent System Cleaned Gaskets Inspected Hopper end of season Emptied and vacuumed FAILURE TO CLEAN AND MAINTAIN THISUNIT AS INDICATED CAN RESULT IN POOR PERFORMANCE AND POTENTIAL SAFETY HAZARDS NEVER CLEAN THIS UNIT WHILE IT IS HOT AL...

Страница 25: ...urnpot make sure it is level and pushed all the way back down and that the igniter hole is to the rear when it is reinstalled see Figure 17 h Make sure the burnpot is level and pushed all the way in if the collar on the burnpot attached to the fresh air tube is not pushed back to meet the firebox wall the Hot Rod will not work properly MAKE SURE ASHES ARE COOL TO THE TOUCH BEFORE USING A VACUUM VA...

Страница 26: ...andle end with hole of the cleaning tool onto the cleaning rod refer to figure 13 The cleaner rod is located in the grill above the stove door Move the cleaner rod back and forth several times to clean the heat exchanger tubes When finished be sure to leave tube cleaner at the rear of the stove B Interior Chambers The four ash doors in the firebox of the Monroe can be removed for periodic cleaning...

Страница 27: ...vection blower is accessed by removing the stove s left side panel The combustion blower can be accessed by removing the right side panel The convection blower is on the left facing stove and the combustion blower is on the right When cleaning be careful not to dislodge balancing clip on convection blower or to bend fan blades Some stove owners lightly spray an anti creosote chemical on the fire t...

Страница 28: ...er will lead to some soot formation which will collect in the exhaust venting system The exhaust venting system should be inspected at least once every year or ton of pellets burned to determine if cleaning is necessary C Inspection and Removal The chimney connector and chimney should be inspected annually or per ton to determine if a creosote or fly ash build up has occurred If creosote has accum...

Страница 29: ...ke sure the ash door is properly latched and the gasket is sealing good If the stove has just a small hole for the ashes to fall through under the burnpot make sure the slider plate is in place to seal off the firebox floor 4 Vent pipe is incorrectly installed Check to make sure vent pipe installation meets criteria in owner s manual 5 The airflow switch wire connections are bad Check the connecto...

Страница 30: ... can lift the shaft out of the stove After you have removed the shaft inspect it for bent flights burrs or broken welds Remove any foreign material that might have caused the jam Also check the auger tube for signs of damage such as burrs rough spots or grooves cut into the metal that could have caused a jam 8 The auger motor has failed Remove the auger motor from the auger shaft and try to run th...

Страница 31: ... to the igniter Check the voltage going to the igniter during startup It should be a full current If the voltage is lower than full current check the wiring If the wiring checks out good the board is bad SMOKE SMELL COMING BACK INTO THE HOME Possible Causes Possible Remedies 1 There is a leak in the vent pipe system Inspect all vent pipe connections Make sure they are sealed with RTV silicone that...

Страница 32: ... of damage such as burrs rough spots or grooves cut into the metal that could have caused a jam 5 Loose wire or connector Check all wires and connectors that connector to the auger motor high limit switch and the Molex connector 6 Bad control board If the fuse is good the wires and connectors check out good and the high limit switch did not trip test for power going to the auger motor If there is ...

Страница 33: ... the times match the auger timing chart If the auger motor runs constantly the board is bad 8 Combustion blower is not spinning fast enough Test the RPM on the blower after the blades have been cleaned The RPM should be approximately 3000 RPM 9 Bad Pellets Applies to GLASS SOOT S UP AT A VERY FAST RATE Only The brand of pellets or the batch of pellets that are being used may be of poor quality If ...

Страница 34: ...Electrical Diagram ...

Страница 35: ...ance Tool A TOOL 96 Burnpot A S BURNPOT Circuit Board Control Panel A E 101GE Combustion Blower A E 027 Convection Blower A E 033A Door Gasket C G 050 Door Glass C D 031 Exhaust Adapter 3 C M 050 Exhaust Adapter 4 A 4 VA Gasket Door C G 055 Gasket Combustion Blower Housing to Stove C G 101 Gasket Combustion Blower Motor to Housing C G 105 Hot Rod Igniter C E IGN Thermodisk Proof of Fire C E 090 22...

Страница 36: ... c If the unit must be examined at the consumer s residence it is the consumer s responsibility to contact a qualified stove technician and any service call charges incurred is the sole responsibility of the consumer as the warranty covers parts only d If the unit must be transported those charges will be the consumer s responsibility 2 When contacting Golden Eagle s technical support department e...

Отзывы: