6-4
Installing Software Drivers
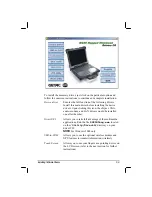
Blue Tooth
Allows your computer to connect to
bluetooth-compliant devices. Refer to the included
USRGUIDE.pdf
file located on the
/BlueTooth/
directory of your driver CD for detailed instructions on
using the Bluetooth feature of your computer. You
need the Adobe Acrobat Reader program to open the
file. Install it first if you do not have it on your
computer. The program can be downloaded free at
www.adobe.com/products/acrobat
.
MTCCTRL
Allows you to use the built-in heater feature that
automatically turns on for low temperature hard disk
drive operation.
VGA Utility
Allows you to use the ATI M11 VGA control panel for
better display control.
WLAN Utility
Allows you to use the computer’s internal Mini PCI
WLAN card’s network function.
ReadMe
Shows you a list of the included drivers in this driver
CD and the version number.
Browse CD
Browses the contents of the CD.
Exit
Exits the driver CD installation.
Touchscreen Driver
To install the touch screen driver, perform the following:
1.
Insert the driver CD into the drive.
2.
Click on “Touch Screen” and follow the onscreen instructions to
continue.
3.
When finished installing, select “Yes” to reboot your system. The
driver should now be loaded.
4.
After the system has finished rebooting, click on the “PenMount
Monitor” icon located on the taskbar to bring up the “PenMount
Control Panel.”
5.
Select the “Standard Calibrate” folder and click on “OK.”
6.
Click on “Advanced Calibrate” button.
Содержание M220
Страница 1: ...M220 Operation Manual Part Number 799001151001R00 24 Mar 062006 ...
Страница 7: ...v European Union CE Marking and Compliance Notices B 9 ...
Страница 8: ......
Страница 11: ...M220 Operation Manual Part Number 799001151001R00 24 Mar 062006 ...
Страница 17: ...v European Union CE Marking and Compliance Notices B 9 ...
Страница 18: ......
Страница 38: ...1 18 Getting Started ...
Страница 65: ...Operating Your Computer 2 27 3 Click on Next to continue ...
Страница 69: ...Operating Your Computer 2 31 ...
Страница 88: ...Expanding Your Computer 4 9 Connect to IR device ...
Страница 93: ...4 14 Expanding Your Computer ...
Страница 98: ...Setup Configuration Utility SCU 5 5 Main Menu Date and Time ...
Страница 100: ...Setup Configuration Utility SCU 5 7 Advanced Menu Geyserville Support ...
Страница 104: ...Setup Configuration Utility SCU 5 11 Security Menu Power on Password ...
Страница 107: ...5 14 Setup Configuration Utility SCU Boot Menu Boot Sequence ...
Страница 110: ...Setup Configuration Utility SCU 5 17 ...
Страница 116: ...6 6 Installing Software Drivers ...


