background image

GE H

EALTHCARE

D

IRECTION

 5394227, 12


LOGIQ S8/LOGIQ E8 S

ERVICE

M

ANUAL

1 - 26

Section 1-5 - Labels Locations

1-5-2

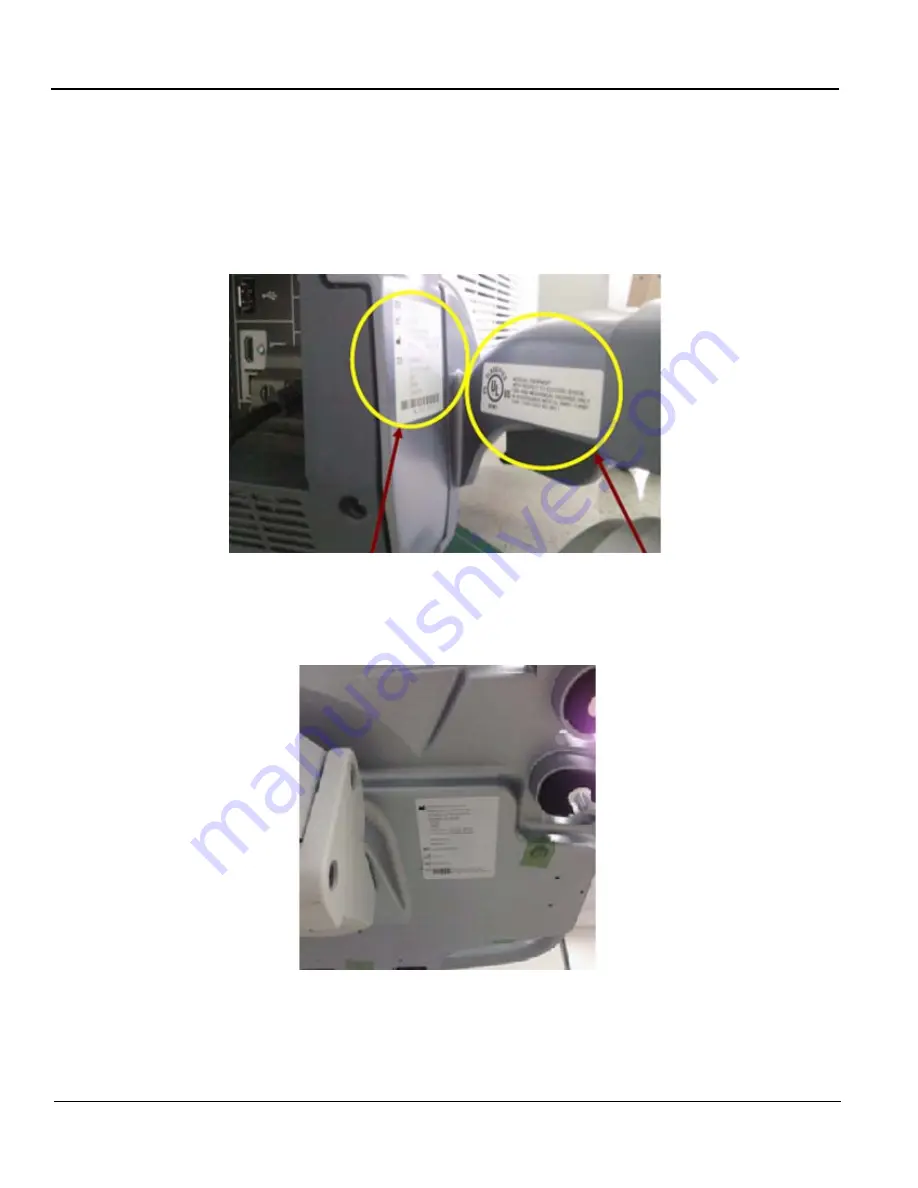
Rating plate

The following information prints on the rating plate.

Figure 1-5   Rating plate and UL label - example

NOTE:

The rating label is located on the rear of R1/R2/R3 system.

Figure 1-6   Rating plate and UL label - R4 example

1. Catalogue 

number

2. Manufacturing 

date

3. Manufacturer
4.  System Serial Number

5. Power 

Supply 

Voltage

6. Power 

Input

7. Power 

Supply 

Frequency

8. Model 

Name

Rating plate

UL label

Содержание 5418099

Страница 1: ...GE Healthcare FEBRUARY 28 2019 COVER FM P R E L I M I N A R Y LOGIQ S8 LOGIQ E8 Service Manual Document Number 5394227 Revision 12 ...

Страница 2: ...ual is a reference for the LOGIQ S8 LOGIQ E8 and LOGIQ S8 Vet ultrasound systems Hereafter listed as LOGIQ S8 All information provided in this manual is relevant for all three systems unless otherwise specified ...

Страница 3: ... L ANGLAIS C EST AU CLIENT QU IL INCOMBE DE LE FAIRE TRADUIRE NE PAS TENTER D INTERVENTION SUR LES ÉQUIPEMENTS TANT QUE LE MANUEL SERVICE N A PAS ÉTÉ CONSULTÉ ET COMPRIS LE NON RESPECT DE CET AVERTISSEMENT PEUT ENTRAÎNER CHEZ LE TECHNICIEN L OPÉRATEUR OU LE PATIENT DES BLESSURES DUES À DES DANGERS ÉLECTRIQUES MÉCANIQUES OU AUTRES DIESES KUNDENDIENST HANDBUCH EXISTIERT NUR IN ENGLISCHER SPRACHE FAL...

Страница 4: ... DEVIDO A CHOQUES ELÉTRICOS MECÃNICOS OU OUTROS ESTE MANUAL DE ASSISTÊNCIA ESTÁ DISPONÍVEL APENAS EM INGLÊS SE QUALQUER OUTRO SERVIÇO DE ASSISTÊNCIA TÉCNICA QUE NÃO A GEHC SOLICITAR ESTES MANUAIS NOUTRO IDIOMA É DA RESPONSABILIDADE DO CLIENTE FORNECER OS SERVIÇOS DE TRADUÇÃO NÃO TENTE EFECTUAR REPARAÇÕES NO EQUIPAMENTO SEM TER CONSULTADO E COMPREENDIDO PREVIAMENTE ESTE MANUAL A INOBSERVÂNCIA DESTE...

Страница 5: ...VAHINGOITTUMINEN SÄHKÖISKUN MEKAANISEN VIAN TAI MUUN VAARATILANTEEN VUOKSI ΤΟ ΠΑΡΟΝ ΕΓΧΕΙΡΙΔΙΟ ΣΕΡΒΙΣ ΔΙΑΤΙΘΕΤΑΙ ΣΤΑ ΑΓΓΛΙΚΑ ΜΟΝΟ ΕΑΝ ΤΟ ΑΤΟΜΟ ΠΑΡΟΧΗΣ ΣΕΡΒΙΣ ΕΝΟΣ ΠΕΛΑΤΗ ΑΠΑΙΤΕΙ ΤΟ ΠΑΡΟΝ ΕΓΧΕΙΡΙΔΙΟ ΣΕ ΓΛΩΣΣΑ ΕΚΤΟΣ ΤΩΝ ΑΓΓΛΙΚΩΝ ΑΠΟΤΕΛΕΙ ΕΥΘΥΝΗ ΤΟΥ ΠΕΛΑΤΗ ΝΑ ΠΑΡΕΧΕΙ ΥΠΗΡΕΣΙΕΣ ΜΕΤΑΦΡΑΣΗΣ ΜΗΝ ΕΠΙΧΕΙΡΗΣΕΤΕ ΤΗΝ ΕΚΤΕΛΕΣΗ ΕΡΓΑΣΙΩΝ ΣΕΡΒΙΣ ΣΤΟΝ ΕΞΟΠΛΙΣΜΟ ΕΚΤΟΣ ΕΑΝ ΕΧΕΤΕ ΣΥΜΒΟΥΛΕΥΤΕΙ ΚΑΙ ΕΧΕΤΕ ΚΑΤΑΝΟΗΣΕΙ ΤΟ ...

Страница 6: ...TOVATELE SLUŽEB OBSLUŽNÉHO PERSONÁLU NEBO PACIENTŮ VLIVEM ELEKTRICKÉHOP PROUDU RESPEKTIVE VLIVEM K RIZIKU MECHANICKÉHO POŠKOZENÍ NEBO JINÉMU RIZIKU DENNE SERVICEMANUAL FINDES KUN PÅ ENGELSK HVIS EN KUNDES TEKNIKER HAR BRUG FOR ET ANDET SPROG END ENGELSK ER DET KUNDENS ANSVAR AT SØRGE FOR OVERSÆTTELSE FORSØG IKKE AT SERVICERE UDSTYRET MEDMINDRE DENNE SERVICEMANUAL ER BLEVET LÆST OG FORSTÅET MANGLEN...

Страница 7: ...TI SUŽEISTAS DĖL ELEKTROS SMŪGIO MECHANINIŲ AR KITŲ PAVOJŲ DENNE SERVICEHÅNDBOKEN FINNES BARE PÅ ENGELSK HVIS KUNDENS SERVICELEVERANDØR TRENGER ET ANNET SPRÅK ER DET KUNDENS ANSVAR Å SØRGE FOR OVERSETTELSE IKKE FORSØK Å REPARERE UTSTYRET UTEN AT DENNE SERVICEHÅNDBOKEN ER LEST OG FORSTÅTT MANGLENDE HENSYN TIL DENNE ADVARSELEN KAN FØRE TIL AT SERVICELEVERANDØREN OPERATØREN ELLER PASIENTEN SKADES PÅ ...

Страница 8: ...ПЕЦИАЛИСТ ПО ТЕХОБСЛУЖИВАНИЮ ОПЕРАТОР ИЛИ ПАЦИЕНТ ПОЛУЧАТ УДАР ЗЛЕКТРИЧЕСКИМ ТОКОМ МЕХАНИЧЕСКУЮ ТРАВМУ ИЛИ ДРУГОЕ ПОВРЕЖДЕНИЕ ТОВА СЕРВИЗНО РЪКОВОДСТВО Е НАЛИЧНО САМО НА АНГЛИЙСКИ ЕЗИК АКО ДОСТАВЧИКЪТ НА СЕРВИЗНИ УСЛУГИ НА КЛИЕНТ СЕ НУЖДАЕ ОТ ЕЗИК РАЗЛИЧЕН ОТ АНГЛИЙСКИ ЗАДЪЛЖЕНИЕ НА КЛИЕНТА Е ДА ПРЕДОСТАВИ ПРЕВОДАЧЕСКА УСЛУГА НЕ СЕ ОПИТВАЙТЕ ДА ИЗВЪРШВАТЕ СЕРВИЗНО ОБСЛУЖВАНЕ НА ТОВА ОБОРУДВАНЕ ОСВ...

Страница 9: ...ZROČENE STRUJNIM UDAROM MEHANIČKIM I DRUGIM OPASNOSTIMA TÁTO SERVISNÁ PRÍRUČKA JE K DISPOZÍCII LEN V ANGLIČTINE AK ZÁKAZNÍKOV POSKYTOVATEĽ SLUŽIEB VYŽADUJE INÝ JAZYK AKO ANGLIČTINU POSKYTNUTIE PREKLADATEĽSKÝCH SLUŽIEB JE ZODPOVEDNOSŤOU ZÁKAZNÍKA NEPOKÚŠAJTE SA VYKONÁVAŤ SERVIS ZARIADENIA SKÔR AKO SI NEPREČÍTATE SERVISNÚ PRÍRUČKU A NEPOROZUMIETE JEJ ZANEDBANIE TOHTO UPOZORNENIA MÔŽE VYÚSTIŤ DO ZRAN...

Страница 10: ...N İNGİLİZCE DIŞINDAKİ BİR DİLDE OLMASINI İSTERSE KILAVUZU TERCÜME ETTİRMEK MÜŞTERİNİN SORUMLULUĞUNDADIR SERVİS KILAVUZUNU OKUYUP ANLAMADAN EKİPMANLARA MÜDAHALE ETMEYİNİZ BU UYARININ GÖZ ARDI EDİLMESİ ELEKTRİK ÇARPMASI YA DA MEKANİK VEYA DİĞER TÜRDEN KAZALAR SONUCUNDA TEKNİSYENİN OPERATÖRÜN YA DA HASTANIN YARALANMASINA YOL AÇABİLİR DİKKAT TR JA Traditional Chinese ...

Страница 11: ...GE HEALTHCARE DIRECTION 5394227 12 LOGIQ S8 LOGIQ E8 SERVICE MANUAL ix ZH CN KO ...

Страница 12: ...GE HEALTHCARE DIRECTION 5394227 12 LOGIQ S8 LOGIQ E8 SERVICE MANUAL x ...

Страница 13: ...rical work on these products will comply with the requirements of the applicable electrical codes The purchaser of GE equipment shall only utilize qualified personnel i e GE s field engineers personnel of third party service companies with equivalent training or licensed electricians to perform electrical servicing on the equipment OMISSIONS ERRORS If there are any omissions errors or suggestions ...

Страница 14: ... basic service software does not extend to or cover this software or related documentation If you are a GE Healthcare employee or a customer who has entered into such a license agreement with GE Healthcare to use this proprietary software you are authorized to use this Material according to the conditions stated in your license agreement However you do not have the permission of GE Healthcare to a...

Страница 15: ...eptember 2015 Update 8 November 2015 Update BW Printer setup 9 Februry 2016 Add UDI label information 10 Februry 2017 Update adding R4 information 11 June 2017 Revise with Service Note information 12 October 2017 Add Installation Instruction information 13 March 2019 Update for R4 2 5x release Pages Revision Pages Revision Pages Revision Title Page 12 Chapter 3 12 Chapter 8 12 Warnings i to xii 12...

Страница 16: ...GE HEALTHCARE DIRECTION 5394227 12 LOGIQ S8 LOGIQ E8 SERVICE MANUAL xiv This page was intentionally left blank ...

Страница 17: ...ntions used in this manual 1 7 Standard Hazard Icons 1 8 Product Icons 1 10 Safety Considerations 1 15 Contents in this section 1 15 Introduction 1 15 Human Safety 1 15 Mechanical Safety 1 17 Electrical Safety 1 19 Auxiliary Devices Safety 1 20 Battery Safety 1 22 Labels Locations 1 23 The labels on the cover 1 23 Rating plate 1 26 Dangerous Procedure Warnings 1 27 Lockout Tagout LOTO Requirements...

Страница 18: ...ARE DIRECTION 5394227 12 LOGIQ S8 LOGIQ E8 SERVICE MANUAL 2 Electrostatic Discharge ESD Prevention 1 30 Customer Assistance 1 31 Contact Information 1 31 System Manufacturer 1 32 Authorized EU Representative 1 32 ...

Страница 19: ...l Requirements 2 3 EMI Limitations 2 4 Probe Environmental Requirements 2 6 Time and Manpower Requirements 2 6 Facility needs 2 7 Purchaser Responsibilities 2 7 Required Facility Needs 2 8 Privacy and Security 2 8 Desirable features 2 9 Minimal floor plan suggestions 2 9 Networking setup requirements 2 10 Environmental Dangers 2 12 Patient Vicinity UL60601 1 USA 2 12 Patient Environment IEC60601 1...

Страница 20: ... S8 3 9 Packing materials recycling information 3 10 Preparing for setup 3 11 Verify Customer Order 3 11 Physical inspection 3 11 EMI Protection 3 11 Completing the Set Up 3 12 System Specifications 3 12 Electrical specifications 3 13 Connection the I O Rear Panel 3 14 Connecting Probes 3 15 Power On Off 3 17 Connect AC mains Power to the LOGIQ S8 3 18 Power ON 3 19 Login 3 20 Logoff Shutdown Exit...

Страница 21: ...g the printer to print reports 3 65 PC printer setup 3 65 Connectivity Setup 3 66 Connectivity Introduction 3 66 The Dataflow Concept 3 66 Stand alone LOGIQ S8 3 68 LOGIQ S8 PC within a Sneaker Net 3 68 Connection between LOGIQ S8 and DICOM Server 3 68 Wired Ethernet from LOGIQ S8 to a Workstation 3 69 Connection using Wireless Option R2 x x or later 3 69 Network icon 3 70 Configuring Connectivity...

Страница 22: ...ring Request for Service RFS 3 90 Verifying InSite Connection CSD 3 91 Verifying InSite Connection VCO 3 92 Agent Configuration R4 2 5x and later 3 93 Overview 3 93 Verifying back office connection CSD 3 93 Verifying Back Office Connection VOC 3 94 Connectivity Setup Worksheet 3 95 Paperwork 3 97 Product Locator Installation Card 3 97 User Manual s 3 97 ...

Страница 23: ...ervice Platform Confirmation R1 to R4 4 17 Functional Checks 4 18 Overview 4 18 Contents in this section 4 18 Preparation 4 18 Basic Controls 4 19 Performance Tests 4 22 B Mode Checks 4 23 M Mode Checks 4 25 Color Flow Mode Checks 4 27 PW CW Doppler Mode Checks 4 29 Tissue Velocity Imaging TVI Checks 4 31 SWE Shear Wave Shear Elasto Functional Check 4 32 Cineloop Check 4 32 Basic Measurements 4 33...

Страница 24: ...ICE MANUAL 8 Volume Navigation Option 4 46 FibroScan module Option 4 47 Application Turnover Check List 4 48 Software Configuration Checks 4 48 Power supply test and adjustments 4 48 Power Supply Test Procedure 4 48 Power Supply Adjustment 4 48 Site Log 4 49 ...

Страница 25: ...ption 5 11 Power Loss description 5 12 Software Overview 5 13 Purpose of this section 5 13 Contents in this section 5 13 LOGIQ S8 software 5 13 Software Options 5 14 Hardware Options 5 17 LOGIQ S8 R4 FibroScan Option 5 21 Regional and Peripheral Options 5 25 Regional Options 5 25 Peripheral Options 5 25 Air Flow Distribution 5 26 Air Flow Distribution 5 26 Product Manuals 5 27 Purpose of the opera...

Страница 26: ...nts Overview 6 1 Purpose of this chapter 6 1 Monitor Adjustment 6 2 19 LCD Monitor 6 2 22 OLED and 23 Wide Monitor Adjustment 6 8 Volume Navigation Calibration Procedure 6 10 Purpose of this section 6 10 Overview 6 10 Equipment 6 10 Setup 6 11 Measure Initial Accuracy 6 12 Perform Calibration 6 13 ...

Страница 27: ...tion 7 5 Collecting Vital System Information 7 6 Collecting a Screen Capture with Logs 7 9 Capturing Service Logs with ALT D 7 12 Screen captures 7 13 Capturing Network Logs with Network Sniffer 7 14 Service Desktop CSD R1 to R4 7 20 Purpose of this Section 7 20 Contents in this chapter 7 20 Global Service User Interface GSUI 7 21 CSD Top Page 7 22 Error Logs 7 23 Diagnostics 7 24 Image Quality 7 ...

Страница 28: ... 7 74 Universal Video Converter Troubleshooting 7 75 4D Option Trouble shooting 7 75 Power Assistant Option Trouble Shooting 7 75 Extended Battery Option Trouble Shooting 7 76 Mode encoder works twice when pushed button once 7 77 Sticky buttons 7 77 Mode button failure 7 77 PC Printer Installation 7 78 FibroScan Module FSIM Trouble Shooting 7 79 Fibroscan Probe 7 81 Privacy and Security Trouble Sh...

Страница 29: ...THCARE DIRECTION 5394227 12 LOGIQ S8 LOGIQ E8 SERVICE MANUAL 13 CHAPTER 8 Renewal Parts Overview 8 1 Contents in this chapter 8 1 Optional Peripherals and Accessories 8 2 Printers 8 2 Probes 8 4 Power Cord 8 8 ...

Страница 30: ...Functional checks 9 8 Cleaning 9 10 Physical inspection 9 13 Probe maintenance 9 14 Using a Phantom 9 16 Electrical Safety Tests 9 17 Safety test overview 9 17 GEHC Leakage Current Limits 9 18 Outlet Test Wiring Arrangement USA Canada 9 20 Grounding Continuity 9 21 Chassis leakage current test 9 22 Data sheet for enclosure chassis leakage current 9 23 Isolated patient lead source leakage lead to g...

Страница 31: ...4227 12 LOGIQ S8 LOGIQ E8 SERVICE MANUAL 15 When There s Too Much Leakage Current 9 35 Chassis Fails 9 35 Probe Fails 9 35 Peripheral Fails 9 35 Still Fails 9 35 ECG Fails 9 36 Ultrasound Equipment Quality Check EQC and IQC 9 36 ...

Страница 32: ...GE HEALTHCARE DIRECTION 5394227 12 LOGIQ S8 LOGIQ E8 SERVICE MANUAL 16 ...

Страница 33: ...ield Service trainers for the agreed upon time period This service manual provides installation and service information for the LOGIQ S8 ultrasound system as shown in Table 1 1 Contents in this service manual on page 1 2 NOTE Ensure you are working with the latest version of the Proprietary Service Manual Consult the CDL and OnBase to confirm and to download the latest version 1 1 2 Contents in th...

Страница 34: ...dure checklist 4 Functional Checks Contains functional checks that must be performed as part of the installation or as required during servicing and periodic maintenance 5 Components and Functions Theory Contains block diagrams and functional explanations of the electronics 6 Service Adjustments Contains instructions on how to make any available adjustments to the LOGIQ S8 7 Diagnostics Troublesho...

Страница 35: ... SERVICE MANUAL Section 1 2 Service manual overview 1 3 1 2 2 Typical users of the Service Manual GE Service Personnel Setup maintenance etc Hospital Service Personnel Architectural Planners Installation Planners some parts of Chapter 2 Site preparations ...

Страница 36: ...A configuration Y U U N N 5418104 LOGIQ S8 Console USA configuration Y U U N N 5418105 LOGIQ S8 Console CANADA configuration Y U U N N 5478057 LOGIQ S8 R2 110V N Y U N N 5478058 LOGIQ S8 R2 220V N Y U N N 5669845 LOGIQ S8 R3 N N Y U N 5669847 LOGIQ S8 R3 with OLED monitor N N Y U N 5756373 LOGIQ S8 R4 with OLED monitor N N N Y U 5815518 LOGIQ S8 R4 2 5x with OLED monitor N N N N Y 5808841 LOGIQ S8...

Страница 37: ...re Configurations and Hardware Software Compatibility Upgrade Options Y Original U Upgrade available N Not supported U Upgrade available No LCD upgrade Table 1 4 LOGIQ E8 Model ship only for People s Republic of China MODEL NUMBER DESCRIPTION R1 R2 R3 R4 2 5x 5486788 LOGIQ E8 R2 N Y U N 5669848 LOGIQ E8 R3 OLED N N Y N 5818169 LOGIQ E8 R4 2 5x OLED N N N Y ...

Страница 38: ... Doppler M Mode Color M Mode PW CW and 3D 4D Tissue Velocity imaging Volume Guided Ultrasound Elastography and Contrast applications The fully digital architecture of the LOGIQ S8 LOGIQ E8 allows optimal usage of all scanning modes and probe types throughout the full spectrum of operating frequencies Signal flows from the Probe Connector Panel to the Front End and then over to the Back End Process...

Страница 39: ...ard is present that can cause property damage but has absolutely no personal injury risk a NOTICE is used Notice Example Disk drive may crash NOTE Notes are used to provide important information about an item or a procedure Be sure to read the notes the information contained in a note can often save you time or effort DANGER DANGER IS USED TO INDICATE THE PRESENCE OF A HAZARD THAT WILL CAUSE SEVER...

Страница 40: ...for Danger Warning or Caution as seen throughout this chapter In addition to text several different graphical icons symbols may be used to make you aware of specific types of hazards that could cause harm Even if a symbol isn t used in this manual it is included for your reference Table 1 5 Standard Hazard Icons ELECTRICAL BIOHAZARD RADIATION or LASER HEAT PINCH or or ACOUSTIC OUTPUT EXPLOSION MOV...

Страница 41: ...Standard Icons that indicate that a special procedure is to be used Other hazard icons make you aware of specific procedures that should be followed Table 1 6 Standard Icons Indicating a Special Procedure be Used AVOID STATIC ELECTRICITY TAG AND LOCK OUT WEAR EYE PROTECTION WEAR HAND PROTECTION WEAR FOOT PROTECTION ...

Страница 42: ...tes only Prescription Requirement label Rear of the system CE Mark The CE Mark of Conformity indicates this equipment conforms with the Council Directive 93 42 EEC Rear of the system Authorized European Representative address Rear of the system IP Code IPX8 Indicates the degree of protection provided by the enclosure per IEC60 529 Can be used in operating room environment Footswitch Type B Applied...

Страница 43: ...dicates the power off position of the mains power breaker Rear of the system Mains ON indicates the power on position of the mains power breaker Rear of the system ON indicates the power on position of the power button CAUTION This Power button DOES NOT ISOLATE Mains Supply R1 R2 R3 Operator control panel Stand by The standby symbol line partially within a broken circle indicates a sleep mode or l...

Страница 44: ... or disposed of in accordance with local or country laws The letters below the separate collection symbol indicate whether certain elements Pb Lead Cd Cadmium Hg Mercury are contained in the battery To minimize potential effects on the environment and human health it is important that all marked batteries that you remove from the product are properly recycled or disposed For information on how the...

Страница 45: ...orm outside the published specifications Keep power to these devices turned off when near this equipment Rear of the system This product consists of devices that may contain mercury which must be recycled or disposed of in accordance with local state or country laws Within this system the backlight lamps in the monitor display contain mercury Rear of the system UL conformity mark according to UL 6...

Страница 46: ... Mark of Products Circulation in the market of the Customs Union member states Under the rating plate Every system has a unique marking for identification the Unique Device Identification UDI Label The UDI label consists of a series of alpha numeric characters and barcode which uniquely identify the LOGIQ S8 system as a medical device manufactured by General Electric Scan or enter the UDI informat...

Страница 47: ...nly personnel who have participated in a LOGIQ S8 Training are authorized to service the equipment DANGER DANGEROUS VOLTAGES CAPABLE OF CAUSING DEATH ARE PRESENT IN THIS EQUIPMENT USE EXTREME CAUTION WHEN HANDLING TESTING AND ADJUSTING WARNING WARNING IF THE COVERS ARE REMOVED FROM AN OPERATING LOGIQ S8 SOME METAL SURFACES MAY BE WARM ENOUGH TO POSE A POTENTIAL HEAT HAZARD IF TOUCHED EVEN WHILE IN...

Страница 48: ...THERE ARE NO TEST POINTS TO VERIFY ISOLATION THE BLUE LIGHT ON THE POWER BUTTON WILL TURN OFF WARNING WARNING RISK OF ELECTRICAL SHOCK SYSTEM MUST BE TURNED OFF AND DISCONNECTED FROM POWER SOURCE CORD MUST BE CONTROLLED AT ALL TIMES WARNING WARNING USE EXTREME CAUTION AS LONG AS THE LOGIQ S8 LOGIQ E8 IS UN STABLE NOT RESTING ON ALL FOUR CASTERS WARNING WARNING TILTING THE CONSOLE REQUIRES TWO PEOP...

Страница 49: ...n ready for use Care must be used when moving it or replacing its parts Failure to follow the precautions listed could result in injury uncontrolled motion and costly damage ALWAYS Use the handle to move the system Be sure the pathway is clear Use slow careful motions Do not let the system strike walls or door frames Two people are required when moving on inclines or lifting more than 16 kg 35 lbs...

Страница 50: ...e unit in a vehicle see 4 3 8 3 Transporting the System on page 4 16 CAUTION Use Protective Glasses during drilling filing and during all other work where eyes need protection CAUTION Use Safety Shoes when doing work where there is any chance of foot damage CAUTION Use Protective Gloves when drilling and cutting NOTICE Be careful not to pinch any of the cables ...

Страница 51: ...his correct handling of probes is important and the following points should be noted Do not drop a probe or strike it against a hard surface as this may damage the transducer elements acoustic lens or housing Inspect the probe prior to each use for damage or degradation to the housing cable strain relief lens seal connector pins and locking mechanism Do not use a cracked or damaged probe In this e...

Страница 52: ...e a potential difference between the protective earth and any line of the computer network including the shield In this case the only way to operate the system safely is to use an isolated signal link with minimum 4mm creepage distance 2 5mm air clearance of the isolation device For computer networks there are media converters available which convert the electrical to optical signals Please consid...

Страница 53: ...special main outlet provided for the electrical safety of the system CAUTION Auxiliary equipment with direct main connection requires galvanic separation of the signal and or control leads NOTICE The system integrator any person connecting the medical device to other devices is responsible that the connections are safe If in doubt consult the technical service department or your local representati...

Страница 54: ...ep on it DO NOT use a damaged battery DO NOT apply solder to a battery DO NOT connect the battery to an electrical power outlet DO NOT immerse the battery in water or allow it to get wet DO NOT place the battery into a microwave oven or pressurized container If the battery leaks or emits an odor remove it from all possible flammable sources If the battery emits an odor or heat is deformed or disco...

Страница 55: ...he labels on the cover The LOGIQ S8 comes equipped with product labels and icons These labels and icons represent pertinent information regarding the operation of the unit NOTE The rating label is located on the rear of R1 R2 R3 system Figure 1 1 Label location R1 R2 R3 system LOGIQ S8 LOGIQ E8 LOGIQ S8 Vet 19 Monitor 23 22 Wide Monitor ...

Страница 56: ... Labels Locations Figure 1 2 Label location R4 and later system NOTE Depending on country Gender Label is attached 1 LCD Caution label 2 LOGIQ S8 rating label 3 Gender Caution only for India China Korea 4 Multi Caution label 5 LOGIQ S8 Rating label only for China Korea Japan 6 UL label ...

Страница 57: ...394227 12 LOGIQ S8 LOGIQ E8 SERVICE MANUAL Section 1 5 Labels Locations 1 25 1 5 1 1 WLAN label location if WLAN option installed Figure 1 3 WLAN Label location R1 to R3 system Figure 1 4 WLAN Label location R4 and later system ...

Страница 58: ...s on the rating plate Figure 1 5 Rating plate and UL label example NOTE The rating label is located on the rear of R1 R2 R3 system Figure 1 6 Rating plate and UL label R4 example 1 Catalogue number 2 Manufacturing date 3 Manufacturer 4 System Serial Number 5 Power Supply Voltage 6 Power Input 7 Power Supply Frequency 8 Model Name Rating plate UL label ...

Страница 59: ...EN HANDLING TESTING AND ADJUSTING WARNING WARNING IF THE COVERS ARE REMOVED FROM AN OPERATING LOGIQ S8 LOGIQ E8 SOME METAL SURFACES MAY BE WARM ENOUGH TO POSE A POTENTIAL HEAT HAZARD IF TOUCHED EVEN WHILE IN SHUT DOWN MODE WARNING WARNING EXPLOSION WARNING DO NOT OPERATE THE EQUIPMENT IN AN EXPLOSIVE ATMOSPHERE OPERATION OF ANY ELECTRICAL EQUIPMENT IN SUCH AN ENVIRONMENT CONSTITUTES A DEFINITE SAF...

Страница 60: ... isolation All potentially hazardous stored or residual energy is relieved NOTICE Energy Control and Power Lockout for LOGIQ S8 When servicing parts of the system where there is exposure to voltage greater than 30 Volts 1 Remove the front cover and confirm the power status LED If ON then turn off the system 2 Unplug the system 3 Maintain control of the system power plug 4 Wait for at least 20 seco...

Страница 61: ... that items what were saturated and or dripping with human blood that are now caked with dried blood or which were used or intended for use in patient care are regulated medical waste for transportation purpose and must be transported as a hazardous material When returning or shipping the LOGIQ S8 system in the original packaging 1 Adjust the LCD monitor and control panel using Up Down control and...

Страница 62: ...ic discharge radiated and conducted RF fields magnetic fields and power line transient requirements as mentioned in IEC 60601 1 2 NOTE For CE Compliance it is critical that all covers screws shielding gaskets mesh clamps are in good condition installed tightly without skew or stress Proper installation following all comments noted in this service manual is required in order to achieve full EMC per...

Страница 63: ...ondary image capture cine loop NOTE Restart the application before resuming clinical scanning Table 1 8 Phone Numbers for Customer Assistance Location Phone Number USA GE Healthcare Ultrasound Service Engineering 9900 Innovation Drive RP 2123 Wauwatosa WI 53226 USA Service On site Service Parts Applications support 1 800 437 1171 1 800 558 2040 1 800 682 5327 or 1 262 524 5698 Canada 1 800 668 073...

Страница 64: ...er GE Ultrasound Korea 9 Sunhwan ro 214beon gil Jungwon gu Seongnam Si Gyeonggi do Korea 82 0 31 740 6436 Table 1 10 Authorized EU Representative Manufacturer TEL FAX Number The location of the CE marking is shown in the Safety chapter of this manual Authorized EU Representative European registered place of business GE Medical Systems Information Technologies GmbH GEMS IT GmbH Munzinger Strasse 3 ...

Страница 65: ...view 2 1 1 Purpose of this chapter This chapter provides the information required to plan and prepare for the setup of a LOGIQ S8 Included are descriptions of the facility and electrical needs to be met by the purchaser of the unit 2 1 2 Contents in this chapter 2 1 Overview 2 1 2 2 General console requirements 2 2 2 3 Facility needs 2 7 ...

Страница 66: ...r system installation updates and repairs However operator and patient comfort may be optimized if the room light is subdued and indirect Therefore a combination lighting system dim bright is recommended Keep in mind that lighting controls and dimmers can be a source of EMI which could degrade image quality These controls should be selected to minimize possible interference Table 2 1 System Enviro...

Страница 67: ...peripherals Power Consumption nominal 900 VA including all on board peripherals 2 2 2 3 Inrush Current Inrush current is not a factor to consider due to the inrush current limiting properties of the power supplies 2 2 2 4 Site Circuit Breaker It is recommended that the branch circuit breaker for the machine be readily accessible 2 2 2 5 Site Power Outlets A dedicated AC power outlet must be within...

Страница 68: ...e that interference will not occur in a particular installation Possible EMI sources should be identified before the unit is installed Electrical and electronic equipment may produce EMI unintentionally as the result of a defect These sources include Medical lasers Scanners Cauterizing guns Computers Monitors Fans Gel warmers Microwave oven Light dimmers Mobile phones In house wireless phones DECT...

Страница 69: ...low radio frequencies to interfere with the ultrasound signals Replace broken RF gaskets If more than 20 or a pair of the fingers on an RF gasket are broken replace the gasket Do not turn ON the unit until any loose metallic part is removed and replaced if required Do not place labels where RF gaskets touch metal Never place a label where RF gaskets meet the unit Otherwise the gap created will per...

Страница 70: ... soon as possible If possible allow six weeks before delivery for enough time to make necessary changes Table 2 4 Probe Environmental Requirements Probe Operation Storage Transport Temperature 2D probe 10 35 C 50 95 F 40 60 C 40 140 F 10C D 10 55 C 14 131 F 40 55 C 40 131 F 4D probe 18 30 C 64 4 86 F 10 50 C 14 122 F Humidity 2D probe 10 90 non condensing 4D probe 30 75 non condensing 10 85 non co...

Страница 71: ...performed by qualified personnel The products involved and the accompanying electrical installations are highly sophisticated and special engineering competence is required All electrical work on these products must comply with the requirements of applicable electrical codes The purchaser of GE equipment must only utilize qualified personnel to perform electrical servicing on the equipment The des...

Страница 72: ...Proposed location for the LOGIQ S8 is at least 0 2 m 0 67 ft from the walls to enable cooling Power outlet and place for any external peripheral are within 2 m 6 5 ft of each other with peripheral within 1 m of the unit to connect cables Power outlets for other medical equipment Clean and protected space for storage of probes either in their case or on a rack Material to safely clean probes perfor...

Страница 73: ...et Sink with hot and cold running water Receptacle for bio hazardous waste for example used probe sheaths Emergency oxygen supply Storage area for linens and equipment Nearby waiting room lavatory and dressing room Dual level lighting bright and dim Lockable cabinet for software and manuals 2 3 5 Minimal floor plan suggestions Figure 2 1 Minimal Floor Plan 4 3m x 5 2m 14ft x 17ft Dedicated Power O...

Страница 74: ...de the transfer of images to workstations for viewing or transferring images to remote printers As an added benefit transferring images in this manner frees up the on board LCD and peripherals enabling viewing to be done while scanning continues With DICOM images can be archived stored and retrieved faster easier and at a lower cost 2 3 6 5 DICOM Option Pre installation Requirements To configure t...

Страница 75: ...m Information Services Destination Devices TCP IP Settings Device Type Manufacturer Name IP Address Port AE Title 1 2 3 4 5 6 7 8 9 10 11 12 Dept LOGIQ S8 SN Type Floor Room REV Comments CONTACT INFORMATION Name Title Phone E Mail Address Site System IP Settings IP Address Subnet Mask Default Gateway Server Name Remote DB User Name Name AE Title Remote Archive Setup IP Address Subnet Mask Default ...

Страница 76: ...r providing the device with extra protective earth will be required in order to meet UL60601 1 and IEC60601 1 IEC60601 1 1 standards for electrical leakage 2 4 1 Patient Vicinity UL60601 1 USA 2 12 20DV UL60601 1 2003 In area in which patients are normally cared for the patient vicinity is the space with surfaces likely to be contacted by the patient or attendant who can touch the patient This enc...

Страница 77: ... 1 2005 Such an area is an environment in which medical diagnosis monitoring or treatment is carried out It is very difficult to attach unique dimensions to the PATIENT ENVIROMENT In practice a distance of 2 5 m 8 2 ft above the floor on which the medical personnel stand and a horizontal distance of 1 5 m 4 9 ft have justified themselves as indicative of the dimensions of the Patient Environment T...

Страница 78: ...GE HEALTHCARE DIRECTION 5394227 12 LOGIQ S8 LOGIQ E8 SERVICE MANUAL 2 14 Section 2 4 Environmental Dangers This page was intentionally left blank ...

Страница 79: ...the unit probes and external peripherals for electrical safety are included in this procedure 3 1 2 Contents in this chapter 3 1 Overview 3 1 3 2 Setup reminders 3 2 3 3 Receiving and unpacking the equipment 3 5 3 4 Packing materials recycling information 3 10 3 5 Preparing for setup 3 11 3 6 Completing the Set Up 3 12 3 8 System Configuration 3 32 3 9 Optional Peripherals Peripheral Connection 3 ...

Страница 80: ...e site has been prepared the average installation time required is shown in table below Table 3 1 Average Installation Time Description Average Setup Time Comments Unpacking the scanner 0 5 hours Setup the scanner options printers 0 5 to 1 5 hours Dependent on the configuration DICOM Option connectivity 0 5 1 5 hours Dependent on the configuration Install Insite iLink 0 5 hours ...

Страница 81: ... PANEL EXTENDED MOVE THE OPERATOR CONTROL PANEL TO IT S CENTERED AND LOCKED POSITION REFER TO Section 8 2 3 Returning Shipping Probes and Repair Parts on page 8 4 CAUTION CAUTION TO PREVENT ELECTRICAL SHOCK CONNECT THE UNIT TO A PROPERLY GROUNDED POWER OUTLET DO NOT USE A THREE TO TWO PRONG ADAPTER THIS DEFEATS SAFETY GROUNDING CAUTION CAUTION DO NOT WEAR THE ESD WRIST STRAP WHEN YOU WORK ON LIVE ...

Страница 82: ... after transportation of the system with the monitor in the folded down position it is highly recommended to place the monitor in the upright position and to leave it in this position for a period of longer than 1 hour before use This will enable it to properly adjust to the environmental conditions CAUTION CAUTION Turning the system ON after arrival at the site without allowing time for acclimati...

Страница 83: ...STEM WITH THE FRONT HANDLE OF THE USER INTERFACE OPERATOR PANEL CAUTION Two people are needed to unpack the unit because of its weight Attempts to move the unit considerable distances or on an incline by one person could result in injury or damage or both Two people are required whenever a part weighing 16 kg 35 lbs or more must be lifted CAUTION Remember to use relevant personal protecting equipm...

Страница 84: ... the tilt indicator Is the tilt Indicator red colored 1 inside the middle of the indicator If YES The tilt Indicator has been activated Continue with the instructions in Section 3 3 2 3 Damage in transportation on page 3 6 If NO continue with the instruction in Section 3 3 4 Unpacking the LOGIQ S8 on page 3 9 Table 3 4 Damage in transportation STEP TASK 1 Write Damage In Shipment on ALL copies of ...

Страница 85: ... is undamaged To make it easier to detect if the handling during transportation has been improper a set of Tilt Shock indicators have been attached to the transportation box 3 3 2 4 2 Position of the Tilt Shock indicators Inspect the Drop and Tilt Indicator for evidence of accidental shock or tilting during transit damage incident as illustrated in the figure below Figure 3 1 Tilt Shock indicators...

Страница 86: ... PROPRIETARY TO GE DIRECTION 5394227 12 LOGIQ S8 LOGIQ E8 SERVICE MANUAL 3 8 Section 3 3 Receiving and unpacking the equipment 3 3 3 Transportation Box Label Figure 3 2 Label 1 Figure 3 3 Label 2 Figure 3 4 Label 3 ...

Страница 87: ...ing the LOGIQ S8 ultrasound scanning unit Images are ONLY for reference wear proper PPE when handling packaging gloves safety shoes etc Table 3 5 Unpacking Procedure Step Task 1 Cut the straps around the crate 2 Remove the top cover 3 Remove three P Joint then remove the out sleeve 4 Remove the option box 5 Carefully remove foam packing material and plastic bag from the ultrasound unit and monitor...

Страница 88: ...ard The inner reinforcements are made of Ethafoam Polyethylene foam The plastic foil is made of LDPE Low Density Polyethylene 7 Unlock the casters and align the orientation of the 4 caster s direction refer to 4 3 7 Caster on page 4 11 and then using the incline plane of the box bottom assy slowly move the system from the box Note Place all of the filling inside the Transportation Box Close the bo...

Страница 89: ...efer to 3 3 2 3 Damage in transportation on page 3 6 in the beginning of this manual 3 5 3 EMI Protection This unit has been designed to minimize the effects of Electo Magnetic Interference EMI Many of the covers shields and screws are provided primarily to protect the system from image artifacts caused by this interference For this reason it is imperative that all covers and hardware are installe...

Страница 90: ...in max 1150 mm 45 3 in min 500 mm 19 7 in Keyboard 620 mm 24 4 in Caster 865 mm 34 1 in max 795 mm 31 3 in Caster 85 kg 187 4 lbs Table 3 7 LOGIQ S8 R4 and later without Peripherals Height Width Depth Weight 1760 mm 69 3 in max 1150 mm 45 3in min 23 LCD 1100 mm 43 3in min 22 OLED 520 mm 20 5 in Keyboard 530 mm 20 9 in Caster 561 mm 22 1 in 23 LCD Monitor 527mm 20 7in 22 OLED Monitor 865 mm 34 1 in...

Страница 91: ... a label on the back of the system on lower rear frame of the LOGIQ S8 3 6 2 2 Electrical Specifications In the table below the electrical specifications for LOGIQ S8 include LCD and on board peripherals Power Consumption nominal 900 VA including all on board peripherals WARNING WARNING CONNECTING A LOGIQ S8 TO THE WRONG VOLTAGE LEVEL WILL MOST LIKELY DESTROY THE UNIT Table 3 10 Electrical Specifi...

Страница 92: ...he signal input part or signal output part of the LOGIQ S8 system configures a medical system and is therefore responsible to ensure that the system complies with the requirements of the valid version of IEC60601 1 1 If in doubt consult the technical service department or your local GE Healthcare representative Figure 3 6 External I O Connectors on Rear of System Table 3 11 External I O Connector ...

Страница 93: ...d connector 2 Put the probe in the probe holder Use the integrated cable management hook to wrap the cord 3 Ensure that the probe locking handle is at horizontal position 4 Hold the probe connector vertically with the cable pointing upward 5 Align the connector with the probe port and carefully push into place 6 Turn the connector locking handle clockwise to vertical position to secure the probe c...

Страница 94: ... LOGIQ S8 system Figure 3 8 DLP RS Connector 1 Hold the probe connector and TEE DLP RS adapter with the cable pointing DLP connector lock knob 2 Turn the RS connector lock knob to release side Figure 3 9 Lock Release position 3 Align the connector with the RS port and carefully push into place 4 Turn the RS connector lock knob to the lock side 5 Hold the adapter probe connector vertically with the...

Страница 95: ...ed battery charging the LED is blinking and turn off when the battery is fully charged DANGER ALWAYS CONNECT THE UNIT TO A FIXED POWER SOCKET WHICH HAS THE PROTECTIVE GROUNDING CONNECTOR DANGER NEVER USE A THREE TO TWO PRONG ADAPTER THIS DEFEATS THE SAFETY GROUND DANGER ENSURE THAT THE POWER CORD AND PLUG ARE INTACT AND THAT THE POWER PLUG IS THE PROPER HOSPITAL GRADE TYPE WHERE REQUIRED CAUTION L...

Страница 96: ...Circuit Breaker is in OFF position if not switch it OFF Figure 3 10 Circuit breaker and main power cable at rear of system 8 Connect the Power Cable s other end male plug to a hospital grade mains power outlet with the proper rated voltage and the unit is ready for Power ON Boot Up NOTE The power for on board peripheral auxiliary equipment are commonly switched with the power button The power swit...

Страница 97: ... the scanner During a normal boot you may observe Power is distributed to Peripherals Operator Panel control panel Monitor Front End and Back End Processor The Back End Processor and rest of the scanner starts with the sequence listed in following steps a Boot Screen is displayed b Back End Processor is turned ON and starts to load the software c The Start Screen is displayed on the monitor d Star...

Страница 98: ... are acknowledging that you are authorized to do so and are trained in appropriate use and regulatory guidelines Figure 3 12 Login Window Example of R4 2 5x After you have established your password follow these steps to login 1 Type your user name in the Operator field 2 Type your password in the Password field 3 Press OK to login or Cancel to cancel login NOTICE The System Administrator manages s...

Страница 99: ...t down The power button turns on blue indicated Standby mode refer to Section Figure 3 11 Power Button on page 3 19 For the system with R4 2 5x and later press Power On Off button three 3 times to shutdown NOTE If the system has Small Extended battery Option the system automatically starts battery charging when goes to Standby mode Cancel Use this button to exit from the System Exit menu and retur...

Страница 100: ...ds before turning it on again The system may not be able to boot if power is recycled too quickly NOTICE The The system will go to Power Assistant Mode Optional R2 or later if above procedures are skipped NOTICE Be sure to wait with the next step until the system has finished its shut down Failing to do so may destroy data on the Hard Disk Drive making the system fail later WARNING WARNING Confirm...

Страница 101: ... into the sleep mode enter the scan screen and lightly press the Power On Off switch once The System Exit window is displayed 2 Select Sleep The system performs sequence to go to SLEEP mode 3 Unplug the power cable from the wall outlet 4 Plug the power cable to the wall outlet 5 To exit out of Sleep Mode press the On Off switch Boot time is about 90 seconds CAUTION CAUTION You need to wait at leas...

Страница 102: ...n first logging onto the system 1 Type your name in the Operator field 2 Press the Change Password button The Change Password pop up displays Figure 3 13 Change Password Pop Up 3 Type the following Password Type your current password New Password Type your new password Confirm Password Retype your new password 4 Press OK to confirm your changes or Cancel to cancel your changes ...

Страница 103: ...d policies To create password policies 1 Navigate to Utility Admin Logon 2 Select Enable Password Policies The system prompts the user for a password at logon Figure 3 14 Policies Window Example of R4 2 5x screen 3 Under Password Policies use the drop down selection beside each feature to set the rules for passwords 4 Click Save ...

Страница 104: ...r 3 Enter password using the defined policies 4 If needed select User Must Change Password The user will be prompted to change the password on the next logon 5 Under Group Membership select the groups for the new user NOTE The user password is system specific If the user needs to access multiple systems the password will need to be entered manually on each system Figure 3 15 Users Window R4 2 5x s...

Страница 105: ... Group List select from the list of groups with pre determined access is available to select for each new user b To view access rights for these groups highlight a group and then under Group Rights view the access rights 3 To create a new group and assign access rights a Select Add b Under Name and Description type in the name and a description c Under Group Rights select the boxes according to th...

Страница 106: ...n in minutes The screen will appear completely black when locked timeout 4 Click Save 5 Press or move any button trackball on the operator panel to display Login window 6 On the Login window enter the user ID enter the password and then select Ok The user will have access according to the rights in their assigned group To set auto logon Auto LOGON only works when password policies are disabled and...

Страница 107: ... Logon after starting system This is not the user password this is system access for all users 5 Recovery key is created this can be saved to a USB flash drive 6 Insert a USB flash drive in the USB port on the operator panel or monitor to save the key 7 Select Save to store the recovery key to the USB flash drive 8 Select Print key to send the key to a print destination 9 Select Show key to write ...

Страница 108: ...covery key The generated key will always be different 13 Select Ok to continue Encryption of data begins This may take up to 90 minutes the first time After the initial encryption there is no long process for daily use Figure 3 20 Disk Encryption Encrypting Window 14 If the recovery key needs to be changed perform disk encryption again Insert the USB flash drive and select Change key Figure 3 21 D...

Страница 109: ...ock Secure the password and recovery key including USB memory It is recommended the recovery key is stored in a USB flash drive and printed out If both password and recovery key are lost you will not be able to access archived patient data images and measurements included nor store new patient data on this system The only way to recover the system to allow storing patient data is to reset the enti...

Страница 110: ...o control adjust connectivity settings starting with Section 3 11 Connectivity Setup on page 3 66 3 8 2 System Configuration For complete instructions refer to the Basic User Manual Chapter 16 R1 to R3 or Chapter 10 R4 in eDoc CD provided with the system or BUM on CDL When setting up R4 2 5x systems select the lowest security level when the system is first booted up This will allow the system to b...

Страница 111: ...nu 3 Set Hospital name Department name Language Units Time Date format as needed 4 To save the changes select Save on the bottom left Select Exit to return to scanning In some cases you may need to reboot the system for the change to take effect Table 3 1 Location Preset Parameter Description Hospital Type the institution s name Department Type the institution s department name Preset Region resta...

Страница 112: ...rameter Description Time Format Select the time format 12 Hr AM PM or 24 Hr Date Format Select the date format dd mm yyyy mm dd yyyy or yyyy mm dd Default Century Select the default century for the system to use Date Time Select to display the Date Time Properties window to specify the system date time time zone and to auto adjust for daylight savings time ...

Страница 113: ...word is specific for each LOGIQ S8 3 8 3 1 Installing a Software Option 1 Before you install a software option you must login 2 From the Touch Panel select Utility Admin System Admin 3 Enter the new option key code and select Add button in the SW Option Key section Figure 3 24 System Admin screen CAUTION INCORRECT PASSWORD ENTRY WILL RESULT IN LOSS OF SYSTEM OPTIONS IF PASSWORD IS INCORRECT PLEASE...

Страница 114: ...n R3 and later the Option String can be imported from the media 5 Press Save to save the new setting 6 Restart to save and activate the settings and adjustments you have done so far Figure 3 25 Option Keys File in R3 and later Import Option keys file can be imported from There is an Import button on the Utilities System Admin Preset Menu Media CD DVD USB Service Folder ...

Страница 115: ... please review Section 1 4 6 Auxiliary Devices Safety on page 1 20 NOTE Normally auxiliary devices and peripherals come pre installed with the system WARNING WARNING WARNING After each installation the leakage currents have to be measured according to IEC 60601 1 respectively UL 60601 1 CAUTION CAUTION Please observe that some printers may not be medical devices If the Line Printers are not medica...

Страница 116: ... CAUTION CAUTION When you connect the Off board On board UVC to the Secondary Patient Monitor If the secondary patient monitor to be located inside of the patient environment to be connected to the appropriate isolation transformer If the secondary patient monitor to be located outside of the patient environment no need the isolation transformer NOTICE NOTICE Secondary Monitor is NOT intended for ...

Страница 117: ...LCD Monitor cont d 3 9 1 1 WIthout UVC Figure 3 26 Connection Scheme Secondary LCD Monitor without UVC HDMI to DVI HDMI to HDMI cable connected to the rear side of the 2nd Monitor Secondary Monitor Appropriate Transformer A Secondary Patient Monitor MUST NEVER be connected to the LOGIQ S8 s mains supply directly Always connect it to an appropriate Isolation Transformer CAUTION CAUTION ...

Страница 118: ...onitor with Off board UVC Secondary Monitor Appropriate Transformer A Secondary Patient Monitor MUST NEVER be connected to the LOGIQ S8 s mains supply directly CAUTION CAUTION Output connection Following Output formats are available DVI D SUB VGA S VIDEO COMPOSITE BNC COMPOSITE RCA If the secondary patient monitor to be located inside of isolation transformer the patient environment to be connecte...

Страница 119: ...D Monitor without UVC Secondary Monitor Appropriate Transformer A Secondary Patient Monitor MUST NEVER be connected to the LOGIQ S8 s mains supply directly CAUTION CAUTION Output connection Following Output formats are available DVI D SUB VGA S VIDEO COMPOSITE BNC COMPOSITE RCA If the secondary patient monitor to be located inside of isolation transformer the patient environment to be connected to...

Страница 120: ...ptional Peripherals Peripheral Connection 3 9 2 Connecting the Off Board On Board UVC 3 9 2 1 Connecting the Off Board UVC 1 Power OFF Shutdown the system as described in Section 3 7 Power On Off on page 3 17 2 Connect the UVC according to correct connection scheme Figure 3 29 R2 Off Board UVC Connection ...

Страница 121: ...ptional Peripherals Peripheral Connection 3 43 3 9 2 1 Connecting the Off Board UVC cont d Figure 3 30 Off Board UVC Connection for R3 and later 3 When all the cables are connected press the Power ON switch on the UVC 4 Power ON Boot up the system as described in Section 3 7 Power On Off on page 3 17 ...

Страница 122: ...3 9 2 2 Connecting the On Board UVC 1 Power OFF Shutdown the system as described in Section 3 7 Power On Off on page 3 17 2 Connect the UVC according to correct connection scheme Figure 3 31 R2 On Board UVC Connection WARNING WARNING AFTER EACH INSTALLATION THE LEAKAGE CURRENTS HAVE TO BE MEASURED ACCORDING TO IEC 60601 1 RESPECTIVELY UL 60601 1 ...

Страница 123: ... Power ON Boot up the system as described in Section 3 7 Power On Off on page 3 17 3 9 2 3 UVC functional check Procedure 1 Connect output DVI or D sub or S video Composite on UVC to the external monitor 2 Turn the system ON and wait for about 30seconds It takes about 30 seconds for UVC booting 3 Check that image on external monitor is displayed right If you connect S video Composite port on UVC t...

Страница 124: ...witch should be directly connected to any accessible USB port on the system e g on rear of the system NOTE Connection of the Footswitch is always the same no differences between PC Motherboard version of the system After physical connection configure the Footswitch functionality Left Center Right via the Utility Applications Footswitch parameters Figure 3 33 Connection Scheme Footswitch ...

Страница 125: ...ional Peripherals Peripheral Connection 3 47 3 9 4 ECG connector Connect the ECG cable to the ECG connector on the monitor arm or on the side of the operator panel depending on the system version Figure 3 34 ECG Connector location R1 to R3 system Figure 3 35 ECG Connector location R4 system Figure 3 36 ...

Страница 126: ...Remarks and Hints when using external USB3 0 Devices R4 or later NOTICE NOTICE Before connecting an USB device please read Section 3 9 5 1 General Remarks and Hints when using external USB Devices on page 3 48 NOTICE NOTICE Before disconnecting an external USB storage device such as a USB memory or an external hard disk the system has to be informed about the removal of the device For this purpose...

Страница 127: ...onnector 3 When all the cables are connected press the power button to ON on the printer 4 Power ON Boot up the system as described in Section 3 7 Power On Off on page 3 17 All software drivers are pre installed for the designated Black White printer only 5 After physical connection to the system assign the printer to a remote key as described in Section 3 10 3 Adding the printer to the system on ...

Страница 128: ...RE PROPRIETARY TO GE DIRECTION 5394227 12 LOGIQ S8 LOGIQ E8 SERVICE MANUAL 3 50 Section 3 10 Printer Installation 3 10 1 1 Connection Scheme Black White Printer Figure 3 37 R1 and R2 Black White Printer connection ...

Страница 129: ...RIETARY TO GE DIRECTION 5394227 12 LOGIQ S8 LOGIQ E8 SERVICE MANUAL Section 3 10 Printer Installation 3 51 3 10 1 1 Connection Scheme Black White Printer cont d Figure 3 38 Black White Printer connection for R3 and later ...

Страница 130: ... below for printer setting Table 3 3 Settings for UP D897 D898 Recommended Setting Paper size 1920x1280 Windows Orientation Portrait Utility Orientation Portrait Avoid using WIDE setting In Utility System System Display Image Display Area Large or Default Turn OFF all parameters in Use Wide Screen for Use Large Print Setting Paper size 1920x1280 Windows Orientation Landscape Utility Orientation La...

Страница 131: ...nter Properties Click Properties 4 Select Properties from Printer pull down menu 5 Click Printing Preferences at the bottom of Properties Window 6 Select Layout tab and select Paper 1920x1280 Orientation Portrait Interpolation Method Bilinear 7 Select the Density Adjust tab and select Gamma TONE2 Sharpness 0 Dark 0 Light 0 Sharpness 2 8 For saving the adjusted printer settings click Apply and then...

Страница 132: ...SERVICE MANUAL 3 54 Section 3 10 Printer Installation 3 10 1 3 BW Printer shape differences Setting 1920x1280 Portrait in Printer Properties Portrait in Utility Connectivity Service Table 3 4 Print example of Portrait Portrait 19 Monitor 22 23 Wide Monitor Wide ON Wide OFf ...

Страница 133: ...E MANUAL Section 3 10 Printer Installation 3 55 3 10 1 3 BW Printer shape differences cont d Setting 1920x1280 Landscape in Printer Properties Landscape in Utility Connectivity Service Table 3 5 Print example of Landscape Landscape 19 Monitor 22 23 Wide Monitor Wide ON Wide OFf ...

Страница 134: ...TION 5394227 12 LOGIQ S8 LOGIQ E8 SERVICE MANUAL 3 56 Section 3 10 Printer Installation 3 10 1 3 BW Printer shape differences cont d Setting 960x1280 Print output differ by BW Printer Model to orientation Figure 3 39 960x1280 Print output ...

Страница 135: ... Medium Previous Service Manual recommendation 1920x1280 P P Medium Recommended 1920x1280 L L Large UP D898 960x1280 P P Very small Unfit for use 1920x1280 P P Medium Recommended 1920x1280 L L Large R3 Upgrade UP D897 UP D898 960x1280 P P Small or Medium Not recommended on UP D898 1920x1280 P P Medium Recommended Monitor size same as R1 R2 1920x1280 L L Large R3 UP D897 UP D898 960x1280 P P Small ...

Страница 136: ...l the cables are connected press the power button to ON on the Color printer 4 Power ON Boot up the system as described in Section 3 7 Power On Off on page 3 17 All software drivers are pre installed for the designated Color printer only 5 After physical connection to the system assign the printer to a remote key as described in Section 3 10 3 Adding the printer to the system on page 3 64 6 Verify...

Страница 137: ...ALTHCARE PROPRIETARY TO GE DIRECTION 5394227 12 LOGIQ S8 LOGIQ E8 SERVICE MANUAL Section 3 10 Printer Installation 3 59 3 10 2 1 Connection Scheme Color Printer Figure 3 40 R1 and R2 Color Printer connection ...

Страница 138: ...E PROPRIETARY TO GE DIRECTION 5394227 12 LOGIQ S8 LOGIQ E8 SERVICE MANUAL 3 60 Section 3 10 Printer Installation 3 10 2 1 Connection Scheme Color Printer cont d Figure 3 41 Color Printer connection for R3 and later ...

Страница 139: ...om Printer pull down menu 3 Click Printing Preferences at the bottom of Properties Window 4 Select the Paper tab and select Recommended Paper UPC 24LA large UPC 24SA small NOTE Paper UPC 21L and UPC 21S are also acceptable paper to use Orientation Landscape recommended when using large paper size High Speed check mark on Figure 3 42 Paper page NOTICE NOTICE Settings for Paper Size MUST match with ...

Страница 140: ...tings cont d 5 Select the Graphics tab From the Color Adjust pop up menu select a Color Balance Cyan 0 Magenta 0 Yellow 0 b Gamma Select Gamma 1 Figure 3 43 Graphics page Color Balance Gamma Select c Color Correction set Printer Hardware Color Correction d Lightness Sharpness 7 Dark 0 Gamma 14 Light 0 Figure 3 44 Graphics page Color Correction Lightness ...

Страница 141: ...inter Installation 3 63 3 10 2 2 UP D25MD Printer Settings cont d 6 For saving the adjusted printer settings click Apply and then OK 7 Finally close the Printers window with the close button and exit System Setup with Save and Exit 8 Assign the Printer to the remote keys See section 3 10 4 on page 3 65 ...

Страница 142: ...r from the Printer pull down Properties menu For the UP D897 D898 printer select Portrait as orientation 5 Type the printer name in the Name field This name is used on the Button screen After you select the printer from the Printer pull down Properties menu again it turns white 6 Press Save 7 Select Button 8 Select the appropriate print key Print1 Print2 from the Physical Print Buttons section 9 S...

Страница 143: ...t Utility System Peripherals 2 Select the printer from Default Printer pull down menu Figure 3 45 Report Printer Setup 3 Press Save 4 Press Print on the Report screen to print the report 3 10 5 PC printer setup 1 Turn off the LOGIQ S8 2 Connect the PC printer to the LOGIQ S8 rear USB port 3 Turn on the PC printer 4 Turn on the LOGIQ S8 The following message appears 5 Click OK and shutdown the LOGI...

Страница 144: ... S8 PC within a Sneaker Net on page 3 68 LOGIQ S8 and DICOM server in a network see Section 3 11 5 Connection between LOGIQ S8 and DICOM Server on page 3 68 3 11 2 The Dataflow Concept Communication between the LOGIQ S8 ultrasound unit and other information providers on the network takes the form of data flows Each dataflow defines the transfer of patient information from either an input source to...

Страница 145: ... Images are stored to internal hard drive The local database is used for patient archiving Afterwards images are stored to a DVD CD or external USB device etc Search in the DICOM Modality Worklist the patient found is copied into local database The patient information and the examination results are stored to the local database Images are stored to a DICOM server and to an image network volume on ...

Страница 146: ...k connection needed 3 11 5 Connection between LOGIQ S8 and DICOM Server In this configuration the LOGIQ S8 is configured to work with a DICOM server in a network environment Usually this will be the hospital network Images are first saved on the local image buffer on the scanner At the end of the examination the images are sent to the DICOM server via a DICOM spooler This scenario requires that th...

Страница 147: ...k connector on the LOGIQ S8 2 Connect the other end to the network connector to the Workstation see the Workstation Service Manual 3 11 6 2 Connection via a Peer to Peer Network You will need a network switch and one network cable for each unit connected to the switch 3 11 6 3 Connection via Hospital Network You will need one network cable to connect the LOGIQ S8 to a wall outlet on the hospital s...

Страница 148: ...ption Wired network connected Wired network disconnected Wireless network connected Wireless network disconnected Wireless network limited connected No IP address obtained Empty IP means Acquiring Network Address private IP means Limited or no Connectivity Spooler is active with wired network Spooler is failed with wired network Spooler is active with wireless network Spooler is failed with wirele...

Страница 149: ... 2 R4 2 5x and later Table 3 8 Network icon description Ethernet Active Ethernet Error Ethernet Active Spooler Active Ethernet Active Spooler Error Spooler Active Spooler Active Error Spooler Inactive Spooler Inactive Error Wifi 1 Bar Wifi 2 Bars Wifi 3 Bars Wifi 4 Bars Wifi Alert Wifi Spooler Active Wifi Spooler Error Wifi Error ...

Страница 150: ...ed by individual fields This greatly improves query capability DICOM Structured Reporting creates coded clinical data that can be used for clinical research outcomes analysis and disease management DICOM Structured Reporting is a standardized format for medical results LOGIQ S8 supports the following templates OB GYN REPORT TEMPLATES VASCULAR ULTRASOUND REPORT TEMPLATES The system supports selecta...

Страница 151: ...g a dataflow customizes the ultrasound system to work according to the services associated with the selected dataflow 5 Button allows you to assign a pre configured output service or a set of output services to the Print keys on the control panel 6 Removable Media enables formatting DICOM database or blank formatting and DICOM verification of removable media 7 Miscellaneous allows you to set up th...

Страница 152: ...following DO NOT enable DHCP Type the IP Address acquire unique static IP address from hospital network administrator Subnet Mask and Default Gateway if applicable NOTE Do not set up the system with DHCP The IP address MUST BE static for the diagnostic and DICOM to function correctly 3 Select Save settings 4 Re boot the ultrasound system NOTE TCPIP settings do not get restored when restoring backu...

Страница 153: ...IP Address Subnet Mask and Default Gateway when the user chooses to use DHCP IP Address Type the IP Address of the Ultrasound system NOTE IP stands for Internet Protocol Every device on the network has a unique IP address Subnet Mask Type the subnet mask address NOTE The Subnet Mask is an IP address filter that eliminates communication messages from network devices of no interest to your system De...

Страница 154: ...smiley face frowns then the connection has not been made Check the device name and IP address Table 3 11 Device Preset Parameter Description Add Remove Press Add to add a new device press Remove to delete a device Ping Press Ping to confirm that a device is connected Properties Name Type the name of the device Properties IP Address Type the device s IP address Properties AE Title AE Title of the L...

Страница 155: ...ce lists information about destination devices You can select from a list of currently existing devices 2 Service Type to Add lists information about services for the destination device You can add services select from a list of currently existing services and remove services 3 Service Parameters lists parameters for the service currently selected in the Services section The name and parameters in...

Страница 156: ...Retrieve DICOM Storage Commitment DICOM Worklist Standard Print Video Capture Save As Network storage USB Quick Save R2 and later Email to MMS R4 and later Table 3 12 Service Parameters Common Service Parameters Preset Parameter Description Name Free text give a descriptive name to the device AE Title The Application Entity Title for the service Port Number The port number of the service Maximum R...

Страница 157: ...ovided by IT Select Utility Connectivity on the touch screen then select the Device Tab On the Device Tab click Add enter New Device Name and IP Address Click Save Select Ping to verify the icon changes smiley face appears 2 Select the Service Tab The Destination Device displayed should be the Device that was created in the previous step if not use the drop down arrow to select it Select Service T...

Страница 158: ...4 cont d 3 On the Service Tab select the Destination Device My Computer Select Service Type to Add select USB Quick Save then Add and then Save 4 Assign Network Storage to USB Quick Save under Destination Device My Computer on the Service Tab select Destination Device My Computer click on USB Quick Save then click on the down arrow under Properties and select NetworkStorage then click on Save ...

Страница 159: ...nstructions for setting up Network Storage on LOGIQ S8 R4 cont d 5 Select Button Tab Select a Print Button then add the USB Quick Save to the Printflow View by selecting If Copy to Dataflow is in PrintFlow View remove by selecting then click Save NOTE It takes a long time to access Network Storage Service by the condition of the network ...

Страница 160: ...ites for InSite Setup 3 82 3 13 4 Configuration Steps 3 83 3 13 5 Configuring InSite 3 83 3 13 8 Configuring Request for Service RFS 3 90 3 13 9 Verifying InSite Connection CSD 3 91 3 13 10 Verifying InSite Connection VCO 3 92 3 13 3 Prerequisites for InSite Setup 1 If not already available collect the following information from the IT Administrator a System IP Address ________ _________ ________ ...

Страница 161: ...re configuring the agent be sure that you have a network connection and check that it is configured You will not be able to perform checkout with the default network configuration 3 13 6 Configuring Agent Configuration 1 Select the Configuration tab and choose the InSite Agent Configuration link in the frame on the left side 2 Inspect the Device Name field and the CRM field The Device Name field a...

Страница 162: ...ite Connection R1 to R4 3 13 6 Configuring Agent Configuration cont d Figure 3 52 Configuration Home Page 4 In the Display Name field enter a descriptive name that is easy to identify with this device For example Unit 1 5 In the Description field create a unique description of the system For example St Mary s Hospital ...

Страница 163: ...ont d 6 Configure the following mandatory fields as desired Continent Country City State Institution The Agent Configuration Tool screen opens Figure 3 53 Completed Agent Configuration Tool screen Must be PILOT or PRODUCTION Must show IP addresses for the server selected Recommended to filter zip Must be DISABLE unless a proxy server is provided by the hospital Must match System ID ...

Страница 164: ...t change the Directory field 4 In the Filter field it is recommended to set it to zip so that the system will only upload zip files to the back office Example Alt D logs 5 If a proxy is needed select Enable from the Proxy drop down list and enter a valid proxy server address and port if needed If proxy authentication is needed a Enable it and enter Scheme if needed b Enter User information and Pas...

Страница 165: ...ck out confirm the Agent Configuration Tool screen has correct URL IP address information Make corrections and repeat 1 Select PILOT2 or PRODUCTION from the Enterprise Server drop down list The Pilot server is used for initial production please check with the OLC to verify that the current server is used 3 50 If it fails again contact the OLC or the Hospital IT department to check that your system...

Страница 166: ...mer s address Latitude No Arbitrary Longitude No Arbitrary Institution Yes Arbitrary Enter Customer s info Department No Arbitrary Enter Customer s info Building No Arbitrary Enter Customer s info Floor No Arbitrary Enter Customer s info Room No Arbitrary Enter Customer s info Enterprise Server Yes Select PRODUCTION for install base Select PILOT for test purpose Service Center Yes Remains the same...

Страница 167: ...L Section 3 13 Setting up InSite Connection R1 to R4 3 89 Scheme No Consult institutions IT personnel for Proxy settings Proxy User No Consult institutions IT personnel for Proxy settings Password No Consult institutions IT personnel for Proxy settings Table 3 13 Mandatory Values Note ...

Страница 168: ...GE The RFS screen opens 3 Select the Users tab Click on Add Users and type the site s Contact Name Manual and machine generated RFS requests are directed to this person Items with red asterisks are required fields and must be filled in 4 Click on Set Default Machine contact Figure 3 56 Users tab NOTE Machine generated RFS is the system default If you wish to disable RFS remove the checkmark at Aut...

Страница 169: ...lder LOGIQ S8 is found under folder ROOT CS_ULS_LOGIQ_S8_03 0 R1 x x ROOT CS_ULS_LOGIQ_S8_03 5 R2 x x R3 x x ROOT CS_ULS_LOGIQ_E8_03 5 LOGIQ E8 2 Request the OLC to attempt to connect to the system via CSD and VNC 3 To speed up access rate Position the Windows pointer on the GE InSite icon at the bottom of the display 4 Press the right Trackball Set key Select Connect to GE Figure 3 58 Select Conn...

Страница 170: ...voke Disruptive Mode and VCO by right click on the GE InSite icon at the bottom of the display and select Connect Clinical Lifeline Figure 3 59 Select Connect Clinical Lifeline 2 Confirm with the OLC that the connection is established and they can perform VNC connectivity NOTE Questra agent will be replaced by the RSVP Agent but functionally is very similar See below figure Figure 3 60 RSVP Interf...

Страница 171: ... change to a new Device Type Contact the On Line center to seek help for clearing up the quarantine status 3 14 2 Verifying back office connection CSD 1 Login to FFA Site from Remote PC using Chrome web browser As of 2018 FFA Site address is https ffa am health ge com 2 In System ID field type the CRM Number of the machine and select Get Started 3 At CONNECT mode Select Connect of the Service Desk...

Страница 172: ...atically denied 1 On Console invoke Disruptive Mode and VCO by left click GE ICON and select Connect Clinical Lifeline 2 Login to FFA Site from Remote PC using Chrome web browser As of 2018 FFA Site address is https ffa am health ge com 3 In System ID field type the CRM Number of the machine and select Get Started 4 At CONNECT mode Select Connect of the Virtual Console on Remote Console 5 After se...

Страница 173: ...vices Destination Devices TCP IP Settings Device Type Manufacturer Name IP Address Port AE Title 1 2 3 4 5 6 7 8 9 10 11 12 Dept LOGIQ S8 SN Type Floor Room REV Comments CONTACT INFORMATION Name Title Phone E Mail Address Site System IP Settings IP Address Subnet Mask Default Gateway Server Name Remote DB User Name Name AE Title Remote Archive Setup IP Address Subnet Mask Default Gateway Name AE T...

Страница 174: ... d Figure 3 61 Worksheet for DICOM Network Information LOGIQ S8 Host Name AE Title Local Port IP Address Net Mask ROUTING INFORMATION ROUTER2 ROUTER3 ROUTER1 Destination IP Addresses GATEWAY IP Addresses Default DICOM APPLICATION INFORMATION NAME Store 2 Store 3D_1 Store 1 MAKE REVISION IP ADDRESSES PORT AE TITLE Print Worklist Store 3D_2 Storage Commit MPPS Structured Reporting ...

Страница 175: ...nt safety and user information is available during the operation and service of the complete system 3 16 1 Product Locator Installation Card NOTE The Product Locator Installation Card shown may not be same as the provided Product Locator card Figure 3 62 Product Locator Installation Card 3 16 2 User Manual s Check that the correct User Manual s for the system and software revision is included with...

Страница 176: ...GE HEALTHCARE PROPRIETARY TO GE DIRECTION 5394227 12 LOGIQ S8 LOGIQ E8 SERVICE MANUAL 3 98 Section 3 16 Paperwork ...

Страница 177: ...2 4 4 Functional Checks 4 18 4 5 Application Turnover Check List 4 48 4 6 Power supply test and adjustments 4 48 4 7 Site Log 4 49 Section 4 2 Required equipment An empty blank CD R DVD R and or external USB devices Flash drive or hard disk drive A blank DVD RW disc for DVR recording R1 x x or R2 x x A blank DVD RW or DVD RW disc for DVR recording R3 x x or later At least one probe ideally you sho...

Страница 178: ...ce and cooling purposes NOTICE Energy Control and Power Lockout for LOGIQ S8 When servicing parts of the system where there is exposure to voltage greater than 30 Volts 1 Complete shutdown the system 2 Unplug the system 3 Maintain control of the system power plug 4 Wait for at least 20 seconds for capacitors to discharge as there are no test points to verify isolation Beware that the Power Supply ...

Страница 179: ...te the scanner During a normal boot you may observe Power is distributed to Peripherals Operator Panel control panel Monitor Front End and Back End Processor The Back End Processor and rest of the scanner starts with the sequence listed in following steps a Boot Screen is displayed b Back End Processor is turned ON and starts to load the software c The Start Screen is displayed on the monitor d St...

Страница 180: ...you are acknowledging that you are authorized to do so and are trained in appropriate use and regulatory guidelines Figure 4 2 Login Window Example of R4 2 5x After you have established your password follow these steps to login 1 Type your user name in the Operator field 2 Type your password in the Password field 3 Press OK to login or Cancel to cancel login NOTICE The System Administrator manages...

Страница 181: ... Shutdown Use this button to shut down the system The entire system will shut down The power button turns on blue indicated Standby mode refer to Figure 4 1 Power Button on page 4 3 For the system with R4 2 5x and later press Power On Off button three 3 times to shutdown NOTE If the system has Small Extended battery Option the system automatically starts battery charging when goes to Standby mode ...

Страница 182: ...conds before turning it on again The system may not be able to boot if power is recycled too quickly NOTICE The The system will go to Power Assistant Mode Optional R2 or later if above procedures are skipped NOTICE Be sure to wait with the next step until the system has finished its shut down Failing to do so may destroy data on the Hard Disk Drive making the system fail later WARNING WARNING Conf...

Страница 183: ...o avoid injury or damage make sure nothing is within the range of motion before moving the monitor and monitor arm This includes both objects and people 19 LCD Monitor 23 Wide Monitor 22 Wide Monitor Position up down 7 5 cm Position left right 18cm Rotation up down 90 15 Rotation left right 90 Position up down 6 6cm Position left right 13 5cm Rotation up down 90 15 Rotation left right 89 Position ...

Страница 184: ...edures 4 3 5 2 Monitor Arm Lock 1 Unlock the monitor arm 2 Verify the monitor can move up down vertically and left right horizontally 3 Align the monitor arm along center line of the system 4 Engage the monitor arm LOCK 5 Verify the monitor arm is locked and the does not move Figure 4 4 Monitor Arm Lock Unlock Lock ...

Страница 185: ...e operator panel while holding lever 3 Verify the operator panel is free to up down 4 Release the elevation lock lever disengage 5 Verify the operator panel does not up down CAUTION To avoid injury or damage make sure nothing is within the range of motion before moving the operator panel This includes both objects and people NOTICE NOTICE Do NOT attempt to apply excessive rotating force to the ope...

Страница 186: ...ivel Lock Lever R4 system 1 Hold Swivel Lock lever under the operator panel 2 Rotate the operator panel while holding lever 3 Verify the operator panel is free to rotate 4 Release the swivel lock lever disengage 5 Verify the operator panel does not rotate NOTICE NOTICE Do NOT attempt to apply excessive rotating force to the operator panel The swivel brake is designed to hold the operator panel in ...

Страница 187: ...Rotate wheel until it locks only one lock position in 360 deg turn 3 Verify Swivel Lock engages 4 Press b downward see Figure 4 9 5 Verify Brake is applied to the wheel i e Wheel does not rotate 6 Press b upward 7 Verify Brake is released 8 Press c see Figure 4 9 9 Verify Swivel is released CAUTION CAUTION The system weighs approximately 100 kg LOGIQ S8 113 kg LOGIQ E8 with the peripherals Pay att...

Страница 188: ...Figure 4 10 Total Lock Casters 1 Press a see Figure 4 10 2 Rotate wheel until it locks several locations where caster engages 3 Verify Swivel Lock engages and Brake is ON 4 Press b see Figure 4 10 5 Verify wheel is free to move CAUTION CAUTION The system weighs approximately 100 kg LOGIQ S8 113 kg LOGIQ E8 with the peripherals Pay attention for system stability when working with the casters Locked...

Страница 189: ...that the control panel the monitor arm lock firmly and flip down the monitor to prevent system damage CAUTION DO NOT place probes or the footswitch into the side tray when moving transporting the system It is not storage space for probes footswitch and any peripheral devices CAUTION If you park the system on a slippery slope you MUST use the brakes on the wheel CAUTION This equipment is not to be ...

Страница 190: ...3 7 Power On Off on page 3 17 and remove the plug from the wall 4 All cables from off board peripheral devices must be disconnected from the console 5 Disconnect the footswitch from the console 6 Wind the power cable around the cable hook NOTE To prevent damage to the Power Cord DO NOT pull excessively on the cord or make sharp bends while wrapping 7 Connect all probes to be used while off site En...

Страница 191: ...while moving Take extra care when moving the system long distances and on inclines 5 degrees Ask for help if necessary DO NOT attempt to move the console using any cables or fixtures such as the probe connectors DO NOT attempt to move the system by pulling cables or belts placed around the monitor and or monitor arm Use the foot brake pedal when necessary Avoid ramps that are steeper than ten degr...

Страница 192: ... Prevent vibration damage by driving cautiously Avoid unpaved roads excessive speeds and erratic stops or starts Load the system onto a vehicle 1 Load and unload the system to a vehicle parked on a level surface 2 Secure the system while it is on the lift so that it cannot roll Use either wood chocks restraining straps or other similar types of constraints Do not attempt to hold it in place by han...

Страница 193: ...ation lock the wheel brakes 2 Follow the set up procedure described in Section 3 6 Completing the Set Up on page 3 12 4 3 9 Service Platform Confirmation R1 to R4 1 From the touch panel select Utility Service 2 On Service Browser select GE Service and enter the password See Section 7 6 Service Desktop CSD R1 to R4 on page 7 24 for details 3 Note SvcPform version Figure 4 14 Service Platform versio...

Страница 194: ... 4 6 B Mode Checks 4 23 4 4 7 M Mode Checks 4 25 4 4 8 Color Flow Mode Checks 4 27 4 4 9 PW CW Doppler Mode Checks 4 29 4 4 10 Tissue Velocity Imaging TVI Checks 4 31 4 4 11 SWE Shear Wave Shear Elasto Functional Check 4 32 4 4 12 Cineloop Check 4 32 4 4 13 Basic Measurements 4 33 4 4 14 System Integration Checks 4 35 4 4 15 Probe Connectors Checks 4 37 4 4 16 ECG Check 4 38 4 4 17 Peripheral Chec...

Страница 195: ...1 R2 and R3 1 Power On Off 2 A N Keyboard 3 Measurement Selection Menu 4 Rotary and Joystick controls 5 TGC 6 Reverse key 7 User Define keys 8 BT Keys 9 Mode Gain XYZ Controls 10 Trackball Trackball Keys 11 Zoom 12 Measure key 13 Body Pattern Ellipse 14 Comment key 15 Clear key 16 Pointer key 17 Left Right key 18 P1 Print key 19 Steer Width Depth 20 Auto AL and AR 21 P2 and P3 key 22 Freeze key ...

Страница 196: ...tion Arrow 11 F3 Eject media 12 F4 Activates DICOM Job Spooler screen 13 F5 Creates a Fast Key 14 F6 Plays a Fast Key 15 F7 Home Set Home 16 F8 Text1 Text2 17 F9 Grab last 18 F10 Word delete 19 Tab key 20 M Mode 21 CW Doppler Option 22 PW Doppler 23 PDI TVI Option 24 Color Flow 25 B Flow Option 26 B Mode 27 Joystick Depth Steer Width 28 Arrow 29 Clear 30 Comment 31 Bodypattern Ellipse 32 Measure 3...

Страница 197: ...he keys on the trackball area as described below The Trackball area consist of The Trackball used as a cursor control in acquisition mode scrolling control in freeze and as a selection tool like a mouse cursor in post processing mode The Set keys Left Right Perform the selected control or highlighted menu item The Trackball key Upper beneath Toggles between the available trackball function assignm...

Страница 198: ... Healthcare recommends the RMI 430GS phantom optional but it is not required It is the most current phantom optional recommended to our field service personnel and provides the necessary targets and extended life necessary for consistent system testing Figure 4 19 Performance tests 2 4 3 2 1 4 6 8 10 12 14 16 RMI 403GS Lateral Distance Measurement Functional Resolution Contrast Resolution Gray Sca...

Страница 199: ...ection 4 4 Functional Checks 4 23 4 4 6 B Mode Checks For information on the system s different modes as well as expected results refer to the latest revision of the Basic User Manual Chapter 5 4 4 6 1 Introduction The B mode is the system s default mode Figure 4 20 B mode Screen Example ...

Страница 200: ...ol Use Depth to adjust the range to be imaged Use Focus to center the focal point s around the region of interest Use Frequency move to higher frequencies or Frame rate move to lower frame rate to increase resolution in image Use Frequency move to lower frequency to increase penetration Use the control to optimize imaging in the blood flow regions and make a cleaner less noisy image Use Reject con...

Страница 201: ...d Dynamic Range Controls how echo intensities are converted to shades of gray thereby increasing the adjustable range of contrast Focus Number and Position Increases the number of transmit focal zones or moves the focal zone s so that you can tighten up the beam for a specific area A graphic caret corresponding to the focal zone position s appears on the right edge of the image Rejection Selects a...

Страница 202: ... to adjust the range to be imaged Use the Frequency move to higher frequencies or the Frame rate control move to lower frame rate to increase resolution in image Use the Frequency move to lower frequency to increase penetration Check Focus to move the focal point s around the region of interest in the M Mode display Check Dynamic range to optimize the useful range of incoming echoes to the availab...

Страница 203: ...ct one of the probes to the scanner s active probe connector see 3 6 4 Connecting Probes on page 3 15 for info about connecting the probes For available probes see Section 9 13 Probes on page 9 59 2 Turn ON the scanner The B Mode window is displayed default mode 4 4 8 3 Select Color B Mode 1 After optimizing the B Mode image then press CF Color Flow 2 Move the color flow area of interest as close ...

Страница 204: ...o a low setting for better flow resolution or a higher setting to more easily locate disturbed flows Adjust Frequency to optimize the color flow display Higher settings improve resolution Lower settings improve depth penetration and sensitivity This does not affect the frequency used for B and M Mode Adjust Acoustic output power to obtain an acceptable image using the lowest setting possible NOTE ...

Страница 205: ...t bring up a B Mode picture for navigation purpose and then add Doppler For information refer to the latest revision of the Basic User Manual Chapter 5 4 4 9 1 Preparations 1 Connect one of the probes to the scanner See 3 6 4 Connecting Probes on page 3 15 for info about connecting the probes For available probes see Section 9 13 Probes on page 9 59 2 Turn ON the scanner The B Mode window is displ...

Страница 206: ...er setting will improve resolution and the lower setting will increase the depth penetration Adjust Frame rate to a higher setting to improve motion detection or to a lower setting to improve resolution Adjust Power to obtain an acceptable image using the lowest setting possible This is particularly important in CW mode as the energy duty cycle is 100 constant NOTE The Doppler Power setting affect...

Страница 207: ...esolution 4 4 10 2 Preparations 1 Connect one of the probes to the scanner s left most probe connector See 3 6 4 Connecting Probes on page 3 15 for info about connecting the probes For available probes see Section 9 13 Probes on page 9 59 2 Turn ON the scanner The B Mode window is displayed default mode 3 If needed adjust the Display s Brightness and Contrast setting 4 Press TVI 5 To adjust the RO...

Страница 208: ...l Check Select a probe 9L D and C1 6D Select ELASTO button In the Touch Panel select Shear Wave button if not already selected Verify that the Shear Wave button is available 4 4 12 Cineloop Check 4 4 12 1 Introduction A cineloop is a sequence of images recorded over a certain time frame When using ECG the time frame can be adjusted to cover one or more heart cycles When frozen the System automatic...

Страница 209: ...to worksheets press Clear 4 4 13 2 Check Circumference Area Ellipse Measurement 1 Press Measure once to display an active caliper 2 Move the Trackball to position the active caliper 3 Press Set to fix the start point 4 The system fixes the first caliper and displays a second active caliper 5 Move the Trackball to position the second caliper 6 Turn the Ellipse control an ellipse with an initial cir...

Страница 210: ...IQ S8 LOGIQ E8 SERVICE MANUAL 4 34 Section 4 4 Functional Checks 4 4 13 4 Report Pages Measurements Calculations that are included on the worksheet can also be displayed on Report Pages Report Pages can be customized to meet the appropriate needs of the user ...

Страница 211: ... panel 1 Power ON the system 2 Check backlight on AN Keyboard B Button Freeze Key and TGC Knob 3 Select UTILITY in touch panel 4 Turn joystick knobs to adjust the backlighting of Touch Panel Light Keyboard Light Button Light 5 Verify backlight luminance intensity changes when knobs are turned Figure 4 27 Touch panel and knobs Freeze Key B Button AN Keyboard TGC Knob Utility Touch Panel Button Keyb...

Страница 212: ... B image gain change 11 Press COMMENT key 12 Type in arbitrary strings from A N Keyboard Verify keyboard is functional 4 4 14 2 DVD Drive Test 1 Insert Blank CD R or DVD R Media into Optical Drive 2 Select UTILITY SYSTEM Backup Restore 3 Select CD DVD in MEDIA list 4 Select User Define Configuration checkbox in Backup and Press Backup 5 Start backup into Media by pressing OK Button 6 Verify Finish...

Страница 213: ...Adult And start scan 2 Verify calibration normally finished 3 Verify that B mode image appear CAUTION TAKE THE FOLLOWING PRECAUTIONS WITH THE PROBE CABLES KEEP AWAY FROM THE WHEELS DO NOT BEND DO NOT CROSS CABLES BETWEEN PROBES Table 4 2 Probe and Connectors Checks Step Task Expected Result s 1 Select the appropriate connected probe from the probe indicators on the Touch Panel The probe activates ...

Страница 214: ...isplayed select Utility Application and Check Show ECG Tab NOTE Without the ECG option the ECG touch panel is not displayed NOTE For more information about ECG refer to the latest revision of the LOGIQ S8 Basic User Manual Chapter 13 Plug in the ECG cables with nothing attached so you pick up noise the line should display noise Table 4 3 ECG Checks Step Task Expected Result s 1 Connect the ECG har...

Страница 215: ...lity System Peripherals and confirm DVD is set as DVR media If not set it and restart the system 3 Insert the media Go to DVR Touch Panel menu 4 Start Recording Perform image scanning including Doppler sound 5 Stop Recording 6 Play 7 Verify that Recorded image and sound can be played back NOTE For more information about DVR refer to the latest revision of the Basic User Manual Chapter 9 4 4 17 3 B...

Страница 216: ...mer Test 1 Insert Gel Bottle into Gel Warmer 2 Power ON the warmer Figure 4 29 Gel warmer ON OFF switch 3 Verify Gel gets warm NOTE Depending on environment Gel requires 30 minute or more to warm up 4 4 17 7 Single CWD 1 Connect P2D or P6D probe Select cardiac application like Adult And start scan 2 Verify that CW timeline image appears ...

Страница 217: ... Check 4 4 18 1 Physical Abnormalities Check for no loose or cracked parts on above locations Figure 4 30 LOGIQ S8 System Exterior example No Parts name 1 Main monitor 2 Monitor Arm 3 Control Panel 4 Rear Handle 5 Top Cover 6 Front Cover 7 Side Covers 8 Base 9 Casters 10 Rear Cover 11 External I O Panel AC Power Plug Holder 1 3 2 4 4 5 6 8 7 9 10 11 ...

Страница 218: ...ection 4 4 Functional Checks Figure 4 31 LOGIQ E8 System Exterior No Parts name 1 Main Monitor 2 Monitor Arm 3 Control Panel 4 Rear Handle 5 Top Cover 6 Front Cover 7 Side Covers 8 Base 9 Casters 10 Rear Cover 11 External I O Panel AC Power Plug Holder 12 Probe door 1 3 2 5 6 8 7 9 10 11 12 4 ...

Страница 219: ...4 43 4 4 18 2 Label Check Figure 4 32 Label location R1 R3 system Console No ٻ Manufacturing date GE ULTRASOUND KOREA Ltd 65 1 SANGDAEWON DONG JUNGWON KU SEONGNAM SI GYEONGGI DO KOREA ٻ Serial No 100 120V 220 240V 900VA 50 60Hz LOGIQ S8 BAR CODE 2 3 2 2 2 1 For 19 monitor For 23 wide monitor For 22 wide monitor OLED ...

Страница 220: ... Check presence of Caution Label on the rear panel of the monitor 2 3 2 Check presence of Multi Caution Label 2 2 3 Check presence of Rating Plate 2 1 NOTE Rating Plate design slightly differ depending on Console destination At minimum simply check Console number manufacturing date and serial Number NOTE Some countries may not have gender determination label ...

Страница 221: ... Check presence of Rating Plate 2 1 NOTE Rating Plate design slightly differ depending on Console destination At minimum simply check Console number manufacturing date and serial Number NOTE Some countries may not have gender determination label Console No ٻ Manufacturing date GE ULTRASOUND KOREA Ltd 65 1 SANGDAEWON DONG JUNGWON KU SEONGNAM SI GYEONGGI DO KOREA ٻ Serial No 100 120V 220 240V 900VA ...

Страница 222: ...ed Battery Diag can be performed with over 15 charging condition And actual battery kit is shipped with 20 30 charged condition so basically you don t need to check capacity for function test of extended battery If capacity is less than 15 normally this case is not happen you have to wait to charge it takes around 5 minutes to increase 1 4 4 21 3D 4D Option NOTE This test is only applied if the 4D...

Страница 223: ...and white on FibroScan Module front panel are lit Figure 4 35 LED on FIbroScan 3 Select the assigned key to start FibroScan mode Screen will be dual screen FibroScan view will be showed on right side of monitor and Touch panel will be FibroScan tab 4 Connect either M or XL probe to FibroScan Module 5 Select the exam type button to activate the connected probe The activated probe blue LED will star...

Страница 224: ...est Refer to 7 9 3 System on page 7 130 4 6 2 Power Supply Adjustment There are no adjustments on the power supplies The DC Power is self regulated If a voltage is outside the specified range it means that something is wrong either with the power supply itself or with a unit connected to that specific power outlet Table 4 4 Software Configuration Checks STEP TASK CHECK 1 Check Date and Time settin...

Страница 225: ...GE HEALTHCARE PROPRIETARY TO GE DIRECTION 5394227 12 LOGIQ S8 LOGIQ E8 SERVICE MANUAL Section 4 7 Site Log 4 49 Section 4 7 Site Log Table 4 5 Site Log DATE SERVICE PERSON PROBLEM COMMENTS ...

Страница 226: ...GE HEALTHCARE PROPRIETARY TO GE DIRECTION 5394227 12 LOGIQ S8 LOGIQ E8 SERVICE MANUAL 4 50 Section 4 7 Site Log Table 4 5 Site Log Continued DATE SERVICE PERSON PROBLEM COMMENTS ...

Страница 227: ...er Distribution scheme and probes NOTE When not otherwise specified the contents of this manual and reference to LOGIQ S8 applies to all LOGIQ S8 LOGIQ E8 LOGIQ S8 Vet models 5 1 2 Contents in this chapter 5 1 Overview 5 1 5 2 General Information 5 2 5 3 Power Distribution 5 11 5 4 Power Loss description 5 12 5 5 Software Overview 5 13 5 6 Software Options 5 14 5 7 Hardware Options 5 17 5 8 Region...

Страница 228: ...General Information LOGIQ S8 is a digital beam forming curved linear and phased array ultrasound imaging system The system supports various operating mode such as B Mode M Mode Color Flow CFM Power Doppler Imaging PDI PW Doppler CW Doppler Volume Mode 3D 4D Refer to Basic User Manual for full range of operating mode ...

Страница 229: ... Printer or V Nav 9 Color printer or Drawer 10 Probe port 4 active probe port and 1 parking port LE8 has the cover 11 Foot rest 12 Side tray option 13 Touch panel 14 CW pencil probe port 15 ECG Connector 16 External I O panel 17 USB ports left side of 23 monitor right side of OLED monitor 18 Control panel swivel lever 19 Control panel up down lever 20 Cooling fan and dust filter inside front cover...

Страница 230: ...Wide Monitor 2 Control panel 3 Probe holder 4 Gel warmer 5 Audio speaker 6 DVD Drive 7 Blind cover B W printer Color Printer Drawer V Nav controller or FibroScan module 8 Probe port 4 active probe ports 1 parking port 9 CW pencil probe port 10 Footrest 11 Measurement Selection Menu 12 ECG connector 13 External I O panel 14 USB port 15 Control panel swivel lever 16 Control panel up down lever ...

Страница 231: ...or Panel Figure 5 4 R4 and later Operator Panel Integrated A N Keyboard Interchangeable FREEZE and P1 Key User Define Keys BT Key Power Button Probe Holder Gel Warmer Probe Holder Option Probe Holder Integrated A N Keyboard User Define Keys BT Key Power Button Probe Holder Gel Warmer Probe Holder Option Probe Holder Interchangeable FREEZE and P1 Key ...

Страница 232: ...obe connector 5 2 2 System Options Figure 5 6 System Options DLP Probe Connector 4 ports Parking DLP Connector Single CW Connector CWD Option LOGIQ S8 only Optional Probe Holder ECG Connector Cabinet for BW Printer Color Printer V Nav Unit FIbroScan Module Drawer Single CW Connector CWD Option LOGIQ S8 LOGIQ S8 Vet Side Tray for R1 R2 and R3 ...

Страница 233: ...8 SERVICE MANUAL Section 5 2 General Information 5 7 5 2 3 USB Ports Figure 5 7 USB Ports on the system Figure 5 8 OPIO USB port R4 system 23 Wide monitor Left side 22 Wide monitor Right side One direct port for user front One hub port for service side ...

Страница 234: ...ed limit 5 2 3 3 USB ports on the monitor R3 and later The two USB2 0 Ports are used for USB Storage USB HDD and USB Flash Device NOTE USB ports on the monitor are non isolated and not fit to connect external powered USB Devices NOTE Connector type is USB3 0 but it works as USB2 0 Table 5 1 Front USB port Location Description Front side USB 2 0 480 Mbps 5V 500 mA The customer use connected to USB ...

Страница 235: ...E8 SERVICE MANUAL Section 5 2 General Information 5 9 5 2 3 4 USB ports on the OPIO R4 or later The two USB3 0 Ports are used for USB Storage USB HDD and USB Flash Device Table 5 4 Specification Software version Description R4 USB 3 0 5 Gbps 5V 900 mA ...

Страница 236: ...4 2 Ethernet 1000 Base T 100 Base T 10 Base T 5 2 4 3 Audio MiniJack Normal Audio L R GND pin assign Line out 5 2 4 4 AC Inlet Figure 5 9 AC Inlet 1 USB Port USB2 0 Full Speed R3 and later No isolated 2 HDMI connector HDMI connector for an external monitor 3 Ethernet LAN for InSite Connection RJ45 4 Audio Audio line out 3 5mm pin jack 5 Circuit breaker 10A 6 AC Inlet 100 120V 220 240V 19 1 18 2 10...

Страница 237: ...N button on the Operator Panel 3 BEP and system power up Sequence 1 Circuit breaker ON 2 AC DC Unit creates Stand by Power 3 Stby Power routed to COM Express 4 Stby Power routed to OPIO LED 5 Main ON signal from OPIO 6 COM Express Sends ON Signal to AC DC 7 AC DC route 12V to DC DC Controller 8 AC DC route 12V to system GFS BF192 and VNav DVD FibroScan module GFS powers OPIO and LCD 9 Main AC powe...

Страница 238: ...s description A power loss may be due to The Mains Switch has been switched to OFF The Mains cable has been disconnected Brown out If a power loss occur all AC power distribution within the unit is lost Both the Back End Processor and the Front End Card Rack stops functioning the peripherals and the monitor also looses its power ...

Страница 239: ...used on LOGIQ S8 You can also refer to the Basic User Manual for more information 5 5 2 Contents in this section 5 5 1 Purpose of this section 5 13 5 5 2 Contents in this section 5 13 5 5 3 LOGIQ S8 software 5 13 5 5 3 LOGIQ S8 software LOGIQ S8 running R1 x software The LOGIQ S8 Software is based on Windows XP Embedded LOGIQ S8 running R2 to R4 software The LOGIQ S8 Software is based on Windows 7...

Страница 240: ...mference and enclosed area Yes Yes Yes Yes Yes Coded Contrast Provides contrast imaging capability Yes Yes Yes Yes Yes CW Doppler LS8 only Allows examination of blood flow data all along the Doppler Mode cursor rather than from any specific depth Gather samples along the entire Doppler beam for rapid scanning of the heart Range gated CW allows information to be gathered at higher velocities Yes Ye...

Страница 241: ...ter a Static 3D or Real Time 4D acquisition N A Yes Yes Yes Yes VCI Static VCI Volume Contrast Imaging allows you to sweep smaller slices of data with a higher volume rate The resulting image shows an average integrated gray value of the tissue contained within the ROI N A Yes Yes Yes Yes Auto EF Automated Ejection Fraction AutoEF is a semi automatic measurement tool used for measurement of the gl...

Страница 242: ...w approach for clinical assessment of the fetal heart STIC offers an easy to use technique to acquire data from the fetal heart and to aid in visualization with both two dimensional and three dimensional 3D cine sequences N A N A N A Yes Yes OmniView Omniview function Display non orthogonal view along any drawn plane Sub menu on Sectional Visualization of 3D 4D mode N A N A N A Yes Yes FibroScan C...

Страница 243: ...LS8 Power Assistant hardware Y Y LS8 R4 Power Assistant hardware Y Y Battery for Power Assistant Y Y Y Y Extended battery for scan Y Y LS8 R3 CW Doppler kit Y Y Y FibroScan Module Y Y Peripheral Devices Misc Polaris Side Tray Y Y Y Wireless LAN A4100 Y Y Wireless LAN A6210 Y Y Running Change for R2 Japan model is different H Cat Wireless LAN A6210 for LS8 R4 Y Y USB 3 Pedal Foot Switch Y Y Y Y Y S...

Страница 244: ...Y V Nav eTRAX 18 20g starter kit Y Y Y Y V Nav eTRAX starter kit 12GA Y Y Y Y V Nav eTRAX starter kit 14GA Y Y Y Y V Nav Active Tracker kit Y Y Y V Nav Active Tracker kit MR Y Y Y Cardiac and ECG Option LS8 ECG Module without ECG cables Y Y Y ECG kit without Cable Y Y LS8 ECG Cable AHA Y Y Y Y Y LS8 ECG cables IEC Y Y Y Y Y Peripheral Device Cabinet LOGIQ High Cabinet Y Y Y LOGIQ Mid Cabinet Y Y Y...

Страница 245: ...ore as UP D897 compati Mode Color Sony UP D25 Y Y Y Y Y LS8 Sony UP D55 Digital Color A5 Printer Y Y Y Y Color Sony UP DR80 Y Y Y Y UP DR80 can be used on LOGIQ S8 R2 2 1 or later Color Inkjet Printer HP470 Off board Y Y Y Y Y Color Inkjet Printer HP100 Off board Y Y Y Y Color Inkjet Printer HP6100 Off board Y Y Y HP OfficeJet Pro 8100 ePrinter Off board Y Y Y Printer install kit Y Y Y Printer ins...

Страница 246: ...8 SERVICE MANUAL 5 20 Section 5 7 Hardware Options LS8 UVC Off board installation kit Y Y Y Y LS8 Off Board UVC AC Adaptor Y Y Y Y Japan model is different H Cat Table 5 6 Hardware option list Hardware Options SW Revision Description R1 R2 R3 R4 R4 2 5x ...

Страница 247: ...394227 12 LOGIQ S8 LOGIQ E8 SERVICE MANUAL Section 5 7 Hardware Options 5 21 5 7 1 LOGIQ S8 R4 FibroScan Option 5 7 1 1 FibroScan Screen Figure 5 10 FibroScan Screen 5 7 1 2 FibroScan Module Box Figure 5 11 FibroScan Module Box ...

Страница 248: ...Options 5 7 1 3 FibroScan mounting position Figure 5 12 FibroScan mounting position 5 7 1 4 FibroScan Signal Connection Figure 5 13 Signal Connection 5 7 1 5 FibroScan Probe Figure 5 14 FibroScan Probe 1 Electrodynamic transducer 2 Measurement button 3 Indicator light LED 4 Ultrasonic transducer ...

Страница 249: ...o activate XL probe Note If only one FibroScan probe is connected the exam type is automatically activated when entering the FibroScan mode CAP Activate the CAP measurement when the CAP option is installed Note If the CAP option is installed the CAP button is automatically activated when entering FibroScan mode FibroScan Report Activate FibroScan Report page Delete Delete a group of measurements i...

Страница 250: ...e Calibration Calibration Indicator Probe needs to be calibrated every 2 years A message will be displayed 14 days prior calibration expiration date as well as if the calibration has expired When performing FibroScan Exam without the calibration the exam may continue but the Calibration icon will be showed on FibroScan View ...

Страница 251: ...ion Set South Africa Destination Set Argentina Destination Set Israel Destination Set Switzerland Destination Set Denmark Destination Set US Destination Set Japan Destination Set Australia New Zealand Destination Set China Destination Set India Destination Set Italy Destination Set Brazil Europe 220V power cable Optional Language Keyboards Greek Keyboard Norwegian Danish Keyboard Russian Keyboard ...

Страница 252: ...on 5 9 1 Air Flow Distribution Through the filter grid on the front of the system air flow into the LOGIQ S8 By means of the 1 FAN air is blown through the nest box and the warm air exits the system through holes in the left side panel and rear of the system Figure 5 17 Air Inlet Outlet Main Air inlet Filter grid Main Air Outlet Rear Side ...

Страница 253: ...eference The online versions of the operator manuals are available via the Help function F1 key on LOGIQ S8 s operator panel The translated user manuals are available on a CD ROM delivered with the system They are also available on the Common Documentation Library CDL for downloading 5 10 2 User documentation LOGIQ S8 User Manual LOGIQ S8 Advanced Reference Manual LOGIQ S8 User Guide LOGIQ S8 Rele...

Страница 254: ...n for LOGIQ E8 This universal video converter needs a fan assy for cooling 4 LOGIQ E8 SW Option LOGIQ E8 does use LOGIQ S8 application software LOGIQ E8 SW is required to boot system as LOGIQ E8 When LOGIQ E8 Software Option Key is enabled the system behavior changes as follow LOGIQ E8 is described in splash screen LOGIQ E8 displays as Probe direction mark The Device type and Device Name prefix on...

Страница 255: ...GE HEALTHCARE DIRECTION 5394227 12 LOGIQ S8 LOGIQ E8 SERVICE MANUAL Section 5 11 LOGIQ E8 5 29 Figure 5 19 LOGIQ E8 Emblem position R4 system ...

Страница 256: ...GE HEALTHCARE DIRECTION 5394227 12 LOGIQ S8 LOGIQ E8 SERVICE MANUAL 5 30 Section 5 11 LOGIQ E8 This page was intentionally left blank ...

Страница 257: ...this chapter This chapter describes how to test and adjust the mechanical capabilities of the sytsem that may be out of specification Although some tests may be optional they should only be performed by qualified personnel NOTE When not otherwise specified the contents of this manual and reference to LOGIQ S8 applies to all LOGIQ S8 LOGIQ E8 LOGIQ S8 Vet models ...

Страница 258: ... adjusted values will be lost after loss of power Figure 6 1 Monitor Adjustment buttons NOTE 1280 x 1024 60Hz Table 6 1 Contents in this section Section Number Main Menu Sub Menu Range Setting for LOGIQ S8 6 2 1 1 Picture Contrast 0 100 100 Brightness 0 100 80 Colortemp Gamma Select 2 2 or 2 4 2 4 Colortemp Mode 9000K 11000K 13000K 15000K USER 13000K 6 2 1 2 Function Scale Full 5 4 Native Full Inf...

Страница 259: ...ale The lowest level of black should just disappear into the background and the highest white should be bright but not saturated 1 Adjust the BRIGHTNESS by pressing the LEFT or RIGHT button to decrease increase value 6 2 1 1 2 Contrast 1 Press the MENU middle key of the monitor controls over 10 sec 2 Select the Picture Contrast by pressing the LEFT or RIGHT button to decrease increase cursor and t...

Страница 260: ...o move the cursor and the MENU middle key 3 Select 2 2 or 2 4 by pressing the MENU middle key 6 2 1 1 4 Mode 1 Press the MENU middle key of the monitor controls over 10 sec 2 Select the Picture Color Temp MODE by pressing the LEFT or RIGHT button to move the cursor and the MENU middle key 3 Select desired value by pressing the MENU middle key 4 If selecting USER mode adjust the R G B value by pres...

Страница 261: ...FUNCTION Scale by pressing the LEFT or RIGHT button to move the cursor and the MENU middle key 3 Select FULL 5 4 NATIVE by pressing the LEFT or RIGHT button to decrease increase the value and the MENU middle key 6 2 1 2 2 Information 1 Press the MENU middle key of the monitor controls over 10 sec 2 Select the FUNCTION INFORMATION by pressing the LEFT or RIGHT button to move the cursor and the MENU...

Страница 262: ...n to move the cursor and the MENU middle key NOTE MEMORY RECALL is Factory default If selecting MEMORY RECALL all settings will be back to factory default status 6 2 1 2 4 SBC 1 Press the MENU middle key of the monitor controls over 10 sec 2 Select the FUNCTION SBC by pressing the LEFT or RIGHT button to move the cursor and the MENU middle key 3 Select ON OFF by pressing the LEFT or RIGHT button t...

Страница 263: ...OSITION by pressing the LEFT or RIGHT button to decrease increase cursor and the MENU middle key 3 Adjust the H POSITION by pressing the LEFT or RIGHT button to decrease increase the value default 50 6 2 1 3 3 V Position 1 Press the MENU middle key of the monitor controls over 10 sec 2 Select the OSD V POSITION by pressing the LEFT or RIGHT button to decrease increase cursor and the MENU middle ke...

Страница 264: ... touch panel 2 Adjust Room profile Color Profile Gamma Brightness Contrast Room profile User defined and Color Space 22 OLED monitor only as necessary Figure 6 7 Utility second page 22 OLED Monitor example Table 6 2 Parameters for Wide Monitor Parameter Range Note Room Profile Dark Semi Dark Light User Defined Color Profile 0 1 2 3 Gamma 2 2 or 2 4 Color Space OLED only 0 1 2 Brightness Room Profi...

Страница 265: ... main display If User Defined is selected the user can adjust Brightness Contrast by Brightness Contrast control at the bottom of the Touch Panel NOTE Brightness Contrast setting is displayed only when touch panel has Room Profile button NOTE Brightness Contrast setting is changeable only when Room Profile setting is User Defined In Utility System System Display you can select Last Used Factory de...

Страница 266: ...on This procedure is a means to do a system specific calibration correction Note that the field calibration only applies to the specific type of probe 9L D ML6 15 D C1 5 D e g that is used Therefore it may be necessary to repeat this procedure for each probe type that a customer owns 6 3 3 Equipment Use a phantom optional with distinguishable points that can be scanned from at least two directions...

Страница 267: ...he 2nd Environmental Quality Indicator in the upper left corner of the screen to initiate a mouse over window 3 Move the transducer across the surfaces of the phantom optional where you will be scanning The absolute value of the magnetic distortion reading 1 2 Distortion should be consistently less than 1 mm especially since the transducer is held steady in one location It is also important that t...

Страница 268: ...ing the probe steady move the Windows Pointer over the point of interest and press the Right Trackball key A GPS Target Marker labeled 1 is placed on the point of interest 5 Change the orientation on the probe 90 degrees and mark the same point again Write down the results shown on the status bar Prior to Correction Distance _________ mm After Correction Distance _________ mm 6 Return to the origi...

Страница 269: ...rest identified in step 5 For example turn the probe 90 degrees or move the probe to a different surface of the phantom optional The GPS marker will help to guide back to the same point of interest make sure that you are marking the same point of interest Once you are at the same point use the Windows Pointer and the Right Trackball key as before to mark the point of interest If this view of the p...

Страница 270: ...A series of calculations are performed in 5 steps Once the fifth step is complete a value appears on the status bar This message appears briefly so watch for it If you miss this message press Calibration Calculate again to redo the computations and re display the result Record your results Init Mean Dev ______________ Opt Mean Dev __________________ The lower the value the more likely the calibrat...

Страница 271: ...e trouble images and system data logs for acquisition through remote diagnostics or to be sent back to the manufacturer for analysis There are different options to acquire this data that would give different results NOTE When not otherwise specified the contents of this manual and reference to LOGIQ S8 applies to all LOGIQ S8 LOGIQ E8 LOGIQ S8 Vet models 7 1 2 Contents in this chapter 7 1 Overview...

Страница 272: ...ystem Remote access to the LOGIQ S8 requires permission and customer input to run diagnostics 7 2 3 Local Access R1 to R4 1 If not already in read mode freeze the image 2 Select Utility on the Touch Panel and then touch Service Service Login opens 3 Select Operator from the pull down menu enter the password uls and then click Okay 4 GEHC Service Home Page appears The Common Service Desktop CSD is ...

Страница 273: ...e access to the LOGIQ S8 scanner requires permission and customer input before a GE service technician or OLC can access the customer s ultrasound scanner remotely Disruptive Mode can be selected by the customer directly on the LOGIQ S8 ultrasound system or remotely by the service technician or OLC 7 2 4 2 How the Customer enables disables Disruptive Mode and VCO 1 If not already in read mode free...

Страница 274: ...mote access to your LOGIQ S8 scanner following InSite Notification appears on the systems screen 1 Enable Disruptive Mode feature by confirming Yes NOTE If the customer does not wish to have diagnostics running at the time of the request they select No A message is sent back to the OLC or FE that Disruptive Mode is not enabled NOTE The user must have Remote service access rights to authorize disru...

Страница 275: ...ice or through remote diagnostics InSite These data can be used to perform service at the device or can be sent back to the manufacturer for analysis 7 3 2 Contents in this section 7 3 1 Purpose of this Section 7 5 7 3 2 Contents in this section 7 5 7 3 3 Collecting Vital System Information 7 6 7 3 4 Collecting a Screen Capture with Logs 7 9 7 3 5 Capturing Service Logs with ALT D 7 12 7 3 6 Scree...

Страница 276: ...or being returned to the manufacturer NOTE This information is normally collected with the Alt D or Gather Logs utility Product Name LOGIQ S8 or LOGIQ E8 1 From the touch panel select Utility System About Figure 7 5 System About R1 Figure 7 6 System About R2 and later 2 Record software version and System Image version Applications Software Software Version Software Revision R2 x x and later Softwa...

Страница 277: ...pointer on the GE InSite icon at the bottom of the display 2 Press the right Trackball Set key Select Contact GE The RFS screen opens Figure 7 7 Contact GE Request for Service NOTICE NOTICE Service Connectivity has to be checked out once before you can request for service i e Service platform has to be configured properly see Section 7 4 Service Desktop CSD R1 to R4 on page 7 20 ...

Страница 278: ...confirmation screen is displayed Figure 7 8 Request submitted 3 Write down and keep the Reference Number for follow up procedures then click OK NOTE f the service platform is not configured an Error message is displayed The request is NOT sent The request is saved in QUEUE for reviewing and or re sending Figure 7 9 Contact GE Queue Write down and keep the Reference Number ...

Страница 279: ...lects a screen capture of the image monitor user defined presets and the following logs Keyboard Shadow Log Error Logs Crash Log Vital Product Data DICOM Logs Windows Event Logs Diagnostic Logs Service Logs FibroScan Module Logs For a detailed list of Service Logs captured see 7 3 5 Capturing Service Logs with ALT D on page 7 12 Figure 7 10 ALT D Dialog Box 1 When Alt D is pressed a menu box opens...

Страница 280: ...For CD DVD the system will automatically format if you insert an unformatted disk gather logs and write it out to the disk The subsequent file is compressed and time stamped The screen capture is a bitmap which eliminates the possibility of artifacts from compression Double check the media that you made to ensure it contains at least two files as below example Figure 7 11 Example of Zipped Trouble...

Страница 281: ... or later Zip file configuration 7 3 4 1 Marking Log files If a customer is experiencing issues during operations the event can be marked and logged by pressing Alt 1 or Alt 2 when they occur When Alt 1 or Alt 2 are pressed the log will register time and help log analysis when troubleshooting intermittent issues Zipped_log_without_protected_info Zipped_log_including_protected_info ...

Страница 282: ... LOGIQ S8 LOGIQ E8 SERVICE MANUAL 7 12 Section 7 3 Gathering Troubleshooting Data R1 to R4 7 3 5 Capturing Service Logs with ALT D The following is a list of the Service logs captured during an ALT D log capture Figure 7 12 Log example ...

Страница 283: ...es that can then be viewed by the OLC 7 3 6 2 To Capture a Screen Image Using the Shortcut With the desired image displayed on the screen press Ctrl and PrtSc print screen keys simultaneously If you want to compress or delete them 1 From the touchpanel select Utility Service Utilities Common Utilities Image Compress Delete Utilities 2 Select the checkbox for the image s you want to save compress o...

Страница 284: ... under d log Sniffer folder to ensure they form part of general log collection Alt D or Collect Log 1 Press Alt N 2 On the network sniffer screen select Capture Options Figure 7 13 Network Sniffer Screen Select the interface that will be receiving packets Network card A NOTE Remember if the device has a DVR it will show up in the list Select either Intel Network connection or the Wireless network ...

Страница 285: ...ork Sniffer cont d Use filters to limit the captured data Filter by IP or by IP and port number By IP only press on Capture Filter 3 Select IP only Use the IP address of the system or the one from the DICOM device under test on the Filter string field using the following syntax example host 3 62 12 33 as shown in below press OK Figure 7 14 Capture Filter IP Only ...

Страница 286: ...for example DICOM port 104 6 Enter the string with the following syntax port xxx and host yy yy yy yy where xxx is the port number of My Computer in the LOGIQ S8 and yy yy yy yy is the IP address of the device under test PACS server etc 7 Press OK Figure 7 15 Sniffer Capture Filter IP and Port 8 Select Start 9 Minimize network sniffer window and initiate communication to the DICOM device e g send ...

Страница 287: ...ty A Packet List pane the packet list pane displays all the packets in the current capture file Each line in the packet list corresponds to one packet in the capture file B Packet Details pane shows the current packet selected in the Packet List pane in a more detailed form This pane shows the protocols and protocol fields of the packet selected in the Packet List pane C Packet Bytes pane The pack...

Страница 288: ...g 11 Type dcm and press Apply The display should filter all DICOM packets filtering out image data Figure 7 17 Filter Tool Display 12 Select Capture Stop Or select the icon in the task bar to stop the capture 13 Select File Save As Enter the file name d log Sniffer MyLog MyLog can be changed to the name of your preference WireShark uses the libpcap pcap cap file format as the default format to sav...

Страница 289: ... rather than the entire capture 15 Select SAVE If you perform Alt D or Gather Logs these sniffer logs will be included in the zip file Figure 7 19 Select Capture Display 16 Exit the sniffer application by clicking on the X in the upper right corner 17 If you have already performed Save as you can continue without saving and quit the program Make sure you have saved your data before exiting the pro...

Страница 290: ...e NOTE When using the Common Service Desktop do NOT minimize any of the Common Service Desktop windows If you minimize them they end up in the lower left corner of the screen behind the Service Desktop Manager window and cannot be restored 7 4 2 Contents in this chapter 7 4 1 Purpose of this Section 7 20 7 4 2 Contents in this chapter 7 20 7 4 3 Global Service User Interface GSUI 7 21 7 4 4 CSD To...

Страница 291: ...evels Each user is only granted access to the tools that are authorized for their use Every access request whether successful or not will be logged into a service access log that is viewable to authorized users Restart LOGIQ S8 after diagnostics Always shutdown the system and reboot after a diagnostics session A red message on the task bar will remind you that the system needs to be restarted afte...

Страница 292: ...us etc 2 Connected Probes Connected and System recognized probe listed 3 Options Installed Enabled Options and its expiration date 4 Windows Printers Connected and system recognized peripheral listed 5 Current System Status System Date Time etc 6 System Health Information Current System Status System Power ON hours Health Limit link should not be referenced 7 Temperature and Voltage Details on the...

Страница 293: ...ables to view a number of different system logs 1 LOGS enables to view following logs System Displays all the system logs including errors and additional details Power Displays all the power logs including errors monitoring dates and values Temperature Displays all the temperature logs including errors monitoring dates and values 2 UTILITIES enables to access following log utilities Plot Log to vi...

Страница 294: ... interface to provide access to common service components and perform diagnostics Non Interactive The tests are performed without the user s intervention Interactive The user is required to perform an operation on the ultrasound unit in order for the test to be completed successfully This option is not applicable when used remotely Figure 7 23 Common Service Desktop Diagnostics ...

Страница 295: ...7 4 Service Desktop CSD R1 to R4 7 25 7 4 7 Image Quality In the Image Quality page you can verify image quality NOTE This page is not populated in this version 7 4 8 Calibration There is no accessible parameters from Calibration Figure 7 24 Common Service Desktop Image Quality ...

Страница 296: ...In the Configuration page you can view and modify different device informations and configurations in the InsiteExC Agent Configuration option field Figure 7 25 Common Service Desktop Configuration NOTICE NOTICE Remote access is ONLY possible if the service platform is properly configured either by the user or a GE technician at site ...

Страница 297: ... Application link an event log relative to application events System link an event log relative to system events Log Name enter the Log Name you want to view and click the View button Figure 7 26 Event Log Viewer Window 7 4 10 2 Disruptive Mode Allows you to enable or disable disruptive mode troubleshooting If you are accessing through InSite this can only be enabled with the customer operator con...

Страница 298: ... 12 LOGIQ S8 LOGIQ E8 SERVICE MANUAL 7 28 Section 7 4 Service Desktop CSD R1 to R4 Figure 7 27 Disruptive Mode Window 7 4 10 3 Disk Usage View capacity and usage statistics for the different disk drives Figure 7 28 Disk Usage Window ...

Страница 299: ... MANUAL Section 7 4 Service Desktop CSD R1 to R4 7 29 7 4 10 4 IP Configuration View Windows IP configuration and LAN connection data Figure 7 29 IP Configuration 7 4 10 5 Network Status View data for active network connections Figure 7 30 Network Status Window ...

Страница 300: ...s View the Windows Services that are started and running A Windows Service is a computer program that has been automatically started and is running in the background on the computer Figure 7 31 Windows Services Window 7 4 10 7 User Accounts View the user accounts that have been given access to this system Figure 7 32 User Accounts Window ...

Страница 301: ...Virus Software Control Select Disable to disable the Anti Virus software if needed Figure 7 33 Anti Virus Software Control Window NOTE R4 If the Advanced Security software option installed and the Anti Virus software has not been disabled the following message appears Disable the Anti Virus software by following the steps above ...

Страница 302: ...is system Figure 7 34 Shared Resources Window 7 4 10 10 System Shutdown System Shutdown gives you the ability to Restart or Shutdown the system when using Virtual Console Observation from a remote computer NOTE Retain Disruptive Mode checkbox MUST be checked if you are working from a remote computer Should be unchecked if you are working locally on the scanner Figure 7 35 System Shutdown Window ...

Страница 303: ...can be gathered using the Gather Logs shortcut on the Windows desk top Figure 7 36 Gather Logs Utility WIndow In R4 and later Gather Logs Utility will not be collecting logs that contain protected information If those logs are needed the OnLine Engineer will have to request the user to perform an Alt D function authorizing the inclusion of protected information in the logs 7 4 10 12 Image Viewer U...

Страница 304: ... images available at this time Compress Files compresses images into a zip file Delete Files deletes the images from the image Export Service directory Figure 7 38 Image Compress Delete Utility Window 7 4 10 14 Scanner Documentation Interface Use this to view the user and service documentation for the system You need to have eDoc CD inserted in the drive in order to open it Figure 7 39 Scanner Uti...

Страница 305: ...E MANUAL Section 7 4 Service Desktop CSD R1 to R4 7 35 7 4 11 Utilities Scanner Utilities 7 4 11 1 Reset Database Remove Patient data from database Figure 7 40 7 4 11 2 Clean Userdefs Remove User defs under D scanner target resources Figure 7 41 Clean Userdefs ...

Страница 306: ...o verify DICOM connectivity between the scanner and DICOM devices on the network 1 Enter AE Title IP Address and Port values of the DICOM device 2 Check the Loop checkbox to repeat the operation or leave it unchecked to perform the operation once 3 Click the Verify button to see the results 4 Uncheck the Loop checkbox to stop the operation Figure 7 42 DICOM Verify Window ...

Страница 307: ...E DIRECTION 5394227 12 LOGIQ S8 LOGIQ E8 SERVICE MANUAL Section 7 4 Service Desktop CSD R1 to R4 7 37 7 4 12 Replacement Field is not populated 7 4 13 PM Field is not populated Figure 7 43 Common Service Desktop PM ...

Страница 308: ...gathering log files To gather log files the system requires a user to be logged in The error message below appears when hitting Alt D key without any user logged in 7 5 2 Collecting vital system information The following information is necessary to properly analyze data or images being reported as a malfunction or a LOGIQ S8 being returned to the manufacturer NOTE This information is normally coll...

Страница 309: ...he flagging issues during operation Alt F10 Displays SW Shut Down If the LOGIQ S8 can be shut down by using these keys it means that SW is working and the problem could be the ON OFF switch or the wire that carries the shut down signal Alt F5 For the echo simulator keyboard simulation brings up or removes the front panel simulator It may be used with VCO to press buttons on the front panel that ar...

Страница 310: ...s Alt D is available at all times and collects a screen capture of the image monitor user defined presets and these logs Keyboard Shadow Log protected information Error Logs Crash Log protected information Vital Product Data DICOM Logs Windows Event Logs Windows Modem Log Diagnostic Logs Service Logs For a detailed list of Service Logs captured see 7 3 7 Capturing Network Logs with Network Sniffer...

Страница 311: ...og_ SN _ DATE _ TIME _DB zip log_ SN _ DATE _ TIME _ProtectedInfo_DB zip Where SN is the serial number DATE is the date in format YYMMDD and TIME is the time in format HHMMSS 4 To include a duration check Time Duration and select a duration from the dropdown 5 Under Destination select a storage media or Service directory for remote viewing 6 Click the Store button NOTE To save to a CD DVD or USB F...

Страница 312: ...tains the file An example is shown in Figure 7 45 Example of Zipped Trouble Image and Logs File on page 7 42 Figure 7 45 Example of Zipped Trouble Image and Logs File Figure 7 46 Contents of the Zipped Trouble Image and Logs File Mark log files If a customer is experiencing issues during operation mark the issue by pressing Alt 1 or Alt 2 when the event occurs When Alt 1 or Alt 2 is pressed a mark...

Страница 313: ...nt information to GE under ADMIN System Admin To collect the image press the P1 key copy to hard drive This places an unidentified jpeg image in the D Log DL folder This folder will be transferred to the back office if a transfer is scheduled Figure 7 47 Example of a Trouble Image Collected with P1 To collect logs using Gather Logs the image or images will be captured in the log collection Zip fil...

Страница 314: ...me other network sniffer to analyze it To troubleshoot network capture logs 1 On the LOGIQ S8 run the Network Capture utility to generate etl and cab files for analysis For more information see Network Capture on page 7 61 2 Locate the etl file at D Service 3 Transfer these files to a laptop 4 On the laptop download Microsoft Message Analyzer if not already done 5 In Microsoft Message Analyzer ope...

Страница 315: ... 45 6 To export the etl file to cab select File Save As and then select Save As or Export If the network capture was of a wireless connection Microsoft Message Analyzer creates a pcap file that does not have any of the packets and is probably useless 7 Use Wireshark or some other third party network sniffer to examine the cab file ...

Страница 316: ...nfiguration 7 66 7 6 1 Purpose of this section This section describes the features of the Service desktop These are the different levels of access to the Service desktop Service Basic access Class A a user locally logged into the machine with Local Service Access privilege This level provides limited access to Service desktop widgets and utilities Remote access a user remotely accessing the LOGIQ ...

Страница 317: ... LOGIQ S8 may be limited When Disruptive mode is Off some service functionality on the Service desktop is not available and user operation of the LOGIQ S8 is normal Additionally the ability to enable Disruptive mode depends on the logged in user Local user a user locally logged into the machine will be able to set the LOGIQ S8 to Disruptive mode or allow a Disruptive mode request from a remote use...

Страница 318: ... Section 7 6 Service Desktop R4 2 5x and later 7 6 4 Licenses With Service Basic Access Class A these are the available options HOME Utilities Change Password Data Transfer Delete Files Gather Logs Network Capture SSA License Third Party Licenses Options Agent Configuration ...

Страница 319: ...n 7 6 Service Desktop R4 2 5x and later 7 49 7 6 5 Home Home configurations vary depending upon the purchased service level Figure 7 49 Home with Class A Access For more information see System Information on page 7 50 Software Status on page 7 52 Connected Probes on page 7 53 ...

Страница 320: ...IQ S8 When the LOGIQ S8 has been successfully configured with the back office these elements will have the corresponding values Agent Registered will be Yes Agent Quarantine will be No Agent CRM Verified will be Yes The information on System Information is available to all service class licenses To access System Information navigate to Utility second page Service Home Figure 7 50 System Informatio...

Страница 321: ...figured Agent Quarantine Quarantine status of the agent Valid values are Yes The agent has more than one device registered with the same CRM Number in the back office No The agent has one device registered with the listed CRM Number in the back office Not Available The agent is not running or has not been configured Agent CRM Verified CRM verified status of the agent Valid values are Yes The agent...

Страница 322: ... 7 5 Software Status Element Description System Date Current date in the format day month date year System Time Local time based on the last time the system desktop was refreshed in the format hh mm ss Application Installation Date Date the application software was installed The application software includes the LOGIQ S8 product specific software Base Image Installation Date Date the base image so...

Страница 323: ... shows all the elements available on Connected Probes with descriptions For more information see Home on page 7 49 Table 7 6 Connected Probes Element Description Active Probe Temperature Celsius When available temperature of the active probe Not all probes report temperature The most common probe to report temperature is the TEE probe Probe Name Name of the probe connected to the LOGIQ S8 Probe ID...

Страница 324: ... later 7 6 6 Utilities Utilities configurations vary depending upon the service class For more information see Change Password on page 7 55 Data Transfer on page 7 57 Delete Files on page 7 59 Gather Logs on page 7 60 Network Capture on page 7 61 SSA License on page 7 63 Third Party Software Licenses on page 7 64 ...

Страница 325: ...e elements available on Change Password with descriptions CAUTION RISK OF LOSING DATA IF THE PASSWORD IS LOST GE WILL NOT BE ABLE TO RECOVER OR RESET IT LOSS OF A PASSWORD MAY RESULT IN THE LOSS OF PATIENT DATA Table 7 7 Change Password Element Description User Type Type of user for the password reset GEService Windows user for GE Service SVCService Windows user loaded with the base image load sof...

Страница 326: ...If the password is changed when offline the back office will not be updated and you will have to change the password again with the LOGIQ S8 online There is no notification when this password has been changed Changes to this password do not affect logs sent to the GE Service data lake SVCService This is the Windows user loaded with the base image load software You will never be prompted for this p...

Страница 327: ... descriptions Table 7 8 Data Transfer Element Description Type of Upload Type of log file For example Incremental Logs or Full Logs Monitoring Logs System Logs and Windows Logs are incrementally transferred when automatic transfer is enabled To enable automatic transfer navigate to System Admin and under Service check Enable Automatic Request for Service Upload Permission Whether the permission to...

Страница 328: ...these settings Transfer Machine Logs to GE Default is checked Transfer Operator Information to GE Transfer Images captured without patient information to GE Default is checked 3 Click Save 4 Navigate to Utility second page Service Utilities Data Transfer 5 On Data Transfer select Scheduler and then select the days to perform the data transfer 6 Click Save Settings 7 To manually perform a data tran...

Страница 329: ...rvice class licenses To access Delete Files select Utility second page Service Utilities Delete Files Figure 7 55 Delete Files This table shows all the elements available on Delete Files with descriptions To delete files 1 Navigate to select Utility second page Service Utilities Delete Files 2 Under Delete Files select the available folders and files that you want to delete 3 Click Delete 4 In the...

Страница 330: ...ilable to all service class licenses To access Gather Logs select Utility second page Service Utilities Gather Logs Figure 7 56 Gather Logs This table shows all the elements available on Gather Logs with descriptions To gather log files 1 Navigate to Utility second page Service Utilities Gather Logs 2 Select one of the following 1 Day Logs 1 Week Logs All Logs 3 Click Gather Logs In the resulting ...

Страница 331: ...he elements available on Network Capture with descriptions Table 7 11 Network Capture Element Description Network Capture Parameters Maximum Size Allowed size of the generated log file Valid value are 256MB 512MB 1024MB Devices DICOM configured devices for which you want to capture information If no additional devices are configured only All will be available Start Network Capture Select to start ...

Страница 332: ... devices are configured only All will be available 3 Select Start Network Capture to start the process This causes the network capture to start enables the Stop button and updates the Network Capture Status pane and changes the Status to Running 4 Click the Stop button to end data collection Stopping is a two step process Stops the data collection and immediately closes the etl file Collects addit...

Страница 333: ... SSA License This table shows all the elements available on SSA License with descriptions Table 7 12 SSA License Element Description Class M Key Details Class M Key Status Status of the SSA key Valid values are Not Plugged In Plugged In Drive Letter Drive where the SSA key is plugged into the LOGIQ S8 Expire Date Date the SSA key is set to expire SSO ID Identifier for the user assigned to the SSA ...

Страница 334: ...d Party Software Licenses displays the third party software licenses used as part of the service platform The information on Third Party Software Licenses is available to all service class licenses To access Third Party Software Licenses select Utility second page Service Utilities Third Party Software Licenses Figure 7 59 Third Party Software Licenses ...

Страница 335: ...de of the screen Press Show All to view all of the activated options The information on Options is available to all service class licenses To access Options navigate to Utility second page Service Options Figure 7 60 Options This table shows all the elements available on Options with descriptions Table 7 13 Options Element Description Software Options Option Software options on the LOGIQ S8 Status...

Страница 336: ...e Update contact details The information on Agent Configuration is available to all service class licenses To access Agent Configuration navigate to Utility second page Service Agent Configuration Figure 7 61 Agent Configuration This table shows all the elements available on Agent Configuration with descriptions Table 7 14 Agent Configuration Element Description Agent Configuration Contact Details...

Страница 337: ... same number as listed on the rating plate Serial Number Serial number of the agent read only If the agent is not registered with a serial number this field is populated with the serial number of the LOGIQ S8 The serial number of the agent is tied to the serial number of the LOGIQ S8 CRM No Customer Relationship Management CRM number System identifier assigned to the customer unit by the service r...

Страница 338: ...ponse rate between the LOGIQ S8 and a DICOM PACS server 7 82 7 7 20 When the touch panel does not response 7 83 7 7 21 Limitation message during AFI Analysis 7 83 7 7 22 Noise Troubleshooting 7 84 7 7 23 Electromagnetic Interference EMI Troubleshooting 7 86 7 7 24 Connectivity Troubleshooting 7 87 7 7 2 Shortcut Keys There are several Shortcut keys to be utilized on the LOGIQ S8 Alt 1 or Alt 2 to ...

Страница 339: ... Switch till it changes to green System starts booting Check cables between Console and Monitor Press Standby Switch for approximately 5 sec until system is down Is there any picture on the monitor Is there any picture on the monitor Is there any picture on the touch screen Other error Please contact the service engineer Verify that Power Cord is connected to Mains Power Switch is turned on on the...

Страница 340: ...ting Trees Instructions and Tech Tips 7 7 4 Noise disturbs the Image Figure 7 63 Noise disturbs the Image Troubleshooting Noise is shown in Image YES NO Is there any electrical devices that affect the scanner Keep the scanner away from those electrical devices Use another wall socket Check probes ...

Страница 341: ... sensitivity Trackball has low sensitivity Set up the appropriate trackball response time via Speed and Acceleration in the Utility System General Trackball Refer to Figure 3 23 on page 3 33 Is the trackball issue resolved Is the trackball issue resolved Clean the trackball Refer to section 7 7 5 1 on page 7 72 Replace the trackball Return to normal scanning Return to normal scanning No No No Yes ...

Страница 342: ...y lint free cloth e g lens cleaner cloth in accordance with procedure below 1 Remove the ball from the operation panel 2 Clean the crane ring and ball 3 Clean the aiming balls the protection covers over the X Y position sensor Carefully remove the smudges to avoid scratching to the protections when cleaning around the sensors 4 After cleaning install it back into the operation panel and confirm th...

Страница 343: ...ded with paper Load paper by using the correct format Check paper size small large etc Check paper tray to fit with the used paper format Is printing media ink cartridge etc empty Depending on the Printer Type replace ink cartridge etc color Are the P keys configured properly Check programmed P keys and re configure them if not correct Is printing also impossible by manual operation Check remote c...

Страница 344: ...Prints do not match monitor Verify factory default settings Chapter 3 in the User Manual calls out suggested settings for various exam and lighting conditions Video test patterns are not clear bright parallel or square Replace the monitor Figure 7 66 Monitor Troubleshooting Error on the monitor display Set the Monitor settings to the default Section 6 2 Monitor Adjustment on page 6 2 NO YES Do the...

Страница 345: ...ld be lower position ON For 22 and 23 wide monitor Switch No 8 should be lower position ON Fault symptom Check these items Cannot select probe from touch panel Make sure 4D option is installed Probe will not sweep No image update Try another 3D 4D probe If the new probe works you have a bad probe Probe will sweep for a short time then stops Image update halts Try another 3D 4D probe If the new pro...

Страница 346: ...ough if battery remaining capacity is quite low system automatically go to Power saving mode Cannot use Printer Cannot use Universal Video Converter This is system spec AC powered modules cannot be used on Battery mode Short battery life less than 60 minutes Replace all of 4 batteries Battery operation time depends on the console configuration and scanning mode Beep sound starts while discharging ...

Страница 347: ...improper setting or dust in a cap Before replacing an encoder verify the setting dust of a cap NOTE It occasionally sounds like a correct setting from a cap when assembled it improperly 7 7 13 Sticky buttons The cause may be dust liquid into a button Call GE Service 7 7 14 Mode button failure Other function works when push a mode button Mode button fail to respond even if you push a button Call GE...

Страница 348: ...oubleshooting Trees Instructions and Tech Tips 7 7 15 PC Printer Installation If the following message displays when you connect the PC Printer first time to the system execute the following procedures Figure 7 67 PC Printer message 1 Click OK and shutdown the system 2 Restart the system ...

Страница 349: ...broScan probe is connected to FibroScan module Pull off the connected FibroScan probe from FibroScan module and reconnect it again Apply pressure to FibroScan probe with your finger tip If still not successful go to step2 2 Make sure FibroScan probe M XL is selected in the examination Select the desired FibroScan probe on FibroScan tab on touch panel Note that probe selection is successful only if...

Страница 350: ...tint cursor Pointing cursor is available for only the following red area of the screen during FibroScan Mode 3 Measurements in Report Worksheet Order of the measurements isn t equal between FibroScan Report and LS8 Report Worksheet However measurements results are correct 7 7 16 2 Issues 1 CAP and KPa values occasionally not displayed At the 1st time of FibroScan mode after system starts CAP score...

Страница 351: ...ng generated the button may not respond Example 2 Do not press the button on FibroScan probe when FibroScan Report is selected and the system starts generating the report WORKAROUND Do not press the button on FibroScan probe when FibroScan Report is selected and the system starts generating the report 3 Error message FibroScan is not available A FibroScan module is required The following error mes...

Страница 352: ...ound The system is accidentally turned off during the disk encryption is being configured Turn on the system The disk encryption configuration will be continued Lost the USB key to unlock the disk encryption If a password to unlock the disk encryption is created use the password And then create new USB key Formatted the USB key to unlock the disk encryption If a password to unlock the disk encrypt...

Страница 353: ...onse From R4 system the touch panel changes to electrostatic type If the keys does not respond clean the touch panel first If the gel or somehting remains on the touch panel it does not reposnd 7 7 21 Limitation message during AFI Analysis The limitaion message Over Depth too high for analysis xx xx cm EXIT displays when you measure AFI deeper than 20 cm Measure whithin 20cm ...

Страница 354: ...e conditions when the noise appears Table 7 16 Noise Conditions The noise is present Determine If the test fails see All the time n a 7 7 22 2 Noise picked up from the air on page 7 85 and 7 7 22 3 Noise received through the external cables on page 7 85 After some time of use The amount of time between initial use and when the noise begins 7 7 22 2 Noise picked up from the air on page 7 85 CertaIn...

Страница 355: ...hen the LOGIQ S8 is sharing a power line with other equipment 7 7 22 4 Intermittent noise Intermittent noise can be caused by other equipment Table 7 17 Noise Conditions Picked Up from the Air Symptom Cause Solution Noise is coherent penlight noise pointing down in the picture due to the fact that the noise is received on all channels The electromagnetic interference EMI from radio frequencies mag...

Страница 356: ...s incoming power source to the LOGIQ S8 is only a conduit See Minimal floor plan suggestions on page 2 9 7 7 23 3 Different system Try another LOGIQ S8 at the same location and look for the same noise If the noise is present on the new system too the noise is most likely from an external source equipment 7 7 23 4 Different location Move the LOGIQ S8 to another location and check to see if the nois...

Страница 357: ...he network Media type not set to Auto Select Check the speed of your connection Media type should be set for Auto Select Remember that every time the system is re ghosted that setting goes back to the default value Hardware not connected properly Check cables You need a crossover cable if you are connected directly to the device Use a straight cable whenever you go through a hub The use of a hub i...

Страница 358: ...n Cine or Secondary Capture Destination unable to view the particular photometric interpretation Check what compression and photometric interpretation the destination device supports and adjust if possible on the destination service to the settings which results in successful viewing Note that compression JPEG will give photometric interpretation YBR_FULL_422 RLE will give YBR_FULL and uncompresse...

Страница 359: ...oes not allow you to remove it You can uncheck the attribute and save but when returning to the same page the attribute remains checked See configuration screen on Utility Admin Users Workaround Remove the user affected then add the user again and then set up Group Membership attributes that you want 7 7 25 2 The group right does not work properly Affected version R4 Issue The group right does not...

Страница 360: ...N DeletePatientData Allow to delete patient exam Can remove patients and exams if user has this right Y DeleteReport Allow to delete report But this right does not work any user can remove reports The check box has no effects N LocalServiceAccess Allow to Service browser access on machine But this right does not work the Service login does not depend with group right controls The check box has no ...

Страница 361: ...t down 1 Select OK and reboot the system 2 If the same message appears after reboot shut down the system and turn off the breaker Then turn on the system according to Power On Off on page 3 17 Cause Hardware and or Voltage error detected System Error Please reboot the system 1 Select OK and reboot the system 2 If the same message appears after reboot shut down the system and turn off the breaker T...

Страница 362: ...power mode power saving locked keys etc No message Condition Plugged Warning Battery has deteriorated Replace the battery for proper function Condition Battery has deteriorated Shown periodically 14 days on startup Warning Low Battery System shutting down Condition Shutdown due to low battery power Warning Error in Battery System shutting down Condition Shutdown due to battery error Warning Batter...

Страница 363: ...nd the system on boot up Message Shutting down FibroScan Module please wait The system will be shutting down in a moment The system will shut down FibroScan Module safely before shutting down itself The system will proceed on shut down after message disappears Message FibroScan connection is not available Reconnecting this could take up to 30 seconds The system has detected FibroScan Module connec...

Страница 364: ...GE HEALTHCARE DIRECTION 5394227 12 LOGIQ S8 LOGIQ E8 SERVICE MANUAL 7 94 Section 7 8 Error messages This page was intentionally left blank ...

Страница 365: ... 12 LOGIQ S8 LOGIQ E8 SERVICE MANUAL Section 8 1 Overview 8 1 Chapter 8 Renewal Parts Section 8 1 Overview 8 1 1 Contents in this chapter 8 1 Overview 8 1 8 2 Optional Peripherals and Accessories 8 2 8 3 Probes 8 4 8 4 Power Cord 8 8 ...

Страница 366: ...l Peripherals and Accessories Printers No Part Name Part Number Description Qty 1 Digital B W Video Printer Sony UP D897 5160458 Digital B W Video Printer USB Port 2 Digital B W Video Printer Sony UP D898 5599030 Digital B W Video Printer USB Port 3 Digital Color Printer Sony UP D25MD H44642LW Digital Color Printer USB Port 4 Digital Color Printer Sony UP DR80MD 5555266 Digital Color Printer USB P...

Страница 367: ... 2 Optional Peripherals and Accessories 8 3 NOTE The illustrations may not correspond to the actual product 5 HP OfficeJet PRO 8100 ePrinter 5716062 6 HP OfficeJet PRO H8210 5763696 Table 8 1 Optional Peripherals and Accessories Printers No Part Name Part Number Description Qty ...

Страница 368: ...TO ASO SRI HD Advanced3D Volume Navigation Biopsy Non RoHS 5499605 RoHS Compliant probe 5488219 C2 9VN D 5476030 5476031 Japan model 10C D Pediatric Neonatal Vascular No transcranial B CHI CF PDI M Anatomical M PW B Flow B Flow Color CrossXBeam LOGIQView ATO ASO SRI HD Advanced3D 5476026 5476027 Japan model C2 6b D Abdomen Radio frequency Ablation RFA Biopsy B CHI CF PDI M Anatomical M PW Contrast...

Страница 369: ...8 Non RoHS Replaced by 5499594 5499594 RoHS Compliant probe GE 3MIX M5S D Cardiac Transcranial Abdomen B CHI CF PDI M MCF Anatomical M PW CW TVI TVD B Flow B Flow Color Contrast Virtual Convex LOGIQView ATO ASO Stress Echo SRI HD Volume Navigation Advanced 3D 5446030 M5Sc D Cardiac Transcranial Abdomen B CHI CF PDI M MCF Anatomical M PW CW TVI TVD B Flow B Flow Color Contrast Virtual Convex LOGIQV...

Страница 370: ...natomical M PW CW TVI TVD Virtual Convex ATO ASO SRI HD Note Need DLP2RN adapter to connect Note 6Tc RS probe requires special handling Refer to the TEE Probe User Manual enclosed with 6Tc RS probe Non RoHS KN100106 RoHS Compliant probe TE100024 P2D Cardiac Vascular CW ASO TQ100002 P6D Cardiac Vascular CW ASO 5499606 C1 6 D Abdomen OB GYN Vascular No transcranial B CHI CF PDI M Anatomical M PW B F...

Страница 371: ...iew ATO ASO SRI HD Advanced3D 5482856 L3 12 D Vascular No transcranial OB Small Parts Breast Musculoskeletal B CHI CF PDI M Anatomical M PW B Flow B Flow Color BF HD Color Contrast Strain Elastography Virtual Convex CrossXBeam LOGIQView ATO ASO SRI HD Advanced3D Biopsy KTZ157046 RSP6 16 D Small Parts Vascular No transcranial Breast Musculoskeletal B CHI CF PDI M Anatomical M PW B Flow B Flow Color...

Страница 372: ...ction 8 4 Power Cord Section 8 4 Power Cord Table 8 3 Power Cord No Part Name Part Number Description Qty 1 Power Cord for India 5182611 1 2 Power Cord for Switzerland 5182235 1 3 Power Cord for UK HK 5182816 1 4 Power Cord for ANZ 5182296 1 5 Power Cord for Denmark 5182083 1 ...

Страница 373: ...ower Cord for Argentina 5182942 1 8 Power Cord for Israel 5182453 1 9 Power Cord 110V for Canada USA JPN 2388982 Power Cord 110V for Canada USA JPN Power Cord 200V for Thailand 1 10 Power Cord 220V for EU Replace with 6736105 3 2327990 1 11 Power Cord for China 2388981 1 Table 8 3 Power Cord No Part Name Part Number Description Qty ...

Страница 374: ...9995 2388982 1 13 Power Cord for Brazil 5399665 1 14 Power Cord for South Africa 5408183 1 15 Power Cord for Japan 5408490 1 16 Power Cord for Taiwan 5792418 1 17 Power Supply Cord EUROPE KOREA 10A 250V STRAIGHT 4M 6736105 7 1 18 Power Supply Cord UNITED STATES CANADA 15A 125V STRAIGHT 4M 6736114 3 1 Table 8 3 Power Cord No Part Name Part Number Description Qty ...

Страница 375: ...hapter This chapter describes Care Maintenance on the scanner and peripherals These procedures are intended to maintain the quality of the ultrasound systems performance Read this chapter completely and familiarize yourself with the procedures before performing a task NOTE When not otherwise specified the contents of this manual and reference to LOGIQ S8 applies to all LOGIQ S8 LOGIQ E8 LOGIQ S8 V...

Страница 376: ...quality control testing must occur regularly The same tests are performed during each period so that changes can be monitored over time and effective corrective action can be taken Testing results corrective action and the effects of corrective action must be documented and maintained on the site Your GE service representative can help you with establishing performing and maintaining records for a...

Страница 377: ...ly W Weekly M Monthly A Annually Table 9 1 Customer Care Schedule Item Service at Indicated Time D W M A Notes Air Filter Grid Remove the filter grid and clean the air filter Recommend to clean filter at least bi weekly AC Mains Cable Inspect AC Mains Cable Mobile Unit Check weekly Cables and Connectors Check if all cables are fixed well seated at the correct position and if there is no mechanical...

Страница 378: ...ective maintenance or as required by your facilities QA program Peripheral Leakage Current Checks Also after corrective maintenance or as required by your facilities QA program Surface Probe Leakage Current Checks Also after corrective maintenance or as required by your facilities QA program Endocavity Probe Leakage Current Checks Also after corrective maintenance or as required by your facilities...

Страница 379: ...hapter 3 Refreshing battery refresh the battery every 6 months for the user Refresh procedure 1 Turn on the system 2 Wait until the battery is fully charged it takes at least 1 hour to fully charge the battery 3 Turn off the system 4 Remove all probes 5 Turn on the system 6 Unplug the AC cable and wait until the system shuts down It may take 30 minutes or more to complete shutdown 7 Wait at least ...

Страница 380: ...e Tool Comments Digital Volt Meter DVM Anti Static Kit Typically includes antistatic mat wrist strap and ground cable Anti Static Vacuum Cleaner If available on site Safety Analyzer Any calibrated Electrical Safety Analyzer compliant with AAMI ESI 1993 or IEC 60601 or AS NZS 3551 Phantom If available on site CD R DVD R Media DVD RW Disc Media blank B W Printer Cleaning Sheet see printer user manua...

Страница 381: ...tion Certificate see Ultrasound INSPECTION CERTIFICATE on page 9 37 Note all probes and system options 3 Power up Turn the system power on and verify that all fans and peripherals turn on Watch the displays during power up to verify that no warning or error messages are displayed 4 Probes Verify that the system properly recognizes all probes 5 Displays Verify proper display on the LCD monitor and ...

Страница 382: ...his mode of operation 5 3D Mode Where applicable verify basic 3D Mode operation Check the basic system controls that affect this mode of operation 6 Real Time 4D Mode Where applicable verify basic Real Time 4D Mode operation Check the basic system controls that affect this mode of operation 7 Basic Measurements Check Distance and Tissue Depth Measurement 8 Probe Elements Perform an Element Test on...

Страница 383: ...B W video page printer Clean heads and covers if necessary 2 Color Printer Verify hardcopy output of the Color video page printer Clean heads and covers if necessary 3 Media Verify hardcopy output of the Deskjet Bluetooth printer Clean heads and covers if necessary 4 DVR Verify record playback capabilities of the DVR 5 DICOM Verify that DICOM is functioning properly Send an image to a DICOM device...

Страница 384: ... a soft damp cloth Caution DO NOT spray any liquid directly onto the LOGIQ S8 covers monitor keyboard etc Table 9 8 Appropriate Cleaning Disinfectant Agents Cleaning Disinfectant Agent Monitor Glass Monitor Frame Panel System Cabinet Measurement Selection Menu Operator Controls Mild Non Abrasive Soap and Water OK OK OK OK OK Ammonia N A OK N A N A N A Disinfectant Bleach 10 to 1 Ratio of 5 Home Bl...

Страница 385: ...nt cover of cabinet with hand and pull out the air filter Figure 9 1 Air filter location 2 Dust the filter with a vacuum cleaner and or wash it with a mild soapy solution If washed rinse and dry the filter before re installation 3 Put back the air filter and the front cover Metal Air filter 1 Pull the front cover of cabinet Figure 9 2 Remove the front cover CAUTION Be sure to lock the wheels befor...

Страница 386: ... the filter with a vacuum cleaner and or wash it with a mild soapy solution If washed rinse and dry the filter before re installation 4 Put back the air filter with both hands and the front cover Figure 9 4 Put back the air filter NOTE For your convenience or if the air filter is too dirty replacement filters are available Refer to Chapter 9 for the air filter replacement part number ...

Страница 387: ...eck all wheels and casters for wear and verify operation of foot brake to stop the unit from moving and release mechanism Check all wheel locks and swivel locks for proper operation 7 Cables Connectors Check all internal cable harnesses and connectors for wear and secure connector seating Pay special attention to footswitch assembly and probe strain or bend reliefs 8 Power Cord Check the power cor...

Страница 388: ... precautions can result in serious injury and equipment damage Failure to properly handle or maintain a probe may also void its warranty Figure 9 5 Probe handling icons Any evidence of wear indicates the probe cannot be used Do a visual check of the probe pins and system sockets before plugging in a probe Table 9 10 Probe Related Checks Step Item Description 1 Probes Thoroughly check the system pr...

Страница 389: ...are Card instructions supplied with each probe inside the transducer boxes for disinfectants and gels that are compatible with the surface material of the probes CAUTION CAUTION To help protect yourself from blood borne diseases when cleaning and handling probes wear approved non allergenic disposable gloves NOTICE NOTICE Disinfect a defective probe before you return it Be sure to tag the probe as...

Страница 390: ...AL 9 16 Section 9 7 Using a Phantom Section 9 7 Using a Phantom The Use of a Phantom is not required during Preventive Maintenance Customer may use it as part of their Quality Assurance Program tests Refer to the Phantoms User Manual for information on how to use it ...

Страница 391: ...amaged insulation and adequacy of strain relief and cable clamps Locate and examine all associated transducers Inspect the cables and strain relief at each end Inspect the transducer enclosure and lens for cracks holes and similar defects Equipment users must ensure that safety inspections are performed whenever damage is suspected and on a regular basis in accordance with local authorities and fa...

Страница 392: ...ed service personnel or GE for further analysis Table 9 11 Leakage current limits for Ultrasound system operation on 100 120 Volt mains US Canada Japan Leakage Current Test System Power Lift Ground PE Conductor Limit µA Chassis Enclosure Leakage On and Off Open 300 Type B BF Applied Parts On transmit Closed Open 100 500 Type CF Applied Parts On transmit Closed Open 10 50 Type BF Applied Parts sink...

Страница 393: ...00 µA CF 50 µA Table 9 14 Equipment Type and Test Definitions Applied Parts AP Parts or accessories that contact the patient to perform their function For ultrasound equipment this includes transducers ECG leads and e TRAX Needle Sensor Type BF or Defibrillation proof Type BF Body Floating or non conductive ultrasound probes which are marked with the man in box BF symbol this includes all transduc...

Страница 394: ...e combination of lights that are illuminated Any problems found should be reported to the hospital immediately and the receptacle should not be used Figure 9 6 Typical Alternate Outlet Tester NOTE No outlet tester can detect the condition where the Neutral grounded supply conductor and the Grounding protective earth conductor are reversed If later tests indicate high leakage currents this should b...

Страница 395: ...nd wire resistance should be less than 0 2 ohms Reference the procedure in the IEC60601 1 Figure 9 7 Ground Continuity Test NOTE The Safety Analyzer can also be used instead of Ohmmeter Refer to the manufacturer s user manual of the Safety Analyzer CAUTION Electric Shock Hazard The patient must not be contacted to the equipment during this test 1 Ultrasound System 3 Ohmmeter 2 Ground Pin 4 Accessi...

Страница 396: ...as applicable Record the highest reading 1 Connect Safety analyzer to wall AC power outlet 2 Plug the equipment under test power cable into the receptacle on the panel of the meter 3 Connect the meter to an accessible metal surface of the scanner using the cable provided with the meter 4 Select the Chassis or Enclosure leakage function on the meter NOTE Consult the manufacturer s user manual of th...

Страница 397: ...each set of test conditions The actual location of the test probe may vary by Ultrasound system NOTE Record all data in the Electrical safety tests log NOTE Values in italics font are given as examples only Table 9 15 Typical data format for recording enclosure chassis leakage Unit under test___________________________ Date of test _____________________ Test Conditions Measurement Test Point Locat...

Страница 398: ...ll AC power outlet 2 Plug the equipment under test power cable into the receptacle on the panel of the meter 3 Connect the ECG cable to the scanner and the Patient leads to the analyzer 4 Select the Patient lead leakage function on the meter NOTE Consult the manufacturer s user manual of the Safety Analyzer 5 Test opening and closing the ground with the scanner on and off as indicated in 9 11 or 9...

Страница 399: ...E MANUAL Section 9 8 Electrical Safety Tests 9 25 9 8 7 2 Generic Procedure cont d For each combination the operating controls such as the lead switch should be operated to find the worst case condition Figure 9 8 Test Circuit for Measuring Patient Lead Leakage ...

Страница 400: ...nation under each set of test conditions specified in Record all data on the EQC inspection certificate Also known as Patient Auxiliary Current 1 Connect Safety analyzer to wall AC power outlet 2 Plug the equipment under test Scanner power cable into the receptacle on the panel of the meter 3 Connect the ECG cable to the scanner and the Patient leads to the analyzer 4 Select the Lead to lead or Pa...

Страница 401: ...C power outlet 2 Plug the equipment under test power cable into the receptacle on the panel of the meter 3 Connect the ECG cable to the scanner and the Patient leads to the analyzer 4 Select the Lead isolation or main applied function on the meter NOTE Consult the manufacturer s user manual of the Safety Analyzer Test opening and closing the ground with the scanner on and off as indicated in 9 11 ...

Страница 402: ...e configuration of the test equipment 9 8 10 1 Generic Procedure on Probe Leakage Current The most common method of measuring probe leakage is to partly immerse the probe into a saline bath while the probe is connected to the Ultrasound system and active This method measures the actual leakage current resulting from the transducer RF drive Measurements should be made under the test conditions spec...

Страница 403: ...current path NOTE The Saline solution is a mixture of water and salt The salt adds free ions to the water making it conductive Normal saline solution is 0 9 salt and 99 1 water If ready mixed saline solution is not available a mixture of 1 quart or 1 liter water with 9 or more grams of table salt mixed thoroughly will substitute Figure 9 12 FibroScan probe with Aluminium foil CAUTION To avoid prob...

Страница 404: ... as applicable NOTE Values in italics font are given as examples only Table 9 18 Typical data format for recording probe source leakage CAUTION Equipment damage possibility Never switch the Polarity or the status of the Neutral when the Ultrasound system is powered on Power off the Ultrasound system allow the stored energy to bleed down and turn the circuit breaker off BEFORE switching the POLARIT...

Страница 405: ...onnected from the Ultrasound system Apply mains voltage over the insulation barrier Between protective earth on the probe connector and an electrical anode in saline solution The patient applied part of the probe is immersed into the saline solution Measure current flowing in the circuit leakage current As a minimum tests according to IEC60601 1 must be performed once a year The requirements for B...

Страница 406: ... test setup of non TEE Probes can be as illustrated in 9 8 10 Probe leakage current test on page 9 28 A typical test setup for TEE probes could be as indicated below Figure 9 14 TEE Probe Leakage Isolation Sink Current Test The test passes when the reading measure less than the values in 9 13 on page 9 19 WARNING WARNING The handle of the TEE probes must not be immersed ...

Страница 407: ...ing some other grounded surface 9 8 12 2 Generic Procedure on Leakage Current Refer to section 9 8 10 1 Generic Procedure on Probe Leakage Current for detail Put the e TRAX Needle sensor into Saline water instead of Probes Figure 9 15 Set Up for e TRAX Leakage Current CAUTION CAUTION Equipment damage possibility Never switch the Polarity and the status of Neutral when the unit is powered ON Be sur...

Страница 408: ...d all data on the inspection certificate Table 9 19 Typical data format for recording e TRAX Sink leakage DANGER DANGER Electric Shock Hazard Line voltage is applied to e TRAX during this test To avoid possible electric shock hazard the system being tested must not be touched by patients users or anyone during testing CAUTION CAUTION Equipment damage possibility Never switch the Polarity and the s...

Страница 409: ...ts are normal from probe to probe Other variations will result from differences in line voltage and test lead placement The maximum allowable leakage current for body surface contact probe differs from an inter cavity probe Be sure to enter the correct probe type in the appropriate space on the check list If excessive leakage current is slot dependent inspect the Ultrasound system connector for be...

Страница 410: ...9 9 When There s Too Much Leakage Current 9 9 5 ECG Fails Inspect cables for damage or poor connections 9 9 6 Ultrasound Equipment Quality Check EQC and IQC Download and use the latest version of these forms They can be retrieved from MyWorkshop EQC Refer to DOC0929340 in MyWorkshop ...

Страница 411: ...requency Scan Format Model Number Serial Number Probe 2 Frequency Scan Format Model Number Serial Number Probe 3 Frequency Scan Format Model Number Serial Number Probe 4 Frequency Scan Format Model Number Serial Number Probe 5 Frequency Scan Format Model Number Serial Number Probe 6 Frequency Scan Format Model Number Serial Number Probe 7 Frequency Scan Format Model Number Serial Number Probe 8 Fr...

Страница 412: ...ring config System Ground Continuity Chassis Source Leakage Current Probe Chassis Source Leakage Current Wheel Chassis Source Leakage Current CRT Patient Lead Source Leakage Lead to Ground Patient Lead Source Leakage Lead to Lead Patient Lead Source Leakage Isolation Peripheral 1 Leakage Current Peripheral 1Ground Continuity Peripheral 2 Leakage Current Peripheral 2Ground Continuity Peripheral 3 L...

Страница 413: ...stance 1 31 D Dangerous Procedure Warnings 1 27 Dataflow Examples 3 67 Device Connectivity 3 76 Diagnostics 7 24 DICOM Adjust Timeout for DICOM Servers 7 88 DICOM Option Pre Installation Requirements 2 10 DICOM Network Information Worksheet 3 96 DICOM Server 3 68 Disconnection External USB Devices 3 48 E ECG connector 3 47 Electrical Requirements 2 3 Electrical Safety 1 19 Electrical Safety Tests ...

Страница 414: ...g Arrangement USA Canada 9 20 P Packing Materials Recycling Information 3 10 Periodic Maintenance 9 1 Schedule 9 3 Periodic Maintenance How often 9 3 Peripherals Connection 3 37 Physical Inspection 9 13 Physical Dimensions 3 12 Physical Inspection Probe Connector Cleaning 9 13 Power Off 3 21 4 5 Power On Off 3 17 Power Requirements 2 3 electrical 2 3 Power Supply Test Procedure 4 48 Pre Installati...

Страница 415: ...ite Requirements Mandatory 2 8 Sleep Mode 3 23 Sneaker Net 3 68 Software Option Installation 3 35 Sony UP D25MD Installation 3 58 Sony UP D897 Installation 3 49 Special Tools Supplies and Equipment 9 6 Structured Reporting 3 72 Swivel Lock 4 10 System Maintenance 9 7 Periodic Maintenance 9 7 System Configuration 3 32 System Maintenance 9 7 System Manufacturer 1 32 System General Preset Menu 3 33 S...

Страница 416: ...GE HEALTHCARE DIRECTION 5394227 REVISION 12 LOGIQ S8 LOGIQ E8 SERVICE MANUAL Index 4 ...

Страница 417: ......

Страница 418: ...eneral Electric Company GE Medical Systems a General Electric Company going to market as GE Healthcare GE Ultrasound Korea 65 1 Sangdaewon dong jungwon gu Seongnam si Gyeonggi do 462 120 Korea www gehealthcare com ...

Отзывы: