background image

1.6 

Cable and Connection Considerations

19

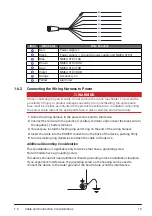
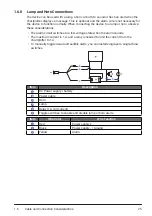
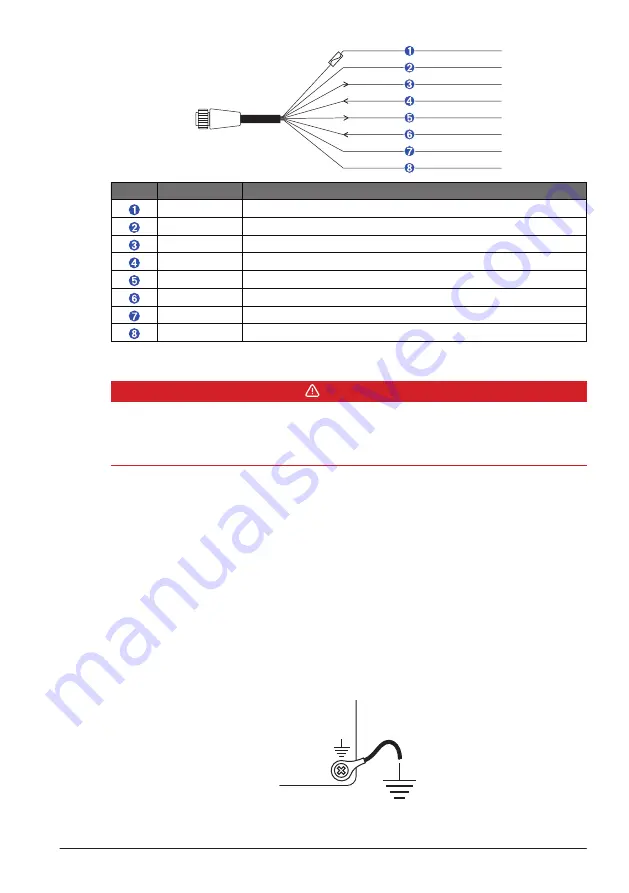
Item

Wire Color

Wire Function

Red

Power

Black

Power supply - / Ground (power supply and NMEA 0183)

Blue

NMEA 0183 TXA

Brown

NMEA 0183 RXA

Gray

NMEA 0183 TXB

Violet

NMEA 0183 RXB

Orange

Accessory on

Yellow

Alarm low

1.6.2  Connecting the Wiring Harness to Power

 WARNING

When connecting the power cable, do not remove the in-line fuse holder. To prevent the 

possibility of injury or product damage caused by fire or overheating, the appropriate 

fuse must be in place as indicated in the product specifications. In addition, connecting 

the power cable without the appropriate fuse in place voids the product warranty.

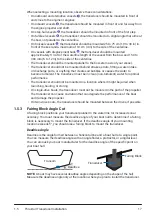
Route the wiring harness to the power source and to the device.

Connect the red wire to the positive (+) battery terminal, and connect the black wire to 

the negative (-) battery terminal.

If necessary, install the locking ring and O-ring on the end of the wiring harness.

Insert the cable into the POWER connector on the back of the device, pushing firmly.

Turn the locking ring clockwise to attach the cable to the device.

Additional Grounding Consideration

This consideration is applicable only to devices that have a grounding screw.

Not all models have a grounding screw.

This device should not need additional chassis grounding in most installation situations. 

If you experience interference, the grounding screw on the housing can be used to 

connect the device to the water ground of the boat to help avoid the interference.

Содержание CS 1522

Страница 1: ...CS 1522 Professional Fishfinder Owner s Manual...

Страница 2: ...rmin ClearV Garmin Connect Garmin Helm Garmin LakeV Garmin Quickdraw GCV GMR GRID GXM HomePort MotionScope Panoptix Shadow Drive and SmartMode and are trademarks of Garmin Ltd or its subsidiaries Thes...

Страница 3: ...nting Considerations 13 1 4 4 Bail Mounting the Device 13 1 4 5 Flush Mounting the Device 14 1 5 Thru Hull Transducer Installation 16 1 5 1 Tools Needed 16 1 5 2 Mounting Considerations 16 1 5 3 Fairi...

Страница 4: ...usting the Range 32 2 3 3 Adjusting the Zoom 32 2 3 4 Hiding Overlay Data and Depth Scale 35 2 4 Optimizing the Sonar Display 35 2 4 1 Adjusting Gain 35 2 4 2 Adjusting Echo Stretch 35 2 4 3 Adjusting...

Страница 5: ...Noise 47 3 3 6 Adjusting Echo Stretch 47 3 3 7 Adjusting TVG 47 3 4 Alarms 48 3 4 1 Setting a Shallow Water Alarm 48 3 4 2 Setting a Deep Water Alarm 48 3 4 3 Setting Water Temperature Alarms 48 3 4 4...

Страница 6: ...Customizing Chart Layers 58 3 10 2 Editing Data Panels 58 3 11 Settings 59 3 11 1 System Settings 59 3 11 2 Preferences 59 3 11 3 Communications Settings 60 3 11 4 My Vessel Settings 60 3 11 5 Data M...

Страница 7: ...s under the surface of water Sonar devices determine the distance to objects by sending out sound pulses and measuring the time it takes for the sound pulses to be reflected back 1 1 2 Development of...

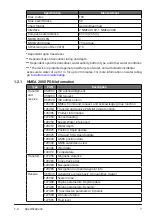
Страница 8: ...4 0 kg 6 0 kg with bail mount Display size W x H 15 228 1 x 304 1 mm Display type XGA Display resolution 1024 x 768 pixels Power supply 10 to 36 VDC Fuse 8 A 125 V fast acting Max power consumption at...

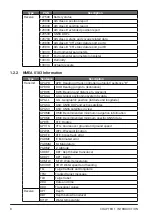
Страница 9: ...ion Type PGN Description Transmit and receive 059392 ISO acknowledgment 059904 ISO request 060928 ISO address claim 126208 NMEA Command request and acknowledge group function 126464 Transmit and recei...

Страница 10: ...in to destination GPBWC BWC Bearing and distance to waypoint GPGGA GGA Global positioning system fix data GPGLL GLL Geographic position latitude and longitude GPGSA GSA GNSS DOP and active satellites...

Страница 11: ...DM Heading magnetic MWD Wind direction and speed MDA Meteorological composite MWV Wind speed and angle VDM AIS VHF data link message You can purchase complete information about National Marine Electro...

Страница 12: ...screw x 4 M4 x 0 7 x 70 211 00210 04 Flush mount screw x 4 M3 x 0 5 x 60 211 52207 55 Flush mount screw x 4 TFWM 4 0 x 25 211 00171 00 13 Nut plate x 4 115 01407 50 14 Trim piece snap cover x 2 145 03...

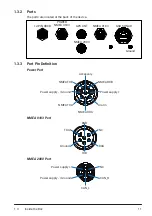
Страница 13: ...EA 0183 12 PIN XDCR GPS ANT NMEA 0183 GSD SONAR NMEA 2000 Ground 1 3 3 Port Pin Definition Power Port NMEA TXB NMEA TXA NMEA RXA NMEA RXB Accessory Alarm Power supply Power supply Ground NMEA 0183 Por...

Страница 14: ...cutting or sanding NOTICE When drilling or cutting always check what is on the opposite side of the surface Read all installation instructions before proceeding with the installation If you experience...

Страница 15: ...shock To avoid interference with a magnetic compass the device should not be installed closer to a compass than the compass safe distance value listed in the product specifications The location must a...

Страница 16: ...surface along the inside line on the template 5 Place the device in the cutout to test the fit 6 If necessary use a file and sandpaper to refine the size of the cutout 7 Use a pry tool such as a flat...

Страница 17: ...he included M3 screws through the smaller 3 6 mm 9 64 in holes 18 Install the foam gasket on the back of the device The pieces of the foam gasket have adhesive on the back Make sure you remove the pro...

Страница 18: ...e compartment or near heat sources NOTICE When drilling or cutting always check what is on the opposite side of the surface The device should be installed by a qualified marine installer 1 5 1 Tools N...

Страница 19: ...turbulent The transducer must be in clean non turbulent water for optimal performance The transducer should not be mounted in a location where it might be jarred when launching hauling or storing On s...

Страница 20: ...be used to secure the cable along the route and through any bulkheads or the deck You should not run cables near moving objects and high heat sources or through doorways and bilges To avoid interfere...

Страница 21: ...roduct warranty 1 Route the wiring harness to the power source and to the device 2 Connect the red wire to the positive battery terminal and connect the black wire to the negative battery terminal 3 I...

Страница 22: ...sducer Models to select the correct transducer model NOTICE Driving the transducer with a wrong model would damage the transducer so make sure the device has identified the transducer correctly If you...

Страница 23: ...ead the NMEA 2000 Network Fundamentals chapter of the Technical Reference for NMEA 2000 Products You can find this document using the Manuals link on the product page for your device at www garmin com...

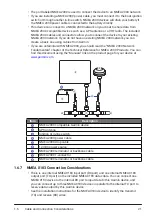
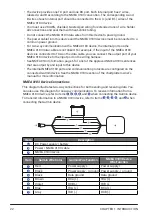
Страница 24: ...e to the input port on the wiring harness See NMEA 0183 Information page 6 for a list of the approved NMEA 0183 sentences that are output by and input to this device The internal NMEA 0183 ports and c...

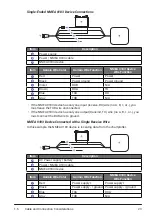
Страница 25: ...put receive RX wire no A B or you must leave the TXB wire unconnected If the NMEA 0183 device has only one output transmit TX wire no A B or you must connect the RXB wire to ground NMEA 0183 Device Co...

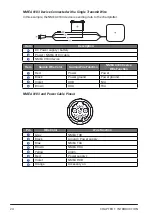
Страница 26: ...ttery B Power NMEA 0183 cable C NMEA 0183 device Item Garmin Wire Color Garmin Wire Function NMEA 0183 Device Wire Function Red Power Power Black Power ground Power ground Violet RXB N A Brown RXA TXA...

Страница 27: ...se considerations The alarm circuit switches to a low voltage state when the alarm sounds The maximum current is 1 A and a relay is needed to limit the current from the chartplotter to 1 A To manually...

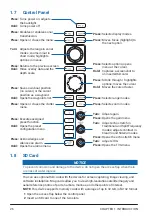
Страница 28: ...Press Executes assigned preset function Hold Opens the preset configuration menu Press Acknowledges and silences an alarm Hold Opens the alarms menu Turn Adjusts gain Press Opens the gain menu Turn Ad...

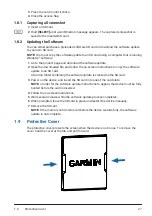
Страница 29: ...een instructions to copy the software update to an SD card A Garmin folder containing the software update is created on the SD card 3 Power on the device and insert the SD card into one of the card sl...

Страница 30: ...ard into your computer 5 On your computer go to my garmin com 6 Follow the on screen instructions to download install and open the Garmin Express application 7 Select Add a Device 8 While the applicat...

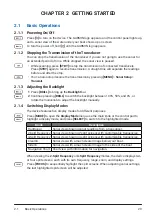
Страница 31: ...the backlight between 100 50 and 0 or rotate the main knob to adjust the backlight manually 2 1 4 Switching Display Modes The device features five display modes for different purposes Press MODE to op...

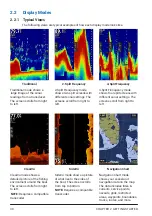
Страница 32: ...oll from right to left 4 Split Frenquency mode shows four split screens with different sonar settings The screens scroll from right to left ClearV mode shows a detailed picture of the fishing environm...

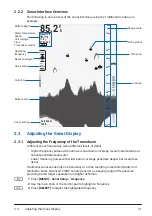
Страница 33: ...3 Adjusting the Sonar Display 2 3 1 Adjusting the Frequency of the Transducer Different sonar frequencies reveal different levels of detail Higher frequency pulses with narrower sonar beam coverage re...

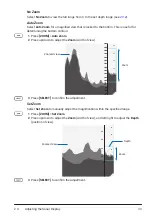
Страница 34: ...ically track the bottom Allowing the device to adjust the range automatically keeps the bottom within the lower or outer third of the sonar screen and can be useful for tracking a bottom that has mini...

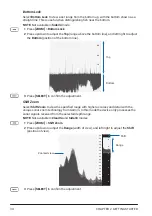
Страница 35: ...t F 0 10 20 30 40 50 60 70 80 90 100 102 32 34 36 38 40 42 44 46 48 50 52 54 56 58 60 62 64 66 68 70 72 74 76 78 Zoom Zoomed view 3 Press SELECT to confirm the adjustment Set Zoom Select Set Zoom to...

Страница 36: ...F 60 50 40 30 20 10 0 Top Bottom 3 Press SELECT to confirm the adjustment Shift Zoom Select Shift Zoom to view the specified range with higher accuracy and detail with the unique sonar zoom technology...

Страница 37: ...splay and can make it more difficult to recognize actual returns You can lower the gain to remove lower intensity returns and noise Low Med High Rotate the GAIN knob to adjust the gain and reduce nois...

Страница 38: ...evel over time as the ping travels into deeper water resulting in a more consistent level of gain throughout the depth of the water column The TVG is also useful for reducing the level of noise near t...

Страница 39: ...ng corresponding to the cursor are shown at the top left of the sonar display 80 3 Paused 0 00 007 f t f t M 0 10 20 30 40 50 60 N 25 45 563 W080 10 426 New Waypoint 26 3f t 70 80 86 0 00f t 63 2F Bot...

Страница 40: ...ht a waypoint and press SELECT or select Review to move navigate to edit change the symbol of delete or send an SOS distress call at the waypoint Select Sort Filter to sort the list by name symbol dis...

Страница 41: ...45 563 W080 10 426 0 8mi 0012 G GPS Hdg COG 69 7f t Depth GPS Position N End Turn 2 Turn 1 Begin 1 29m i 4 48m i A M Dist to Dest R0 59f t 0 00m h Off Course Bearing Wpt VMG Dist to Next __ __ __ __...

Страница 42: ...information about a tide station for a specific date and time including the tide height and when the next high and low tides will occur By default the device shows tide information for the most recent...

Страница 43: ...up the F1 F4 Presets menu 2 Use the main knob or the control pad to highlight the function you wish to swap out 3 Press SELECT 4 Use the main knob or the control pad to highlight the function you wish...

Страница 44: ...CHAPTER 2 GETTING STARTED 42...

Страница 45: ...ons My Vessel Gain 45 35 50 53 Highlight Sub menu Selection Mode specific menus Settings Current selections 3 2 Sonar Setup Press MENU Sonar Setup in sonar modes to customize the settings of your sona...

Страница 46: ...elect Zoom and make a selection No Zoom expands the view to show the full range Auto Zoom tracks the bottom automatically Set Zoom allows you to manually adjust the zoom Bottom Lock locks the bottom t...

Страница 47: ...uto is recommended for ClearV and SideV modes Default sets the speed to the default scroll speed 3 2 8 Adjusting Bottom Search Limit You can set a maximum depth at which the auto range feature searche...

Страница 48: ...d be used 3 3 2 Selecting a Color Limit You can filter out weak clutter from the screen by selecting the threshold color and hiding part of the color palette NOTE Not available in ClearV and SideV mod...

Страница 49: ...Surface noise NOTE Not available in SideV mode Select Surface Noise to toggle the setting on off 3 3 6 Adjusting Echo Stretch You can expand or contract sonar returns see 2 4 2 for more information NO...

Страница 50: ...eper than the set depth Select Deep Water to toggle the alarm on off With Deep Water Alarm toggled on select Change Depth and use the main knob and the control pad to enter a depth 3 4 3 Setting Water...

Страница 51: ...alarm will sound when the target on a collision course comes within the selected range Select Collision Alarm Time To to select a collision alarm time from 15 seconds to 24 minutes The collision alar...

Страница 52: ...ta Depth Line Color Gain Peak Hold Display Off Variable Default Off A Scope Whiteline Fish Symbols Navigation Info Alarms Settings System Preferences Communications My Vessel Color Scheme Classic Blue...

Страница 53: ...ect Whiteline to show hide the whiteline You can use whiteline to highlight the strongest signal from the bottom to help define the hardness or softness of the signal only available in Traditional mod...

Страница 54: ...igation Info Press MENU Navigation Info to access navigation settings NOTE The menu is specific to Navigation Chart mode f t G Menu Navigation Info Navigation Information Quickdraw Contours Other Vess...

Страница 55: ...delete saved tracks 3 8 Other Vessels Press MENU Other Vessels to manage other vessels including AIS and ATON targets and change how they appear with these settings NOTE The menu is specific to Navig...

Страница 56: ...ed to the triangle indicates the heading of the target If Collision Alarm is off the target flashes but the audible alarm does not sound and the alarm message does not appear If the AIS transmission f...

Страница 57: ...on The circle represents the approximate area of the map that is scanned by each pass A green circle indicates good depth and GPS position and a speed under 16 km h A yellow circle indicates good dept...

Страница 58: ...isplays the quality of the recording the color of the colored circle when the area was surveyed see 3 9 1 Depth Shading sets the upper and lower limits of a depth range and a color for that depth rang...

Страница 59: ...n SD card to your computer 2 Access the Garmin Quickdraw Community 3 Use the map and search features to locate an area to download 4 The red dots or lines represent Garmin Quickdraw Contours maps that...

Страница 60: ...mpass Rose and more Select Waypoints to manage waypoints Select Boundaries to show hide the boundaries see 3 4 7 Select Tracks to show hide saved tracks see 3 7 3 Select Water to adjust how water dept...

Страница 61: ...the device to power on automatically or not when your vessel powers on Resetting to Default Settings Select System Information Reset Reset Default Settings to restore the device to factory default set...

Страница 62: ...3 11 4 My Vessel Settings Press MENU My Vessel to adjust your vessel s settings such as anchor height and fuel capacity Menu Settings My Vessel My Vessel System Temperature Offset 0 0 106 Calibrate W...

Страница 63: ...schools 4 1 Surface Noise Surface noise appear near the top of the screen when the sea is rough or when your boat passes over a wake The effect can be reduced in the Clutter menu see 3 3 1 Surface no...

Страница 64: ...to the surface in the day and fall to deeper waters in the night Plankton 4 4 Air Bubbles Air bubbles in the water can block sound waves causing gaps in the water bottom Gaps Gaps 4 5 Side Lobe Echoe...

Страница 65: ...nna Satellite reception was lost Make sure the GPS antenna whether internal or external has a clear view of the sky Memory card is write protected Make sure the Lock switch is slid up to the unlock po...

Страница 66: ...0945 2002 08 Maritime navigation and radiocommunication equipment and systems General requirements Methods of testing and required test results EN 60950 1 2006 A11 2009 A1 2010 A12 2011 A2 2013 IEC609...

Страница 67: ...g Traditional Surface Noise Not in SideV Echo Stretch Traditional TVG Alarms Shallow Water Change Depth Deep Water Change Depth Water Temperature Lower Limit Upper Limit Countour Shallow Deep Fish Col...

Страница 68: ...ter Temperature Unit Voltage Speed Time of Day Beam Width Color Bar Traditional Transducer Model Depth Line A Scope Traditional Display Peak Hold Whiteline Traditional Fish Symbols Traditional Range L...

Страница 69: ...Line Angle Markers Source My Vessel Display Distance Distance Units Compass Rose Waypoints Boundaries Tracks Saved Tracks Tracks Display Active Track Options Water Depth Shading Depth Range Shallow Sh...

Страница 70: ...ets Traditional 2 Split Frequency 4 Split Frequency ClearV SideV Navigation Chart Screenshot Capture Port Types NMEA Input 1 NMEA 0183 Setup NMEA Input 2 NMEA Output 1 NMEA Output 2 Output Sentences S...

Страница 71: ...Data Management Delete User Data Waypoints Routes Active Track Saved Tracks Owner s Manual Boundaries Delete All User Data Installation Transmit Rate Traditional Transmit Power Traditional Filter Widt...

Страница 72: ...CHAPTER 5 APPENDICES 70...

Страница 73: ......

Страница 74: ...t Olathe Kansas 66062 USA Garmin Europe Ltd Liberty House Hounsdown Business Park Southampton Hampshire SO40 9LR UK Garmin Corporation No 68 Zhangshu 2nd Road Xizhi Dist New Taipei City 221 Taiwan M N...

Отзывы: