Caring for the Heart Rate Monitor
NOTICE
You must unsnap and remove the module before washing the
strap.
A build up of sweat and salt on the strap can decrease the ability
of the heart rate monitor to report accurate data.
• Go to
for detailed washing
instructions.
• Rinse the strap after every use.
• Machine wash the strap after every seven uses.
• Do not put the strap in a dryer.
• When drying the strap, hang it up or lay it flat.
• To prolong the life of your heart rate monitor, unsnap the
module when not in use.
User Replaceable Batteries
WARNING
Do not use a sharp object to remove batteries.
Keep the battery away from children.
Never put batteries in mouth. If swallowed, contact your
physician or local poison control center.
Replaceable coin cell batteries may contain perchlorate
material. Special handling may apply. See
.
CAUTION
Contact your local waste disposal department to properly
recycle the batteries.
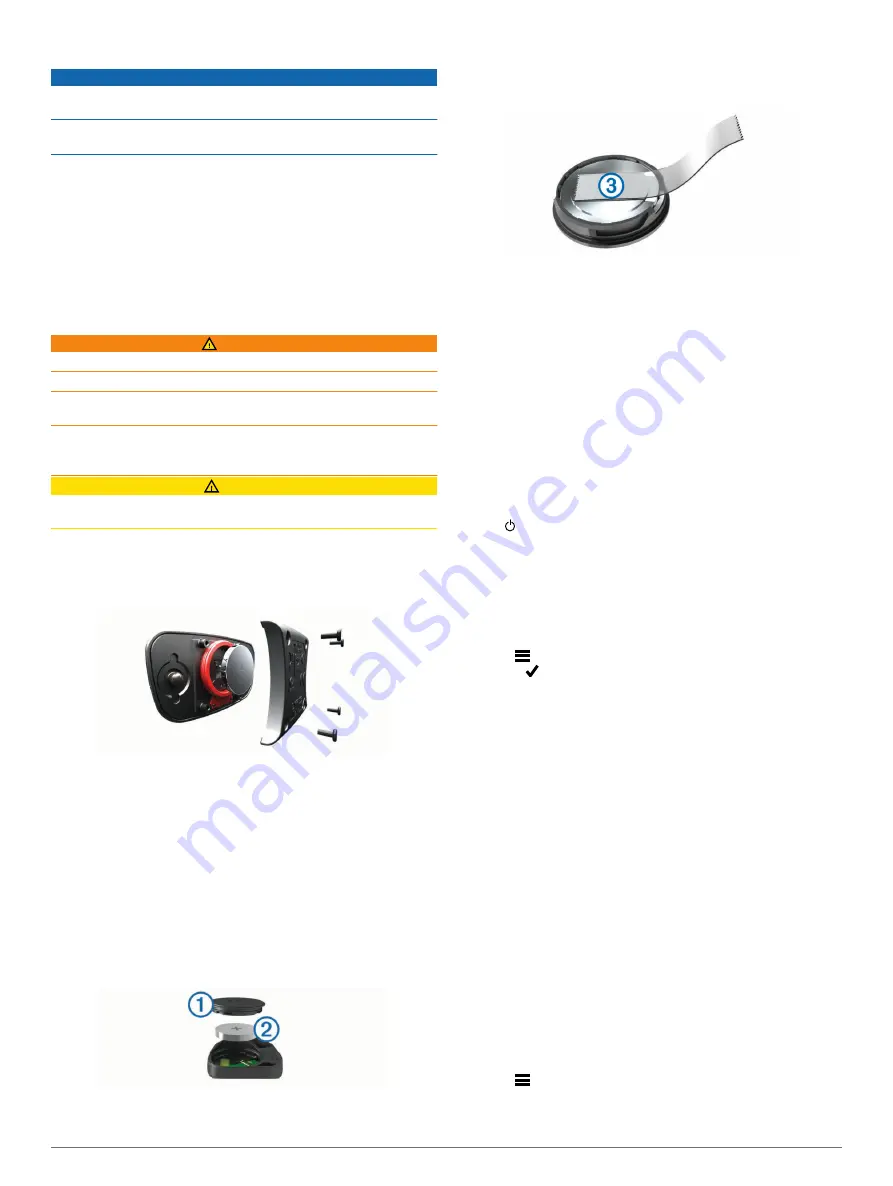
Replacing the Heart Rate Monitor Battery
1
Use a small Phillips screwdriver to remove the four screws on
the back of the module.
2
Remove the cover and battery.
3
Wait 30 seconds.
4
Insert the new battery with the positive side facing up.
NOTE:
Do not damage or lose the O-ring gasket.
5
Replace the back cover and the four screws.
NOTE:
Do not overtighten.
After you replace the heart rate monitor battery, you may need
to pair it with the device again.
Replacing the Speed Sensor or Cadence Sensor
Battery
The LED flashes red to indicate a low battery level after two
revolutions.
1
Locate the circular battery cover
À
on the back of the sensor.
2
Twist the cover counter-clockwise until the marker points to
unlocked and the cover is loose enough to remove.
3
Remove the cover and the battery
Á
.
TIP:
You can use a piece of tape
Â
or a magnet to remove
the battery from the cover.
4
Wait 30 seconds.
5
Insert the new battery into the cover, observing polarity.
NOTE:
Do not damage or lose the O-ring gasket.
6
Twist the cover clockwise until the marker points to locked.
NOTE:
The LED flashes red and green for a few seconds
after battery replacement. When the LED flashes green and
then stops flashing, the device is active and ready to send
data.
Troubleshooting
Resetting the Device
If the device stops responding, you may need to reset it. This
does not erase any of your data or settings.
Hold for 10 seconds.
The device resets and turns on.
Clearing User Data
You can restore all of the device settings to the factory default
values.
NOTE:
This deletes all user-entered information, but it does not
delete your history.
Select
>
Settings
>
System
>
Device Reset
>
Factory
Reset
> .
Maximizing Battery Life
• Turn on
Battery Save Mode
(
).
• Decrease the backlight brightness (
) or shorten the backlight timeout (
).
• Select the
Smart
recording interval (
).
• Turn on the
Auto Sleep
feature (
).
• Turn off the
Bluetooth
wireless feature (
).
• Select the
GPS
setting (
Changing the Satellite Setting
).
Turning On Battery Save Mode
Battery save mode adjusts the settings automatically to extend
the battery life for longer rides. During an activity, the screen
turns off. You can enable automatic alerts and tap the screen to
wake it up. Battery save mode records GPS track points and
sensor data less frequently. Speed, distance, and track data
accuracy are reduced.
NOTE:
History is recorded in battery save mode when the timer
is running.
1
Select
>
Settings
>
Battery Save Mode
>
Enable
.
2
Select the alerts that wake up the screen during an activity.
Troubleshooting
19
Содержание A03001
Страница 1: ...A03001 Owner s Manual July 2016 190 02077 00_0A...
Страница 29: ......


