


13–8–612 Page 14
Operation at excessive discharge air
pressure can cause personal injury or
damage to equipment. Do not adjust
the full discharge air pressure above
the maximum stamped on the unit
nameplate.
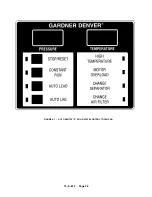
8. Operating Mode – Refer to Section 4 for detailed
information on the control system.
9.
Enclosure – Check for damaged panels or doors.
Check all screws and latches for tightness. Be
sure doors are closed and latched.
10
Optional Integrated Dryer – see Section 11,
pages 60 thru 66, for Operating Instructions and
pages 67 thru 71, for Parts Listing.
STARTING THE UNIT – Observe the following starting
procedures.
Unit Cold:
1.
If the unit has the optional integrated dryer, start
the dryer.
2.
Close the air service valve (customer furnished)
between the main air system and the check valve
on the package.
3.
Start the unit by pushing either the “CONSTANT
RUN” or one of the “AUTO” buttons.
4.
Run for approximately five minutes or until the
temperature stabilizes and then open the air ser-
vice valve.
The unit is equipped with a minimum (65 psig) pres-
sure/check valve, no special procedure to maintain the
unit reservoir pressure is required.
Unit Hot (No warm–up period is required):
1.
If the unit has the optional integrated dryer, start
the dryer.
2.
Close the air service valve (customer furnished)
between the main air system and the check valve
on the package.
3.
Start the unit by pushing either the “CONSTANT
RUN” or one of the “AUTO” buttons.
4.
Run for approximately one minute and then open
the air service valve. The unit is equipped with a
minimum (65 psig) pressure/check valve, no spe-
cial procedure to maintain the unit reservoir pres-
sure is required.
DAILY CHECK – Refer to Section 8, “Maintenance
Schedule,” page 32.
STOPPING THE UNIT:
1.
Close the air service valve (customer furnished)
between the main air system and the check valve
on the package.
2.
Allow the unit to build up to full unloaded pressure
and run unloaded for 1 to 2 minutes.
3.
Wait a short period for the reservoir to blow down.
4.
Press “STOP–RESET” button.
Stopping the unit at a pressure below full unloaded may
cause oil carry–over and can damage the air/oil sepa-
rator element. The oil reservoir will automatically blow
down as the motor stops. Open the air service valve.
If the unit has the optional integrated dryer and will be
off more than 8 hours, shut down the dryer.
Содержание EBB BB-7.5 HP
Страница 12: ...13 8 612 Page 2 FIGURE 1 2 PACKAGE COMPRESSOR MOTOR SIDE FIGURE 1 3 PACKAGE BELT GUARD SIDE...
Страница 13: ...13 8 612 Page 3 FIGURE 1 4 PACKAGE CONTROLLER END...
Страница 16: ...13 8 612 Page 6 DECALS 206EAQ077 212EAQ077 218EAQ077 211EAQ077 207EAQ077...
Страница 17: ...13 8 612 Page 7 DECALS 216EAQ077 217EAQ077 222EAQ077 221EAQ077 208EAQ077...
Страница 32: ...13 8 612 Page 22 FIGURE 4 7 AUTO SENTRY S SOLID STATE CONTROL TOUCH PAD...
Страница 33: ...13 8 612 Page 23 200EBB546 Ref Drawing FIGURE 4 8 WIRING DIAGRAM...
Страница 53: ...13 8 612 Page 43 PIPING AND MOUNTING GROUP 213EBB810 B Ref Drawing...
Страница 61: ...13 8 612 Page 51 ELECTRICAL GROUP 205EBB810 A Ref Drawing For Parts List Refer to Pages 52 thru 54...
Страница 72: ...13 8 612 Page 62 FIGURE 11 4 REFRIGERATED DRYER FIGURE 11 5 SUCTION PRESSURE GAUGE DRYER INLET AND OUTLET...
Страница 73: ...13 8 612 Page 63 FIGURE 11 6 CONDENSER HEAT EXCHANGER HOT GAS BYPASS FIGURE 11 7 COMPRESSOR REFRIGERATED DRYER...
Страница 77: ...13 8 612 Page 67 INTEGRATED DRYER ASSEMBLY AND PIPING 301EBB810 A Ref Drawing...
Страница 82: ...13 8 612 Page 72 300EBB541 B Ref Drawing...
Страница 84: ......


