03-14
7
8
NOTES
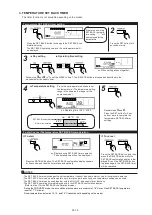
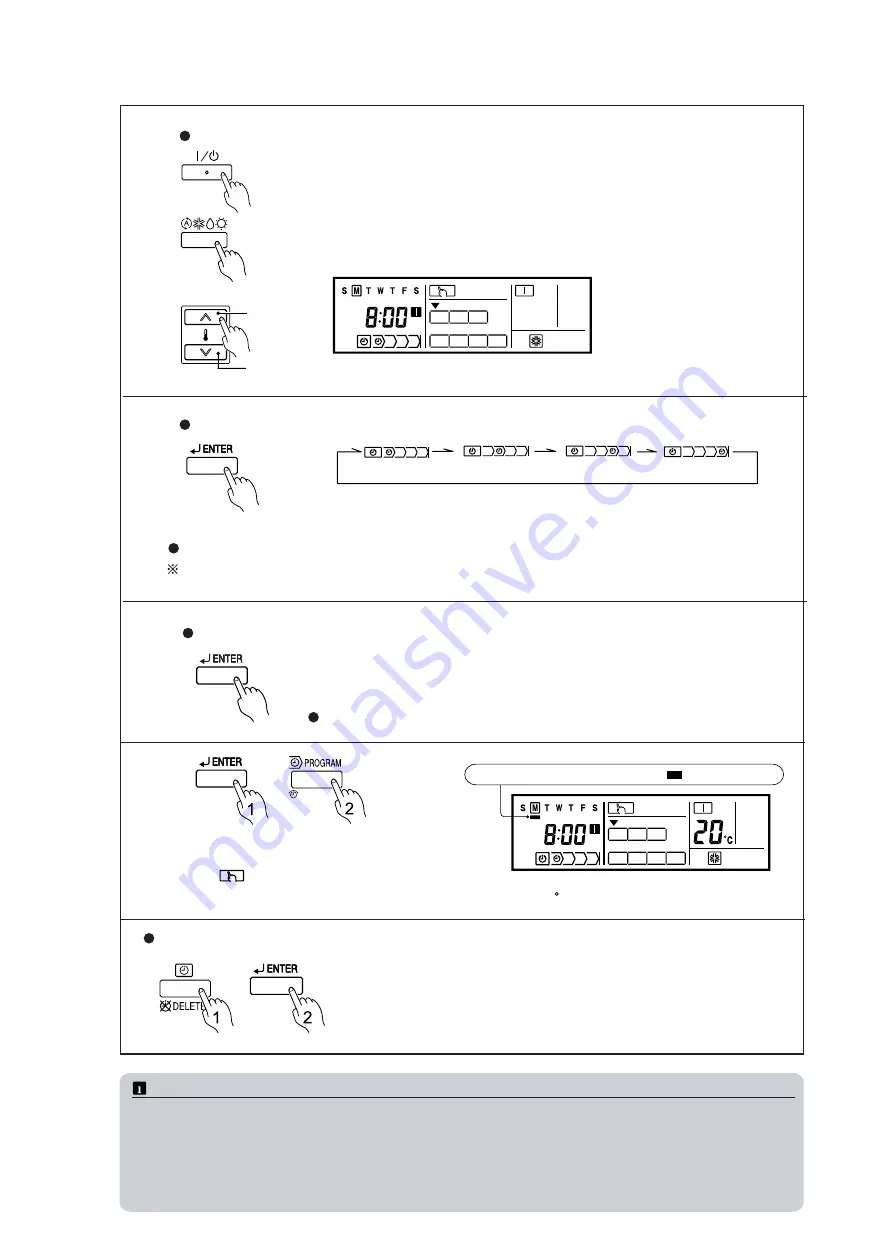
To delete the operating time
5
6
Operating setting
Raise
Lower
Press the Start/Stop button or the Mode button or the Set Temperature button to set
the operation.
* For the operations that can be set, refer to "Operation mode setting", "Room tem-
perature setting", and "To start /stop operation" , in "OPERATION".
* Only the current operation settings are displayed.
ex.TIMER-1 will start operation at 8:00 on COOL.
Setting the next timer for the same day:
TIMER-1
TIMER-2
TIMER-3
TIMER-4
Then press the ENTER button to proceed to the time setting, and repeat steps from to .
4 5
Repeat steps to to set the timer for another day of the week.
3 5
Be careful for pressing the ENTER button without any operation setting because the time that is set will be
cancelled.
When the operating time is set, the
mark appears.
ex. TIMER-1 will start operation at 8:00 on COOL with a set-
ting of 20 C
1. Press the ENTER button to confirm the set timer.
2. Press again the PROGRAM (CLOCK ADJUST)
button to complete the weekly timer setting.
*
flashes for two seconds.
Setting the timer for the other indoor units:
Before setting the timer for other indoor units, press the ENTER button to confirm the
settings.
* The display switches to the next timer.
Repeat steps to to set the timer for other indoor units.
2 6
1. If the Timer Mode (DELETE) button is pressed during steps to , the operat-
ing time for the selected day will be deleted.
* If all the days are selected, the operating times for all of the days of the se-
lected timer will be deleted.
2. Press the ENTER button to confirm the deletion.
3 7
AM
(1) The WEEKLY timer does not operate when the HEAT timer is set if a HEAT PUMP MODEL in the air conditioning system
is operating in the cooling mode. In addition, the WEEKLY timer does not operate when the COOL or DRY timer is set if
a HEAT PUMP MODEL in the air conditioning system is operating in the heating mode.
(2) Even if the timer operation is set, the timer lamp of the indoor unit does not light up. (The timer lamp is used for
wireless remote controller only.)
(3) If the same time is set in Timer-1 to Timer-4 of an indoor unit, the timer setting of the smallest number will be effective.
Содержание Airstage J-II
Страница 1: ...Small VRF system for light commercial and home use SERVICE MANUAL ...
Страница 2: ......
Страница 6: ......
Страница 7: ...1 TEST RUN ...
Страница 8: ......
Страница 27: ...2 OUTDOOR UNIT OPERATION CONTROL ...
Страница 28: ......
Страница 42: ......
Страница 43: ...3 INDOOR UNIT OPERATION ...
Страница 44: ......
Страница 63: ...4 TROUBLE SHOOTING ...
Страница 73: ......
Страница 170: ......
Страница 171: ...5 APPENDING DATA UNIT ...
Страница 172: ......
Страница 174: ...MODELS AUXB07 AUXB09 AUXB12 AUXB14 AUXB18 AUXB24 05 02 5 2 WIRING DIAGRAM 5 2 1 Indoor Unit ...
Страница 175: ...MODELS AUXD18 AUXD24 AUXA30 AUXA36 AUXA45 AUXA54 05 03 ...
Страница 176: ...MODELS ARXB07 ARXB09 ARXB12 ARXB14 ARXB18 05 04 ...
Страница 177: ...MODEL ARXB24 MODELS ARXB30 ARXB36 05 05 ...
Страница 178: ...MODEL ARXB45 05 06 ...
Страница 179: ...MODEL ARXA24 MODELS ARXA30 ARXA36 ARXA45 05 07 ...
Страница 180: ...MODELS ARXC36 ARXC45 ARXC60 MODELS ARXC72 ARXC90 05 08 ...
Страница 181: ...MODELS ARXD07 ARXD09 ARXD12 ARXD14 ARXD18 ARXD24 05 09 ...
Страница 182: ...MODELS AB A12 AB A14 AB A18 AB A24 05 10 ...
Страница 183: ...MODELS AB A12LBTH AB A14LBTH 05 11 AB A18LBTH AB A24LBTH ...
Страница 184: ...05 12 MODELS AB A30 AB A36 AB A45 AB A54 ...
Страница 185: ...05 13 MODELS AB A30LBTH AB A36LBTH AB A45LBTH AB A54LBTH ...
Страница 186: ...MODELS AS A07 AS A09 AS A12 AS A14 05 14 ...
Страница 187: ...MODELS AS E07 AS E09 AS E12 AS E14 05 15 ...
Страница 188: ...MODELS AS A18 AS A24 AS A30 05 16 ...
Страница 189: ...05 17 MODELS AS A18LACH AS A24LACH AS A30LACH ...
Страница 190: ...05 18 MODELS AJ A36 45 54LALH 5 2 2 Outdoor Unit ...
Страница 195: ...6 DISASSEMBLY PROCESS ...
Страница 196: ......


