background image

19

1

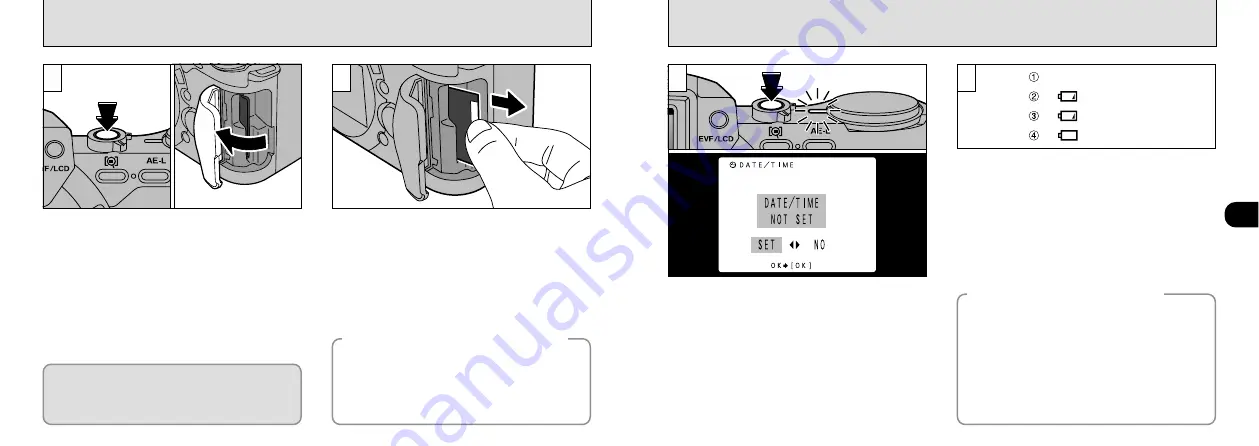
SWITCHING ON AND OFF

18

REMOVING THE SmartMedia

1

2

Blank

Lit  yellow

Lit  red

Lit  red

2

Check that the indicator lamp is green and
switch the camera off (

next page).

Open the slot cover.

Grasp the SmartMedia with your fingertips and
pull it out.

Never open the SmartMedia slot cover while
the camera is switched on.This could destroy
the image data or damage the SmartMedia
itself.

!

To protect the SmartMedia, always store it in the
special anti-static case.

Printing Images and Downloading
Images to a Personal Computer

See P.86, 105 for information on printing
images.

See P.105 – 108 for information on
downloading images to a personal computer.

Press the “

$

” (Power) button to switch the

camera on and off. When you switch the camera
on, the indicator lamp turns green.
If the date and time are not set, a confirmation
screen appears each time you switch the
camera on. Use “

d

” or “

c

” to select “SET” or

“NO” and press the “MENU/OK” button. (See
P.21 if you selected “SET”.)

!

If you switch the camera on when the Mode switch is
set to “

0

”, the lens extends. Take care not to press

on the lens.

With the LCD monitor on, you can check the
remaining charge in the battery.

Battery has ample charge. (No indicator
displayed.)

The battery is approximately half charged.

Battery charge low. Replace or recharge the
battery as it will run out shortly.

The battery is exhausted. The display will
shortly go blank and the camera will stop
working. Replace or recharge the battery.

1

Auto Power Save Function

If the camera is not used in any way for 15
seconds when the camera functions are
enabled, this function temporarily switches
features such as the LCD screen off to
reduce power consumption. If the camera is
then left unused for a further period (2 or 5
minutes), the Auto Power Save function
automatically switches the camera off. (See
P.102 for details.)

See P.67 – 68 for information on selecting the language

Содержание Finepix 4900 Zoom

Страница 1: ...ou how to use your FUJIFILM DIGITAL CAMERA FinePix4900 ZOOM correctly Please follow the instructions carefully BB11855 200 1 E Getting Ready Basic Photography Setting Advanced Features Playback Advanc...

Страница 2: ...before using the camera This symbol is intended to alert the user to the presence of uninsulated dangerous voltage within the product s enclosure that may be of sufficient magnitude to constitute a r...

Страница 3: ...TING 59 PHOTOGRAPHY MODE 4 Advanced Features Playback ADVANCED PLAYBACK 73 Playback mode menu 73 PLAYBACK INFORMATION 74 MOVIE PLAYBACK 75 c ERASING SINGLE ALL FRAMES FORMATTING 77 N PLAYBACK AUTOMATI...

Страница 4: ...and other countries Windows is an abbreviated term referring to the Microsoft Windows Operating System SmartMedia is a trademark of Toshiba Corporation Other company or product names are trademarks o...

Страница 5: ...SmartMedia slot P 17 BACK button MENU OK button Battery cover P 15 Tripod mount LCD monitor 4 direction button Hot shoe P 70 Mode dial P 11 Focusing ring P 56 Macro close up photography button P 53 S...

Страница 6: ...ch P 22 32 Power button P 19 Photography mode P 22 Playback mode P 32 Exposure compensation button P 55 Custom white balance button P 65 Lens Focusing mode selector switch P 56 Zoom button P 24 Flash...

Страница 7: ...halfway so that the camera takes the measurements and displays the settings 1 If you change the settings and the image is still overexposed use the optional Adapter Ring and ND Light Adjustment Filter...

Страница 8: ...emove the lens cap when taking pictures Arrow mark 2 1 Do not use excessive force to open the battery cover When replacing the battery always switch the camera off beforehand If you open the battery c...

Страница 9: ...te a fault If you switch the camera on while the battery is charging the charging will stop The battery will not charge if the AC power adapter connector is not correctly plugged into the camera Charg...

Страница 10: ...me you switch the camera on Use d or c to select SET or NO and press the MENU OK button See P 21 if you selected SET If you switch the camera on when the Mode switch is set to 0 the lens extends Take...

Страница 11: ...g The SET UP screen then reappears To exit the 2 mode set the mode dial to any mode other than the 2 mode Use a or b to select DATE TIME Press the MENU OK button If the date and time settings are clea...

Страница 12: ...Hold the camera grip with your right hand and use your left hand to support the camera lens securely Check that the lens is clean If it is dirty clean the lens as described on P 113 Use of the automat...

Страница 13: ...s the shutter button down halfway the image on the screen freezes temporarily However this image is not the recorded image If it is too dark to focus move at least 2 m away from the subject and take t...

Страница 14: ...st between the subject and the background such as white walls or subjects dressed in the same color as the background When there are objects in front of or behind the subject such as an animal in a ca...

Страница 15: ...focus on a subject that is not centered in the frame or change the picture composition after the exposure is set you can obtain good results by changing the composition after the AF and AE settings a...

Страница 16: ...fted slightly from the scene frame Use this frame when you want to position your main subject in center of the frame or when you want to align your shot with the horizon This is the most effective fra...

Страница 17: ...tMedia using a FUJIFILM FinePix series MX series and DX series digital camera You can fast forward through the frames by holding down d or c button for about 3 seconds during playback During fast forw...

Страница 18: ...tton and pressing a b d and c on the 4 direction button Press the BACK button to return to normal unscaled display Pressing the DISP button twice switches to the multi frame 9 frame display Use the ab...

Страница 19: ...isplay the image to be erased Press the MENU OK button to erase the displayed image When erasing is complete the next image appears and the message is displayed To cancel single frame erase press the...

Страница 20: ...O O O 9 Aperture priority Auto P 42 Z M 8 O O O O O O 4 Manual P 44 Z M O O O O Movie P 46 Switch off the camera and the TV Plug the video cable provided into the VIDEO OUT socket on the camera Plug...

Страница 21: ...to slower shutter speeds Shutter Slow shutter speed mode with speeds as slow as 3 seconds White Balance Use this setting for shots taken outdoors in daylight g When using the flash Slow Synchro Red Ey...

Страница 22: ...es or switch the camera off If you exceed the control range for the photography mode as with a scene that is extremely overexposed or underexposed the shutter speed or aperture is displayed in red on...

Страница 23: ...xposed image plus displayed in yellow while moving the indicator towards minus minus displayed in yellow gives an underexposed image This mode allows you to set any shutter speed or aperture setting S...

Страница 24: ...rter than 160 seconds MG 64S SW 64MB MG 32S SW 32MB MG 16S SW 16MB MG 8S 8MB MG 4S 4MB SmartMedia capacity Approx 364 Approx 182 Approx 90 Approx 45 Approx 22 Available recording time sec SmartMedia s...

Страница 25: ...time When the recording time bar reaches the right hand end recording automatically ends and the data is recorded onto the SmartMedia A recording time bar is displayed on the monitor during shooting I...

Страница 26: ...allows you to take pictures of people at night that clearly show both your subjects and the nighttime backdrop Slow Synchro The image may be overexposed when you shoot bright scenes Because a slow shu...

Страница 27: ...r lighting at distances too great for the flash to have any effect such as theater performances or indoor sporting events When you use Suppressed Flash the Auto White Balance function P 112 operates s...

Страница 28: ...1 step 1 3 EV 1 notch 1 3 EV Exposure compensation is disabled in the following situations When the flash is used in Auto or Red eye Reduction mode When Forced Flash mode is used and the scene photog...

Страница 29: ...using Indicator Marks The focusing mark appears when you move the focus a set amount close to the focused position Use the mark as a guide to focusing Use this function when you have difficulty confir...

Страница 30: ...s and exposure are determined for the first frame and cannot be changed during shooting Continuous shooting can be specified in all photography modes except Selecting continuous shooting allows you to...

Страница 31: ...tarts flashing until the picture is taken A countdown is displayed on the screen indicating the time remaining until the picture is taken Self timer mode is automatically cancelled after each shot To...

Страница 32: ...is function to check the settings not to change them Flash brightness adjustment White balance Photometry ISO sensitivity Bracketing Sharpness Press the MENU OK button to display the menu Use d and c...

Страница 33: ...l light source In such situations select the correct white balance for the light source See P 112 for more information on the white balance AUTO Automatic adjustment Shooting to show the ambience of t...

Страница 34: ...e set previously press the MENU OK button without pressing the Q button The white balance setting does not affect the image shown on the screen After you take the picture you should check the Color Wh...

Страница 35: ...5 7 9 4 photography modes Use this setting to soften or emphasize outlines or to adjust the image quality Three levels of sharpness are available HARD Emphasizes the outlines Best for shots of subject...

Страница 36: ...the following 3 conditions The aperture can be set External flash synchronization can be used The ISO sensitivity can be set When you are using an external flash always specify a fixed aperture setti...

Страница 37: ...back functions that you can access by setting the Mode switch to If you are close to a power outlet you should use the AC Power Adapter AC 5V AC 5VH sold separately to avoid any loss of power during s...

Страница 38: ...e file When you play a movie file the screen goes dark temporarily while the camera reads in the image data Playback automatically stops when the end of the file is reached and the initial screen reap...

Страница 39: ...e LCD monitor Image data that can be played back The FinePix4900 ZOOM can play back video data recorded on an FinePix4900 ZOOM or image data recorded on a 3 3 volt SmartMedia using a FUJIFILM digital...

Страница 40: ...en playback ends the next frame appears Press d or c to select N PLAYBACK Use the a and b buttons to select one of the 3 display methods wipes Press the MENU OK button The image frames are automatical...

Страница 41: ...ge the Resize menu option is not displayed Press d or c to select the image to be resized Press the MENU OK button to display the menu on the monitor Movie files cannot be resized E RESIZE PLAYBACK ME...

Страница 42: ...screen To remove the protection press the MENU OK button again Movie are protected one photographed item file at a time If you do not want to protect any images press the BACK button to return to the...

Страница 43: ...eturn to the menu To exit the menu screen press the BACK button again Press the MENU OK button to display the menu on the monitor Use d or c to select P PROTECT Press a or b to select PROTECT ALL or U...

Страница 44: ...00 ZOOM Note that some printers do not support date and time imprinting or specification of the number of prints Note that the warnings shown below may be displayed while you are specifying the prints...

Страница 45: ...gs If you specify FRAME SET and use cropping and then specify SET ALL the number of frames specified in the FRAME SET and cropping settings are cancelled Use d or c to display the frame to be specifie...

Страница 46: ...hat were being set Settings for other frames are not cancelled 7 To Continue When you have completed the settings always press the MENU OK button to confirm the settings The total number of prints is...

Страница 47: ...ame playback is an easy way to select images P 35 If you do not want to check or delete the DPOF settings press the BACK button to return to the menu To exit the menu screen press the BACK button agai...

Страница 48: ...AME SET specifications and cropping settings are cancelled A confirmation screen appears To proceed press the MENU OK button Index creation can only be specified when there are image files selected Th...

Страница 49: ...re is taken See P 100 for details Use this setting to specify whether the camera is switched to low power mode and then automatically switched off when the camera controls are not being used See P 102...

Страница 50: ...K button Use no compression HI or a low compression ratio FINE or NORMAL with the largest possible file size setting However because this increases the amount of data in each frame the remaining numbe...

Страница 51: ...picture is possible You can zoom in or out on the image on the preview screen by pressing a or b on the 4 direction button You can move around a zoomed image by holding down the SHIFT button and press...

Страница 52: ...n to CONT makes file management easier as it ensures that file names are not duplicated when images are downloaded to a PC RENEW Pictures are stored on each SmartMedia beginning with a file number 000...

Страница 53: ...settings press the BACK button The brightness adjustment can be set independently for the LCD viewfinder and the LCD monitor FinePix4900 ZOOM Digital Camera Video output PC card slot Personal Compute...

Страница 54: ...SB Socket Insert the small plug on the special cable into the Digital USB socket on the camera and plug the other end of the cable into the USB socket on the PC When you switch the PC on t USB appears...

Страница 55: ...ing increases the amount of distortion The wide conversion lens and built in flash cannot be used together The adapter ring is required for using commercially available filters Adapter ring specificat...

Страница 56: ...an external disk drive for a personal computer IEEE 1394 interface Dual slot for SmartMedia and CompactFlash Type II Microdrive compatible e The optional accessories sold separately can make taking pi...

Страница 57: ...button down half way locks the focus and exposure settings AF and AE lock If you want to focus on a subject that is not centered in the frame or change the picture composition after the exposure is s...

Страница 58: ...a just before you take a picture If you are using a heating pad take care not to place the battery directly against the pad The camera may not operate if you use a depleted battery in cold conditions...

Страница 59: ...f the plug and pull it out do not disconnect it by pulling on the cord Do not use this AC power adapter with any device except the specified device During use this AC power adapter will become hot to...

Страница 60: ...ata on a SmartMedia To edit image data copy the image data to the computer s hard disk and then edit the copied data SmartMedia The SmartMedia card supplied with your FinePix4900 ZOOM camera is a new...

Страница 61: ...be specified on the same SmartMedia is 999 The image you tried to erase has a DPOF print setting The DPOF file contains an error Alternatively the DPOF file was set up on a different device Explanatio...

Страница 62: ...Remove the write protection Peel off the write protect sticker The ERASE ALL function does not erase all the frames The frame is protected Remove the frame protection Problem Cause Remedy No power The...

Страница 63: ...t to 80 cm 2 6 ft Shutter Variable speed 3 to 1 2000 sec using AE System Quality Mode Image Data Size MG 4S 4MB MG 8S 8MB MG 16S SW 16MB MG 32S SW 32MB 0 0 1 2 Approx 12 7MB HI MG 64S SW 64MB 5 File S...

Страница 64: ...ifications are subject to change without notice The LCD monitor on your digital camera is manufactured using advanced high precision technology Even so small bright points and anomalous colors particu...

Страница 65: ...cause a fire or electric shock Never attempt to take pictures whilst in motion Do not use the camera while you are walking or operating a moving car or other vehicle This can result in you falling do...

Страница 66: ...le the AC power adapter is still connected Do not pull on the connection cord to disconnect the AC power adapter This can damage the power cord or cables and cause a fire or electric shock Do not cove...

Страница 67: ...Printed in Japan FGS 002108 FG Printed on recycled paper 26 30 Nishiazabu 2 chome Minato ku Tokyo 106 8620 Japan...

Отзывы: