PAG.23
rev 1.2
EN
GL
ISH
OSD 30
OSD 31
mode after you confirm to save the changes when you leave
this menu.
3.1.4.3 LOCK
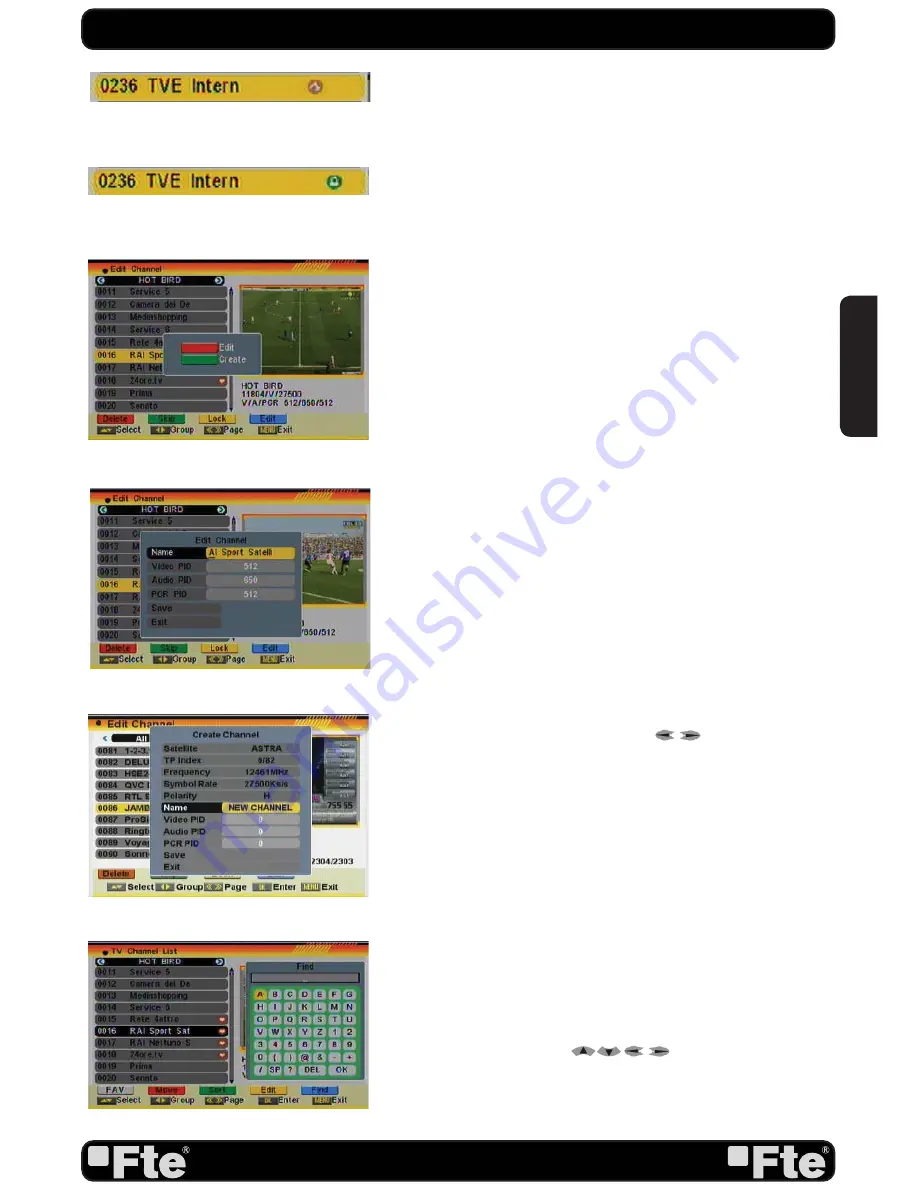
In Channel Edit menu, press [Yellow] button to place a Lock icon
behind the name of the highlighted channel. Marked channels
(OSD 31) will be locked and displayed only after password has
been entered if you confirm to save the changes when you
leave this menu.
3.1.4.4 EDIT
Pressing the [Blue] button in the TV Channel List Edit menu will
open another window where you can choose between Edit the
actual channel or create a new channel (OSD 32).
1. Edit current channel: To edit the channel press the [Red]
button (OSD 33).
- Name: You can edit the name of the current channel using the
keys on the remote control.
- On the “Video PID”, “Audio PID” and “PCR PID” items you
can input numbers to modify the item’s value.
- After modification select “Save” and press [OK] button to save
the modified values and exit “Edit” mode. Or select “Exit” and
press [OK] to leave Edit mode without saving the modifica-
tions.
2. Create: Press [Green] button to open the Create window
(OSD 34).
- Press [OK] button on the “Satellite” item to display the satelli-
te list. You can select the satellite for which you want to crea-
te a new channel.
- With marked “TP Index” item press [
] to select the TP
number where the channel can be found. The next three
items will show the related parameters.
- Highlight the “Name” item and edit the name of the current
channel using the keys on the remote control.
- In “Video PID”, “Audio PID” and “PCR PID” items you can
enter the numbers directly to set these parameters of the
new channel.
- After modification select “Save” and press [OK] to save the
new channel and leave the Edit mode. Select “Exit” and press
[OK] to exit the Edit mode without saving the new channel.
3.1.5. FIND
1. Press [Blue] button to open the “Find” window like showed
besides (OSD 35). Press [
] to select the leading
character of the channel name and press [OK] to confirm it.
2. After entering the character(s) highlight “OK” in the window
and press [OK] on the RCU.
CHANNEL
OSD 32
OSD 33
OSD 34
OSD 35
Содержание MAX S405 HD PLUS
Страница 1: ...MAX S405 HD PLUS...


