71
PB
REMOVAL
Outdoor Unit
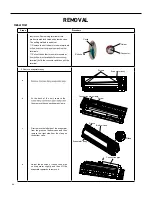
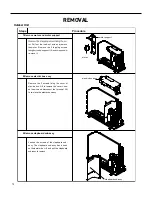
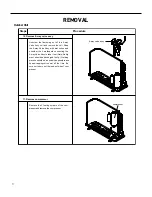
10.Remove 4-way valve assy
Procedure
Steps
11.Remove compressor
4-way valve assy
compressor
Remove the 3 footing screws of the com-
pressorand remove the compressor.
Unscrew the fastening nut of the 4-way
Valve Assy coil and remove the coil. Wrap
the 4-way Valve Assy with wet cotton and
unsolder the 4 weld spots connecting the
4-way Valve Assy to take it out (Note: Refrig-
erant shouldbe discharged firstly.) Welding
process should be as quickly as possible and
keep wrapping cotton wet all the time. Be
sure not to burn out the lead-out wire of com-
pressor.
Содержание FSHW091
Страница 8: ...8 INTRODUCTION FSHSW09A1A FSHSW12A1A Figure 102 Indoor Units FSHSW18A3A FSHSW24A3A FSHSW36A3A ...
Страница 47: ...47 INSTALLATION ...
Страница 48: ...48 INSTALLATION Installation Tools ...
Страница 72: ...72 WIRED CONTROLLER Display ...
Страница 122: ...122 TROUBLESHOOTING Malfunction of IDUFanMotorU8 Service Manual No Start End ...
Страница 146: ...146 WIRING DIAGRAMS Figure 8054 9 12KOutdoorUnitWiringDiagrams 60000706067401 3 2 N 1 C3 C4 ...
Страница 147: ...147 WIRING DIAGRAMS Figure 805 18 24kOutdoorUnitWiringDiagrams Figure 806 36kOutdoorUnitWiringDiagrams 6361000047001 ...
Страница 158: ...158 FIgure 906 PARTS CATALOG 9KOutdoorUnit 28 27 29 31 30 32 ...
Страница 160: ...160 PARTS CATALOG 12k OutdoorUnit 28 27 29 31 30 32 FIgure 907 ...

