


- 36 -
VII. Other Modes/Features
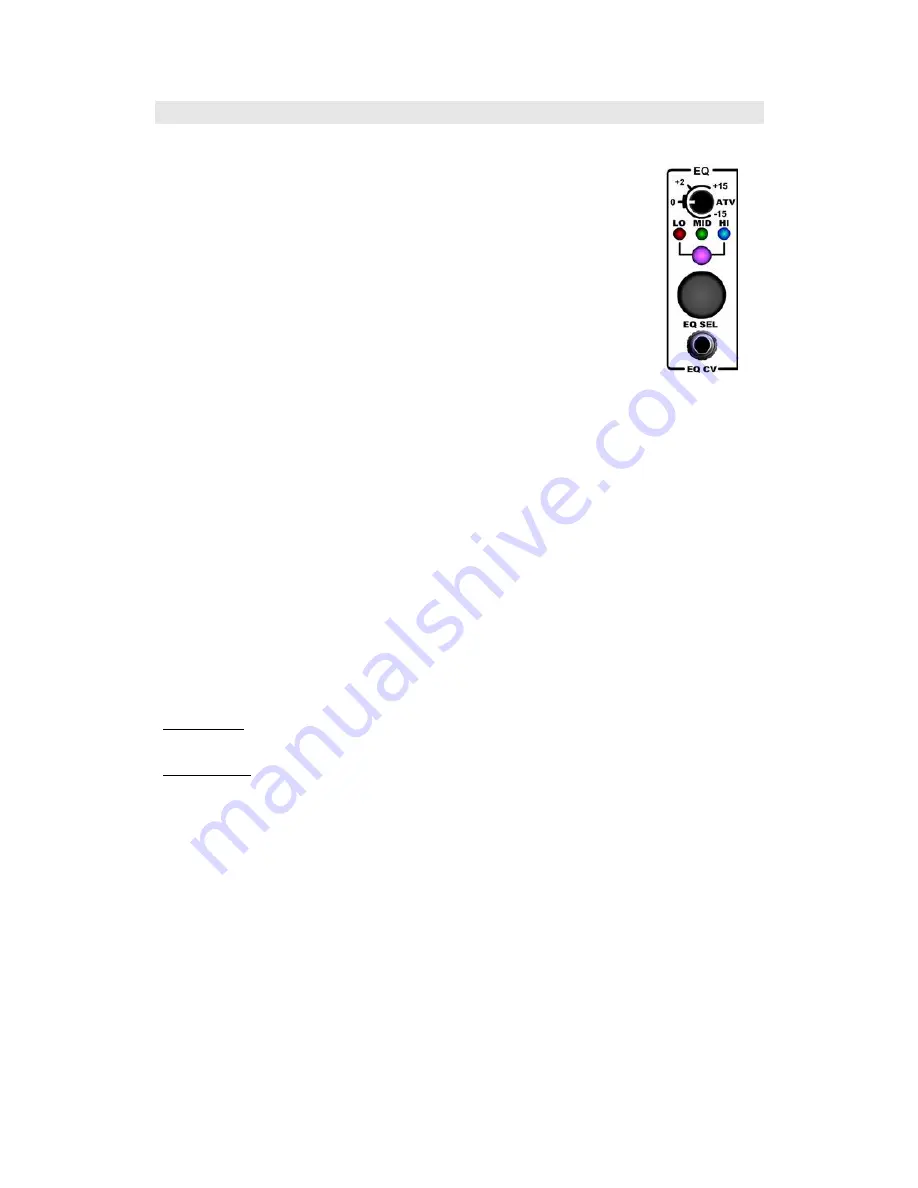
A. EQ (Equalizer)
The Reflex LiveLoop has been equipped with a 3 band stereo EQ (actually 2 EQ's) that can
be used to tailor feedback and output audio. It is in 1dB steps with +/-15dB on each side so is
pretty touchy in the Feedback area! You'll find that you'll be mostly attenuating the 3 bands
rather than turning them up.
Controls
The EQ control is basically an attenuvertor for the EQ CV, but is normalized to +5V when not
patched. The 3 LEDs, LO, MID, and HI are the band indicators. Each band can be selected
with the Black EQ button in the sequence LO-MID-HI-ALL-OFF/BLEND, and will be under CV
control.
The OFF position controls the BLEND control as a takeover to CV control panning from the AC
in audio to the Sampler out audio.
All of the EQ bands together, and Blend control can act as an envelope , and even though the
resolution is 20mS, does a nice job!
Centering the EQ
For unmodified Feedback and sample play, it's important that the EQ be centered. Turn the knob toward zero until
the Band LED(s) flicker off momentarily. At this point the EQ is centered. A 0V CV patched in will also center the
EQ no matter where the knob is…except if the input is switched to uni-polar mode (below)
Unipolar input
The attenuvertor is designed to operate over +/- 15dB with +/-5V patched into the EQ CV input when at full, but if
you want to use as an envelope, 0-5V giving response over the full -15dB to +15dB might be better.
By holding the EQ button for > 1 second, the bi-polar/uni-polar modes will toggle. Now, if not patched, the EQ knob
acts as a unipolar knob on each half, and a CV input will give the full 30dB range.
The Blend control acts in a slightly different way in unipolar mode, see below.
Note that there is no visual indicator for this.
EQ vs. Feedback
The EQ can be subtly used to offset the feedback control, i.e. add 1 or 2 dB on all bands, but reduce the gain of
the feedback. This will give you the ability to jump up the feedback quickly to far above 100% if desired.
*There are 4 MID band settings. See Sect. IX.A. "Settings" to permanently change the MID band frequency.
Blend CV Control
The Blend CV (if enabled, Option LED 3, default is on. See pg.40) is selected by All EQ LEDs off. This takes over
the Blend knob, which becomes inactive until an EQ band is again selected. The EQ knob will act as the Blend knob
when in bipolar mode with the same direction of turn.
In Bipolar mode
0 volts to +5 volts fades the raw (input) audio leaving the sampler audio, while 0 volts to -5 volts fades the sampler
audio leaving the raw audio.
In Unipolar mode
With EQ knob on (+) side, 0 volts to +5 volts brings up the sampler audio with the raw audio remaining,
with EQ knob on (-) side, 0 volts to +5 volts brings up the raw audio with the sampler audio remaining (less used).
*The first unipolar setting will be the most used as it allows envelope controlled spurts of sampler audio to be
mixed with through audio.
NEW! EQ "Pass Lock"
As of V.1.01G there is an option (User Settings Submenu LED 7, default=on) that will lock a band when focus is
selected to another band. Normally (prior) the bands would hold the last knob/CV position, but would sometimes
change unexpectedly if the knob is in a different position than it was before. This can be disastrous during a tight
Echo with the feedback all the way up!
EQ Pass Lock won't allow a band's setting to change until it's previous value is met and passed by the new setting.
For example, the LOW band is turned right down to get a crisp string of echos, but the EQ button was set to
adjust the HI band up some. After 3 taps on the EQ button, selection is focused on LOW, but the knob is still
above 0dB a ways. Before this option, any movement on that EQ knob or CV would bring the LOW band right up to
where the knob is. For that reason you had to be quick!
Now, the EQ knob/CV must be lowered to capture the previous position, then can be gently adjusted to the new
position. This seems ideal, but can be a bit confusing if you can't remember where the setting was. The RGB LED
will show a colored / dimmed reference R=LOW, G=MID, B=HI. The lower the setting, the dimmer it will be.


