Flint & Walling © Copyright 2018. All rights reserved.
6
"S2" on the display board terminal strip with a small
screwdriver (provided) .
Tighten the strain relief on the pressure switch/transducer
lead .
IL0026
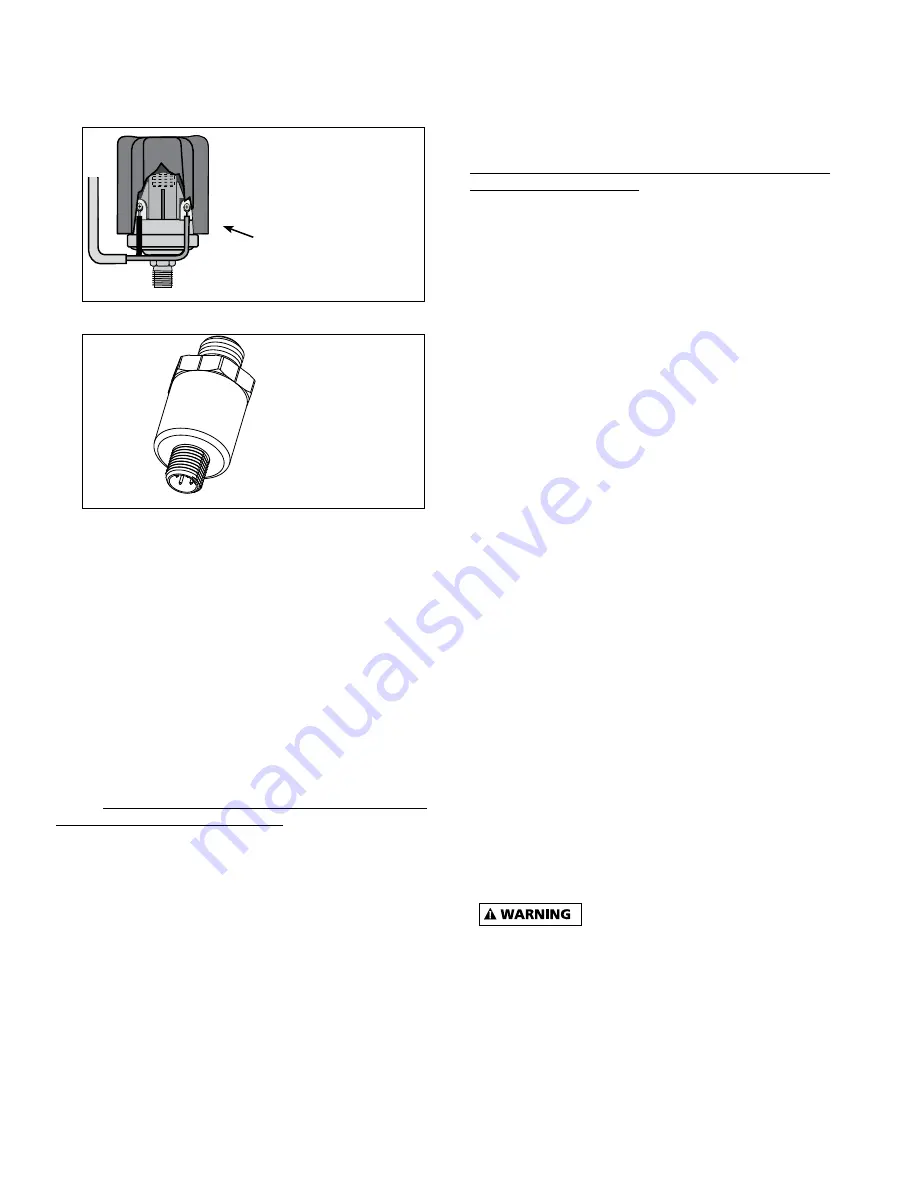
Remove rubber end cap
to adjust pressure . Use
7/32” allen wrench
Pressure switch
boot
Figure 7 Pressure Switch
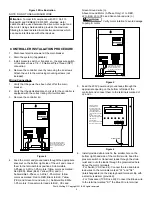
IL1875
Figure 8 Pressure Transducer
A 10 foot section of cable is provided with the system
to connect to the pressure switch / transducer. Lengths
of up to 100 feet can be used, provided the appropriate
shielded cabling is used. Consult the factory for proper
cable specification.
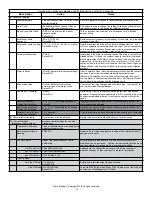
7 . Use the appropriate strain relief or conduit connectors
(not included) .
8 . Replace the cover . Do not over-tighten the screws .
9 . Set the pressure tank pre-charge to 70% of the desired
water pressure setting . To check the tank’s pre-charge,
de-pressurize the water system by opening a tap .
Measure the tank pre-charge with a pressure gauge at its
inflation valve and make the necessary adjustments .
NOTE
: For pressure switch installation (VS systems) only,
Follow steps 10, 11 & 12 . (Figure 7)
For pressure transducer installations, skip to Step 13 .
10 . Connect the other end of the pressure switch cable with
the two spade terminals to the pressure switch . The
connections are interchangeable .
11 . The pressure switch communicates the system pressure
to the controller . The switch is preset at the factory to
50 psi, but can be adjusted by the installer using the
following procedure:
a . Remove the rubber end-cap .
b . Using a 7/32” Allen wrench (provided), turn the
adjusting screw clockwise to increase pressure
and counter-clockwise to decrease pressure . The
adjustment range is between 30 and 80 psi (1/4 turn =
approximately 3 psi) .
c . Replace the rubber end cap .
d . Reset the pressure tank pre-charge to the appropriate
pressure
12 . Cover the pressure switch terminals with the rubber boot
provided .
For pressure transducer installation (TVS systems) only,
Follow Step 13 . (Figure 8):
13 . Connect the free end of the transducer cable to the
transducer by lining up the keyway on the connector
to the transducer, pressing the cable into place & then
tightening the thumbscrew finger tight .
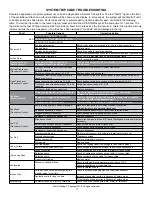
START-UP OPERATION
Apply power to the controller . The display should briefly show
“Please Wait Initializing” and then read “Press Enter to Begin
Set-Up” . Pressing ENTER button will begin taking you through
the quick set-up menu where you can select Pump type
(Submersible or Above Ground); Motor type (Three Phase,
3W Single Phase - if option is available); Maximum Motor
Current; Maximum Frequency; Control (Switch, Transducer)
by using the UP & DOWN buttons to change the setting
and then pressing the ENTER button to save the choice .
Once all the choices have been selected, press the STOP/
START button to save the setting to the controller’s memory .
The drive will then spin the motor in a reverse direction for
a couple of seconds and then begin to run the motor in the
correct direction and begin regulating the pressure . While the
drive is running the motor, for VS drive kits (pressure switch)
the display will show the current that the motor is drawing and
the frequency that is being supplied . When there is no water
use, the controller will shut off the output to the motor and the
display will show “Motor is in Standby Mode” . For TVS drive
kits (transducer) the display will show the transducer pressure
reading, current that the motor is drawing and the frequency
that is being supplied .
NOTE
: Conventional private water systems intermittently fill a
pressure tank as commanded by a standard pressure switch
(e .g . 30 - 50 psi) . The constant pressure controller maintains
a constant pressure at the pressure switch/transducer up to
the maximum capability of the motor and pump . Although the
pressure is constant at the pressure switch or transducer,
pressure drops may be noticeable in other areas of the home
when additional taps are opened . This is due to limitations in
the plumbing and will be more pronounced the further the taps
are from the pressure switch/transducer . This would be true of
any system, and if observed, should not be interpreted as a
failure in the performance of the constant pressure controller .
Serious or fatal electrical shock may
result from contact with internal electrical components.
DO NOT, under any circumstances, attempt to modify
connections to the drive until power has been removed
and 10 minutes have passed for internal voltages to
discharge!


