


EN
82
7.2.2.1 STEP 1 - Administrator/User login credentials
• Set the Administrator account user and password (minimum 8
character for password):
Administrator account can open and view the contents of photovoltaic
site. Additionally, they can change inverter settings.
User and password are CASE SENSITIVE.
• Set the User account user and (optional) password (minimum 8
character for password):
User account can only read data. It cannot make any changes.
User and password are CASE SENSITIVE.
• Click on “NEXT” to go to next step.
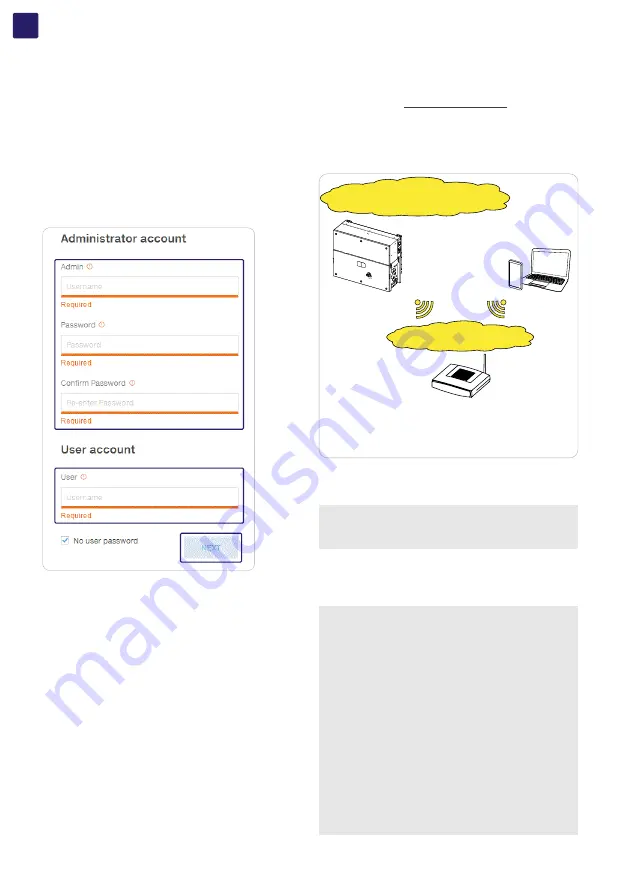
7.2.2.2 STEP 2 (Optional) - Wireless network
connection.
As described on
paragraph the
recommended way to get all the installed inverters communicating
to the internet and Aurora Vision Cloud is creating a wired Ethernet
daisy chain bus. Anyway, in case of a few inverters installation in
suitable environment, it is also possible to connect each inverter of
the plant to a Wi-Fi router without using any cable.
- The AP is still available and the user can connect to the inverter.
- In this scenario the Router gives IPs according to its own rules.
- Inverter is reachable by IP.
- Domain name can be used only if the Router permits multicast
Direct Access
SSID: ABB-XX-XX-XX-XX-XX-XX
(XX-XX-XX-XX-XX-XX= Inverter MAC address)
IP given by inverter
DHCP server
IP given by inverter
DHCP server
Customer SSID
Aurora Vision Plant Viewer™
Aurora Vision Plant Viewer for Mobile™
Aurora Vision Plant Portfolio Manager™
During the installation wizard, the installer will be asked to connect
the inverter to a Wi-Fi router. By selecting connection to Wi-Fi
router the inverter will turn on a second Wi-Fi radio channel in
order to enable connection to the Wi-Fi router.
NOTE –
D
By selecting “Skip this step” button the second
radio channel will be kept off and you will need to use a
wired Ethernet daisy chain bus to allow the inverters to
communicate.
Two Wi-Fi radio channels enables simultaneous wireless
connection; one static IP address connection between inverter
and installer devices and one between inverter and switch/router.
NOTE –
D
Whatever option is used to connect the inverter to
the switch/router (Ethernet cable or Wi-Fi) it will be always
possible to access to the Web User Interface by connecting
its own device (Smartphone, tablet or laptop) to the same
switch/router, and reaching the inverter by using the assigned
IP address or inverter’s host name.
NOTE –
D
The IP address assigned to the inverter may vary
or may be unknown. Please contact the IT administrator for
getting the assigned IP address.
NOTE –
D
Differently from the assigned IP address, the «Host
Name» of the inverter is does not change over time.
NOTE –
D
In order to use the «Host Name» as an alternative
to the assigned IP address, for accessing to the inverters
Web User Interface from the router, the Domain Name
System (DNS) service shall be available and activated.
NOTE –
D
The Host Name associated to each Fimer inverter
is structured as indicated below:
ABB-logger ID.LOCAL
where logger ID stands for the MAC address indicated on the
“Communication identification lable” applied on the inverter.


