Ferm
37
•
Before use, inspect the grinding disc for any damage.
Do not use grinding discs which are crack-ed, ripped
or otherwise damaged.
•
Before use, let the machine run idle for 30 seconds.
Immediately switch off the machine in case of
abnormal vibrations or occurrence of another
defect. Carefully inspect the machine and grinding
disc before switching the machine on again.
•
Make sure that sparks do not put people into danger
or that they contact highly flammable substances.
•
Make sure that the workpiece is sufficiently
supported or clamped. Keep your hands away from
the surface to be cut.
•
Always wear safety goggles and hearing protection. If
desired or required also use another kind of
protection like for example an apron or helmet.
•
Ensure that mounted wheels and points are fitted in
accordance with the manufacturer’s instructions.
•
Ensure that blotters are used when they are
provided with the bonded abrasive product and
when they are required.
•
If a guard is supplied with the tool never use the tool
without such a guard.
•
For tools intended to be fitted with threaded hole
wheel, ensure that the thread in the wheel is long
enough to accept the spindle length.
•
Ensure that ventilation openings are kept clear when
working in dusty conditions. If it should become
nessesary to clear dust, first disconnect the tool
from the mains supply (use non metallic objects) and
avoid damaging internal parts.
•
Though poor conditions of the electrical mains,
shortly voltage drops can appear when starting the
equipment. This can influence other equipment (eq.
blinking of a lamp). If the mains-impedance Zmax
<0.348 Ohm, such disturbances are not expected.
(In case of need, you may contact your local supply
authority for further information.
3. ASSEMBLY
Prior to mounting an accessory always unplug the
tool.
MOUNTING A GRINDING DISC.
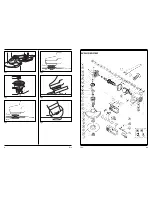
Fig 2
Use grinding discs of the correct dimension. Use fibre
reinforced grinding discs only. The grinding disc must
not touch the edge of the guard.
•
Press the spindle lock (6) and turn the spindle (9)
until it engages in the lock. Keep the spindle lock
pressed during this procedure.
•
Remove the flange nut (12) from the spindle using the
spanner (11).
•
Position the grinding disc (7) on the flange (5).
•
Place the flange nut on the spindle an tighten it using
the spanner.
•
Release the spindle lock and check that the spindle is
unlocked by rotating it.
MOUNTING THE SIDE HANDLE
Fig 1
The side handle can be used for both left-hand and right-
hand control.
•
Fasten the side handle (Fig. 5) for left-hand operation
on the right-hand side of the machine.
•
Fasten the side handle for right-hand operation on
the left-hand side of the machine.
•
Fasten the side handle for upright working at the top
of the machine.
Make sure that the side handle is fastened
properly and cannot loosen unexpectedly.
MOUNTING GRINDING DISCS AND
ROUGHING DISCS
Fig. 3 and 4 show how to mount the flange (10) when
using thick (4 – 8 mm) and thin (2,5 – 4 mm) discs.
4. USE
SPECIAL ATTENTION WHEN STARTING
THE MACHINE
•
Clamp the workpiece and make sure that the
workpiece cannot slide from under the machine
during the cutting activities.
•
When working with the machine, always hold it firmly
with both hands and provide for a secure stance.
•
Always direct the cable to the rear away from the
machine.
•
Insert the mains plug only when the machine is
switched off.
•
Apply the machine to the workpiece only when
switched on
Never use the machine for grinding magnesium
workpieces.
SWITCHING ON AND OFF
•
This machine is equipped with a safety switch.
•
Start the machine by pressing the “lock off” button
(to disengrage the switch) and switch on the
machine.
Before start working, the machine must be run
according to the max. speed.
OPERATION
•
Hold the machine firmly and move it against the
workpiece. Move the grinding disc evenly across the
workpiece.
•
Move the machine during roughing under an angle of
30º - 40º across the workpiece (fig. 5).
Never use grinding discs for roughing!
•
The machine must always work opposite to the
direction of rotation. Therefore, never move the
machine in the other direction! Otherwise, the
danger exists of it being pushed uncontrolled out of
the cut (fig. 6).
•
Inspect the grinding disc regularly. Worn discs have a
negative effect on efficiency of the machine. Replace
the grinding disc on time.
•
Do not put the machine down when the motor is still
running. Do not place the machine on a dusty
surface. Dust particles may enter the mechanism.
4
Ferm


