background image

4  

480 Budget - Issue 00 

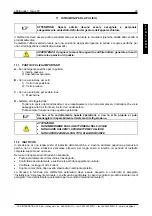
1.3 SAFETY 


The vending machine construction and analysis relevant to safety issues 
refer to the requirements in force. 
The installation and maintenance procedures, including replacing the 
power supply cable, must be carried out by competent personnel. 
Any interventions other than routine maintenance procedures must be 
carried out with the plug of the power supply disconnected. 

It is obligatory to wear suitable clothing as stipulated in this manual and by the 
ruling in force in the country in which the machine is used; avoid wearing baggy 
or loose clothing, belts, rings and chains; long hair must be kept under a 
suitable cap. 
 
It is strictly prohibited to operate the machine with the fixed and/or mobile 
protections disassembled or with the safety devices switched off.  
It is strictly prohibited to remove or tamper with the safety devices. 
Do not perform machine maintenance operations or adjustments of any kind 
without first having read and familiarised yourself with the contents of this 
manual. 
Adjustment carried out with reduced safety protections or with some switched 
off must be performed by one person only: During the adjustments, access to 
the machine by non-authorised personnel must be prohibited. If possible keep 
only one protection open at a time. 
After having performed adjustments or maintenance operations with reduced 
safety protections, the machine must be restored as soon as possible to its 
original conditions with all the protections active. 
Comply rigidly with the periodical maintenance operations described in this 
manual to ensure safe working conditions and to maintain machine efficiency. 
Keep the safety labels in good condition and learn their significance: these are 
necessary for preventing accidents; if the labels are damaged, lost or belong to 
replaced parts, they must be replaced with other original labels which can be 
requested from the Manufacturer. Position new labels in the exact positions 
indicated in this manual. 
 

Remember that an alert operator in good mental-physical conditions is the 
best assurance against accidents.


1.4 EMERGENCY 

SITUATIONS 


In the event of fire, do not direct jets of water against the machine as this 
could cause short-circuiting and result in accidents, even fatal, for 
persons nearby. 

FAS INTERNATIONAL S.p.A. Via Lago di Vico, 60 SCHIO (VI) – tel. +39 0445 502011 – fax +39 0445 502010 - e-mail: [email protected]


Содержание 480 BUDGET

Страница 1: ...480 BUDGET Issue 00 03 2004 Cod 22056301...

Страница 2: ......

Страница 3: ...dukt al quale questa dichiarazione si riferisce conforme alle seguenti norme to which this declaration relates is in conformity with the following standards auquel cette d claration se r f re est conf...

Страница 4: ...l de la maison MIT WEM SICH IM ST RUNGSFALL IN VERBINDUNG SETZEN In den meisten F llen sind viele der technischen Schwierigkeiten durch kleine Operationen l sbar deshalb raten wir Ihnen diese Betriebs...

Страница 5: ...t rieur de cette plaquette GARANTIE Die Firma haftet f r 24 Monate f r mechanische Herstellungsdefekte Sch den die durch unsachgem ssen Gebrauch der Maschine entstehen wie z B eine andere Spannung als...

Страница 6: ...azione non pu essere riprodotta n completamente n parzialmente e non pu essere comunicata a terzi senza l autorizzazione scritta della FAS The instructions drawings tables and everything else containe...

Страница 7: ...MICROINTERRUTTORE PORTA 14 7 3 CARICAMENTO PRODOTTI 14 7 4 OPERAZIONI DI VENDITA DI UN PRODOTTO 14 8 SCHEDA DI CONTROLLO 15 8 1 TARATURE POSSIBILI MEDIANTE DIP SWITCH FIG 4 15 8 2 SIGNIFICATO CARATTER...

Страница 8: ...pagine sostituire o cancellare informazioni o comunque modificarne il suo contenuto Gli eventuali aggiornamenti ed i fogli illustrativi degli accessori vanno ad integrare il presente manuale e pertant...

Страница 9: ...portato Qualora sul fianco del cassone fossero presenti delle serigrafie la targa B viene posta sul retro del cassone in alto a destra Inoltre il numero di matricola riportato sui componenti pi import...

Страница 10: ...guite da una sola persona e durante il loro svolgimento necessario vietare l accesso alla macchina a persone non autorizzate se possibile si deve tenere aperta solo una protezione per volta Dopo aver...

Страница 11: ...lutamente vietato servirsi degli schemi elettrici per apportare modifiche alla macchina Nel seguito del manuale riferendosi alla macchina con il termine davanti o anteriore si intende il lato porta me...

Страница 12: ...matico possono essere venduti prodotti alimentari I prodotti alimentari erogati dal distributore automatico devono essere accuratamente confezionati Attenersi scrupolosamente alle indicazioni del prod...

Страница 13: ...C Condizioni ambientali limite di funzionamento Temperatura min 3 C Umidit relativa max 70 Sistema di refrigerazione A compressione classe N Evap Ventilato Sbrinamento ciclico Sistema di vendita FIFO...

Страница 14: ...per sbloccare le monete incastrate nella gettoniera e il recupero delle stesse 4 Pulsantiera di selezione la pulsantiera situata sotto il pulsante di reso composta da una serie di numeri Per la selezi...

Страница 15: ...anno la funzione di liberare il piatto selezionato consentendo la rotazione 4 Pannello elettrico il pannello elettrico posto nella parte inferiore del cassone raccoglie tutte le connessioni elettriche...

Страница 16: ...lla sua messa in funzione 6 2 STOCCAGGIO Per quanto riguarda lo stoccaggio delle macchine opportuno che l ambiente di conservazione sia ben asciutto con temperature comprese fra 0 40 C Coprire la macc...

Страница 17: ...a vostra presa procedere come segue Il filo di colore VERDE e GIALLO deve essere collegato con il morsetto della presa contrassegnato dalla lettera E o dal simbolo di massa o colorato in VERDE o VERDE...

Страница 18: ...ettoniera procedere come da esempio riportato nello schema a fianco 1 2 3 4 5 Fissare la gettoniera sul sostegno posizionandola entro i perni Premere verso il basso la gettoniera in modo da bloccarla...

Страница 19: ...rumento Programmazione del setpoint di lavoro Tenere premuto il tasto SET per visualizzare l attuale valore del setpoint di lavoro il led comp lampeggia velocemente Per modificarne il valore tenere pr...

Страница 20: ...care Ruotare il disco 3 Se si vuole far ruotare i dischi automaticamente per mezzo del motore inserire la chiave apposita sul micro A lasciando aperto B ATTENZIONE l inserimento della chiave predispon...

Страница 21: ...ITCH SW2 PER SELEZIONE DISECCITAZIONE MAGNETI SELEZIONE SW2 1 SW2 2 OFF OFF ritardo di 100 msec ON OFF ritardo di 200 msec OFF ON ritardo di 300 msec ON ON ritardo di 400 msec DIP SWITCH SW3 ABILITAZI...

Страница 22: ...e Altrimenti 1 Controllare collegamento elettrico fra connettore JP1 della scheda e termico 1 CARATTERE 5 Solo nei distributori BO Il carattere 5 appare quando il termico del motore estrazione bottigl...

Страница 23: ...mento in modalit price Holding N B Le gettoniere vanno acquistate complete di display la macchina non monta di serie il display 9 1 MONTAGGIO SELETTORE DI MONETE FIG 5 N B Tutte le operazioni di monta...

Страница 24: ...P 01 3 Premere tasto 1 incremento finch il display visualizza P 05 4 Premere il tasto 3 conferma per accedere al valore attuale del prezzo impostato che verr visualizzato sul display 5 Tramite i tast...

Страница 25: ...come in fig 8 9 Potr essere necessario cambiare le dimensioni degli scomparti per ospitare prodotti di tipo diverso Si pu variare il numero degli scomparti togliendo o aggiungendo le palette divisorie...

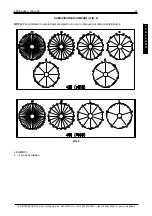
Страница 26: ...RO DISCHI H 6 316 51 8 120 8 239 36 10 90 12 158 21 16 117 13 24 75 5 48 32 0 NUMERO SCOMPARTI A B NUMERO DISCHI H 5 374 62 8 120 10 191 27 10 90 20 92 9 40 41 0 FIG 8 FAS INTERNATIONAL S p A Via Lago...

Страница 27: ...9 NOTA Per cambiare il numero degli scomparti non occorre rimuovere il disco del distributore I T A L I A N O FIG 9 LEGENDA Foro senza tappo FAS INTERNATIONAL S p A Via Lago di Vico 60 SCHIO VI tel 39...

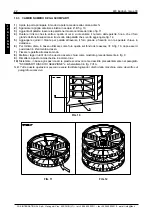
Страница 28: ...ciale chiave in dotazione 6 Per l ultimo disco in basso utilizzare come foro quello sul fondo del cassone rif A fig 10 dopo esserci posizionati in riferimento ad esso 7 Fissare le palette allo stesso...

Страница 29: ...colonnetta e allontanarla dai dischi Anche qui consigliato fare dei segni di riferimento per riposizionare la colonnetta nel modo corretto 4 Chiudere la porta coricare il distributore sulla schiena e...

Страница 30: ...inistro della macchina Girando il grano in senso orario si ottiene un serraggio pi stretto girando in senso antiorario si allenta la chiusura 10 7 ISTRUZIONI MONTAGGIO INGRANAGGI MOTORIDUTTORE FIG 14...

Страница 31: ...sempre il cassone dopo questa operazione Se non si fa correttamente questa operazione o non la si fa proprio si pu danneggiare irreparabilmente il sistema di refrigerazione ATTENZIONE NON IMMERGERE MA...

Страница 32: ...26 480 Budget Issue 00 I T A L I A N O 12 LAYOUT CONNETTORI ELETTRICI FAS INTERNATIONAL S p A Via Lago di Vico 60 SCHIO VI tel 39 0445 502011 fax 39 0445 502010 e mail info fas it...

Страница 33: ...3 7 2 DOOR MICROSWITCH 14 7 3 PRODUCT LOADING PROCEDURE 14 7 4 VENDING A PRODUCT 14 8 CONTROL CARD 15 8 1 POSSIBLE SETTINGS THROUGH DIP SWITCH FIG 4 15 8 2 MEANING OF THE CHARACTERS SHOWN ON THE DISPL...

Страница 34: ...any way Any revisions and pages illustrating the accessories form an integral part of this manual and should therefore be added to it 1 1 TO IDENTIFY THE MACHINE The immediately subsequent pages of t...

Страница 35: ...ssero presenti delle serigrafie la targa B viene posta sul retro del cassone in alto a destra Inoltre il numero di matricola riportato sui componenti pi importanti della macchina schede compressore ve...

Страница 36: ...d off must be performed by one person only During the adjustments access to the machine by non authorised personnel must be prohibited If possible keep only one protection open at a time After having...

Страница 37: ...s strictly prohibited to use the wiring diagrams to modify the machine Throughout the manual when referring to the machine the terms at the front or front indicate the door side while the terms at the...

Страница 38: ...ing machine can be used for the sale of food products The food products distributed by the vending machine must be carefully wrapped Comply rigidly with the producer s instructions regarding the expir...

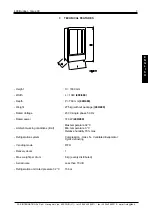
Страница 39: ...ture 32 C Ambient working conditions limit Min temperature 3 C Relative humidity 70 max Refrigeration system Compression class N Ventilated Evaporator Cyclic defrosting Vending mode FIFO Delivery door...

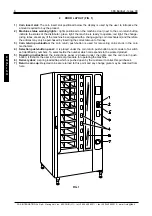
Страница 40: ...in return push button is used for recovering coins stuck in the coin mechanism 4 Selection push button panel it is placed under the coin return push button and it consist of a switch set identified by...

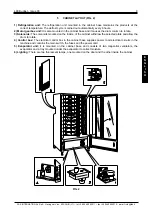
Страница 41: ...plate and allow the drum to rotate 4 Control box The electrical control box in the cabinet base supplies power to all electrical circuits in the machine and contains the main switch the fuses and the...

Страница 42: ...hours before setting the machine at work 6 2 STORAGE As to the storage of the machines it is appropriate that the environment of conservation is very dry with temperatures between 0 40 C Cover the ma...

Страница 43: ...ceed as follows The GREEN and YELLOW wire must be connected to the socket terminal marked with the letter E or with the GREEN or GREEN and YELLOW earth symbol The BLUE wire must be connected to the so...

Страница 44: ...m proceed following the example given in the diagram at the side 1 Secure the coin mechanism on the support positioning it between the pins 2 Press the coin mechanism downwards to block it correctly 3...

Страница 45: ...splay the current working setpoint value the comp led flashes rapidly To modify the value keep the SET key pressed down and at the same time operate on the UP or DOWN keys the working setpoint is pres...

Страница 46: ...ng to the disc to be loaded Turn the disc 3 If you want to let the discs turn automatically through the engine insert the special key into the micro A leaving B open ATTENTION Inserting the key could...

Страница 47: ...nism DIP SWITCH SW2 TO SELECT THE DEACTIVATION OF THE SELECTION SOLENOIDS SW2 1 SW2 2 OFF OFF 100 msec delay ON OFF 200 msec delay OFF ON 300 msec delay ON ON 400 msec delay DIP SWITCH SW3 ENABLING RE...

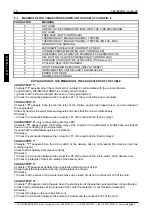
Страница 48: ...rwise 1 Check the connection between the connector JP1 of the card and the thermic relay 1 CHARACTER 5 only in the vending machines BO Character 5 appears when the thermic relay of the engine for the...

Страница 49: ...oin mechanisms must be bought complete with display the standard machine is not fit with a display 9 1 MOUNTING THE COIN VALIDATOR FIG 5 N B All the mounting and the connections have to be carried out...

Страница 50: ...utton 3 on the pushbutton panel P 01 appears on the display 3 Press pushbutton 1 increment till P 05 appears on the display 4 Press pushbutton 3 confirmation to access the present value of the set pri...

Страница 51: ...have the compartments set as in fig 8 9 It may be necessary to change the compartment sizes to sell different products The number of compartments is altered by removing or adding divider blades The n...

Страница 52: ...ARTITION H 6 316 51 8 120 8 239 36 10 90 12 158 21 16 117 13 24 75 5 48 32 0 PIECES DRUM A B NUMBER PARTITION H 5 374 62 8 120 10 191 27 10 90 20 92 9 40 41 0 FIG 8 FAS INTERNATIONAL S p A Via Lago di...

Страница 53: ...E It is not necessary to remove the drum of the vending machine to change the number of compartments E N G L I S H FIG 9 KEY Hole without plug FAS INTERNATIONAL S p A Via Lago di Vico 60 SCHIO VI tel...

Страница 54: ...d with each machine 6 For the bottom drum use the hole on the cabinet floor ref A fig 10 after having taken position as to it 7 Clamp the dividers in the same way 8 Plug all the holes which have to be...

Страница 55: ...and remove it from the drums Also here it is advise to set out some reference points to remount the column correctly 4 Close the door put the vending machine on the back and open again the door 5 Remo...

Страница 56: ...ked on the left side of the machione By turning the grub screw clockwise you obtain a tighter screwing up by turning anti clockwise you loosen the locking 10 7 ASSEMBLY OF GEARMOTOR GEARS FIG 14 15 1...

Страница 57: ...ter this operation If this operation is not performed correctly the refrigeration system could be seriously damaged ATTENTION NEVER IMMERSE THE COIN MECHANISM IN WATER DO NOT USE ABRASIVE MATERIALS DO...

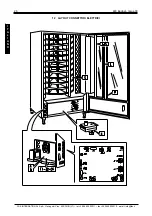
Страница 58: ...26 480 Budget Issue 00 12 LAYOUT OF THE CONNECTORS E N G L I S H FAS INTERNATIONAL S p A Via Lago di Vico 60 SCHIO VI tel 39 0445 502011 fax 39 0445 502010 e mail info fas it...

Страница 59: ...THERMOSTAT 13 7 2 MICROINTERRUPTEUR PORTE 14 7 3 CHARGEMENT DES PRODUITS 14 7 4 PROCEDURE DE VENTE D UN PRODUIT 14 8 PLATINE DE CONTROLLE 15 8 1 REGLAGES AU MOYEN DES DIP SWITCHES FIG 4 15 8 2 LISTE...

Страница 60: ...des informations ou bien d en modifier le contenu Les mises jours successives et les pages explicatives des accessoires font partie int grante du pr sent manuel et pour cette raison il faudra les inc...

Страница 61: ...s Si des s rigraphies sont pr sentes sur le c t de la caisse la plaque B est appliqu e sur l arri re de la caisse en haut droite Par ailleurs le num ro de matricule est indiqu sur les l ments les plu...

Страница 62: ...ment il est n cessaire d interdire l acc s la machine aux personnes non autoris es si possible il vaudrait mieux d ouvrir une seule protection la fois Apr s avoir effectu une op ration de r glage ou d...

Страница 63: ...s Il est strictement interdit d utiliser les sch mas des connexions pour modifier la machine La d finition des positions par rapport la machine au cours du manuel est caract ris e par les mots devant...

Страница 64: ...aires F R A N C A I S Les produits alimentaires distribu s par cet appareil automatique doivent tre soigneusement conditionn s Se tenir scrupuleusement aux indications du producteur concernant la date...

Страница 65: ...2 C Conditions ambiantes de fonctionnements limite Temp rature min 3 C Humidit relative 70 max Syst me de r frig ration Par compression classe N Evaporateur entil D givrage cyclique Syst me de vente F...

Страница 66: ...oinc dans le monnayer et sa r cup ration 4 Panneau de logement des boutons poussoirs de s lection ici se trouvent les poussoirs sur lesquelles il faut appuyer pour l achat des produits 5 Mode d emploi...

Страница 67: ...de d clencher le plateau s lectionn en permettant la rotation 4 Panneau lectrique Le panneau lectrique se trouve dans la partie inf rieure du caisson et rassemble toutes les connexions lectriques qui...

Страница 68: ...C A I S 6 2 STOCKAGE Pour ce qui concerne le stockage des machines l ambience de conservation doit tre bien s che avec des temp ratures entre 0 40 C Apr s avoir plac la machine dans un endroit bien a...

Страница 69: ...fa on suivante le fil VERT et JAUNE doit tre branch avec la borne de la prise marqu e par la lettre E ou par le symbole de masse ou color en VERT ou VERT et JAUNE Le fil BLEU doit tre branch avec la...

Страница 70: ...ions ci dessous et l exemple illustr dans le sch ma tout pr s 1 Fixer le monnayeur sur le support en le positionnant entre les pivots 2 Appuyer le monnayeur vers le bas afin de le bloquer correctement...

Страница 71: ...l Pour afficher la valeur actuelle du setpoint de travail maintenir press e la touche SET la diode comp clignote rapidement Dans l intention de modifier la valeur en question maintenir press e la touc...

Страница 72: ...Si on veut faire tourner les disques automatiquement au moyen du moteur il faut ins rer la cl sp ciale sur le micro A laissant le micro B ouvert ATTENTION Puisque l introduction de la cl entra ne la p...

Страница 73: ...R S LECTIONNER D SEXCITATION AIMANTS S LECTION SW2 1 SW2 2 OFF OFF retard de 100 msec ON OFF retard de 200 msec OFF ON retard de 300 msec ON ON retard de 400 msec F R A N C A I S DIP SWITCH SW3 ACTIVA...

Страница 74: ...ent 1 Contr ler la connexion lectrique entre le connecteur JP1 sur la platine et le thermique 1 CARACT RE 5 Seulement pour les distributeurs BO Le caract re 5 appara t lorsque le thermique du moteur p...

Страница 75: ...distributeur ne fait pas partie de l quipement standard les monnayeurs doivent tre achet s quip s avec le display 9 1 MONTAGE DU SELECTEUR DE MONNAIE FIG 5 NB D brancher le distributeur avant d effect...

Страница 76: ...01 3 Appuyer sur la touche 1 augmentation jusqu au moment o le display affiche P 05 4 Appuyer sur la touche 3 confirmation pour avoir acc s la valeur actuelle du prix programm qui sera affich par le d...

Страница 77: ...g 8 9 Il peut tre n cessaire de modifier les dimensions des compartiments pour recevoir des produits diff rents On peut varier le nombre des compartiments en liminant ou en adjoutant des palettes de s...

Страница 78: ...16 51 8 120 8 239 36 10 90 12 158 21 16 117 13 24 75 5 48 32 0 F R A N C A I S NOMBRE DES CASES A B NOMBRE DES DISQUES H 5 374 62 8 120 10 191 27 10 90 20 92 9 40 41 0 FIG 8 FAS INTERNATIONAL S p A Vi...

Страница 79: ...ur modifier le nombre des compartiments il n est pas n cessaire d enlever le plateau du distributeur F R A N C A I S FIG 9 L GENDE Trou sans bouchon FAS INTERNATIONAL S p A Via Lago di Vico 60 SCHIO V...

Страница 80: ...visser avec la cl sp ciale en dotation 6 Pour le dernier plateau en bas il faut utiliser comme trou celui en bas du caisson r f A fig 10 apr s s tre plac s par rapport lui 7 Fixer les palettes de s p...

Страница 81: ...crocher des disques Il est conseill de faire m me ici des points de rep re pour pouvoir ensuite remonter le petit montant correctement 4 Fermer la porte coucher le distributeur sur sa partie post rie...

Страница 82: ...ens des aiguilles d une montre on obtient un serrage plus troit tandis qu en tournant en sens inverse de celui des aiguilles d une montre on desserre la fermeture F R A N C A I S 10 7 MONTAGE DES ENGR...

Страница 83: ...ndensateur Apr s cette op ration on doit toujours nettoyer le caisson Si cette op ration n est pas effectu e correctement le syst me de r frig ration pourrait en tre s rieusement endommag ATTENTION NE...

Страница 84: ...26 480 Budget Issue 00 12 LAYOUT CONNECTEURS LECTRIQUES F R A N C A I S FAS INTERNATIONAL S p A Via Lago di Vico 60 SCHIO VI tel 39 0445 502011 fax 39 0445 502010 e mail info fas it...

Страница 85: ...LTER T R 14 7 3 BEF LLUNG MIT WAREN 14 7 4 VERKAUFSVERFAHREN 14 8 KONTROLLPLATINE 15 8 1 EINSTELLEN DES BETRIEBES DES VERKAUFSAUTOM MITTELS DIP SWITCH ABB 4 15 8 2 TAFEL DER ZEICHEN DIE AUF DEM DISPLA...

Страница 86: ...onen ersetzt oder gel scht oder auf irgendeine Weise sein Inhalt ge ndert werden Die m glichen Aktualisierungen und die Anschauungsbl tter der Zubeh rteile sollen das vorliegende Handbuch erg nzen und...

Страница 87: ...ite mit Serigraphien versehen sein wird das Schild B oben rechts auf der R ckseite des Geh uses angebracht Au erdem ist auf den wichtigsten Ger tekomponenten Kompressorkarten Ventilatoren etc die Seri...

Страница 88: ...der Arbeiten ist unbefugten Personen der Zugang zum Ger t zu verwehren M glichst immer nur eine Schutzvorrichtung gleichzeitig offen halten Nach unter ung nstigeren Sicherheitsbedingungen durchgef hrt...

Страница 89: ...immt Es ist strikt verboten sich der Schaltpl ne zum Zwecke von Umbauten am Ger t zu bedienen Im folgenden ist hier mit Bezugnahme auf das Ger t unter dem Begriff vor oder Vorder die T rseite gemeint...

Страница 90: ...lprodukte vertrieben werden Die vom Verkaufsautomaten abgegebenen Produkte m ssen sorgf ltig verpackt sein Halten Sie sich strikt an die Herstellerangaben zu Verfallsdatum und Aufbewahrungstemperatur...

Страница 91: ...r 32 C Grenzwerte der Umgebungsbedingungen f r den Betrieb Mindesttemperatur 3 C Relative Feuchtigkeit 70 max K hlungssystem Kompression Klasse N Bel fteter Verdampfer Zyklische Enteisung Verkaufssyst...

Страница 92: ...M nzautomaten eingeklemmten M nzen und der Wiedererlangung derselben 4 Die Auswahls ule Die Auswahls ule enth lt die Wahltasten die f r den Einkauf gedr ckt werden m ssen 5 Bedienungsanweisungen Die A...

Страница 93: ...gew hlte Etage freizugeben und somit die Rotation zu erm glichen 4 Elektrische Tafel Die elektrische Tafel befindet sich im unteren Teil des Geh uses und nimmt alle elektrischen Anschl e auf die im Fe...

Страница 94: ...ken nachdem sie in einer gesch tzten Umgebung aufgestellt worden ist und sie befestigen um Verr ckungen oder unvorhergesehene Zusammenst e zu vermeiden D E U T S C H Es ist verboten mehrere verpackte...

Страница 95: ...n welche durch den Buchstaben E das Massesymbol oder die GR NE bzw GELB GR NE Farbe gekennzeichnet ist Der BLAUE Draht mu mit der Buchsenklemme verbunden werden welche durch den Buchstaben N oder die...

Страница 96: ...1 2 3 GETTONIERA WMF F r die Installation des M nzger tes so vorgehen wie es im nebenstehenden Schema dargestellt wird 1 Das M nzger t auf der Unterlage befestigen indem man es in den Bolzen position...

Страница 97: ...igen Sollbetriebswertes die Taste SET gedr ckt halten Die LED comp blinkt mit hoher Frequenz auf Zur nderung des Wertes sind die Taste SET gedr ckt zu halten und gleichzeitig die Tasten UP oder DOWN z...

Страница 98: ...dem zu bef llenden Regal entspricht bei Hand freigeben Das Regal drehen Fails man die Regale automatisch durch Motor drehen lassen will den Schl ssel in den Mikro A einsetzen indem B offen delassen w...

Страница 99: ...SWITCH SW2 ZUR WAHL DER DEAKTIVIERUNG DER WAHLMAGNETE SW2 1 SW2 2 OFF OFF 100 msec Versp tung ON OFF 200 msec Versp tung OFF ON 300 msec Versp tung ON ON 400 msec Versp tung DIP SWITCH SW3 EINSCHALTE...

Страница 100: ...lls D E U T S C H 1 Die elektrische Verbindung zwischen dem Verbinder JP1 der Karte und dem thermischen Relais 1 berpr fen ZEICHEN 5 Nur in Verkaufsautomaten BO Zeichen 5 erscheint wenn das thermische...

Страница 101: ...mplett mit Display kaufen denn der Display ist in der Standardsausf hrung des Automaten nicht inbegriffen 9 1 MONTAGE EINES M NZENW HLERS AUF VERKAUFSAUTOMATEN ABB 5 Falls man nur den M nzenw hler ver...

Страница 102: ...hen auf dem Display erscheint P 01 3 Taste 1 Zunahme dr cken bis auf dem Display P 05 erscheint 4 Taste 3 Best tigung dr cken um zum aktuellen Wert des eingegebenen Preises der auf dem Display erschei...

Страница 103: ...iefert wird haben vorgeregelte R ume wie in Abb 8 9 Es k nnte n tig sein die Dimensionen der F cher zu ndern um Produkte verschiedener Art aufzunehmen Man kann die Zahl der F cher ndern indem man die...

Страница 104: ...6 316 51 8 120 8 239 36 10 90 12 158 21 16 117 13 24 75 5 48 32 0 D E U T S C H ANZAHL DER F CHER A B ANZAHL DER SCHEIBEN H 5 374 62 8 120 10 191 27 10 90 20 92 9 40 41 0 Abb 8 FAS INTERNATIONAL S p A...

Страница 105: ...VERMERK Um die F cherzahl zu ndern ist es nicht n tig die Scheibe des Automaten zu entfernen D E U T S C H Abb 9 LEGENDE BOHRUNG OHNE DECKEL FAS INTERNATIONAL S p A Via Lago di Vico 60 SCHIO VI tel 3...

Страница 106: ...F r die untere Scheibe das Loch auf dem Geh useboden ben tzen Punkt A Abb 10 nachdem man sich in Bezug auf diesem positioniert hat 7 Die Trennw nde auf gleicher Art befestigen 8 Die Zapfen in alle L c...

Страница 107: ...abschrauben und sie aus den Scheiben l sen Es ist auch in diesem Fall ratsam einige Merkzeichen zu markieren um dann die S ule wieder richtig montieren zu k nnen 4 Die T r schlie en den Automaten auf...

Страница 108: ...utomaten Indem man den Stift in Uhrrichtung dreht wird der Druck fester dagegen l t der Druck nach wenn man in Gegenuhrrichtung dreht 10 7 MONTAGE DER GETRIEBE AM VERMINDERER ABB 14 15 1 Die Anschlags...

Страница 109: ...nn diese T tigkeit nicht richtig durchgef hrt wird kann das K hlungssystem schweren Schaden nehmen D E U T S C H ACHTUNG DAS M NZGER T NIE INS WASSER TAUCHEN KEINE SCHMIRGELNDEN MATERIALIEN VERWENDEN...

Страница 110: ...26 480 Budget Issue 00 12 LAYOUT ELEKTRISCHE STECKER D E U T S C H FAS INTERNATIONAL S p A Via Lago di Vico 60 SCHIO VI tel 39 0445 502011 fax 39 0445 502010 e mail info fas it...

Страница 111: ...PUERTA 14 7 3 CARGA DE LOS PRODUCTOS 14 7 4 OPERACIONES DE VENTA DE UN PRODUCTO 14 8 FICHA DE CONTROL 15 8 1 AJUSTES POSIBLES MEDIANTE DIP SWITCH FIG 4 15 8 2 SIGNIFICADO CARACTERES QUE APARECEN EN EL...

Страница 112: ...ificar su contenido Eventuales actualizaciones y las p ginas ilustrativas de los accesorios son una integraci n al presente manual y por tanto deben a adirse al mismo 1 1 IDENTIFICACI N DE LA MAQUINA...

Страница 113: ...cado m s abajo En el caso de que hubiera serigraf as en el costado del distribuidor se colocar la placa B en la parte posterior del mismo arriba a la derecha Asimismo el n mero de fabricaci n est indi...

Страница 114: ...deben efectuarlas una persona sola y durante su desarrollo debe prohibirse el acceso a la m quina a personas no autorizadas si es posible debe mantenerse abierta s lo una protecci n cada vez Despu s...

Страница 115: ...antemente usar los esquemas el ctricos para aportar modificaciones a la m quina M s adelante en este manual refiri ndose a la m quina con la palabra delante o anterior se entiende el lado puerta mient...

Страница 116: ...s alimenticios Los productos alimenticios que suministra el distribuidor autom tico deben estar empaquetados adecuadamente Atenerse escrupulosamente a las indicaciones del productor relativas a la fec...

Страница 117: ...tales l mite de funcionamiento Temperatura m n 3 C Humedad relativa m x 70 Sistema de refrigeraci n De compresi n clase N Evap Ventilado Descongelaci n c clica Sistema de venta FIFO E S P A O L Ventan...

Страница 118: ...onedas sirve para desbloquear las monedas atascadas en la caja recaudadora y recuperar las mismas 4 Montante de selecci n el montante de selecci n aloja los pulsadores que deben apretarse para efectua...

Страница 119: ...r el plato seleccionado permitiendo su rotaci n 4 Cuadro el ctrico el cuadro el ctrico alojado en la parte inferior de la caja portante recoge todas las conexiones el ctricas derivadas de cada utiliza...

Страница 120: ...naje de las m quinas es conveniente que el ambiente de conservaci n sea bien seco con temperaturas comprendidas entre 0 C 40 C Cubrir la m quina despu s de haberla estacionado en un ambiente protegido...

Страница 121: ...e ales de color de los bornes de su toma proceda en el modo siguiente El hilo de color VERDE y AMARILLO debe conectarse con el borne de la toma marcado con la letra E o con el s mbolo de masa o de col...

Страница 122: ...omo en el ejemplo del esquema situado al lado 1 Fijar la caja recaudadora sobre el soporte coloc ndola entre los pernos 2 Apretar hacia abajo la caja recaudadora para bloquearla correctamente 3 Fijar...

Страница 123: ...jo Mantenga apretada la tecla SET para visualizar el valor actual del setpoint de trabajo el led comp destella r pidamente Para modificar su valor mantenga apretada la tecla SET y contempor neamente a...

Страница 124: ...autom ticamente por medio del motor insertar la llave especial en el micro A dejando B abierto CUIDADO La inserci n de la llave podr s causar el movimiento de algunas partes de la m quina y por lo tan...

Страница 125: ...IP SWITCH SW2 PARA SELECCIONAR LA DESEXCITACION DE LOS MAGNETOS DE SELECCION SW2 1 SW2 2 OFF OFF retraso de 100 mseg ON OFF retraso de 200 mseg OFF ON retraso de 300 mseg ON ON retraso de 400 mseg DIP...

Страница 126: ...rolar la conexi n el ctrica entre el conectador JP1 de la ficha y el t rmico 1 CARACTER 5 S lo en los distribuidores BO El caracter 5 aparece cuando el t rmico del motor del mecanismo que extrae botel...

Страница 127: ...cajas para fichas tienen que ser compradas con el display la m quina normal no tiene el display 9 1 MONTAJE SELECTOR DE MONEDAS FIG 5 N B Todas las operaciones de montaje y las conexiones deben realiz...

Страница 128: ...ecla 1 incremento hasta que en el display se visualice P 05 4 Apretar la tecla 3 confirmaci n para acceder al valor actual del precio programado que se visualizar en el display 5 Mediante las teclas 1...

Страница 129: ...la FIG 8 FIG 9 Tal vez sea necesario cambiar las dimensiones de los compartimientos para alojar diferentes tipos de productos Se puede variar el n mero de los compartimientos quitando o agregando los...

Страница 130: ...6 316 51 8 120 8 239 36 10 90 12 158 21 16 117 13 24 75 5 48 32 0 N MERO DE COMPARTIMENTOS A B N MERO DE DISCOS H 5 374 62 8 120 10 191 27 10 90 20 92 9 40 41 0 E S P A O L FIG 8 FAS INTERNATIONAL S p...

Страница 131: ...9 NOTA Para cambiar el n mero de los compartimentos no es necesario remover el disco del distribuidor FIG 9 E S P A O L EXPLICACI N Agujero sin tap n FAS INTERNATIONAL S p A Via Lago di Vico 60 SCHIO...

Страница 132: ...ltimo disco de abajo utilizar como orificio el del fondo de la caja portante ref A FIG 10 despu s de haberse colocado en correspondencia con el mismo 7 Fijar los tabiques de la misma manera 8 Poner l...

Страница 133: ...y alejarla de los discos Tambi n en este caso es aconsejable marcar unos puntos de referencia para colocar nuevamente la columnita en modo correcto 4 Cerrar la puerta recostar el distribuidor apoy nd...

Страница 134: ...do de la m quina Girando la espiga en sentido horario de obtiene un cierre m s apretado girando en sentido antihorario se afloja la presi n de cierre 10 7 MONTAJE ENGRANES REDUCTOR FIG 14 1 Inserir la...

Страница 135: ...ador Limpiar siempre la caja portante despu s de esta operaci n Si esta operaci n no se realiza correctamente el sistema de refrigeraci n podr a resultar seriamente da ado ATENCI N NO SUMERGIR LA CAJA...

Страница 136: ...26 480 BUDGET Issue 00 12 LAY OUT CONECTADORES EL TRICOS E S P A O L FAS INTERNATIONAL S p A Via Lago di Vico 60 SCHIO VI tel 39 0445 502011 fax 39 0445 502010 e mail info fas it...

Отзывы: