TM
Page
106
User Manual
Rules for writing to CD
1.
All sample rates are supported. Regardless of the Project sample rate, the output to CD will be at 44,100 Hz.
2.
EQ, level settings and crossfades between the clips on the track are not performed as the audio is written to
CD. The clips are played as though they were butt edited together, and EQ is ignored.
3.
CD tracks are defined by consecutive clips with the same name. Silences may appear between these clips
without starting a new track. Where a clip has a different name to the one before it, a new track will be
started.
4.
Index markers can be created by placing normal Prodigy Editor Marks at the appropriate timecodes. Marks 0
and 999 will not produce index markers.
5.
To set the Precount to a track, place a clip named PCOUNT (all upper case) as the last clip of the preceding
track. If no such clip is placed there, the precount will be zero.
6.
A CD write cannot be stopped except by switching off the CD writer. The disc will be destroyed.
7.
A CD must all be written in one pass. There is no way to append information to it.
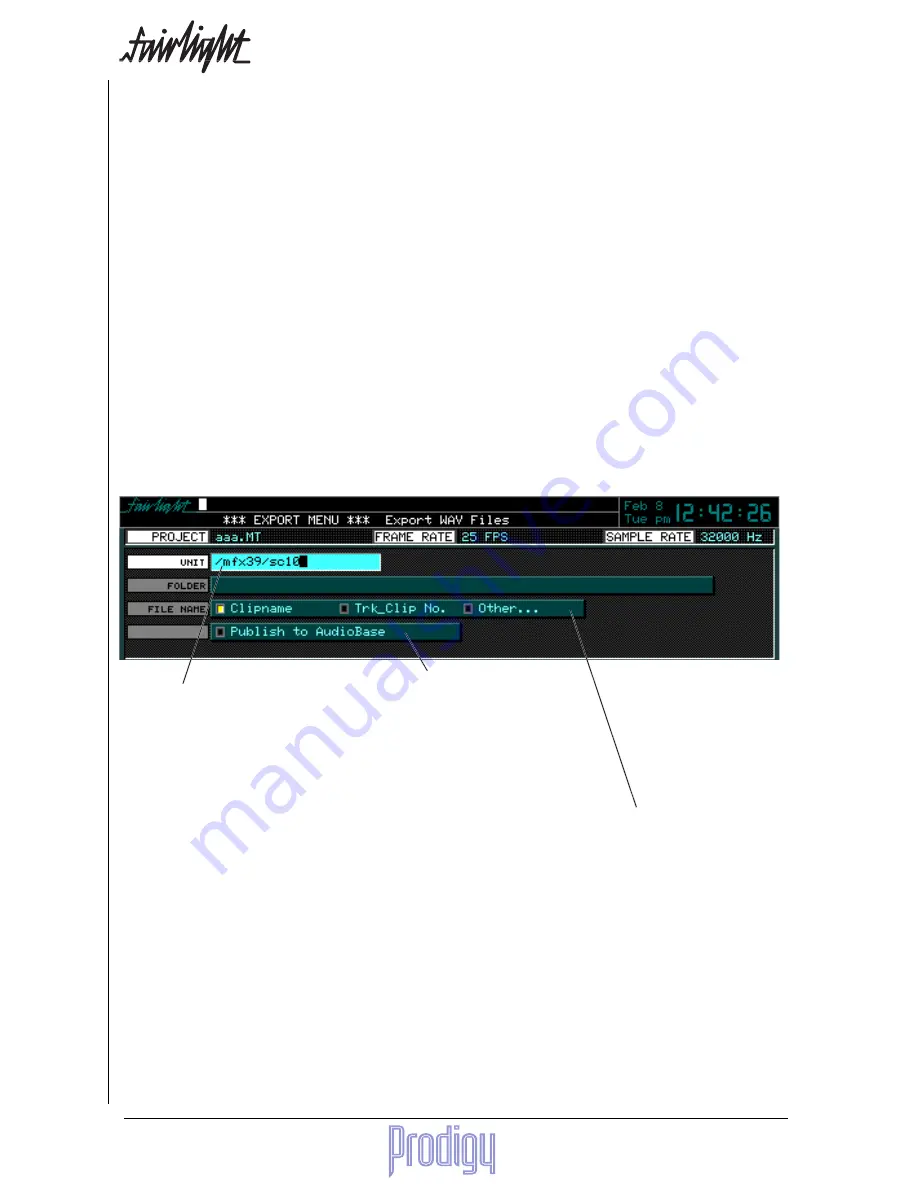
Sets the destination
drive. Use the up and
down arrows to move
between the
available drives on
your system.
Determines how the WAVE files will be
named. Use the left and right arrows to
move between choices. If Other... is chosen,
another field appears, allowing you to
enter a new file name of up to 8 characters.
Press the ENTER key to start the WAVE export process.
Note
: If there are multiple clips with the same name in the range being exported, the system will complain when
Clipname is chosen as the source of the file name. Each one will successively cause a request to overwrite the
previous one or choose a new name. If Other is chosen, and you have entered a new name for the files, numbers will
be appended to each successive file to distinguish the names.
Broadcast WAVE
All WAVE files exported from the Prodigy Editor include the timecode sync chunk from the Broadcast WAVE
specification. This is filled with the timecode location of the head of each clip being exported. For further details
on the Braodcast WAVE specification.
The WAV Export Page
The WAV Export function may use either the red clips under the cursor, or, if a range is present, clips that are
wholly included. Real time audio features such as EQ, level and fades are ignored - only the raw waveform data is
exported. When the WAV Export Soft key is pressed, a display appears with choices for export destination, name
etc. To move between text fields, use the M8 key for previous and the M9 key for next (the macro key must be OFF
during these commands.)
Allows you to publish the WAVE
files to AudioBase at the same
time as creating them. This is a
very useful way of publishing a
single sound or group of sounds
to AudioBase without publishing
the whole project.
Содержание Prodigy
Страница 6: ...TM Page 6 User Manual ...
Страница 16: ...TM Page 16 User Manual NOTES ...
Страница 24: ...TM Page 24 User Manual NOTES ...
Страница 25: ...TM User Manual Page 25 NOTES ...
Страница 34: ...TM Page 34 User Manual NOTES ...
Страница 35: ...TM User Manual Page 35 NOTES ...
Страница 42: ...TM Page 42 User Manual ...
Страница 44: ...TM Page 44 User Manual ...
Страница 51: ...TM User Manual Page 51 NOTES ...
Страница 52: ...TM Page 52 User Manual NOTES ...
Страница 79: ...TM User Manual Page 79 NOTES ...
Страница 80: ...TM Page 80 User Manual NOTES ...
Страница 93: ...TM User Manual Page 93 NOTES ...
Страница 94: ...TM Page 94 User Manual NOTES ...
Страница 110: ...TM Page 110 User Manual NOTES ...
Страница 128: ...TM Page 128 User Manual NOTES ...
Страница 129: ...TM User Manual Page 129 NOTES ...


