9
Subject to change without notice.
Version5_20200424
1.
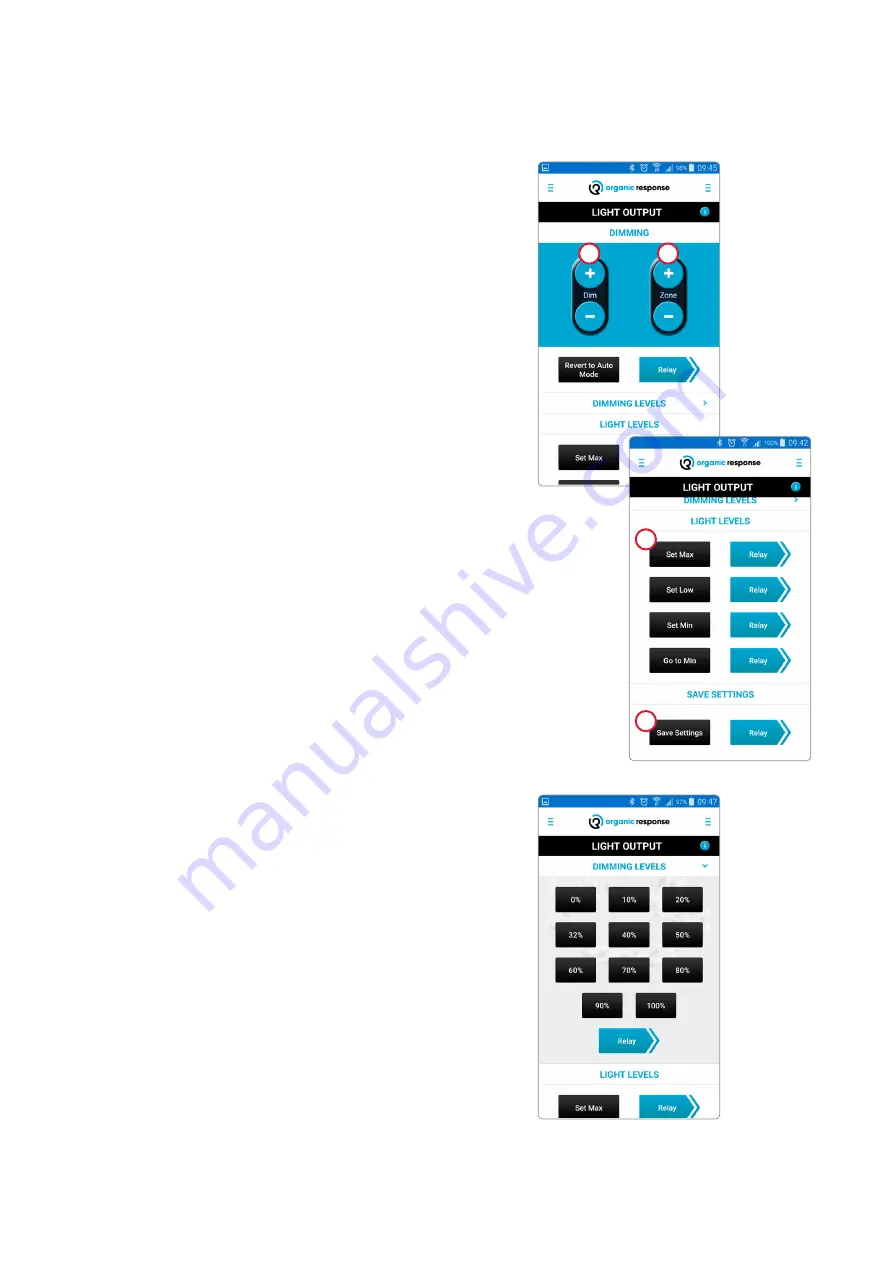
From the Light Output tab in the menu on the right, you can
dim one luminaire at a time or an entire zone. Try pointing the
dongle at a sensor and dimming the light. The buttons are label-
led “DIM”. Dimming is temporary and resets once the system is
switched off due to absence.
2.
Point at the same sensor, but use the “ZONE” buttons to control
light output in order for it to be relayed to other luminaires in
the same zone. This is called relaying information between the
sensors. Dimming is temporary and resets once the system is
switched off due to absence.
Light levels
1.
Here you can adjust and save light levels for presence, for
absence prior to switching off, and lowest level. If you have ad
-
justed the light to the desired level for presence, you can save it
using the “Set Max” button. After this, you can relay the setting
to other luminaires in the same zone (they will immediately
adjust to the same level as the first programmed sensor). The
same procedure is used for other levels. With the Minlight Level
function, you can also lock specific luminaires to constantly
remain at a lowlight level. This can be used as a security feature
in stairwells, lifts, or exits.
2.
By saving the settings, you can reuse the same settings for other
luminaires, e.g. on another floor or at a later date. You can use
the Recall Settings feature to reuse the settings; refer to the
chapter titled Recall Settings.
Temporary dimming of a luminaire or zone
From the Light Output tab, you can also select a precise value for the
different light levels: max., min., and low level. Finish by relaying to
the zone’s other luminaires.
The “Revert to Auto Mode” function is used when programming
scenes. The function enables you to leave programming mode and
revert to normal operation.
Selecting a specific light value (Dimming Levels)
Revert to Auto Mode
1
1
2
2
Содержание e-Sense Organic G3
Страница 1: ...e Sense Organic G3...


