manualshive.com logo in svg
background image


19


LOCK

FSWTX W.LIGHT

30 Vcc

FSW

STOP

9      10     11   12   13    14   15    16   17    18   19   20   21    22   23    24   25

+

OP

CL

NC

B

A

+

+

NO

COM

24

VDC

3-Wire

Receiver


Figure 17. Connect a three-wire receiver 


+

NC

COM

NO

LOCK

FSWTX W.LIGHT

30 Vcc

FSW

STOP

9      10     11   12   13    14   15    16   17    18   19   20   21    22   23    24   25

+

OP

CL

NC

B

A

+

+

4 Wire

Receiver


Figure 18. Connect a four-wire receiver 

 
Decoder Card

: If you are installing the Digicard 

magnetic card reader, or the Digikey keyboard, use the 
quick-fit connector J4 for the DS (formerly the MD01) 
decoder card (see Figure 13). 

 
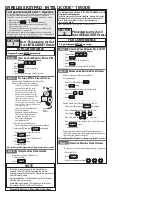
Open/Hold Open Device

: To open and hold open the 

gate, an Open/Hold Open device must make a set of 
contacts across terminals 18 and 19 (or 16 and 17) and 
must break a set of contacts between terminals 13 and 
21 (see Figure 19).  

WARNING

Any triggered reversing or 

stopping device prevents an activating 
command from being recognized. You 
cannot activate the gate to open or close until 
the reversing or stopping device has been 
cleared. 

LOCK

FSWTX W.LIGHT

30 Vcc

FSW

STOP

9      10     11   12   13    14   15    16   17    18   19   20   21    22   23    24   25

+

OP

CL

NC

B

A

+

+

Relay

24 VDC 

SPDT

Switch

NC

NO

COM


Figure 19. Connect an Open/Hold Open device 

to the 450 MPS control panel 

Stop Button

: The stop button you install must have 

normally closed (N.C.) contacts. Multiple stop buttons 
must be wired in series. Connect your stop device 
between terminals 14 and 15.  

Note

: If you choose not to install a stop button, 

you must install a circuit between these 
terminals for the control panel to work. 

The LED Indicators

: The five light-emitting diodes 

(LEDs) on the control panel can be used to check for 
the proper functioning of the devices you attach to the 
control panel. The LED lights are on whenever the 
contacts are closed across each of the respective 
terminals.  
 
DL1 and DL2 should illuminate only when an 
activating signal is sent for 2 and 1 gate leaves, 
respectively. DL3 should be illuminated except when 
the stop button is pressed. DL4 and DL5 should be 
illuminated except when the reversing devices, for 
opening and closing, respectively, are triggered. Use the 
LEDs and the table below to determine if the accessory 
devices you have installed are operating properly. 


LED On  Off 

DL1,  
Open 2 leaves 

Command 
active 

Command 
inactive 

DL2,  
Open 1 leaf 

Command 
active 

Command 
inactive 

DL3, Stop 

Command not 
active 

Command 
active 

DL4,  
FTSW Open 

Opening 
reversing 
devices not 
triggered 

Opening 
reversing 
device triggered 

DL5,  
FTSW Close 

Closing 
reversing 
devices not 
triggered 

Closing 
reversing 
device triggered 


Electric Lock

: An electric lock can make use of the 

reversing stroke function controlled by DIP switch 5. A 
reversing stroke is a short closing phase that allows the 
electric lock time to disengage itself before the operator 
starts its opening. Use DIP switch 5 if necessary for 
your lock to function correctly. Connect your lock to 
terminals 24 and 25. The terminals provide 12 VAC 
pulsed power. 
 

Magnetic Lock:

 Figure 20 shows how to connect a 

mag lock to the 450 MPS control panel. 

Содержание 412 Compact

Страница 1: ...ate Leaf 10 Attach the Rear Mounting Bracket 10 Attach the Operator to the Rear Mounting Bracket 12 Attach the Operator to the Front Mounting Bracket 12 Attach the Front Mounting Bracket to the Gate L...

Страница 2: ...ortant that you locate the gate far enough away from the road to eliminate the potential of traffic getting backed up This distance is affected by the size of the gate how often it is used and how fas...

Страница 3: ...al equipment observe some fundamental rules Do not touch the equipment with damp or humid hands or feet Do not install or operate the equipment with bare feet Do not allow small children or incapable...

Страница 4: ...may affect duty cycle 4 The 90 deg opening time for a gate with the 412 Operator is a maximum of about 46 sec Note that both the mounting dimensions and the torque adjustment help to determine the pr...

Страница 5: ...is marked SX and one is marked DX Be sure to install each on the proper gate leaf see Figure 2 2 Protective covers for the worm screw housing of the operator 1 Package of mounting hardware 2 Rear mou...

Страница 6: ...on the single phase bidirectional motor shuts off automatically if its operating temperature reaches 284 deg F 140 deg C Also for the protection and proper operation of the 412 Operator each gate leaf...

Страница 7: ...e 450 MPS control panel are briefly described below You can find a complete description of each logic in the tables on the following pages A automatic The gate opens on command and automatically close...

Страница 8: ...them after pause time Opens single leaf connected to Motor 1 and closes it after pause time No effect No effect No effect Off Opening Closes both leaves immediately Closes the leaf immediately Stops S...

Страница 9: ...1 No effect opening is inhibited No effect opening is inhibited No effect opening is inhibited Off Opening Stops Stops Stops Stops gate closes when reversing device no longer triggered No effect On O...

Страница 10: ...Installing the operator consists of the following steps Establishing the orientation of each gate leaf and its operator Attaching the rear mounting bracket Attaching the operator to the rear mounting...

Страница 11: ...acket see Figure 6 The recessed liner should be constructed of 3 16 or 1 4 in steel with a minimum interior height of 11 13 16 in 30 cm so as to allow you to meet the required dimensions shown in Figu...

Страница 12: ...gate installation Inward swinging Lengthen the worm screw completely and push the cylinder in one inch Outward swinging Shorten the worm screw completely and then pull the cylinder out one inch With t...

Страница 13: ...unting plate to the center of the front mounting hole on the operator Figure 9 Secure the operator to the front mounting bracket with the short pin and 2 snap rings dimensions are incorrect see Figure...

Страница 14: ...WARNING The voltage of the main power must match the required voltage of the 412 Operator and the 450 MPS control panel Wire the main power supply to control panel terminals in block J1 see Figures 13...

Страница 15: ...the control panel enclosure For the purposes of installation you need to connect at least one normally open N O activating device for your operator s If you have a two leaf gate design connect the ac...

Страница 16: ...Listed cord grip Junction box Op 1 Op 2 1 2 3 4 5 6 7 8 OP COM CL CL COM OP Lamp Motor 1 Motor 2 J1 J2 High voltage terminal strip 450 MPS Control Panel U L Listed Control Panel Enclosure Cord grip or...

Страница 17: ...tially dangerous Do not place yourself within the path of the moving gate during your test Disengage the operator s with the Manual Release key and open the gate by hand about halfway Next engage the...

Страница 18: ...on terminal block J3 requires a fail safe connection for the photocells Connect the photocells to terminals 20 and 21 in the FSWTX grouping Activating Devices and Radio Receiver The acti vating device...

Страница 19: ...button you must install a circuit between these terminals for the control panel to work The LED Indicators The five light emitting diodes LEDs on the control panel can be used to check for the proper...

Страница 20: ...ol Panel has 5 DIP switches and 4 potentiometers that control a wide range of functions Set DIP Switches Switches 1 2 and 3 Operating Logic The 450 MPS Control Panel offers six operating modes A S E E...

Страница 21: ...5 sec Note You cannot adjust this opening delay of the operator connected to Motor 2 However you can avoid the opening delay and closing delay by connecting both operators and their capacitors to Mot...

Страница 22: ...k J3 Check the LED DL1 for a two leaf gate or DL2 for a one leaf gate One of them should turn on when you signal the gate to open or to close If neither one illuminates then check the wiring for the a...

Страница 23: ...negligence or accident or has not been operated in accordance with FAAC International Inc s or FAAC S p A s instructions or has been operated under conditions more severe than or otherwise exceeding...

Отзывы: