background image

• 

Download an Existing Project from a Panel
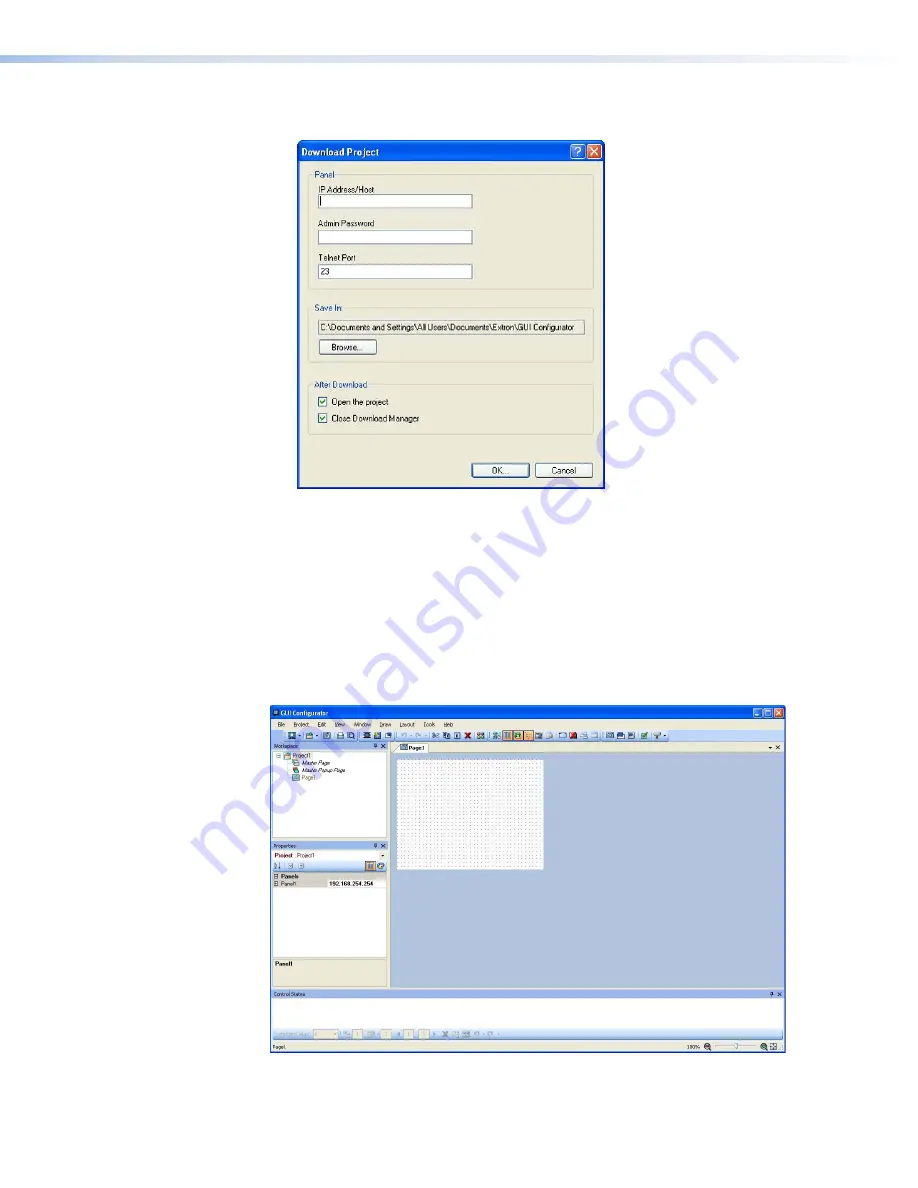
 — Clicking 

OK

 opens a dialog box that 

allows you to download a file that has been uploaded to a panel.

Figure 30. 

GUI Configurator Download Project Dialog Box

In the dialog box that opens, enter the 

IP


address

 of the panel and use the 

Browse


button to navigate to a folder where the file is being saved.
Check 

Open


the


project

 and, 

Close


Download


Manager

.

Click on 

OK

. The project is downloaded to your computer and opens in 

GUI Configurator.

3. 

Depending on which option was selected in step 2, GUI Configurator opens to a new or an 
existing project. The initial screen is divided into a series of panes offering a range of tools 
that can be used to design or modify the project. For full details on how to use these tools, 
consult the help file (in the 

Help

 menu click 

Contents

 or press the <

F1

> key while within 

the program).

Figure 31. 

GUI Configurator Main Screen


TLP 350CV and TLE 350 • Configuration Software

31

Содержание TouchLink TLP 350CV

Страница 1: ...68 1692 01 Rev B 01 19 TLP 350CV and TLE 350 User Guide TouchLink TouchLink 3 5 Cable Cubby Touchpanel and matching Cable Cubby Enclosure ...

Страница 2: ...se trouvent dans la documentation fournie avec le matériel Pour en savoir plus sur les règles de sécurité la conformité à la réglementation la compatibilité EMI EMF l accessibilité et autres sujets connexes lisez les informations de sécurité et de conformité Extron réf 68 290 01 sur le site Extron www extron com Istruzioni di sicurezza Italiano AVVERTENZA Il simbolo se usato sul prodotto serve ad ...

Страница 3: ... Inc or Extron Electronics see the current list of trademarks on the Terms of Use page at www extron com Registered Trademarks Cable Cubby ControlScript CrossPoint DTP eBUS EDID Manager EDID Minder Extron Flat Field FlexOS Glitch Free Global Configurator Global Scripter GlobalViewer Hideaway HyperLane IP Intercom IP Link Key Minder LinkLicense LockIt MediaLink MediaPort NetPA PlenumVault PoleVault...

Страница 4: ...t was tested with shielded I O cables on the peripheral devices Shielded cables must be used to ensure compliance with FCC emissions limits For more information on safety guidelines regulatory compliances EMI EMF compatibility accessibility and related topics see the Extron Safety and Regulatory Compliance Guide on the Extron website Battery Notice This product contains a battery Do not open the u...

Страница 5: ...computer or device responses mentioned in this guide the character 0 is used for the number zero and O represents the capital letter o Computer responses and directory paths that do not have variables are written in the font shown here Reply from 208 132 180 48 bytes 32 times 2ms TTL 32 C Program Files Extron Variables are written in slanted form as shown here ping xxx xxx xxx xxx t SOH R Data STX...

Страница 6: ......

Страница 7: ...er on the TLP 350CV 16 Front Panel Features 17 Front Panel Features 17 On screen Menus 19 Setup Menu 19 Main 19 Volume 20 Time 21 IP 21 Video 23 Calibration Screen 24 Configuration Software 25 Configuration and Control Software 25 Installing Software 26 GUI Configurator and Global Configurator Installation 26 Using the TouchLink Panel Web Pages 27 GUI Design and Configuration 29 Using GUI Configur...

Страница 8: ...TLP 350CV and TLE 350 Contents viii ...

Страница 9: ...panel combines AV system control with cable management It features a tilt up full color touchscreen in an elegant metal enclosure that can be mounted securely into a tabletop lectern or other flat surface In addition ten customizable backlit buttons provide expanded control capabilities to ensure that critical functions are easily accessible The TLP 350CV touchpanel enables integrators to deploy a...

Страница 10: ...ers Built in speaker provides audio for video preview and audible feedback from button presses Light sensor adjusts screen brightness as the ambient room lighting changes AV connectivity options Holds up to 9 single space AAP Architectural Adapter Plates Holds up to 6 Retractor Cable Retraction Systems Cable Cubby design offers easy access to AV data and power connections AC power modules availabl...

Страница 11: ...cted to the same network domain as the TouchLink panel See the TLP 350CV product page at www extron com for suitable products NOTE The TLP 350CV is not compatible with Extron IP Link Pro controllers Application Diagram Extron TLP 350CV 3 5 TouchLink Touchpanel Cable Cubby UNSW ITCHE D 100 24 0V 5A MAX UNSW ITCHE D 100 24 0V 5A MAX LAPTOP PC DVD DOC CAM AUXILIARY DISPLAY ON DISPLAY OFF MUTE VOLUME ...

Страница 12: ...th all the Included Parts see page 7 and have all the Tools Required for Installation see page 7 for installing the cable cubby Plan where you are going to install the Cable Cubby and how you are going to cut the hole Ensure the TLP 350CV is oriented correctly and that there is adequate room for cables and cable retractors optional Ensure you are using the correct cut out template or dimensions se...

Страница 13: ...ct the PC that you are using for the setup the control processor and the touchpanel to the same Ethernet subnetwork Use the Setup Menu see page 19 or Global Configurator to set the DHCP status and if necessary the IP address subnet mask gateway and related settings for the touchpanel Configure the TLP 350CV the GUI Configurator Help File and the Global Configurator Help File provide step by step i...

Страница 14: ...lled see page 8 The number and type of AAPs required for the installation The location of devices that connect to the AAPs either above or below the table 2 Verify that you have the correct template or Cut out Dimensions see page 8 3 Decide on the method for cutting a hole in the table see Cutting the Table on page 8 There are three methods available Router with routing template requires a router ...

Страница 15: ...it may be provided without a power module or with a different power module see the table below With Power Module Without Power Module AC Power Module 1 0 Pass through AAPs 4 4 Blank AAPs 3 5 1 position Bracket Kit4 0 0 2 position Bracket Kit 2 3 3 position Bracket Kit 1 1 NOTES Inside the US the TLP 350CV may be purchased with or without an AC power module If a power module is required for the TLE...

Страница 16: ...Models 3 0 7 6 cm 2 7 6 9 cm 17 0 43 3 cm 23 0 58 5 cm 24 1 61 2 cm 30 1 76 5 cm 2 7 6 9 cm 9 8 24 9 cm 3 0 7 6 cm 9 8 24 9 cm Figure 4 Under table Clearance Requirements for Retractors Cutting the Table Cut out Dimensions There are three alternative methods of making the hole for the TLP 350CV see Cutting the Surface below If using a Router with routing template you should purchase the TLP 350CV ...

Страница 17: ... au moins 0 95 cm 0 375 d épaisseur Be certain the cut is laid out in exactly the desired location and the edge that opens on the lid is correctly oriented After verifying and checking dimensions cut a hole in the surface of the furniture where the enclosure is being installed Router with routing template If using a routing template make sure it is the correct template for the TLP 350CV see www ex...

Страница 18: ...etractors can be installed in the TLP 350CV enclosure three at either end They are not provided with the TLP 350CV and must be purchased separately The buttons on the retractors must be placed at one end of the unit and must therefore be the first or the last items added Secure the bolt with the nut Secure the locking screw on each retractor Do not overtighten Insert the bolt through the retractor...

Страница 19: ...nformément aux codes du bâtiment aux codes incendie et sécurité et aux codes électriques locaux et nationaux NOTE Different countries require different power adapters See www extron com to select a power module that is suitable for your location The power module takes up two or three AAP spaces and may be installed before or after the AAP assembly is installed or if desired with AAPs on either sid...

Страница 20: ...hown in Installing AAPs below then install the populated AAP assemblies into the enclosure as shown in Inserting the AAP Assemblies on the following page NOTE An extra column of AAP bracket mounting points is available for use with TLP single space AAP mounting brackets see the illustration to the right Single space brackets do not fit in any other location Rear Brackets Front Brackets Figure 7 Pr...

Страница 21: ...TER A U D IO Phillips Head Screws secure AAP assembly Tighten down AAP nuts Push assembly through bottom of enclosure Large holes provide tool access to fasten rear brackets 1 1 2 2 3 3 Figure 8 Inserting the AAP Assemblies 1 Push the first AAP assembly through the bottom of the enclosure 1 Align the holes in the rear bracket the bottom row of holes on the rear face of the enclosure and if necessa...

Страница 22: ... ring 5 and the plastic film on the finished surfaces ATTENTION Do not use isopropyl alcohol or other solvents to clean the Cable Cubby Strong solvents will ruin some finishes Ne pas utiliser de l alcool isoproprylique ou d autres solvants pour nettoyer le Cable Cubby Les solvants forts endommageront certaines finitions 2 Carefully lower the enclosure into the hole cut in the table see Cutting the...

Страница 23: ...d by Extron Use of an unauthorized power supply voids all regulatory compliance certification and may cause damage to the supply and the end product Utilisez toujours une source d alimentation fournie ou recommandée par Extron L utilisation d une source d alimentation non autorisée annule toute conformité réglementaire et peut endommager la source d alimentation ainsi que le produit final If not p...

Страница 24: ...d by the captive screws La longueur des câbles exposés est primordiale lorsque l on entreprend de les dénuder La longueur idéale est de 5 mm 3 16 inches S ils sont un peu plus longs les câbles exposés pourraient se toucher et provoquer un court circuit S ils sont un peu plus courts ils pourraient sortir même s ils sont attachés par les vis captives Do not tin the wire leads before installing into ...

Страница 25: ...ey are all activated by opening the lid B B D D E E F F G G H H A A C C Figure 12 TLP 350CV Front Panel A Light sensor B LCD touchscreen C Speaker D Configurable side buttons E Menu button under the bezel F Reset button under the bezel G Reset LED under the bezel H Illumination LED TLP 350CV and TLE 350 Front Panel Features 17 ...

Страница 26: ...tion buttons provide quick access to key functions Use Global Configurator to assign funcutions to each button The buttons are backlit with text so that the function associated with the button can be seen easily If the function assigned to a button does not correspond to the buttons that ship with the TLP 350CV by default a set of replacement buttons is included Additional customized labels can be...

Страница 27: ...rovides access to the other screens by pressing the Vol Volume Time IP and Vid Video buttons From this screen you can also configure the Sleep Timer see below Screen Backlight see page 20 Auto Backlight and LED Backlight Sleep Timer The sleep timer determines how long the panel is inactive before it enters sleep mode In sleep mode the screen backlight is switched off and the touchscreen goes dark ...

Страница 28: ...ure 14 Volume Menu Screen This screen allows you to adjust the maximum volume of the sound and the individual volumes of button click feedback and audio playback Pressing Main returns you to the main setup screen Master Volume Master volume defines the maximum volume for all playback and all other volume settings are scaled in proportion If the master volume is set at 128 50 and the click volume i...

Страница 29: ...ttings Greenwich Mean Time GMT offset and Daylight Savings Time Values are also resynchronized each day at midnight or by pressing the recessed front panel Menu button for 10 seconds Press Main to return to the Main menu screen IP From the Main menu press IP to access the IP menu Main 192 168 254 254 MAC 00 05 A6 05 7D A6 Off 255 255 000 000 IP Address DHCP Subnet Mask Figure 16 IP Menu Screen The...

Страница 30: ... repeat step 2 until all the octets have been set correctly Subnet Mask The Subnet Mask text box displays the currently configured subnet mask for the panel The factory default IP address is 255 255 000 000 To change the subnet mask 1 Ensure DHCP is set to Off 2 Press the on screen subnet mask box A screen appears that is similar to figure 17 but the Subnet Mask field is highlighted in green 3 Ent...

Страница 31: ... to the video inputs Use the Dn and Up buttons or the volume control knob to adjust Contrast between 0 and 127 default 64 Color between 0 and 127 default 64 Brightness between 0 and 255 default 128 Tint between 0 and 255 default 128 The small rectangle provides a preview of incoming video and allows the user to adjust the video properties Press Main to return to the Main menu screen TLP 350CV and ...

Страница 32: ...within one second The calibration screen opens Press and Hold Highlighted Box Until Color Changes Figure 19 Calibration Screen 1 Press the green box and continue pressing until the color changes to gray and a second box is highlighted in green 2 Move to the newly highlighted box and repeat step 1 3 Repeat until all four boxes have been pressed and have turned gray Once all four boxes have been cal...

Страница 33: ...d evolves Both software programs are included on the disc provided with the TLP 350CV and are also available free at www extron com Each program has an extensive help file to guide project development Use GUI Configurator to design the touchpanel interface either by customizing an existing template or by designing an entirely new interface GUI Configurator offers several templates that are designe...

Страница 34: ...left arrows to scroll through more options or go to the alphabet menu and click G ALL A B C D E F G H I J K M L N P O Q T S R U V W X Y Z Figure 21 Alphabet Menu 5 A list of software products with the initial letter G is shown Locate the Global Configurator or GUI Configurator program and click Install 6 Follow the on screen instructions By default the Installer program creates and places the GUI ...

Страница 35: ...The browser opens the TouchLink panel Status page which is read only and provides basic information about the model date and time and IP settings Figure 22 System Status Page 2 Click on the Configuration tab and select the System Settings page to modify information about the IP settings and the date and time settings These correspond to the IP and Time settings see IP and Time on page 21 in the on...

Страница 36: ...Firmware Upgrade More detailed instructions are found in the Updating Firmware Using the Touchpanel Web Pages section on page 43 5 Click on the Touchpanel tab to alter the Touchpanel and volume settings These correspond to the Main settings see page 19 and Volume settings see page 20 in the on screen menus Figure 25 Touchpanel Configuration TLP 350CV and TLE 350 Configuration Software 28 ...

Страница 37: ...ile within the program NOTE To configure the TLP 350CV use GUI Configurator version 1 1 or later To use the GUI Configurator program follow these instructions 1 Click on the desktop icon A splash screen appears momentarily and then the program opens at the main screen behind the GUI Configurator Start Options dialog box Figure 26 Opening GUI Configurator Figure 27 GUI Configurator Start Options Di...

Страница 38: ...can use the factory loaded templates or select a previously created template Open an Existing Project Clicking OK opens a dialog box that allows you to navigate to an existing project for modification Figure 29 GUI Configurator Dialog Box to Open an Existing Project Navigate to the existing file and select it A preview with information about the file appears in the panel on the right To work on th...

Страница 39: ...Close Download Manager Click on OK The project is downloaded to your computer and opens in GUI Configurator 3 Depending on which option was selected in step 2 GUI Configurator opens to a new or an existing project The initial screen is divided into a series of panes offering a range of tools that can be used to design or modify the project For full details on how to use these tools consult the hel...

Страница 40: ...lect Add Panel Figure 32 Add a TouchLink panel 5a b The Panel Manager dialog box opens Figure 33 Add a TouchLink panel 5b c Click on the Add Panel Icon see image to the right to add a new panel to the list in the left panel d Highlight the name of the panel in the left panel to display the properties of that panel in the right pane e When a new panel is added it has the default IP address 192 168 ...

Страница 41: ... section of the File Upload Manager screen during the upload process Using Global Configurator NOTE To configure the TLP 350CV use Global Configurator version 3 0 4 or later This section provides an overview of the Global Configurator program For complete information about the program consult the Global Configurator Help File click on Contents in the Help menu or press the F1 key while within the ...

Страница 42: ...the TLP 350CV panel The default Telnet connection is port 23 and HTTP is port 80 so these values do not usually need to be changed If necessary set Administrator and User passwords If required set the date and time Checking the Set Device as GlobalViewer Host box is optional 4 Click OK TLP 350CV and TLE 350 Configuration Software 34 ...

Страница 43: ...IP Link controller The default value is 192 168 254 254 but this may have been changed Check with your IT Department to verify the address c Enter a Display Name into the text box This is what the device is known as in the Global Configurator project d Checking the Make this device a GlobalViewer Host checkbox is optional e Set the telnet port usually 23 and the web port usually 80 f If the contro...

Страница 44: ...ports Figure 37 Configuring an IP Link Device 6 Select Touchpanel Port 1 The screen shows the available options for the TouchLink panel To add the GUI Configurator project that was uploaded to the TouchLink panel click Click here to add one Figure 38 Adding a TouchLink panel TLP 350CV and TLE 350 Configuration Software 36 ...

Страница 45: ...e password c Check the Import Apply Layout box and click OK 8 The window now shows the GUI from the TouchLink panel Figure 40 Touchpanel GUI Loaded Onto Global Configurator 3 9 You must now use Global Configurator to associate functions with the screen elements that you designed in GUI Configurator The steps for carrying this out can be found in the Global Configurator Help File TLP 350CV and TLE ...

Страница 46: ... down the recessed Reset button while applying power to the unit When power is restored the Reset LED lights 2 Hold the Reset button for a further two seconds before releasing it The touchpanel enters factory firmware mode 3 Upload new firmware to the unit as desired see Updating Firmware on page 40 NOTES User defined Web pages may not work correctly if using an earlier firmware version Do not con...

Страница 47: ...he momentary press does not occur within 1 second Result Reset All IP Settings mode Enables ARP capability Sets the IP address back to factory default 192 168 254 251 Sets the subnet back to factory default 255 255 0 0 Sets the default gateway address to the factory default 0 0 0 0 Sets port mapping back to factory default Turns DHCP off Turns events off Reset to Factory Defaults This mode resets ...

Страница 48: ...ing Firmware Using GUI Configurator Updating Firmware Using the Touchpanel Web Pages Before starting consult your IT team and ensure that the TLP 350CV has a unique IP address NOTE The factory default IP address for the TLP 350CV is 192 168 254 254 Consult with your IT Department to ensure all IP addresses are correctly assigned Obtaining the Latest Firmware File Before updating the firmware you m...

Страница 49: ...hown 5 Scroll down the page until you find the firmware for the TLP 350CV It is listed under TouchLink Touchpanels 2 6 Click Release Notes for more information about the firmware 7 Click Download 8 Follow the onscreen instructions to download an executable file 9 Run that program to save the firmware on the PC Make a note of location where the firmware is stored on the PC TLP 350CV and TLE 350 Ref...

Страница 50: ...350CV 3 a Telnet port number usually 23 4 and if necessary a password 5 4 Click Add 6 The firmware loader opens NOTE Administrator level privileges are required to upload firmware to Extron devices 192 168 254 254 V00 00 A0 X 60 xxxx 01 1 00 00xx 1 1 Figure 44 Firmware Loader Begin Firmware Upload 5 Click File Open and navigate to the folder where the firmware file is located Click on the file to ...

Страница 51: ...rom the Extron Website see Obtaining the Latest Firmware File on page 40 1 Open a browser and type the IP address of the TLP 350CV into the address box 1 The browser opens the TouchLink panel web pages see Using the TouchLink Panel Web Pages on page 27 TLP 350CV Default Web Page 1 1 2 2 3 3 4 4 5 5 Figure 46 Firmware Upgrade Web Page 2 Click on the Configuration tab at the top of the page 2 and th...

Страница 52: ...m go to www extron com Button Replacement To replace one or more buttons on the front panel of the TLP 350CV 1 Remove power from the TLP 350CV The faceplate is snapped on and held in four places two on top and two at the bottom of the faceplate Using an Extron Tweeker gently push down on the two top tabs as shown to release the faceplate 2 The faceplate is still held by two clips on the bottom Whi...

Страница 53: ...ent buttons making sure that they are in the correct orientation 6 Replace the bezel that was removed in step 2 Four clips two at the top and two at the bottom snap into place audibly 7 Reconnect the power to the touchpanel TLP 350CV and TLE 350 Reference Material 45 ...

Страница 54: ...ty does not apply if the fault has been caused by misuse improper handling care electrical or mechanical abuse abnormal operating conditions or if modifications were made to the product that were not authorized by Extron NOTE If a product is defective please call Extron and ask for an Application Engineer to receive an RA Return Authorization number This will begin the repair process USA 714 491 1...

Отзывы: