


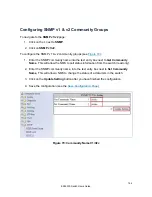

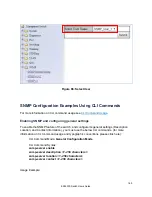


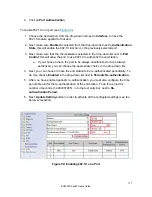

6. Enter an IP address, for the NMS host(s) that should be receiving traps from this
switch, into the text entry box next to any one of the 5 Trap host IP address entry
boxes from
Trap Host 1 IP Address to Trap Host 5 IP Address
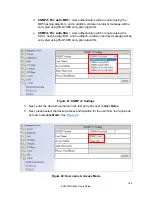
7. Enable or disable the link down trap by selecting the appropriate choice from the
drop-down list next to
Link Down Trap
. This will allow or stop the switch from
sending a trap to the identified trap community groups when any port on the switch
moves from the link up state to the link down state
.
8. Enable or disable the link up trap by selecting the appropriate choice from the drop-
down list next
Link Up Trap
. This will allow or stop the switch from sending a trap to
the identified trap community groups when any port on the switch moves from the
link down state to the link up state.
9. Enable or disable the MAC notification trap by selecting the appropriate choice from
the drop-down list next to
MAC Notification Trap
. This will allow or stop the switch
from sending a trap to the identified trap community groups anytime there is a
change in the MAC table on certain selected ports of the switch.
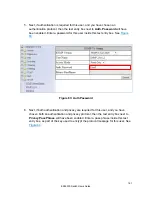
10. Set the interval between the MAC notification traps that you want the switch to send
by entering the interval (in number of seconds from 1 to 65535) into the text entry
box next to
MAC Notification Interval (1 to 65535 seconds)
.
11. Set the size of the MAC notification history table by entering the total number of
records (from 1 to 500) that the switch will keep for user to review at any one time
into the text entry box next to
MAC Notification History Size (1 to 500)
.
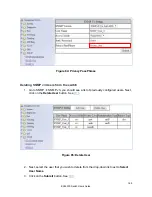
12. Select which ports on the switch for which traps should be sent when there is a new
MAC address added to the MAC table for the port, by checking the appropriate check
boxes for these ports in the
MAC Notification Added
section.
13. Select which ports on the switch for which traps should be sent when there is a MAC
address being removed from the MAC table for the port, by checking the appropriate
check boxes for these ports in the
MAC Notification Removed
section.
14. Click on the
Update
button after you have finished the configuration of the SNMP
Server (Agent) General Settings.
15. Save the configuration (see the
)
162
EX24000 Switch Users Guide
Содержание EX24000
Страница 32: ...Figure 8 IP Address 32 EX24000 Switch Users Guide ...
Страница 42: ...Figure 14 Remote Logging Page 42 EX24000 Switch Users Guide ...
Страница 53: ...Figure 22 Port Security 53 EX24000 Switch Users Guide ...
Страница 61: ...Figure 23 Bridging 61 EX24000 Switch Users Guide ...
Страница 67: ...Figure 26 Storm Detect 67 EX24000 Switch Users Guide ...
Страница 72: ...Figure 31 Port Mirroring 72 EX24000 Switch Users Guide ...
Страница 88: ...Figure 38 LACP Trunking 88 EX24000 Switch Users Guide ...
Страница 93: ...Figure 39 STP Ring Global Configuration 93 EX24000 Switch Users Guide ...
Страница 97: ...Figure 42 Max Age Hello Timer Forward Delay 97 EX24000 Switch Users Guide ...
Страница 116: ...Figure 55 Port Cost Priority 116 EX24000 Switch Users Guide ...
Страница 118: ...Figure 56 Port Instance Configuration Figure 57 Port Instance Adding Ports 118 EX24000 Switch Users Guide ...
Страница 132: ...Figure 63 Advanced Per Port Configuration 132 EX24000 Switch Users Guide ...
Страница 163: ...Figure 78 SNMP General Settings 163 EX24000 Switch Users Guide ...
Страница 181: ...Figure 91 LLDP Global Settings 181 EX24000 Switch Users Guide ...
Страница 183: ...Figure 92 LLDP Ports Settings 183 EX24000 Switch Users Guide ...
Страница 193: ...Figure 95 GVRP 193 EX24000 Switch Users Guide ...
Страница 198: ...Figure 98 GVRP Per Port Settings 198 EX24000 Switch Users Guide ...
Страница 223: ...Figure 110 Daylight Savings Date Mode 223 EX24000 Switch Users Guide ...


