The Control Panel
249
4
4
4
4
4
4
4
4
4
4
4
4
Eng
li
s
h
10. Press the
Menu
button, and the printer starts printing.
After printing is complete, the head alignment starts
automatically.
If you are not satisfied with the result of
BI-D 2-COLOR
alignment, press the
Paper Source
button to return to the
previous level, and then select
BI-D ALL
.
If you are not satisfied with the result of
BI-D ALL
alignment,
try
UNI-D
.
You can also align the print head individually by selecting
#1
,
#2
, or
#3
. Select an ink dot size from
#1
to
#3
depending on
the media you use and the print mode you want to try. The
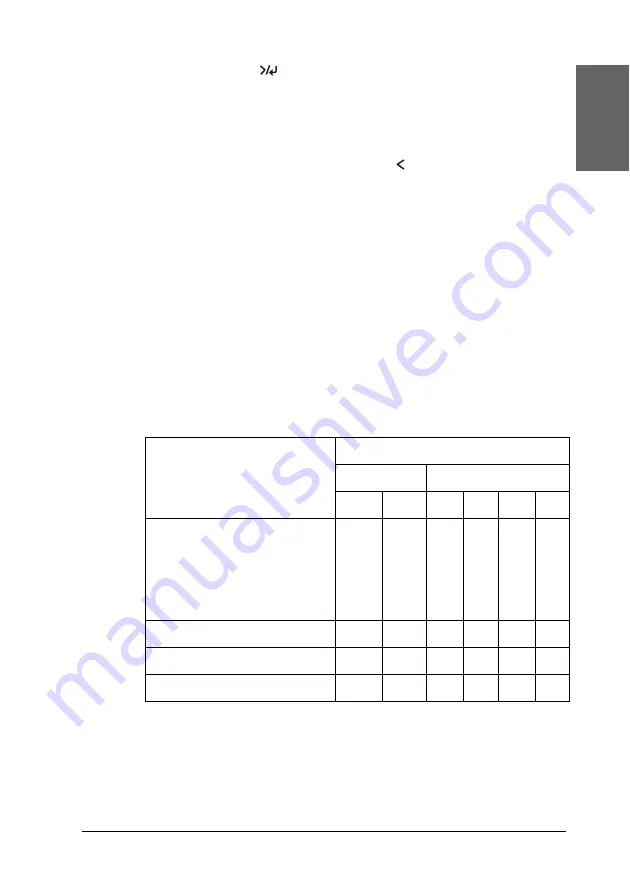
table below illustrates which parameter is available for the
media type and print quality. For Print Quality, refer to the
printer driver.
EPSON Stylus Pro 4400:
✽
Print Quality A: Speed, B: Quality, C: Draft, D: Normal-360dpi, E: Fine-720dpi,
F: Super Fine-1440dpi
Media Name
Print Quality
✽
Main Menu
Custom Print Quality
A
B
C
D
E
F
Photo Quality Ink Jet Paper
Singleweight Matte Paper
Enhanced Matte Paper
Archival Matte Paper
Singleweight Matte Paper
(line drawing)
#1
#2
-
#1
#2
#3
Plain Paper
#1
#2
#1
#1
#2
-
Plain Paper (line drawing)
#1
#2
-
#1
#2
-
Tracing Paper
#1
#2
-
#1
#2
-
Содержание Stylus Pro 4800 Portrait Edition
Страница 1: ...English Reference Guide ...
Страница 50: ...50 Printing with Windows 1 Select Borderless 2 Click the Expansion button The Expansion dialog box appears ...
Страница 102: ...102 Printing with Windows 4 Click Network printer then click Next 5 Click Browse ...
Страница 350: ...350 Problem Solver 4 Carefully remove the jammed paper If necessary open the top cover and remove the jammed paper ...
Страница 354: ...354 Problem Solver 3 Remove the jammed paper from the front If necessary open the top cover and remove the jammed paper ...


