


92
Replacing the Ink Cartridge and Maintenance Box
The maintenance box stores ink that gets flushed from the system during print head cleaning. When the
ink cartridge is expended or the maintenance box is at the end of its service life, you need to replace it.
You may also need to replace a cartridge that is more than six months old if your printouts do not look
their best, even after cleaning and aligning the print head.
Check Status of the Ink Cartridge and Maintenance Box
Purchase Epson Ink Cartridges and Maintenance Box
Removing and Installing the Ink Cartridge
Replacing the Maintenance Box
Check Status of the Ink Cartridge and Maintenance Box
Your product and its software will let you know when the ink cartridge is low or expended, or when the
maintenance box needs to be replaced.
Checking Cartridge and Maintenance Box Status on the LCD Screen
Checking Cartridge and Maintenance Box Status with Windows
Checking Cartridge and Maintenance Box Status on a Mac
Parent topic:
Replacing the Ink Cartridge and Maintenance Box
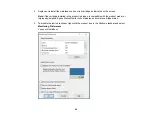
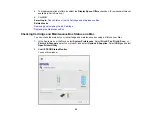
Checking Cartridge and Maintenance Box Status on the LCD Screen
You can check the status of your ink cartridge and maintenance box using your product's LCD screen.
Note:
The ink cartridge and maintenance box levels are approximate.
1.
Press the
home button, if necessary.
2.
Press the arrow buttons to select
Setup
and press the
OK
button.
3.
Select
Ink Level
and press the
OK
button.
The ink cartridge status is displayed.
4.
Press the
OK
button to exit.
5.
Select
Maintenance box
and press the
OK
button.
The maintenance box status is displayed.
6.
Press the
OK
button to exit.
Содержание PM-525
Страница 1: ...PM 525 User s Guide ...
Страница 2: ......
Страница 10: ......
Страница 11: ...11 PM 525 User s Guide Welcome to the PM 525 User s Guide For a printable PDF copy of this guide click here ...
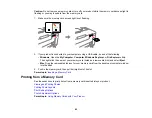
Страница 16: ...16 Printer Parts 1 Edge guide 2 Rear paper feed 3 Feeder guard 4 Rear paper feed cover 5 Control panel ...
Страница 40: ...40 2 Raise the control panel then open the feeder guard 3 Slide the edge guide to the right ...
Страница 47: ...47 Parent topic Selecting the Paper Settings Control Panel ...
Страница 132: ...132 3 If necessary carefully pull out any jammed paper from the front 4 Open the printer cover ...


